Introduction
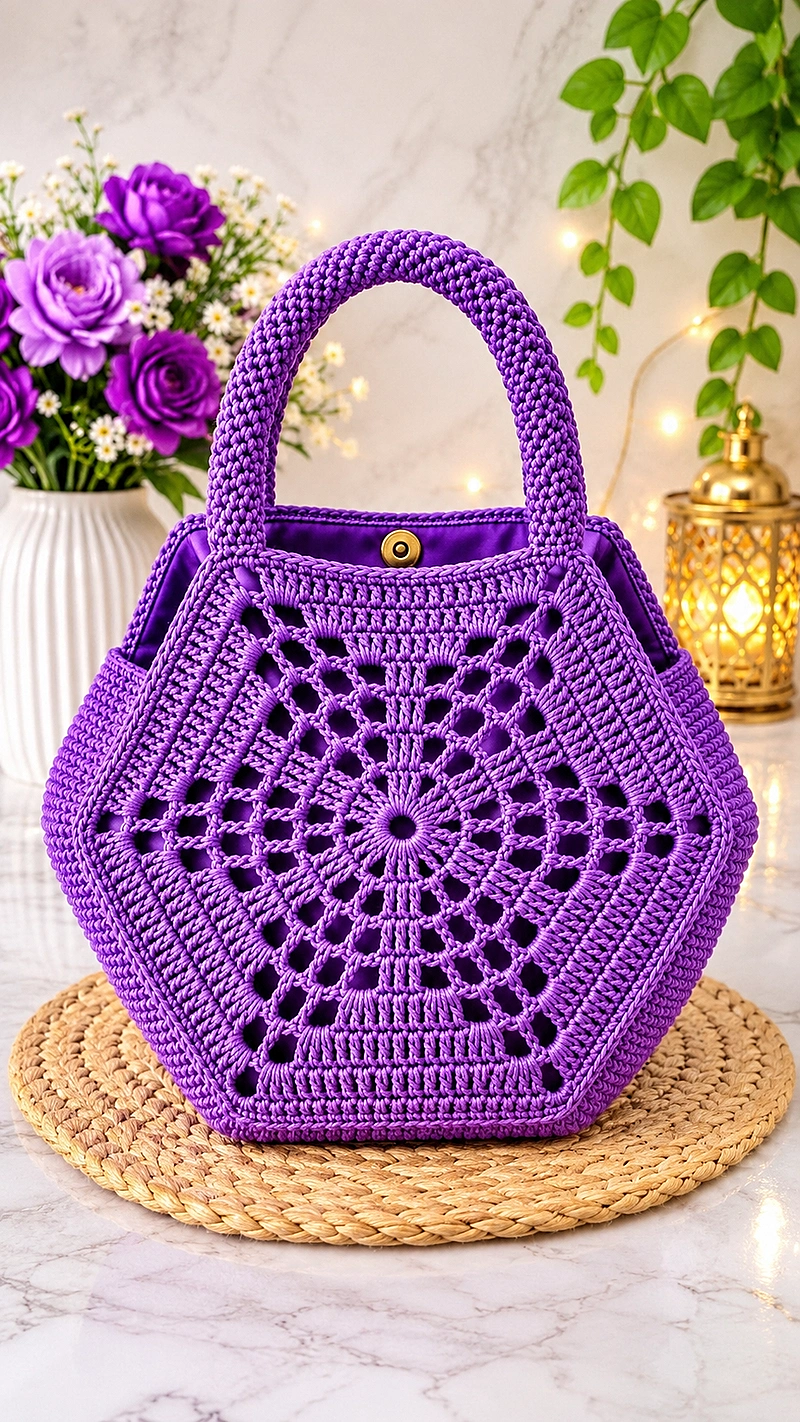
Six radiating corners turn a circular crochet flower into the geometric foundation of this purple handbag. This purple hexagon crochet bag pattern combines openwork panels, dense borders, a reinforced base, and a rounded handle. Use firm cotton yarn or polyester cord with a suitable hook to create an approximately 25–30 cm wide accessory. The project requires intermediate crochet skills and provides a practical way to construct a lined handbag with decorative lace.
The Design: What Makes This Purple Hexagon Handbag Different
The central flower is the defining structural element. Its six radiating sections create an openwork hexagon crochet purse panel while preserving enough solid fabric around the edges for assembly. This combination reduces material consumption without sacrificing the shape of the handbag.
The second decision concerns the border. Dense single crochet rounds distribute tension around the hexagon, preventing the lace openings from carrying the full weight of the bag’s contents. A separate gusset and base provide additional depth.
Finally, the crochet bag with round handle uses a reinforced attachment area. The handle must connect to dense stitches rather than unsupported chain spaces.
A frequent mistake is treating decorative hexagon motifs as load-bearing fabric. Large openings can stretch under weight. This design addresses that problem with a fabric lining, reinforced seams, and a structured bottom.
Project Info at a Glance
| Project Detail | Specification |
|---|---|
| Skill Level | Intermediate |
| Estimated Time | 8–14 hours |
| Target Finished Width | 25–30 cm |
| Target Body Height | 22–27 cm |
| Hook | 4 mm starting point |
| Yarn | Firm cotton or polyester crochet cord |
| Construction | Two panels, gusset, base, handle |
| Closure | Magnetic snap |
| Best For | Small everyday accessories |
Dimensions and time are planning estimates. This is an original, untested construction guide inspired by the photographed handbag, not the original designer’s exact pattern.
Materials and Tools
Yarn
- Purple polyester cord — approximately 3 mm thickness, with 300–400 m available.
- Matching purple cotton yarn — optional for reinforcement and joining.
- Purple sewing thread — one small spool for attaching the lining.
The pictured handbag appears to use a smooth, firm cord that produces pronounced stitch definition. Polyester cord is a practical choice because it resists excessive stretching and holds structured shapes.
Worsted-weight cotton is an alternative, although the finished bag may require extra reinforcement. A published flower hexagon handbag uses worsted yarn with a 3.5 mm hook.
Tools
- 4 mm crochet hook — adjust to match the selected cord.
- Stitch markers — at least six.
- Tapestry needle — large eye suitable for cord.
- Sharp scissors — for trimming yarn and lining.
- Fabric lining — purple cotton or polyester fabric.
- Magnetic snap — one gold-tone set.
- Plastic canvas or bag base insert — optional.
- Measuring tape — for panel alignment.
- Sewing needle and thread — for the lining.
- Handle reinforcement — optional flexible tubing or commercial bag-handle core.
Gauge and Sizing
Gauge is especially important when working with a geometric motif. A small variation in stitch height accumulates across multiple rounds and changes the dimensions of the finished panel.
Make a sample using the chosen cord and hook. Measure the width of ten single crochet stitches and record the result. The final panel should be approximately 25–30 cm across its widest point.
If the panel becomes too large before reaching the final border, use a smaller hook or reduce the number of expansion rounds. If it is too small, add another repeat while preserving the six-corner structure.
Do not combine different cord thicknesses within one panel. Even small variations can distort the flower and prevent the opposite sides from matching.
Crochet Abbreviations
| Abbreviation | Meaning |
|---|---|
| MR | Magic ring |
| sc | Single crochet |
| inc | Two single crochet stitches in one stitch |
| dec | Single crochet decrease |
| sl st | Slip stitch |
| ch | Chain |
| dc | Double crochet |
| BLO | Back loop only |
| st / sts | Stitch / stitches |
| sp | Space |
| rep | Repeat |
| FO | Fasten off |
An invisible decrease is made through the front loops of two adjacent stitches and produces a less prominent reduction than a standard decrease.
Pattern — Step by Step
Pattern note: The instructions below provide an original construction framework inspired by the visible handbag. The complete design has not been sample-crocheted or technically tested. Stitch arithmetic is checked, but fit and assembly must be verified against your gauge.
Part 1: Central Flower Foundation (Make 2)
Yarn: Purple. Work joined rounds.
R1: 6 sc in MR. Join with sl st. (6)
R2: 2 sc in each stitch around. Join. (12)
R3: (1 sc, inc) × 6. Join. (18)
R4: (2 sc, inc) × 6. Join. (24)
R5: (3 sc, inc) × 6. Join. (30)
R6: (4 sc, inc) × 6. Join. (36)
R7: (5 sc, inc) × 6. Join. (42)
At this point, the central circle contains 42 stitches.
Place six markers around the circle, separating it into six groups of seven stitches. These markers identify the future hexagon corners.
Part 2: Hexagon Expansion (Make 2)
Yarn: Purple. Continue with joined rounds.
Each marked stitch becomes a corner. Work two additional stitches at each corner per round, maintaining six sides.
R8: Work 1 sc in each of the 36 unmarked stitches and 3 sc in each of the six marked corner stitches. (54)
R9: Work 1 sc in each stitch except the six new corner-center stitches; work 3 sc in each corner-center stitch. (66)
R10: Repeat the corner expansion method. (78)
R11: Repeat. (90)
R12: Repeat. (102)
R13: Repeat. (114)
R14: Repeat. (126)
R15: Repeat. (138)
R16: Repeat. (150)
Each round increases by 12 stitches because every corner adds two stitches.
These rounds create a solid hexagonal foundation rather than the exact openwork lace shown in the photograph. The next section introduces a separate decorative flower.
Part 3: Decorative Openwork Flower (Make 2)
Yarn: Purple. Optional decorative overlay.
The openwork flower is made separately and attached over the central area. This avoids weakening the load-bearing panel.
R1: Ch 6, join with sl st to form a ring. (6 ch)
R2: Ch 3, work 11 dc into the ring, join to the top of the beginning ch-3. (12 dc equivalents)
R3: Ch 4, skip 1 dc, sc in next dc; repeat six times around, treating the initial chain as the first arch. (6 chain arches)
R4: Work (1 sc, 3 dc, 1 sc) into each arch. (30 worked stitches)
R5: Sl st to the center dc of the first petal. Ch 5, sc in the center dc of the next petal; repeat around. (6 chain arches)
R6: Work (1 sc, 5 dc, 1 sc) into each arch. (42 worked stitches)
Fasten off, leaving a 25 cm sewing tail.
Position the flower over the central hexagon and secure its outer points. This creates a floral accent. A fully openwork panel matching the photograph more closely would require a separately tested lace chart.
Part 4: Outer Border (Make 2)
Yarn: Purple.
The outer border controls the dimensions of the panel and provides a firm edge for joining.
R1: Work 1 sc into each stitch of the final solid hexagon round, with no increases. (150)
R2: Repeat 1 sc in each stitch. (150)
R3: Repeat. (150)
R4: Work 1 sc BLO in each stitch. (150)
R5: Work 1 sc in each stitch. (150)
Fasten off, leaving a 30 cm tail.
The border may cup slightly because no additional corner increases are made. For a flatter panel, replace the non-increasing border with additional six-corner expansion rounds and recalculate the stitch counts.
Measure both finished panels. They must have matching dimensions before the gusset is attached.
Part 5: Side Gusset
Yarn: Purple.
The side gusset creates depth between the front and back panels.
Choose a target depth of approximately 7–9 cm. Crochet a rectangular strip using single crochet rows.
Row 1: Ch 17; sc in the second chain from the hook and across. (16)
Row 2: Ch 1, turn, sc across. (16)
Rows 3 onward: Repeat Row 2 until the strip matches the measured joining path around the sides and bottom of the front panel. (16 per row)
Fasten off with a 35 cm tail.
The number of rows depends on gauge and the exact edge length of the panel. Pin the strip into position before deciding where to stop.
A properly sized gusset follows the outer edge without stretching the panel or creating excess fabric at the corners.
Part 6: Reinforced Bottom
Yarn: Purple. Optional separate base.
The photographed handbag has a broad, stable lower edge. A reinforced base can be made from plastic canvas or a double-layer crochet rectangle.
Row 1: Ch 31, sc in second chain and across. (30)
Row 2: Ch 1, turn, sc across. (30)
Rows 3–8: Repeat Row 2. (30)
Row 9: Repeat Row 2. (30)
Fasten off with a 30 cm tail.
Measure the rectangle before assembly. If it is wider than the intended base, remove stitches; if too narrow, increase the foundation chain.
When using a separate bottom, shorten the gusset so that the total joining length still matches the panel perimeter.
A rigid insert should be slightly smaller than the finished crochet base. Rounded corners reduce pressure against the fabric lining.
Part 7: Rounded Crochet Handle (Make 1)
Yarn: Purple. Tubular construction.
The handbag features one prominent rounded handle, rising above the opening in a continuous arch.
R1: 6 sc in MR. (6)
R2: Inc × 6. (12)
R3: (1 sc, inc) × 6. (18)
R4: 1 sc in each stitch around. (18)
R5 onward: Repeat R4 until the tube measures approximately 45–55 cm. (18 per round)
For a firmer handle, insert flexible tubing or a purpose-made handle core before closing the final end.
Final round: (1 sc, dec) × 6. (12)
Fasten off, leaving a 35 cm sewing tail.
The handle should bend into an even arch without visible kinks. Its ends must be attached to reinforced sections near the upper corners.
For a handbag intended to carry heavier items, internal webbing or a commercial handle core is preferable to an unsupported crochet tube.
Part 8: Handle Attachment Tabs (Make 2)
Yarn: Purple.
Row 1: Ch 9, sc in second chain and across. (8)
Rows 2–10: Ch 1, turn, sc across. (8)
Fasten off, leaving a 25 cm tail.
Fold each tab around a handle end and stitch it securely to the upper edge of the bag. The tab should cover multiple rows of dense crochet rather than a single stitch.
Part 9: Fabric Lining
Material: Purple woven fabric.
Cut two fabric pieces using the finished crochet panels as templates, adding approximately 1–1.5 cm for seam allowances.
Cut a separate gusset piece matching the interior depth and side profile.
Sew the lining components together with the right sides facing inward. Leave the upper edge unfinished until the fit has been checked inside the crochet shell.
Turn the lining right side out and insert it into the bag.
Fold the upper fabric edge inward and pin it below the crochet rim. Hand-stitch the lining in place using small, evenly spaced stitches.
Do not pull the thread tightly enough to distort the crochet edge. The lining should sit flat against the inside of the handbag.
Part 10: Magnetic Closure
Accessory: One gold-tone magnetic snap.
Mark the center of the front and back upper edges.
Attach the two halves of the magnetic snap to the fabric lining, using suitable reinforcement patches behind the hardware.
Check that the closure meets evenly when the bag is held by its handle.
A clasp installed too low may pull the top edge inward. A clasp installed too close to the rim may create visible puckering.
For pronged magnetic snaps, follow the hardware manufacturer’s installation instructions and reinforce the fabric before securing the prongs.
Assembly — 10 Steps
- Prepare the front panel. Lay the first hexagon flat and check its shape, corner spacing, and border tension.
- Prepare the back panel. Compare both panels and correct any significant size difference before joining.
- Align the gusset. Mark the center of the base and corresponding positions on the two panels.
- Join the front panel. Use slip stitches or a firm sewn seam to attach the gusset along the sides and bottom.
- Join the back panel. Attach the second panel to the remaining gusset edge, matching the corner markers.
- Reinforce the bottom. Insert a rigid base if required, and secure it so it cannot move inside the bag.
- Attach the handle. Position the ends symmetrically and sew through multiple rows of dense crochet.
- Install the closure. Fix the magnetic snap to the reinforced lining pieces and test the alignment.
- Insert the lining. Position the fabric inside the crochet shell and stitch it around the upper rim.
- Finish the seams. Weave in all tails, inspect the handle attachments, and check the bag’s symmetry.
The completed handbag has two hexagonal faces, a defined base, an arched handle, and a lined interior.
7 Technical Tips for a Better Crochet Handbag
- Stitch marker displacement: Mark all six corners before expanding the hexagon. A marker moved by one stitch can distort the shape over several rounds.
- Base collapse: Use a firm insert when the bag cannot stand upright. Cut the insert approximately 3–5 mm smaller than the interior base to avoid pressure points.
- Uneven stitch tension: Cord can produce irregular stitch heights when pulled inconsistently. Maintain the same working tension across both panels and compare them after every three rounds.
- Handle stretching: A loosely crocheted handle may lengthen under the weight of the contents. Use a firm core and reinforce both attachment points with multiple passes of thread or cord.
- Openwork distortion: Decorative chain spaces can elongate when they carry weight. Keep the load-bearing seams on solid crochet and allow the lining to support the contents.
- Lining puckering: A lining cut too small will pull the upper crochet edge inward. Check the fabric fit inside the completed shell before sewing the final hem.
- Loose yarn tails: Short tails may work free from the stiff cord stitches. Leave approximately 15–20 cm for finishing and weave each tail through several changes of direction.
Conclusion
The purple hexagon crochet bag pattern combines geometric construction with practical handbag reinforcement. Its main components are two matching panels, a shaped gusset, a firm bottom, a rounded handle, and a fitted lining. The six-corner structure controls panel geometry, while dense border stitches provide secure attachment points for the seams and hardware.
Before using the bag, check the handle attachments and test the lining with a light load. The next step is to make a gauge sample and adjust the panel dimensions to the selected cord.
Share your finished version on Pinterest or Instagram using #PurpleHexagonCrochetBag. Would you retain the central openwork flower or replace it with a denser motif for additional strength?








