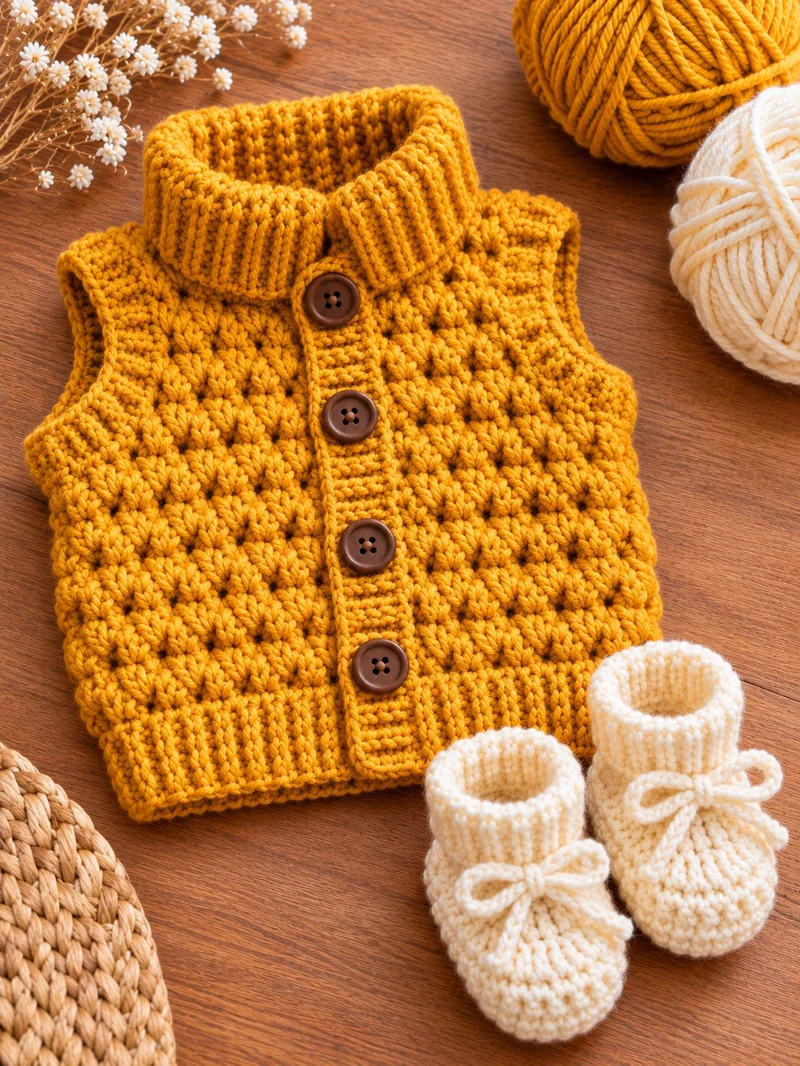
A mustard-yellow baby vest needs a firm ribbed collar, carefully spaced front buttons, and a textured body that keeps its shape without becoming stiff. This crochet baby vest and booties pattern recreates those design features alongside cream-colored booties with folded cuffs and yarn bows. The project uses DK-weight yarn and is designed around an approximate 0–3-month size. Intermediate crochet skills are recommended.
The Design: What Makes This Baby Set Different
The vest combines three important construction details: a raised textured fabric, a broad folded collar, and a buttoned front opening. Each feature has a practical purpose. The textured stitches add definition to the garment, while the ribbed edging helps the neckline and waistband retain their shape. The front opening also makes dressing easier than pulling a close-fitting garment over a baby’s head.
The matching crochet baby booties use an oval sole, a shaped toe, and a folded ankle cuff. Their cream color contrasts with the mustard-yellow vest without introducing another decorative stitch pattern.
One common mistake when making a crochet baby cardigan is treating the ribbed bands and textured body as interchangeable fabrics. Their stitch gauges can differ substantially. Measure the main fabric before shaping the armholes, and check the collar separately before sewing it into position.
Project Information at a Glance
| Feature | Details |
|---|---|
| Project | Baby vest and matching booties |
| Skill level | Intermediate |
| Suggested age | 0–3 months |
| Vest chest circumference | Approximately 43 cm |
| Vest length | Approximately 25 cm |
| Bootie sole length | Target 9 cm |
| Yarn weight | DK / light worsted, category 3 |
| Vest hook | 4 mm |
| Bootie hook | 3.5 mm |
| Estimated working time | 8–12 hours |
| Construction | Flat garment panels and oval bootie soles |
Pattern note: This is an original, photo-inspired construction guide rather than the original pattern for the photographed garments. The dimensions and yarn quantities are planning targets, not measurements verified from the photograph. Make a gauge sample and test the garment fit before use.
Materials and Tools
Yarn
- Mustard yellow DK yarn: Approximately 100–120 g for the vest.
- Ivory or cream DK yarn: Approximately 40–50 g for both booties.
- Suggested fiber: Soft, washable baby acrylic or a smooth baby cotton blend.
- Suggested yarn brands: Paintbox Yarns Baby DK or Stylecraft Special DK, subject to gauge.
Choose yarn with consistent thickness and a smooth surface. Strongly textured or fluffy yarn can obscure the raised stitch pattern and make it harder to count decreases around the bootie toes.
Tools
- 4 mm crochet hook for the vest body.
- 3.5 mm crochet hook for the booties.
- Four brown buttons, approximately 15 mm in diameter.
- Yarn needle for seams and finishing.
- Stitch markers for armholes and shaping.
- Measuring tape for gauge and finished dimensions.
- Scissors and rust-resistant blocking pins.
Baby safety: Buttons and ties can become hazards if they detach or are accessible to a baby. Stitch buttons firmly, check them before every use, and avoid long loose cords. The booties are decorative footwear, not suitable for walking or sleeping. Remove the set for sleep and use it only with appropriate supervision.
Crochet Abbreviations
| Abbreviation | Meaning |
|---|---|
| ch | Chain |
| sc | Single crochet |
| hdc | Half double crochet |
| dc | Double crochet |
| sl st | Slip stitch |
| st / sts | Stitch / stitches |
| inc | Two stitches in one stitch |
| dec | Decrease |
| BLO | Back loop only |
| FLO | Front loop only |
| FPdc | Front post double crochet |
| BPdc | Back post double crochet |
| RS / WS | Right side / wrong side |
All instructions use US crochet terminology. Turning chains do not count as stitches unless stated otherwise. An invisible decrease works through the front loops of two adjacent stitches to reduce visible gaps.
Gauge and Sizing
For the proposed vest construction, begin by testing a gauge of approximately 18 hdc stitches and 14 rows per 10 cm with a 4 mm hook. This is a working target, not a measured gauge from the photographed vest.
Make a sample at least 12 cm wide and 12 cm high. Wash and dry it according to the yarn label, then measure the center 10 cm. Adjust the hook if the sample differs substantially from the target.
The vest panels below use 20 stitches for each front and 40 stitches for the back. At the proposed stitch gauge, the total unseamed body width is approximately 44.4 cm. Allowing for side seams gives a chest circumference near 43 cm.
The booties require a separate gauge check. Their oval soles should measure approximately 9 cm from heel to toe before the upper sections are worked.
Pattern – Step by Step
Part 1: Mustard Yellow Vest – Back Panel
Yarn: Mustard yellow DK.
Hook: 4 mm.
Construction: Worked flat in turned rows.
Ch 41.
Row 1: Hdc in the second chain from the hook and in each remaining chain. (40 sts)
Rows 2–24: Ch 1, turn, hdc in each stitch. (40 sts)
For a more pronounced surface texture, replace selected hdc rows with a consistent alternating front-post and back-post stitch sequence after testing its gauge. The following stitch counts assume plain hdc fabric.
Row 25: Sl st across the first 4 stitches, ch 1, hdc in the next 32 stitches. Leave the final 4 stitches unworked. (32 sts)
Rows 26–34: Ch 1, turn, hdc in each stitch. (32 sts)
Row 35: Ch 1, turn, hdc in the first 10 stitches, fasten off. (10 sts)
Rejoin yarn at the opposite edge of Row 34 and work 10 hdc across the last 10 stitches to form the second shoulder.
The 12 center stitches remain unworked for the back neckline.
Leave a 25 cm yarn tail on each shoulder for assembly.
Part 2: Left Front Panel
Yarn: Mustard yellow DK.
Hook: 4 mm.
Ch 21.
Row 1: Hdc in the second chain from the hook and across. (20 sts)
Rows 2–24: Ch 1, turn, hdc across. (20 sts)
Row 25: At the armhole edge, leave 4 stitches unworked using slip stitches to move past them, then hdc across the remaining 16 stitches. (16 sts)
Rows 26–29: Ch 1, turn, hdc across. (16 sts)
Row 30: At the neckline edge, leave 3 stitches unworked, then work 13 hdc. (13 sts)
Row 31: Decrease once at the neckline edge and work the remaining stitches. (12 sts)
Row 32: Repeat the neckline decrease. (11 sts)
Row 33: Repeat the neckline decrease. (10 sts)
Rows 34–35: Work evenly across the remaining 10 stitches. (10 sts)
Fasten off, leaving a long tail for the shoulder seam.
Keep the neckline shaping on the inner edge and the armhole shaping on the outer edge.
Part 3: Right Front Panel
Repeat the left front panel, reversing the positions of the armhole and neckline shaping.
Both front panels must have 20 stitches at the lower edge and 10 stitches at each shoulder.
Before assembly, place the two fronts beside the back panel. Check that their lower edges align and that both shoulder sections are the same width.
If one panel is longer, count the rows before attempting to correct it through blocking.
Part 4: Shoulder and Side Seams
Place the front panels against the back panel with right sides facing.
Join the shoulders using mattress stitch or a loose slip-stitch seam. Match the 10 shoulder stitches on each front to the corresponding 10 stitches on the back.
Next, join the side seams from the lower edge upward. Stop at the armhole shaping, leaving the upper arm openings free.
Turn the vest right side out and inspect the armholes. Both should have matching depth and shape.
Do not attach the collar until the shoulder seams are complete. The finished neckline circumference determines how many collar stitches are required.
Part 5: Ribbed Waistband
The waistband is worked separately and sewn around the lower edge.
Ch 9.
Row 1: Sc in the second chain from the hook and across. (8 sts)
Row 2: Ch 1, turn, sc BLO across. (8 sts)
Rows 3 onward: Repeat Row 2 until the strip matches the lower circumference of the vest without stretching.
Fasten off with a long sewing tail.
Join the short ends of the strip, then sew the long edge evenly around the bottom of the vest.
Use markers at the side seams and center back to distribute the ribbing. Avoid pulling the strip tightly, since this can distort the lower corners of the front panels.
Part 6: Folded Ribbed Collar
The folded collar is the most prominent structural feature of the mustard-yellow vest.
Measure the finished neckline after joining the shoulder seams.
Ch 15.
Row 1: Sc in the second chain from the hook and across. (14 sts)
Row 2: Ch 1, turn, sc BLO across. (14 sts)
Rows 3 onward: Repeat Row 2 until the ribbed strip matches the neckline measurement.
Fasten off, leaving approximately 30 cm of yarn for sewing.
Pin the collar evenly around the neckline, beginning at the center back. Attach it with small, flexible stitches.
Fold the collar outward to form a double-layered ribbed edge. The fold should remain soft enough to lie comfortably around the neck.
For the photographed high-collar effect, keep the collar approximately 4–5 cm tall after folding, adjusting the starting chain length if necessary.
Part 7: Front Button Bands
Make two narrow ribbed bands for the front opening.
Ch 7.
Row 1: Sc in the second chain from the hook and across. (6 sts)
Row 2: Ch 1, turn, sc BLO across. (6 sts)
Continue repeating Row 2 until each band matches its corresponding front edge.
Sew the bands into place without stretching the garment.
On the buttonhole band, make four reinforced openings aligned with the buttons. One method is to replace two adjacent stitches with two chains on a selected row, then work into those chains on the following row.
Test every opening against the chosen button before sewing the band to the garment.
Mark four button positions at approximately equal intervals. Sew the buttons through reinforced fabric using strong matching thread.
Important: Because detachable buttons present a choking hazard, the finished garment must be inspected carefully and should not be used for unsupervised sleep.
Matching Cream Crochet Baby Booties
The booties use the same light yarn weight as the vest, but a smaller hook produces a denser fabric. Each bootie begins with an oval sole and is shaped upward to form the sides, toe, and ankle opening.
Part 8: Oval Bootie Soles – Make Two
Yarn: Cream DK.
Hook: 3.5 mm.
Target sole length: Approximately 9 cm.
Ch 11.
Round 1: Work 2 sc in the second chain from the hook, sc in the next 8 chains, 4 sc in the final chain. Continue along the opposite side of the foundation chain, sc in the next 8 chains, and 2 sc in the starting chain. Join with a sl st. (24 sts)
Round 2: Inc in each of the first 2 stitches, sc in the next 8 stitches, inc in each of the next 4 stitches, sc in the next 8 stitches, inc in each of the final 2 stitches. Join. (32 sts)
Round 3: (Sc 1, inc) twice, sc 8, (sc 1, inc) four times, sc 8, (sc 1, inc) twice. Join. (40 sts)
Measure the sole from heel to toe. Adjust hook size or yarn tension if the length differs substantially from 9 cm.
Both soles must match before beginning the upper sections.
Part 9: Bootie Sides – Make Two
Round 4: Ch 1, sc BLO in each stitch around. Join. (40 sts)
Round 5: Ch 1, hdc in each stitch around. Join. (40 sts)
Round 6: Ch 1, hdc in each stitch around. Join. (40 sts)
Mark the center front of the bootie with a removable stitch marker.
The next round shapes the toe. Position the decreases symmetrically around the center-front marker.
Part 10: Bootie Toe Shaping – Make Two
Round 7: Ch 1, hdc 12, hdc2tog eight times, hdc 12. Join. (32 sts)
Round 8: Ch 1, hdc 10, hdc2tog six times, hdc 10. Join. (26 sts)
Round 9: Ch 1, sc 9, sc2tog four times, sc 9. Join. (22 sts)
Count the stitches after each shaping round. A missed decrease can shift the toe and make the pair visibly asymmetrical.
The toe should form a smooth rounded shape rather than a sharply pointed front.
Part 11: Folded Bootie Cuffs – Make Two
Round 10: Ch 1, sc around. Join. (22 sts)
Round 11: Ch 2, dc around. Join. (22 sts)
Rounds 12–15: Ch 2, alternate FPdc and BPdc around. Join each round. (22 sts)
Fasten off and weave in the yarn end.
Fold the upper ribbing outward to create the cuff shown in the photograph.
The cuff should hold its folded shape without squeezing the ankle. If the opening is too tight, adjust the hook size or add stitches before working the ribbed rounds.
Part 12: Decorative Bootie Bows – Make Two
For a bow similar to the photographed design, create a short crocheted cord.
Ch 45 using cream yarn.
Sl st into the second chain from the hook and each remaining chain. (44 sts)
Fasten off and weave the ends securely into the cord.
Form two small loops and cross them at the center to create a bow. Attach the bow to the front of the bootie with several secure stitches.
Keep the loops short and avoid long dangling ends. For baby use, a permanently stitched decorative bow is preferable to a removable tie.
Repeat for the second bootie, matching the loop sizes and placement.
Assembly and Finishing
- Block the vest panels lightly and allow them to dry completely.
- Join both shoulder seams, matching the stitch counts.
- Sew the side seams while leaving the armholes open.
- Attach the ribbed waistband evenly around the lower edge.
- Sew the folded collar around the neckline.
- Attach the front bands and reinforce the buttonholes.
- Secure the four brown buttons and test the front closure.
- Finish the armhole edges with an even round of single crochet if needed.
- Complete both booties, fold their cuffs, and attach the decorative bows.
- Weave in every yarn end, inspect all attachments, and measure the finished pieces.
The completed set consists of one sleeveless mustard-yellow vest and two matching cream booties.
7 Technical Tips for Better Results
- Track armhole rows: Place a stitch marker at Row 25 on both front panels and the back. A one-row difference can make the shoulders uneven after seaming.
- Check the vest gauge: Measure a 10 cm section of the body fabric before working the full panels. A difference of two stitches across that measurement can noticeably change the chest circumference.
- Control collar tension: Avoid pulling the ribbed collar tightly while sewing it to the neckline. Excess tension causes the front edges to curl inward.
- Keep toe decreases symmetrical: Mark the center front of each bootie before Round 7. Incorrectly positioned decreases can make one toe lean toward the side.
- Measure both soles: Compare the sole lengths after Round 3. A difference greater than 3 mm may become more noticeable after the uppers are completed.
- Pin before sewing: Use four equally spaced markers when attaching the waistband. Uneven distribution can create puckering near the button bands.
- Secure every finishing detail: Weave yarn tails through several stitches and reverse direction before trimming. Inspect buttons and bows for loose attachments before the set is worn.
Common Crochet Problems and Solutions
Why is the vest wider than expected?
The most likely cause is a mismatch between the working gauge and the planned stitch gauge. Measure the width of each panel before assembly. If the fabric is significantly wider than the target, remake the panel using a smaller hook rather than trying to shrink it through washing.
Why does the collar stand too high?
The collar may have too many stitches across its width or may be folded at an unsuitable position. Reduce its depth by shortening the starting chain, or adjust the fold after attaching it to the neckline.
Why are the booties different sizes?
Even when both booties contain identical stitch counts, tension changes can produce different dimensions. Measure both soles before working the uppers and use the same hook throughout the pair.
How can the textured vest resemble the photograph more closely?
Test front-post and back-post double crochet stitches on a separate swatch. Alternating raised stitch columns can create a more pronounced texture than plain half double crochet. However, substituting these stitches changes the fabric gauge, so the panel dimensions and row counts must be recalculated before using the textured version.
Can this set be made in a larger size?
Yes, but increasing the hook size alone is not a reliable method for garment grading. A larger vest requires revised chest width, body length, armhole depth, shoulder width, and neckline measurements. For the booties, begin by selecting the appropriate sole length and then check the ankle opening.
Care and Washing Instructions
Check the yarn label before washing the finished set. For washable baby acrylic, a gentle machine cycle may be suitable, but hand washing can reduce strain on the raised stitches and sewn decorations.
Use a mild detergent and avoid aggressive wringing. Reshape the collar, waistband, and bootie cuffs while damp, then dry the pieces flat.
Inspect the buttons and bows after washing. Do not use the set if any small decorative component becomes loose.
Store the vest with the buttons closed to reduce distortion of the front bands. Keep the booties together and avoid pulling on their decorative bows when removing them.
Conclusion
This crochet baby vest and booties pattern combines a button-front sleeveless garment with two cream-colored booties featuring shaped toes, folded cuffs, and decorative bows. The construction depends on consistent gauge, balanced panel shaping, and accurately matched soles. Before making the final set, complete a garment swatch and one sample bootie to check the measurements against the intended baby size.
Photograph the finished pieces from the front and side to document the collar, button placement, and bootie shape. Share the project on Pinterest or Instagram using #MustardBabyCrochetSet. For your version, would you keep the four-button front shown in the photograph, or change the spacing to three larger buttons?









