Introduction
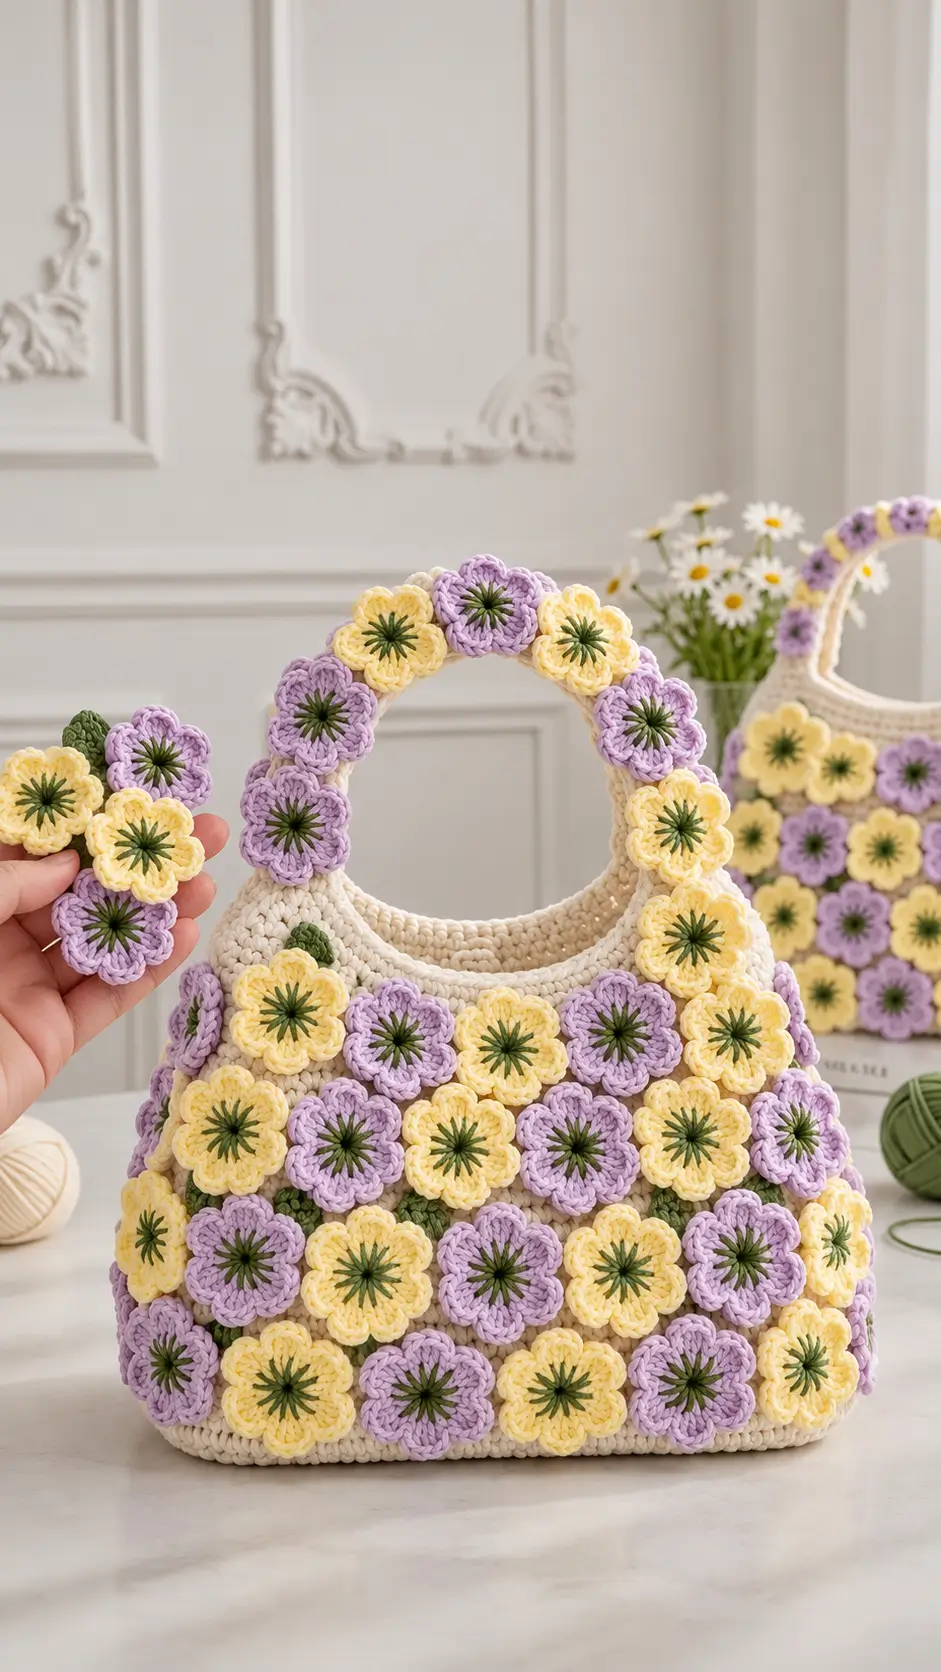
A flower-covered crochet bag fails quickly if the appliqués are asked to carry the weight of the handles. This pastel flower crochet handbag pattern solves that problem with a firm cream bag underneath and separate lavender and pale-yellow flowers stitched across the surface. The rounded body, integrated handle opening, green embroidered centers, and alternating five-petal flowers create the photographed look while keeping the structural seams independent from the decoration.
The Design: What Makes This Flower Bag Different
The handbag is built in two layers. First comes a dense cream shell with a flat base, shaped sides, and reinforced handles. That foundation carries the contents of the bag. The flowers are decorative pieces added only after the shell is complete.
Each flower uses five rounded petals rather than a flat circular motif. Pale yellow and soft lavender alternate across the body, while dark olive-green embroidery forms narrow starburst centers. Small green leaves can be placed selectively between flowers instead of filling every gap.
The handle receives flowers too, but the appliqués stop short of the inner gripping edge. This matters. Covering the entire handle with dimensional petals makes it uncomfortable to hold and can distort the opening.
Project Information
| Skill Level | Construction | Target Size | Hook | Best For |
|---|---|---|---|---|
| Intermediate | Dense bag shell with sewn flower appliqués | Approx. 32–36 cm wide × 28–32 cm high | 4.0–4.5 mm | Handbag, spring tote, gift bag |
Materials and Tools
Yarn
- Warm cream — worsted weight #4 cotton or cotton blend — main bag body and handles
- Soft lavender — worsted weight #4 — approximately half of the flowers
- Pale butter yellow — worsted weight #4 — remaining flowers
- Olive green — small quantity — flower centers and optional leaves
Cotton or a cotton-rich blend is preferable for the structural shell because it produces less stretch than a very soft acrylic yarn. Use similar yarn thickness for all flower colors so every appliqué finishes at approximately the same diameter.
Tools
- 4.0–4.5 mm crochet hook
- Yarn needle
- Scissors
- Stitch markers
- Measuring tape
- Blocking pins
- Optional fabric lining
- Optional magnetic snap
Abbreviations
- MR — magic ring
- ch — chain
- sc — single crochet
- hdc — half double crochet
- dc — double crochet
- tr — treble crochet
- inc — increase
- sl st — slip stitch
- st/sts — stitch/stitches
- sp — space
- BLO — back loop only
- RS — right side
- WS — wrong side
Gauge and Finished Measurements
The exact bag dimensions can be changed, but the fabric needs to be dense enough to support the flowers. Make a 10 cm square swatch in sc before beginning.
A useful target is approximately 16–18 sc per 10 cm, depending on yarn and hook size. If large gaps appear between stitches, reduce the hook size.
For the photographed proportions, aim for a finished body approximately:
- Width: 32–36 cm
- Body height: 24–27 cm before handles
- Total height: 34–39 cm
- Base depth: 8–10 cm
- Handle opening: approximately 14–17 cm wide
These are project targets rather than fixed measurements. Adjust the foundation to the required handbag size.
Bag Construction
The main shell is worked from an oval base upward. This creates a continuous body with fewer seams and enough stability for the appliqués.
Cream Oval Base
With cream yarn, ch 31.
Round 1: Sc in second ch from hook and in each ch to the final ch. Work 3 sc in final ch. Continue along the opposite side of the foundation chain, working 1 sc in each remaining loop. Work 2 additional sc in the first foundation position and join.
Place a marker at each rounded end.
Round 2: Sc along the first straight side. Increase evenly around the first curved end, sc across the second straight side, then increase evenly around the opposite curved end.
Round 3: Repeat the same principle, spacing the curved-end increases farther apart.
Round 4: Continue increasing only around the two curved ends until the base measures approximately 30–34 cm long and 8–10 cm deep.
Do not continue increasing after reaching the required base dimensions.
Turning the Base Upward
Work one complete round of sc in BLO without increases.
This creates a subtle fold line between the base and side walls.
On the following round, return to working through both loops.
Main Cream Bag Body
Rounds 1–5: Sc in every stitch around.
Continue working without increases.
After five rounds, place the bag flat and check that both sides rise vertically rather than spreading outward.
Rounds 6–20: Continue sc around until the body measures approximately 20–23 cm from the base fold.
For a slightly textured surface, every fifth round can be worked in BLO.
Keep the main fabric relatively plain because most of it will eventually be covered with flowers.
Shaping the Upper Bag
The photographed handbag narrows slightly near the handle area.
Divide the bag into front, back, and two side sections using stitch markers.
On the next shaping round, decrease once near each side marker.
Work 2–3 rounds without decreases.
Repeat the side decreases once more if a stronger taper is required.
Avoid decreasing across the center front or center back. Those areas need to remain broad enough for the handle openings.
Integrated Handle Openings
Lay the bag flat and mark the horizontal center of the front and back panels.
Measure approximately 7–8 cm to each side of the center. These markers define an opening about 14–16 cm wide.
Work sc to the first marker.
Chain enough stitches to span the marked handle opening without pulling the fabric. Skip the same number of body stitches, then continue sc around.
Repeat the same opening on the back panel.
On the next round, work one sc into each chain stitch.
Building the Handles
Continue working around the complete upper edge for 2 rounds.
Then work additional rows only over the handle sections if more height is required.
A finished handle width of approximately 3–4 cm provides better support than a narrow cord handle.
Work 4–6 rows of sc around each handle section.
Finish with one round of reverse sc or firm slip stitches around the inner and outer handle edges.
The handle should feel substantially denser than the decorative flowers.
Five-Petal Flower Appliqué
Make flowers in both lavender and pale yellow.
A target diameter of approximately 5–6 cm works well for a medium handbag.
Flower Center Foundation
With the flower color, make an MR.
Round 1: Work 10 sc into MR. Join with sl st. (10)
Round 2: Work (sc, ch 3) five times, spacing the five chain loops evenly around the center.
You should have five petal spaces.
Petals
Into each ch-3 space work:
(sc, hdc, 3 dc, hdc, sc)
Repeat in all five spaces.
Join with sl st.
Fasten off, leaving a sewing tail approximately 20–25 cm long.
More Dimensional Flower Option
For the thicker flowers visible in the photograph, add a second shaping round around each petal.
Work around the outer edge of one petal:
sl st, sc, hdc, 2 dc, hdc, sc, sl st
Repeat around all five petals.
Keep the slip stitches between petals tight. Loose stitches blur the separation between the five lobes.
Green Starburst Flower Centers
The dark green centers provide much of the visual definition in this bag.
Thread a yarn needle with olive-green yarn.
Bring the yarn from the back through the center of the flower.
Make one long straight stitch toward the base of a petal and return to the center.
Repeat between 8 and 12 times, rotating the stitches evenly around the center.
The result should resemble a narrow embroidered starburst.
Do not pull these stitches tightly. Excess tension cups the flower and can make the petals fold inward.
Optional Green Leaves
The photographed bag contains only a few visible green elements between the flowers. Small leaves can be added selectively.
With olive green, ch 8.
Starting in the second ch from hook, work:
sc, hdc, dc, tr, dc, hdc, sc
Ch 2 at the tip.
Continue down the opposite side of the foundation chain:
sc, hdc, dc, tr, dc, hdc, sc
Sl st at the base and fasten off.
Make only enough leaves to fill selected gaps. The flowers should remain the dominant surface detail.
How Many Flowers to Make
The exact quantity depends on flower diameter and handbag size.
For a bag approximately 34 cm wide, begin with:
- 12–16 lavender flowers
- 12–16 pale-yellow flowers
- 6–10 additional flowers for the handles and sides
Make approximately 30 flowers first, arrange them on the completed bag, then calculate the remaining quantity from the uncovered areas.
This is more accurate than making a fixed number before the final bag dimensions are known.
Planning the Flower Arrangement
Stuff the handbag lightly with folded towels before positioning the appliqués. This holds the shell in its finished three-dimensional shape.
Begin with one flower near the upper center of the front panel.
Place the next flowers approximately 5–6 cm apart, alternating lavender and yellow.
Continue downward in staggered rows rather than rigid vertical columns.
The flowers may touch slightly, but avoid stacking petals heavily over neighboring flower centers.
Flower Placement Guide
| Area | Placement |
|---|---|
| Front panel | Dense alternating lavender and yellow flowers |
| Back panel | Repeat the front arrangement |
| Side panels | Continue flowers around the curves |
| Outer handle | Approximately 5–7 flowers per visible handle section |
| Inner handle | Leave mostly undecorated for comfortable gripping |
| Base | Keep free of flowers |
Sewing Flowers to the Bag
Use the long matching yarn tail left on each flower.
Secure the flower through its center foundation first.
Then add one small stitch near the base of each petal.
Five petal-base stitches plus the center attachment are usually sufficient.
Do not sew around the entire outer edge. Free petal tips create the dimensional surface seen in the photograph.
Check the inside of the handbag frequently. Long strands running between attachment points can catch on objects placed inside the bag.
Decorating the Handle
Arrange lavender and yellow flowers around the outer handle arch.
Begin at one lower handle attachment and work upward.
Alternate colors toward the top, then continue down the opposite side.
Keep approximately 1.5–2 cm of the inner gripping edge free from thick petals.
Sew handle flowers more firmly than body flowers because they receive more movement during use.
Reinforcing the Handle
A flower-covered handbag becomes heavier than the undecorated shell.
Before attaching handle flowers, test the bag with approximately the weight you expect to carry.
If the handle stretches more than about 1–2 cm, reinforce it.
One method is to work an additional row of tight slip stitches around the inner handle edge.
Another is to sew cotton webbing or a narrow fabric strip to the wrong side of the handle.
Keep reinforcement hidden behind the crochet fabric.
Optional Fabric Lining
A lining prevents small objects from pushing between crochet stitches and reduces stress on the appliqué attachment points.
Trace the flattened bag body onto fabric, adding approximately 1.5 cm seam allowance.
Cut two lining pieces.
Sew the sides and base together, leaving the top open.
Turn the upper edge to the wrong side and press it.
Insert the lining into the crochet shell and hand-sew it approximately 1 cm below the upper crochet edge.
Do not sew the lining directly across the handle opening.
Optional Magnetic Closure
A magnetic snap can be installed at the center of the lining before the lining is sewn into the bag.
Reinforce the snap area with a small square of interfacing or additional fabric.
Position both halves at exactly the same height.
The closure should sit below the handle opening so it does not interfere with the decorative flowers.
Alternative Flower Colorways
The construction works with many palettes while retaining the cream foundation.
- Spring: lavender, butter yellow, cream and olive
- Rose garden: dusty pink, burgundy, cream and sage
- Coastal: turquoise, white, pale blue and green
- Autumn: rust, mustard, cream and dark olive
- Monochrome: ivory flowers on a beige shell with dark green centers
Use two main flower colors if you want the alternating arrangement to remain visible.
Smaller Handbag Version
For a compact handbag, reduce the base to approximately 24–27 cm long.
Stop the body at approximately 18–20 cm high before shaping the handles.
Make flowers approximately 4–5 cm across.
A smaller bag generally needs about 18–24 flowers depending on coverage.
Larger Tote Version
For a larger tote, extend the oval foundation and increase the base depth to approximately 10–12 cm.
Work the body to 28–32 cm before beginning the upper shaping.
Increase the handle width to approximately 4–5 cm.
A large flower-covered tote should have a fabric lining and reinforced handles because the decorative crochet adds significant weight.
Yarn Estimation
Make the bag shell and five sample flowers before purchasing large quantities for a bigger version.
Weigh the completed cream shell separately.
Next, weigh five flowers and divide that number by five to calculate the average weight per appliqué.
For example, if five flowers weigh 50 g:
50 ÷ 5 = 10 g per flower
If the finished handbag requires 34 flowers:
34 × 10 = 340 g of flower yarn
Divide that amount between lavender and yellow according to the planned arrangement.
Add approximately 10% for swatching, embroidery, leaves, sewing tails, and finishing.
Assembly
- Crochet the cream oval base to the required handbag width and depth.
- Work the body upward without increases and shape the upper sides gradually.
- Create matching handle openings on the front and back, then reinforce both handles.
- Make enough lavender and pale-yellow five-petal flowers to cover the front, back, sides, and outer handles.
- Embroider the olive-green starburst into every flower center before attaching the flowers.
- Make a small number of green leaves and position them only where visible gaps need additional detail.
- Stuff the bag lightly with towels, pin the flowers in alternating rows, and inspect the arrangement from both sides.
- Sew each flower through its center and petal bases while leaving the outer petal edges free.
- Add the optional lining and magnetic closure, keeping all attachment stitches below the upper crochet edge.
- Weave in every yarn end, reshape the handbag, and allow it to dry completely after final blocking.
7 Technical Tips
- Failure mode: the base collapses under the flower weight. Use dense sc fabric and stop increasing when the oval reaches approximately 8–10 cm deep; an oversized base creates a soft bucket shape instead of the structured silhouette.
- Failure mode: the handles stretch during use. Test them with weight before decoration and add reinforcement if the opening lengthens by more than approximately 1–2 cm.
- Failure mode: five-petal flowers become irregular. Mark all five petal spaces before working the petals so each receives the same stitch sequence.
- Failure mode: embroidered green centers pull the flowers into cups. Keep each starburst stitch relaxed and stop tightening as soon as the yarn lies flat against the center.
- Failure mode: flowers form crooked rows on the bag. Stuff the shell to its finished shape and pin an entire front panel before sewing the first appliqué.
- Failure mode: handle flowers make the grip bulky. Maintain approximately 1.5–2 cm of undecorated space along the inner handle edge.
- Failure mode: sewing tails catch objects inside the handbag. Weave each tail through at least 4–5 cm of dense cream stitches and trim it individually instead of carrying yarn between flowers.
Care and Finishing
Follow the washing instructions for the selected yarn. If the bag includes a fabric lining, magnetic hardware, or internal reinforcement, spot cleaning or gentle hand washing is generally more practical than aggressive machine washing.
Reshape the base, sides, and handles while damp.
Arrange every flower so the five petals lie separately rather than folding underneath neighboring appliqués.
Dry the handbag supported in its three-dimensional shape rather than hanging it from the handles while wet.
Conclusion
The structure underneath the flowers determines how well this pastel flower crochet handbag pattern performs in daily use. Complete the cream shell first, reinforce the handles, and test its shape before adding any appliqués. Then make one lavender and one yellow master flower so every remaining motif matches their diameter. Alternate the colors across the front and back, keep the green starburst centers consistent, and leave the inner handles relatively flat. The finished design can be shared on Pinterest or Instagram with #PastelFlowerCrochetBag. Would you keep the lavender-and-yellow combination shown here, or replace one flower color with dusty pink?








