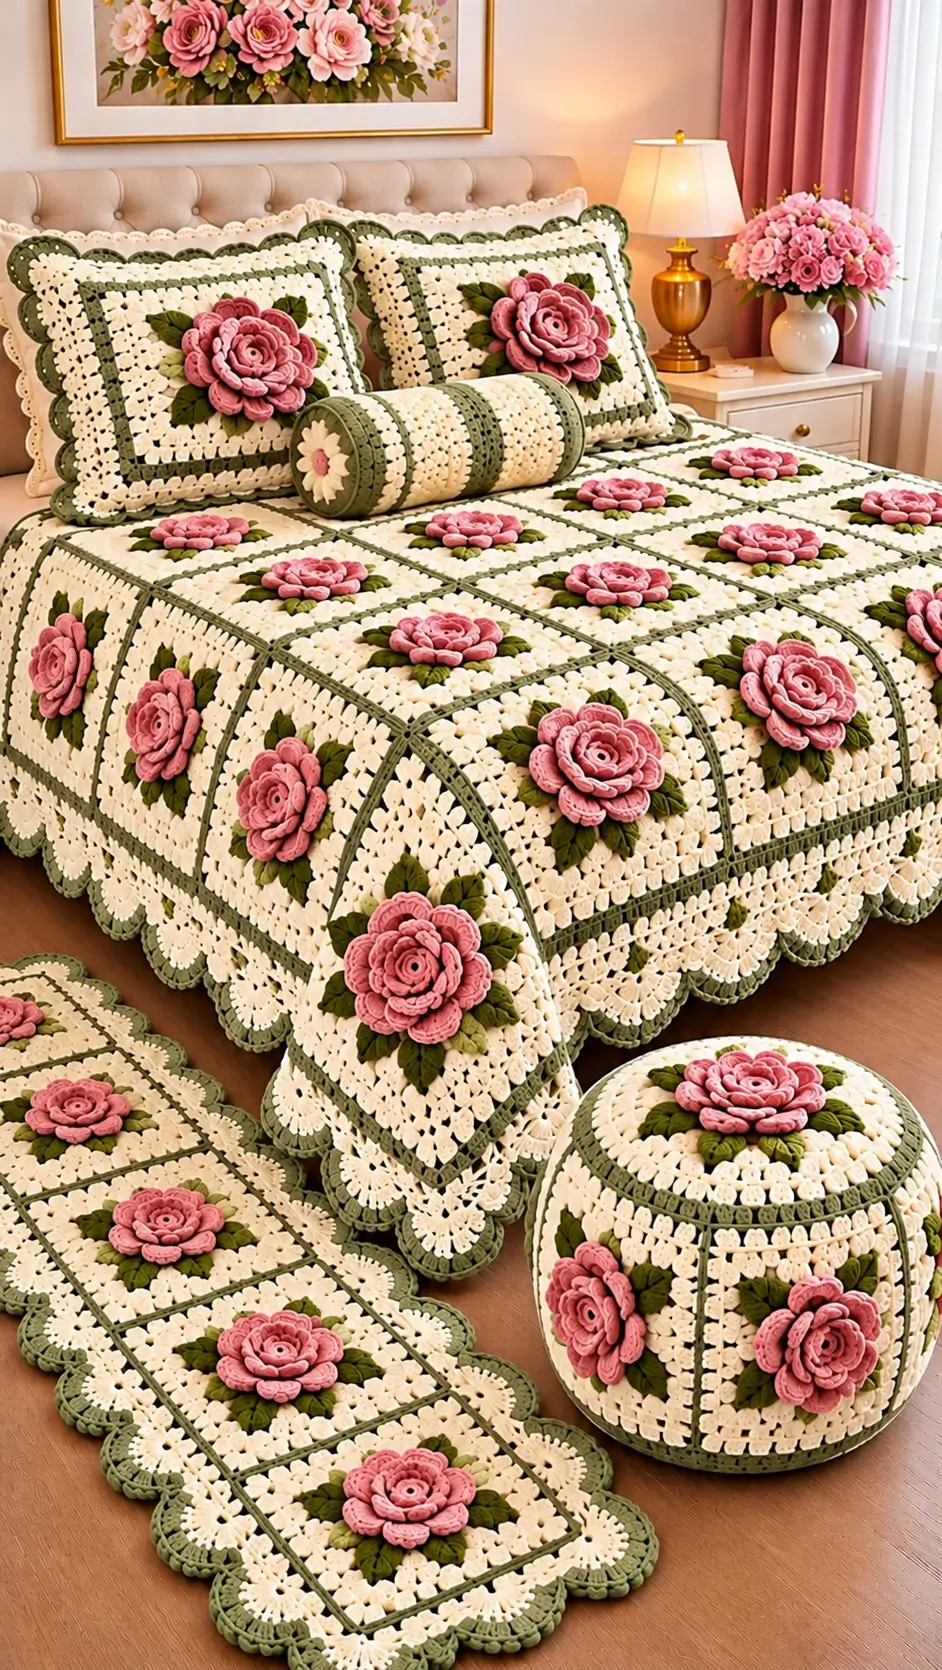
A rose this deep cannot be crocheted directly into a loose granny-square background without pulling the center out of shape. This 3D rose granny square crochet bedspread pattern solves that problem by separating the pink layered flower, olive leaves and structural cream square. Worked in worsted-weight yarn with a 4.5–5 mm hook, the project produces approximately 20–22 cm blocks suitable for a bedspread, pillow cover or matching runner.
The Design: What Makes This Rose Bedspread Different
The photographed design uses three clearly separated structural levels. A raised dusty-pink rose forms the focal point, olive leaves create a transition between the flower and background, and a warm-cream granny-style square carries the actual joining stress. Keeping those elements separate prevents the petals from being trapped inside seams. Thin olive borders around each block create the visible grid across the bedspread and repeat the leaf color without overpowering the roses. The lower edge is wider and more decorative, using cream openwork followed by an olive scalloped finish. One common mistake with a crochet rose granny square blanket is making the flower before checking the blocked square size; an oversized rose can cover the joining edge and make assembly difficult.
Project Information at a Glance
| Skill Level | Construction | Target Square | Hook | Best For |
|---|---|---|---|---|
| Intermediate | Separate 3D rose + leaves + granny square | 20–22 cm | 4.5–5 mm | Bedspreads, throws and pillow covers |
Materials and Tools
Yarn
- Warm Cream — worsted weight #4 — main square background and lace border
- Dusty Rose Pink — worsted weight #4 — layered roses
- Olive Green — worsted weight #4 — leaves, joining outlines and final edging
- Optional Light Pink — worsted weight #4 — subtle inner-petal variation
Yarn quantity depends heavily on bed dimensions and the weight of one completed motif. Make one blocked master square first, weigh each color used in that square, then multiply those weights by the final motif count. Add approximately 10–15% for joining, borders, swatching and finishing.
Tools
- 4.5–5 mm crochet hook
- Yarn needle
- Scissors
- Locking stitch markers
- Blocking pins and mats
- Flexible measuring tape
- Digital kitchen scale for yarn calculations
Abbreviations
- MR — magic ring
- ch — chain
- sc — single crochet
- hdc — half double crochet
- dc — double crochet
- tr — treble crochet
- sl st — slip stitch
- BLO — back loop only
- FLO — front loop only
- sp — space
- st/sts — stitch/stitches
Gauge and Master-Square Test
The individual square determines every later measurement, so make one complete motif before calculating the bedspread.
For this photo-inspired construction, aim for a blocked square of approximately 20–22 cm. The rose should measure roughly 10–13 cm across while remaining at least 2 cm inside the structural joining edge.
Block the square before measuring. Record its width at three points and its two diagonals. The diagonals should differ by no more than approximately 5 mm if the square is lying correctly.
Pattern — Step by Step
Rose Center
Yarn: Dusty Rose Pink.
Round 1: Make MR. Work 6 sc into ring. Join with sl st. (6)
Round 2: Work 2 sc in each st around. Join. (12)
Round 3: (Sc in next st, 2 sc in next st) ×6. Join. (18)
Round 4: Working in FLO, (sl st in next st, ch 3, 3 dc in same st, ch 3, sl st in next st) around to create the compact inner petal layer.
Fasten off while leaving the unused back loops accessible for the next petal layer.
Second Rose Petal Layer
Yarn: Dusty Rose Pink or optional lighter pink.
Join yarn to an unused loop behind the first petals.
Foundation: Ch 4, skip approximately two underlying loops, sl st into the next available loop. Repeat evenly around to create six petal spaces.
Petals: Into each ch-4 space work:
(sc, hdc, 3 dc, hdc, sc).
Repeat in every space.
Fasten off.
Third Rose Petal Layer
Join pink yarn behind the second layer.
Create six larger loops using ch 6, attaching each loop behind the gap between two petals from the previous layer.
Into each ch-6 loop work:
sc, hdc, 2 dc, 3 tr, 2 dc, hdc, sc.
The treble stitches create the height needed for the broad outer petals visible in the reference.
Fasten off.
Outer Rose Layer
For a deeper flower, add one final layer behind the existing petals.
Create six ch-8 loops distributed evenly behind the third layer.
Into each loop work:
sc, hdc, 2 dc, 4 tr, 2 dc, hdc, sc.
Do not tighten the bases of these petals. They need enough movement to overlap slightly without folding the cream square underneath.
Fasten off, leaving a 25–30 cm tail if the flower will be sewn to the square later.
Shape the Rose
Arrange the smallest petals almost upright around the center.
Angle the second layer outward slightly.
The third and fourth layers should lie progressively flatter.
Rotate each layer so that its petals sit between the petals below rather than directly on top of them. This staggered placement creates the dense rose structure visible in the bedspread.
Olive Leaves — Make 4 to 6 per Square
Yarn: Olive Green.
Ch 9.
Starting in second ch from hook:
Side 1: sc, hdc, dc, 2 tr, dc, hdc, sc.
Ch 2 at the tip.
Rotate the chain and work down the unused loops:
Side 2: sc, hdc, dc, 2 tr, dc, hdc, sc.
Sl st at the base.
Fasten off, leaving approximately 15 cm for sewing.
Optional Leaf Vein
Join olive yarn at the leaf base and surface-slip-stitch along the center chain toward the point.
Keep this line loose. A tight surface chain bends the leaf along its center.
Arrange the Leaves
Place four leaves diagonally behind the rose for the cleanest square composition.
For a fuller floral cluster similar to the larger motifs in the photograph, use six leaves and position the additional pair horizontally.
Only the inner third of each leaf should sit beneath the flower. The pointed ends need to remain visible against the cream background.
Cream Granny Square Foundation
Yarn: Warm Cream.
This foundation is worked separately so the square carries the bedspread’s structural load rather than the rose.
Round 1: MR, ch 3, work 2 dc, ch 2, (3 dc, ch 2) ×3. Join. You have four 3-dc groups and four corners.
Round 2: Sl st to first corner. In each corner work (3 dc, ch 2, 3 dc), ch 1 between corners. Join.
Round 3: In each corner work (3 dc, ch 2, 3 dc). Work 3 dc in each ch-1 side space, with ch 1 between groups. Join.
Round 4: Continue the established granny-square structure, placing (3 dc, ch 2, 3 dc) in each corner and 3 dc into every side space.
Measure the square.
If additional width is required, continue one or two more granny rounds before adding the structural frame.
Solid Cream Structural Round
Join cream yarn at any corner.
Round 1: Ch 1. Work sc evenly around, placing (sc, ch 2, sc) in every corner.
Round 2: Hdc in every st. In each ch-2 corner work (2 hdc, ch 2, 2 hdc).
Round 3: Sc in every st with (sc, ch 2, sc) in each corner.
This three-round frame provides a stable area for joining and prevents the open granny background from stretching around the heavy rose.
Olive Outline Round
Join olive yarn at a corner.
Work sc around the entire square.
At each corner work:
(sc, ch 2, sc).
Fasten off.
This narrow olive line creates the grid effect visible between the cream squares.
Attach the Rose and Leaves
Block the cream square before adding the dimensional flower.
Pin the leaves first.
Place the rose over their inner ends.
The flower should remain approximately centered, and the outer petals should finish at least 2 cm from the olive structural edge.
Sew each leaf through its center vein and lower edge.
Attach the rose through its central base and the bases of selected outer petals.
Do not sew around every petal edge. The unstitched outer portions create the three-dimensional effect.
Finished Master Square
After assembly, place the square flat without pressing the rose.
Target dimensions:
- Square: approximately 20–22 cm
- Rose: approximately 10–13 cm
- Rose relief: approximately 2–3.5 cm
- Joining clearance: at least 2 cm around the flower
These are project targets rather than measurements extracted from the photograph.
Calculate the Bedspread Layout
Measure the blocked master square and use that measurement instead of assuming a fixed motif size.
With a 21 cm square, approximate joined dimensions before the outer border are:
| Layout | Approximate Size | Possible Use |
|---|---|---|
| 5 × 7 squares | 105 × 147 cm | Large throw |
| 7 × 9 squares | 147 × 189 cm | Small bedspread |
| 8 × 10 squares | 168 × 210 cm | Medium bed coverage |
| 9 × 11 squares | 189 × 231 cm | Large bedspread |
| 10 × 12 squares | 210 × 252 cm | Extra-large coverage |
The decorative border adds additional width and length.
Estimate Yarn from the Master Square
Weigh each yarn color used in one completely finished square.
For example only, suppose one motif contains:
- 42 g cream
- 24 g pink
- 9 g olive
For 80 squares, multiply each figure by 80:
- Cream: 3360 g
- Pink: 1920 g
- Olive: 720 g
Add the yarn required for joining and the large outer border, then add approximately 10% reserve. Replace these example figures with the weight of your own master square before buying yarn.
Joining the Granny Squares
The narrow olive grid is an important visual feature, so use olive yarn for the visible joining line.
Arrange all squares on a flat surface before joining.
Keep every rose facing in the same orientation unless a deliberately rotated arrangement is preferred.
Place two squares with wrong sides together.
Working through corresponding edge loops, slip stitch the squares together with olive yarn.
Keep the seam relaxed.
Join complete horizontal rows first, then connect those rows vertically.
After several squares have been assembled, place the work flat and check the seam intersections. Four corners should meet without forming a raised knot.
Alternative Flat Join
If a less pronounced grid is preferred, use cream yarn and mattress stitch the squares together.
Afterward, surface-slip-stitch olive yarn along the seam lines.
This method separates the structural seam from the decorative olive outline and can produce a flatter bedspread.
Decorative Outer Border
The reference uses a much wider border than the internal square frames. Building the edge gradually reduces the risk of rippling.
Border Round 1 — Cream Foundation
Join cream yarn.
Sc evenly around the complete bedspread.
At each outer corner work:
(sc, ch 2, sc).
Border Round 2 — Cream Hdc
Hdc in each stitch.
At every corner work:
(2 hdc, ch 2, 2 hdc).
Border Round 3 — Openwork
Work:
*sc in next st, ch 3, skip 2 sts* around.
Adjust the final repeat slightly before each corner if necessary so the corner space remains centered.
Border Round 4 — Cream Fans
Into each ch-3 space work:
(sc, hdc, 3 dc, hdc, sc).
Use a larger corner fan so the border can turn without cupping.
Border Round 5 — Olive Definition
Join olive yarn.
Work sc around the outer edge, placing extra stitches around each corner as needed to keep it flat.
Large Scalloped Finish
The photographed bedspread ends with broad cream scallops outlined in olive.
With cream yarn, establish evenly spaced loops around the border:
*sc, ch 5, skip the next suitable section*.
Maintain equal spacing rather than forcing a fixed number of skipped stitches around every curve.
Into each loop work:
sc, hdc, 3 dc, tr, 3 dc, hdc, sc.
Repeat around.
Join olive yarn and work one relaxed sc or surface-slip-stitch line around the outer scallops.
Block the border before judging its final shape.
Matching Rose Pillow Covers
The same motif can be used for the large decorative pillows shown with the bedspread.
Make four granny squares for a 2 × 2 front panel, or enlarge one square by adding additional cream and olive rounds.
Join the motifs using the same olive seam as the bedspread.
For the back, crochet two overlapping cream rectangles in hdc or sc.
Overlap them by approximately 10–15 cm to form an envelope opening.
Join the pillow front and back with an olive sc round.
Add a small scalloped cream-and-olive border if desired.
Optional Bolster Pillow
The cylindrical pillow visible in the room can be made independently from the bedspread motifs.
Crochet a cream rectangle long enough to wrap around the bolster insert.
Add alternating olive and cream textured stripes.
Seam the long edge to create a tube.
For each circular end, begin with a flat circle and increase evenly until its diameter matches the bolster.
Attach one circle permanently and make the second removable if the cover needs regular washing.
Optional Matching Floor Runner
The floor runner can reuse the same rose squares without changing the main motif.
Arrange the squares in a narrow grid such as 2 × 5, 2 × 6 or 3 × 6 depending on the required dimensions.
Join them with olive yarn.
Because a floor textile receives more friction than a bedspread, keep the roses shallower by omitting the largest outer petal layer.
Add a firm cream sc border and finish with smaller olive-edged scallops.
A crocheted runner should be used with an appropriate non-slip underlay on smooth flooring.
Color Placement
The design depends on a controlled three-color ratio.
Cream should occupy most of the flat surface. Pink is concentrated in the dimensional flowers, while olive appears in smaller quantities around the leaves, joins and border.
A practical visual distribution is approximately:
- 60–70% cream
- 20–25% dusty pink
- 10–15% olive green
This is a visual planning ratio rather than a yarn-weight formula because dimensional roses consume yarn differently from flat granny rounds.
Alternative Colorways
Burgundy Version
Replace dusty pink with burgundy and keep the cream and olive components unchanged.
Blush Version
Use pale blush roses, ivory backgrounds and muted sage leaves for lower contrast.
Lavender Version
Combine lavender flowers with cream squares and gray-green foliage.
Terracotta Version
Use terracotta roses, oatmeal backgrounds and dark olive leaves for an autumn palette.
Assembly
- Make one complete cream master square, block it and record its exact finished dimensions.
- Crochet the required number of cream squares and add the olive structural outline to every motif.
- Make all pink roses, keeping the same number of petal layers and the same hook tension throughout the project.
- Crochet four to six olive leaves for each square and block them lightly before attachment.
- Pin the leaves and roses to the blocked squares, maintaining at least 2 cm of clear joining space around each flower.
- Arrange every finished motif on a flat surface and confirm the final bedspread dimensions before joining.
- Join the squares in rows with olive yarn, then connect the completed rows while checking each four-square intersection.
- Work the cream structural border around the assembled bedspread before beginning any decorative openwork.
- Add the cream fans and large scallops, then finish the outer edge with the olive definition round.
- Weave in all tails, block the flat portions to final measurements and shape the roses by hand after the bedspread is completely dry.
The finished piece consists of a stable cream modular bedspread with raised pink roses, visible olive joining lines, dimensional leaves and a wide scalloped perimeter.
7 Technical Tips
- The rose makes the square buckle: its base has been sewn down too tightly. Attach only the central 3–4 cm and selected outer-petal bases so the cream square remains flat.
- The square corners pull inward: the structural rounds do not contain enough corner space. Maintain a ch-2 corner and place the specified paired stitches on both sides of that space.
- The roses disappear into the background: the flower diameter is too small relative to the motif. For a 20–22 cm square, target approximately 10–13 cm across the completed rose.
- The joining seams become bulky: too many loops are being caught at once. Join corresponding edge loops consistently and keep the olive slip stitches loose enough for the squares to lie flat.
- The leaves curl into tubes: the center vein has been worked too tightly. Surface crochet the vein with enough slack for the leaf to remain flat after blocking.
- The outer border ruffles: too many stitches or chain spaces have been added along the perimeter. Test every 30–40 cm on a flat surface and remove excess repeats before continuing.
- The bedspread becomes unexpectedly heavy: dimensional flowers use substantially more yarn than flat motifs. Weigh one finished square before making the full set and calculate the total projected weight as well as the yarn quantity.
Care and Blocking
Check the care instructions for the selected yarn before washing the complete bedspread.
Block the individual squares before joining rather than trying to correct uneven motifs after the entire bedspread has been assembled.
For final blocking, support the full weight of the wet piece. Do not lift a saturated bedspread by one corner or one joining seam.
Lay it flat, straighten the olive grid and shape the outer scallops individually.
Do not flatten the roses under heavy mats or towels. Once the fabric is dry, lift and arrange each petal layer by hand.
Conclusion
The structural sequence is the key to this 3D rose granny square crochet bedspread pattern: make and block the cream square first, add a narrow olive frame, attach the leaves, then secure the layered rose without sewing down its outer petals. Complete one master motif and weigh it before committing yarn to a full bedspread. That single test also determines the final square count and border dimensions. The same block can then be adapted for matching pillow covers or a narrow runner. Share the completed set on Pinterest or Instagram with #PinkRoseGrannyBedspread. For this particular design, would you keep every rose dusty pink or alternate pink and cream flowers across the bed?









