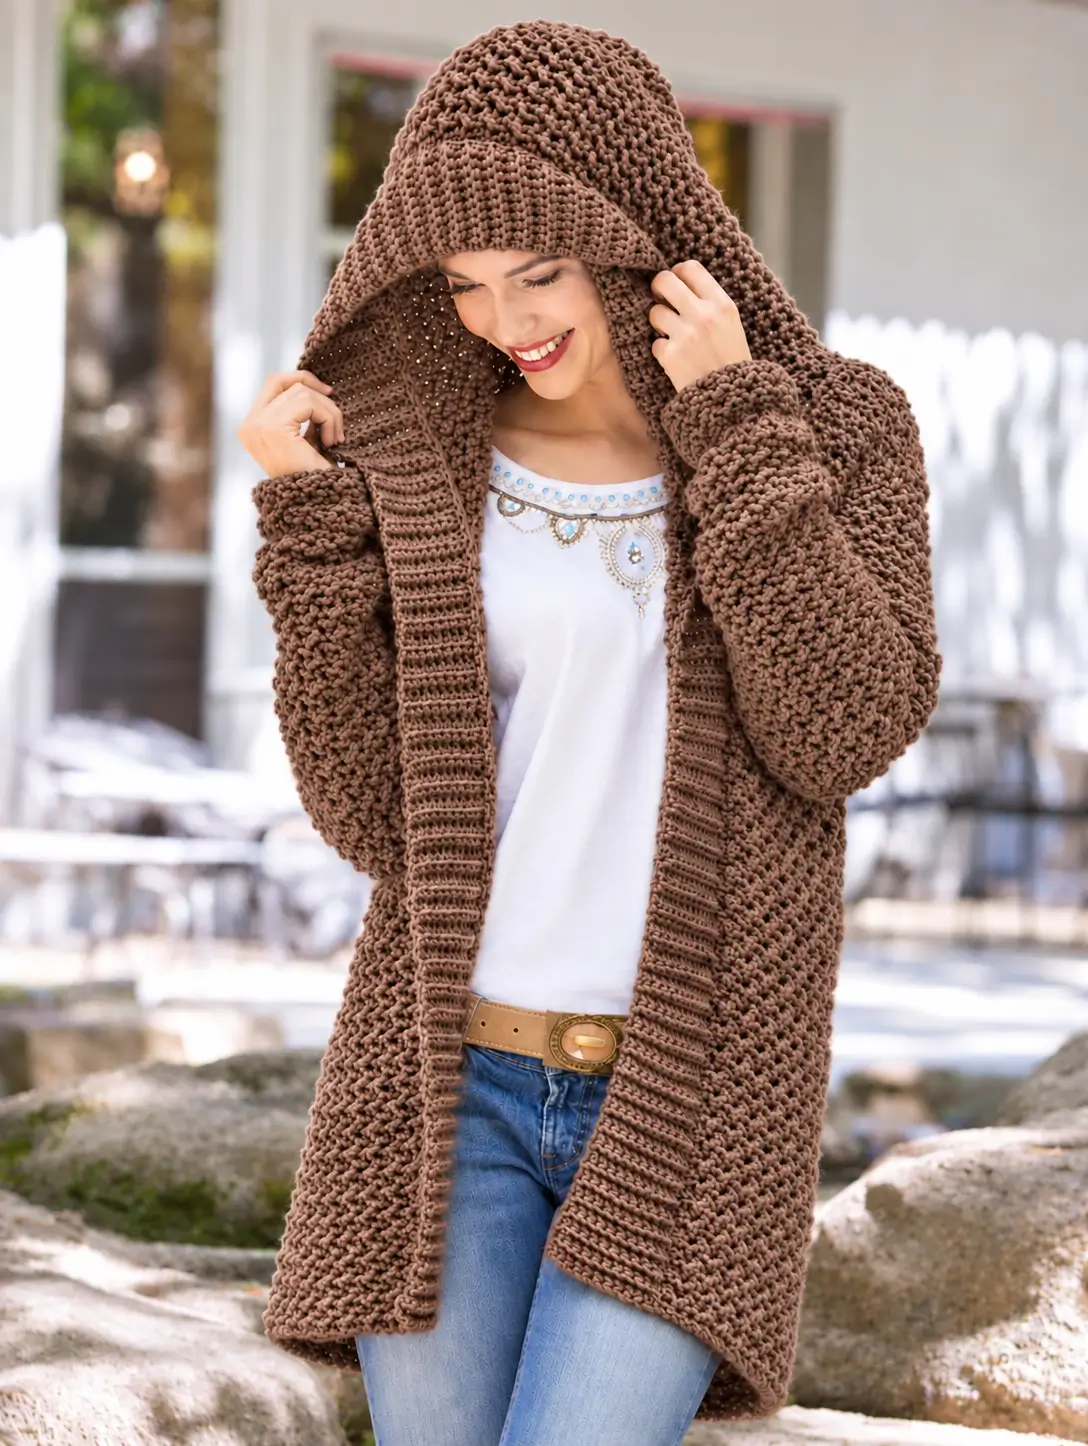
The oversized hood changes the balance of this cardigan before it changes its appearance. This chunky hooded crochet cardigan pattern uses a long open-front body, relaxed sleeves, a deep hood and wide ribbed front bands in one warm mocha shade. The photographed texture can be approximated with bulky yarn and a compact crochet stitch worked loosely enough to retain drape. Size the garment from body measurements rather than relying on a fixed stitch count.
The Design: What Makes This Hooded Cardigan Different
The cardigan combines three distinct structural areas. The main body uses a dense textured stitch that produces the pebbled surface visible across the back, fronts and sleeves. A flatter ribbed treatment runs vertically along both front openings, creating enough weight to stop the edges from rolling. The hood continues directly from the neckline and is intentionally deep, allowing it to fold around the face rather than sitting tightly against the head.
The sleeves are roomy through the upper arm and narrow only near the wrist. This matters with bulky yarn: aggressive shaping through the whole sleeve can produce stiff diagonal seams. The most common construction problem is making the hood too heavy. A hood that contains substantially more fabric than the neckline can support will pull the cardigan backward during wear.
Project Information at a Glance
| Skill Level | Construction | Fit | Suggested Hook | Best For |
|---|---|---|---|---|
| Intermediate | Panels + sleeves + attached hood | Relaxed / oversized | 6–8 mm after swatching | Long cold-weather cardigan |
Materials and Tools
Yarn
- Warm Mocha Brown — bulky #5 or a heavy worsted yarn held double
The photograph suggests a substantial fabric with visible stitch definition. Choose yarn that compresses slightly when squeezed rather than an extremely rigid cord-style yarn. A lighter bulky yarn will reduce the finished garment weight.
Tools
- 6–8 mm crochet hook, selected from the blocked swatch
- Yarn needle
- Scissors
- Locking stitch markers
- Flexible measuring tape
- Blocking mats
- Rustproof pins
Abbreviations
- ch — chain
- sc — single crochet
- hdc — half double crochet
- dc — double crochet
- sl st — slip stitch
- st/sts — stitch/stitches
- BLO — back loop only
- FLO — front loop only
- RS — right side
- WS — wrong side
Finished Fit and Measurements
The cardigan in the photograph has a loose silhouette with considerable positive ease. The front remains open, the shoulders are relaxed and the hem extends well below the hip.
Measure:
- Full bust circumference
- Desired finished cardigan circumference
- Back neck to hem
- Shoulder width
- Upper-arm circumference
- Wrist circumference
- Underarm to wrist
- Desired hood depth
Add approximately 15–25 cm of positive ease to the bust for a relaxed version similar to the photograph.
| Body Bust | Suggested Finished Circumference | Typical Fit |
|---|---|---|
| 80–90 cm | 100–110 cm | Relaxed |
| 90–100 cm | 110–120 cm | Relaxed |
| 100–110 cm | 120–130 cm | Oversized |
| 110–120 cm | 130–140 cm | Oversized |
| 120–130 cm | 140–150 cm | Oversized |
These are construction targets rather than fixed commercial garment sizes. Use the intended wearer’s measurements for the final calculation.
Gauge First
Make at least a 15 × 15 cm swatch in the selected body stitch. A small swatch does not show the weight and vertical stretch of bulky yarn accurately enough for a long cardigan.
Wash and dry the swatch according to the yarn label.
Measure the central 10 cm and record both stitches and rows.
Calculate panel stitches with:
required panel width in cm × stitches per cm = starting stitch count.
Calculate length with the blocked row gauge rather than the unwashed gauge.
Main Textured Stitch
A compact alternating single-crochet texture gives an effective approximation of the dense surface in the image.
Chain an even number plus one turning chain.
Row 1: Sc in second ch from hook and across.
Row 2: Ch 1, turn. *Sc in next st, work a slightly elongated sc in next st.* Repeat across.
Row 3: Ch 1, turn. Sc across.
Row 4: Repeat Row 2, offsetting the elongated stitches if required for a more irregular texture.
Repeat Rows 3–4.
Another option is alternating BLO sc and standard sc rows. Swatch both methods and select the fabric that gives sufficient drape without losing the heavily textured appearance.
Back Panel
Yarn: Mocha Brown.
Calculate the back width as approximately half the desired finished cardigan circumference.
Example: for a finished circumference of 120 cm, begin with a blocked back width close to 60 cm.
Make the foundation chain required by your gauge.
Row 1: Sc across.
Row 2: Work the established textured stitch.
Continue in pattern until the panel reaches the desired length from hem to underarm.
Armhole Area
For a relaxed drop-shoulder cardigan, major armhole decreases are not required. Continue the panel almost rectangular and allow the shoulder extension to form part of the sleeve opening.
If a more fitted armhole is preferred, remove approximately 2–4 cm at each side over several rows.
Back Neck
Continue until the back reaches the full shoulder-to-hem measurement.
Mark a centered back-neck opening approximately 18–22 cm wide.
Leave the neck stitches unworked and finish the two shoulder sections separately if shoulder shaping is required.
Fasten off.
Left Front Panel
The front panel should be narrower than half of the back because the cardigan remains open and a separate front band will add width.
A useful starting point is approximately 40–45% of the back-panel width.
Make the required foundation chain.
Row 1: Sc across.
Rows 2 onward: Continue in the same textured stitch used for the back.
Work until the panel reaches the beginning of the neckline.
Front Neck Shaping
The photograph has a relatively high neckline because the hood begins close to the upper chest.
Decrease one stitch at the inner front edge every 2–3 rows until the shoulder width matches the corresponding back shoulder.
Continue without decreasing if additional shoulder height is required.
Fasten off.
Right Front Panel
Work the second front as a mirror image of the first.
Count rows carefully. Both front pieces must have identical hem-to-shoulder lengths before assembly.
Joining the Shoulders
Place the front panels against the back with right sides facing.
Align the shoulder edges.
Use slip stitches, single crochet or mattress stitch to join each shoulder.
Do not join across the back-neck opening.
Check the shoulder seams before proceeding. A difference of even 1–2 cm can make the hood appear twisted after attachment.
Side Seams and Armholes
Lay the garment flat.
Measure downward from each shoulder to establish the armhole depth.
For a roomy bulky cardigan, the finished armhole circumference should exceed the upper-arm circumference by approximately 8–14 cm.
Place matching markers on both sides.
Join the side seams from the hem upward to the markers.
Leave the armhole openings unseamed.
Textured Sleeves — Make Two
The sleeves in the photograph are wide and heavily textured, with a relaxed upper section and narrower wrist.
They can be worked flat and seamed for easier size control.
Sleeve Foundation
Calculate the upper sleeve width from:
upper-arm circumference + 8–14 cm ease.
Chain to this blocked width.
Row 1: Sc across.
Rows 2–4: Work in the established body texture.
Continue straight for several centimeters.
Sleeve Taper
Decrease one stitch at each end approximately every 4–8 rows.
The exact frequency depends on the difference between upper-arm and wrist measurements.
Continue until the sleeve reaches the desired wrist circumference plus approximately 2–4 cm of ease.
Stop the textured section before the cuff.
Ribbed Cuffs
The cuffs in the photograph are compact and visually denser than the sleeves.
Join yarn at the wrist.
Ch 9–13 depending on the required cuff depth.
Row 1: Sc in second ch from hook and across.
Sl st into the next two sleeve-edge stitches.
Turn.
Row 2: Skip the joining sl sts, BLO sc across the rib.
Ch 1, turn.
Row 3: BLO sc across, sl st into the next two sleeve-edge stitches.
Repeat Rows 2–3 around the wrist.
Join the first and last rib rows.
A cuff depth of approximately 7–10 cm works well with the proportions shown.
Seaming and Attaching the Sleeves
Fold each sleeve lengthwise with right sides together.
Seam from the cuff to the upper edge.
Turn the cardigan body inside out.
Insert each sleeve into its armhole with right sides facing.
Match the sleeve seam to the body side seam.
Match the center of the sleeve cap to the shoulder seam.
Use markers to divide the remaining circumference evenly.
Sew or crochet around the armhole.
Do not stretch the body opening while attaching the sleeve.
Wide Front Ribbing
The vertical front band is one of the most visible structural features of this cardigan.
It begins at one lower front corner, continues around the neckline and hood, then travels down the opposite front.
For the cleanest result, complete the hood before adding the final continuous band.
Hood Foundation
With the cardigan right side out, join yarn at the right front neckline.
Work sc evenly across the neckline, around the back neck and to the left front neckline.
Count the stitches.
The neckline should remain flat. If it gathers, too many stitches were picked up; if it pulls inward, too few were used.
Deep Crochet Hood
The photographed hood is intentionally oversized.
Row 1: Ch 1, turn, sc across.
Row 2: Work the selected textured stitch across.
Row 3: Sc across.
Continue in the established texture.
For additional hood depth, place a small number of increases around the center-back section during the first several rows.
A useful finished hood depth for many adult sizes is approximately 30–38 cm, but head size and yarn stretch should determine the final measurement.
Shaping the Hood Crown
Continue until the hood reaches from the neckline over the crown to the desired front edge when folded.
Fold the hood in half with right sides together.
Seam the upper back edge.
For a less pointed crown, work several short shaping rows or round the final corner before seaming.
Alternative Rounded Hood Crown
For a smoother hood, mark the center-back stitch while crocheting upward.
During the final 8–12 cm, decrease one stitch on each side of the center marker every second row.
Fold the remaining upper edge and seam it.
This removes some excess fabric from the crown without reducing the generous front opening.
Continuous Front and Hood Band
Measure the entire edge from one hem corner, up the first front, around the hood and down the opposite front.
Join yarn at the lower right front.
Foundation Round/Row: Sc evenly along the entire edge.
The pickup ratio must be adjusted to the row gauge. Do not force one stitch into every row end automatically.
Attached Ribbing Method
At the lower corner, ch approximately 10–14 depending on the required band width.
Rib Row 1: Sc in second ch from hook and across. Sl st into the next two edge stitches.
Turn.
Rib Row 2: Skip the joining stitches. BLO sc across.
Ch 1, turn.
Rib Row 3: BLO sc across. Sl st into the next two edge stitches.
Repeat until the ribbing travels up the first front, around the hood and down the second front.
A finished band width of approximately 6–9 cm gives the substantial frame visible in the photograph.
Preventing the Front Band from Waving
Stop after approximately 20 cm of attached ribbing and lay the garment flat.
If the band forms waves, too much ribbing is being attached to too little cardigan edge.
Increase the number of edge stitches consumed by each ribbing repeat.
If the cardigan edge puckers, the opposite problem is occurring. Attach the ribbing more frequently.
Check again around the hood because curved areas often require a different pickup ratio from the straight fronts.
Lower Hem
The image shows a simple lower edge rather than a decorative lace border.
Join yarn at one lower corner.
Row 1: Sc evenly across the hem.
Row 2: Ch 1, turn, BLO sc across.
Row 3: Sc across.
Repeat if a heavier hem is required.
The finished hem should lie flat without drawing the front corners inward.
Optional Pockets
No prominent patch pockets are visible in the reference design, so they are optional.
For practical pockets, make two rectangles approximately 16–20 cm wide and 18–22 cm tall.
Work them in the same texture as the body.
Add two compact rows of sc across the upper edge.
Position each pocket approximately 8–12 cm from the corresponding front band and at a comfortable hand height.
Sew the sides and bottom only.
Adjusting the Cardigan Length
For a hip-length cardigan, target approximately 65–75 cm from shoulder to hem.
For a mid-thigh version similar to the photograph, approximately 78–90 cm may be appropriate depending on the wearer’s height.
A longer coat-style version can extend beyond 95 cm.
Remember that bulky yarn may lengthen under its own weight. Hang the blocked swatch with a small weight for several hours if significant vertical stretching is suspected.
Yarn Quantity Planning
A long hooded cardigan consumes substantially more yarn than a basic hip-length sweater. The hood, wide front ribbing and relaxed sleeves add significant surface area.
For accurate planning, crochet and wash a measured swatch, weigh it, then calculate the approximate garment area.
For example, if a 20 × 20 cm swatch weighs 35 g:
Swatch area = 400 cm².
Yarn rate = 35 ÷ 400 = 0.0875 g per cm².
Estimate the areas of the back, two fronts, sleeves and hood. Multiply the total by the yarn rate, then add approximately 10–15% for ribbing, seams and gauge variation.
This method is more dependable than assigning a fixed gram quantity across different bulky yarns.
Making the Cardigan Lighter
If the swatch feels heavy, move to a lighter yarn before beginning the full garment.
Another option is to replace the dense textured stitch on the lower body with a slightly more open hdc-based stitch while keeping the textured sleeves and hood.
Do not simply use a much larger hook with an unsuitable yarn. Excessively loose stitches can stretch vertically and make the front bands unstable.
One-Color Construction
The monochrome mocha palette makes stitch direction more important because there is no color change to separate the garment sections.
Keep the body texture irregular or pebbled.
Use clearly vertical BLO ribbing on the cuffs and front band.
The contrast between those two textures creates the structure visible in the finished cardigan.
Alternative Yarn Colors
The same construction works in sage green, charcoal gray, oatmeal, cream, deep burgundy or muted navy.
For a softer visual effect, use a heathered yarn. For maximum stitch definition, choose a smooth solid yarn with limited halo.
Assembly
- Block the back and two front panels to their calculated measurements and confirm that both fronts have identical row counts.
- Join the shoulder seams while leaving the measured back-neck opening centered between them.
- Mark equal armhole depths on both sides and close the side seams from the hem to those markers.
- Crochet two matching sleeves, taper them gradually and add the compact BLO ribbed cuffs before seaming.
- Seam each sleeve, match its center to the shoulder and attach it evenly around the armhole without stretching either edge.
- Pick up neckline stitches and work the hood upward until it reaches the required 30–38 cm depth or the wearer-specific measurement.
- Shape and seam the hood crown, then check that it falls backward without pulling the front neckline upward.
- Work one controlled foundation row from one lower front corner, around the hood and down the opposite front.
- Add the wide attached BLO ribbing along the complete front-and-hood edge, checking every 20 cm for waves or puckering.
- Finish the lower hem, weave in all yarn tails, block the cardigan again and allow it to rest flat before checking the final length.
The finished cardigan should hang with two open fronts, a stable vertical band, relaxed sleeves and a deep hood that does not drag the neckline backward.
7 Technical Tips
- The hood pulls the cardigan backward: excessive hood weight is concentrated at the neckline. Reduce hood depth or switch to a lighter stitch if the neckline shifts more than approximately 2 cm during a fitting.
- The front bands flare into waves: too many attachment points have been used. Test the first 20 cm before continuing and reduce the pickup rate until the band lies flat.
- The sleeves feel stiff at the elbow: bulky texture is too dense for the bend point. Increase hook size slightly or work a less compact stitch through a 12–16 cm section centered on the elbow.
- The cardigan grows after blocking: the yarn has significant vertical stretch. Compare the blocked row gauge with the original swatch and shorten the body before assembly if the difference exceeds approximately 5%.
- The armhole seam forms a ridge: the sleeve circumference and armhole circumference differ too much. Their measurements should normally be within approximately 1–2 cm before joining a drop-shoulder construction.
- The cuffs become loose: BLO ribbing was worked at the same tension as the bulky sleeve. Use a hook approximately 0.5–1 mm smaller for the cuff if the ribbing does not retract after stretching.
- The hood crown forms a sharp point: too much fabric meets at the top seam. Begin paired crown decreases during the final 8–12 cm instead of closing a completely rectangular hood.
Blocking and Final Measurements
Wash the completed cardigan according to the yarn manufacturer’s instructions.
Remove excess water without twisting.
Lay the garment flat and shape the back first. Align both front panels, then straighten the sleeves.
Arrange the hood last. Measure from the center back neck to the crown and compare both sides.
Allow the cardigan to dry completely before hanging it. A heavy wet cardigan should not be suspended from a hanger because its own weight can stretch the shoulders and hood.
Care
Store a heavy crochet cardigan folded rather than hanging for long periods. This reduces shoulder distortion and prevents the hood from gradually stretching the neckline.
After several wears, measure the cardigan from shoulder to hem. If it has lengthened significantly, wash and reshape it flat before adjusting any seams.
Conclusion
A successful chunky hooded crochet cardigan pattern depends more on gauge, finished weight and edge control than on complicated shaping. Make the large blocked swatch first, calculate the back and front widths from the wearer’s measurements, and keep the body construction simple. Add the sleeves before the hood so the garment can be tested for weight and balance. The final wide ribbed band should frame both fronts and the hood without waves. Photograph the finished texture in natural light and share the project on Pinterest or Instagram with #MochaHoodedCrochetCardigan. For this design, would you keep the warm mocha brown or make the same oversized hooded version in sage green?








