Introduction
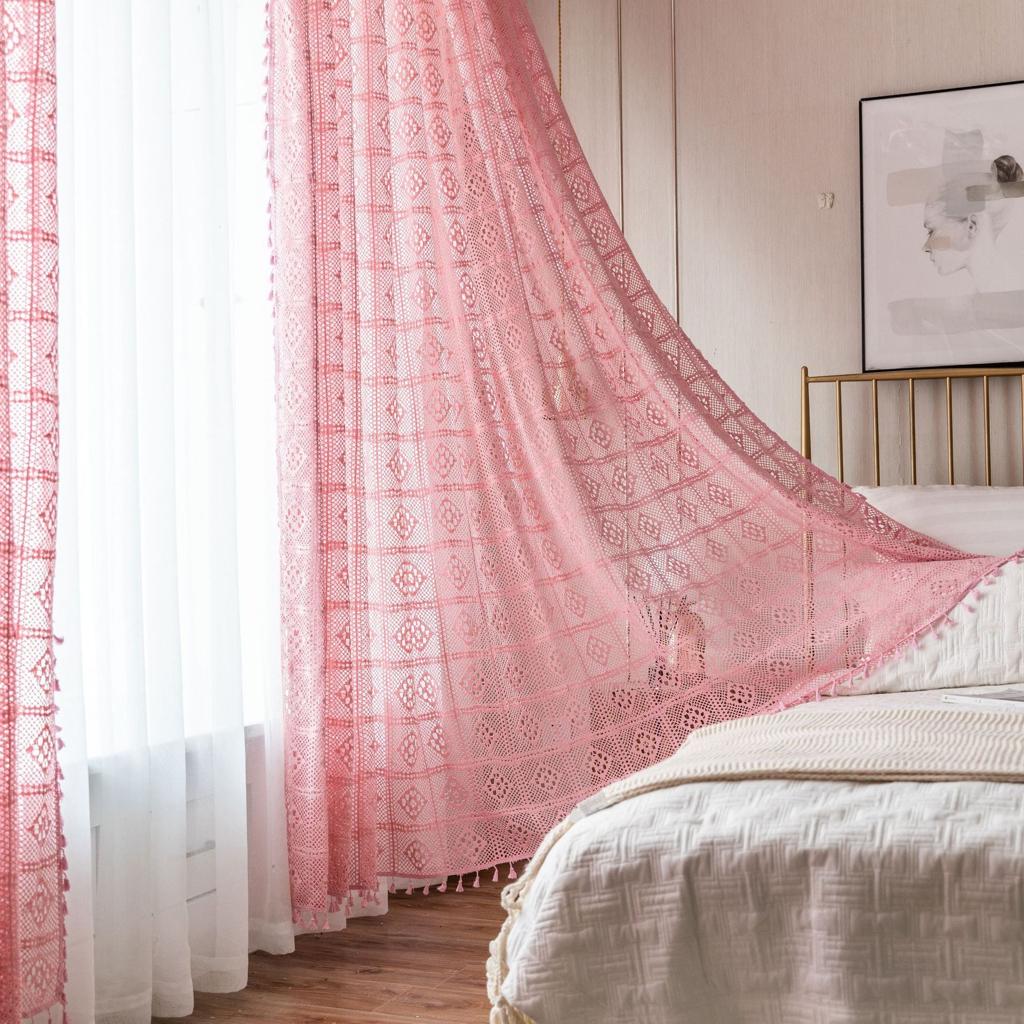
A floor-length crochet curtain has one technical problem that a small lace panel does not: every extra row adds weight that can stretch the openings below it. This pink filet crochet curtain pattern uses fine cotton yarn, repeated diamond motifs, narrow structural bands, and a restrained lower border to create the long translucent panel shown in the reference. The construction is best suited to intermediate crocheters comfortable with filet mesh and chart-style repeats.
The Design: What Makes This Crochet Curtain Different
The curtain is built as one rectangular lace panel rather than joined motifs. Its main field alternates open filet mesh with small filled diamonds arranged inside a subtle geometric grid. Narrow horizontal bands divide the design and prevent a very tall panel from appearing visually unstructured.
The lower section becomes denser. Larger diamond formations create weight near the hem, while a narrow decorative edge and small tassel-like points finish the bottom without making it excessively heavy.
The most important construction decision is gauge control. A curtain that begins 130 cm wide can become noticeably narrower if later filet rows are worked more tightly. Measure the panel regularly while it is hanging vertically, not only while it lies flat on a table.
Project Information
| Skill Level | Construction | Target Size | Hook | Best For |
|---|---|---|---|---|
| Intermediate | One-piece filet crochet rectangle | Approx. 120–140 cm wide × 220–250 cm long | 2.0–2.75 mm | Bedroom windows, tall windows, decorative lace panels |
Materials and Tools
Yarn
- Dusty pink — crochet cotton, fingering or lace weight — approximately 900–1400 g depending on curtain dimensions and yarn thickness
A mercerized or tightly spun cotton is a practical choice because the geometric openings remain more clearly defined after blocking. Very elastic yarn can cause the lower half of a long curtain to stretch unevenly.
Tools
- 2.0–2.75 mm crochet hook
- Stitch markers
- Yarn needle
- Scissors
- Measuring tape
- Blocking pins
- Large blocking surface
- Curtain rod, rings, or hidden hanging loops
Abbreviations
- ch — chain
- sc — single crochet
- dc — double crochet
- tr — treble crochet
- sl st — slip stitch
- sp — space
- st/sts — stitch/stitches
- RS — right side
- WS — wrong side
Understanding the Filet Grid
The main curtain uses two basic units: an open cell and a filled cell.
Open Cell
Work:
dc in next dc, ch 2, skip 2 sts
The next dc begins the following cell.
Filled Cell
Work:
dc in next dc, 2 dc in the ch-2 space
When several filled cells sit beside one another, continue working dc across the required spaces.
The vertical dc posts form the grid lines. Keeping those posts directly above one another is what makes the diamonds look crisp.
Gauge Swatch
Before calculating the foundation chain, make a filet swatch at least 15 × 15 cm.
Use the exact yarn and hook intended for the curtain.
Work alternating open and filled cells, wash the swatch, then block it lightly.
Measure the width of 10 filet cells after drying.
For example, if 10 cells measure 8 cm and the required finished width is 128 cm:
128 ÷ 8 = 16
16 × 10 = approximately 160 cells
Adjust the number so it accommodates the selected diamond repeat.
Planning the Curtain Width
The photographed curtain is intentionally broad enough to form soft vertical folds. A panel installed completely flat will not create the same drape.
For a decorative curtain, calculate approximately 1.3–1.6 times the visible window width.
If the window area is 100 cm wide, a crochet panel between approximately 130 and 160 cm gives room for folds.
For a pair of curtains, divide the total calculated width between the two panels.
Foundation
After determining the required number of filet cells, make the foundation chain according to the standard three-stitch filet grid.
For a panel containing N cells, use:
(N × 3) + turning chains
Because cotton gauge varies significantly, confirm the width against the blocked swatch rather than relying on a fixed chain count.
Bottom Structural Foundation
Although a curtain may be crocheted from top to bottom, working from the lower decorative border upward makes it easier to control the photographed hem treatment.
For a simpler construction, however, work the main curtain from top downward and add the lower border afterward. The instructions below use that method.
Row 1
Dc across the foundation chain according to the calculated width.
This solid row provides a stable upper edge.
Row 2
Ch 3, turn.
Begin the filet grid:
dc, ch 2, skip 2 across the row, ending with a dc.
Row 3
Ch 3, turn.
Repeat the open-cell structure across.
These first mesh rows form a neutral transition before the diamond pattern begins.
Small Diamond Filet Motif
The repeating diamonds can be constructed over a nine-row section.
Each symbol below represents one filet cell:
O = open cell
X = filled cell

Row 1: O O O X O O O
Row 2: O O X X X O O
Row 3: O X X O X X O
Row 4: X X O O O X X
Row 5: O X X O X X O
Row 6: O O X X X O O
Row 7: O O O X O O O
Place one or more open cells between neighboring diamonds depending on the required spacing.
Repeat the motif evenly across the curtain width.
First Main Lace Section
Work the small diamond repeat for approximately 25–35 cm.
Maintain at least one open filet cell between adjacent motifs.
At the end of every 8–10 rows, lay the work flat and compare its width with the original blocked measurement.
If the curtain begins narrowing, the chain spaces are probably being worked too tightly.
Horizontal Divider Band
The image shows visible horizontal lines dividing the long lace field.
Create a divider with three rows:
Row 1: Dc across.
Row 2: Ch 3, *ch 2, skip 2, dc in next st* across.
Row 3: Dc across, placing 2 dc into each ch-2 space.
This creates a narrow structural band without making the curtain opaque.
Second Diamond Section
Resume the small diamond motif after the divider.
Offset the diamonds by half a repeat if the stitch count permits. This prevents the motifs from forming uninterrupted vertical columns and creates the more distributed lace appearance visible in the photograph.
Work another section approximately 25–35 cm long.
Repeating the Main Curtain Body
Continue alternating:
- 25–35 cm diamond filet sections
- 3-row structural divider bands
Stop when the main body reaches approximately 25–35 cm above the required finished length.
Reserve that remaining depth for the larger lower-border pattern.
Large Lower Diamond Border
The hem in the reference is visually denser than the main body. Use larger diamonds to create that transition.
A simplified 13-row diamond can be arranged as follows:
Row 1:  O O O O O X O O O O O
Row 2:  O O O O X X X O O O O
Row 3:  O O O X X O X X O O O
Row 4:  O O X X O O O X X O O
Row 5:  O X X O O O O O X X O
Row 6:  X X O O O O O O O X X
Row 7:  O X X O O O O O X X O
Row 8:  O O X X O O O X X O O
Row 9:  O O O X X O X X O O O
Row 10: O O O O X X X O O O O
Row 11: O O O O O X O O O O O
Repeat the larger motif across the lower edge.
If the total curtain width does not divide exactly by the repeat, center the pattern and use plain open cells at both sides.
Decorative Center Inside the Large Diamonds
A small flower-like element can be placed inside selected large diamonds.
Replace the central open cells with a compact filled formation:
O X O
X X X
O X O
This creates the appearance of a tiny floral cross without adding a separate appliqué.
Alternate decorated and undecorated diamonds if a lighter hem is preferred.
Lower Openwork Band
After completing the large diamonds, work:
Row 1: Dc across.
Row 2: *dc, ch 3, skip 3* across.
Row 3: Work 5 dc into each ch-3 space, then sc into the next space.
Adjust the final repeat at the side edge rather than forcing an extra shell.
Scalloped Hem
The bottom edge should hang evenly rather than curling toward the room.
Work one foundation row of sc across the lower edge.
Count the stitches and mark the center.
For each scallop work:
skip 2 sts, 7 dc in next st, skip 2 sts, sc in next st
Repeat across.
If the edge begins ruffling strongly, reduce the shell to 5 dc. If it pulls inward, increase selected shells to 8 or 9 dc.
Small Hanging Points
The photographed curtain has tiny decorative points along the lower edge.
These can be added between scallops.
At the sc between two shells:
ch 5, sl st back into the same sc
For a more defined point, work:
ch 7, sl st in second ch from hook and down the remaining chains, sl st into the base
Keep the points short. Heavy tassels can stretch a fine filet curtain unevenly.
Side Edging
Long vertical sides need a stable finish because exposed row ends can stretch.
Attach the pink yarn at one upper corner.
Round 1: Work sc evenly down the side edge.
A practical starting ratio is approximately 2 sc for every dc row end, but adjust according to the actual gauge.
The edge should lie flat without gathering.
Round 2: Ch 1, turn, sc in every stitch.
Repeat on the opposite side.
Optional Picot Side Finish
For a more decorative treatment, add a restrained picot after the structural sc rows.
Work:
*sc in next 4 sts, ch 3, sl st into first ch*
Repeat down the edge.
Skip this round if the curtain will slide directly beside another fabric panel, since projecting picots can catch on neighboring material.
Top Hanging Edge
The top of a long crochet curtain carries the entire weight of the panel, so it needs more reinforcement than the lower border.
Work three solid rows:
Row 1: Sc across.
Row 2: Dc across.
Row 3: Sc across.
This compact band distributes the load across the complete width.
Hidden Hanging Loops
For a simple rod installation, make loops across the wrong side of the upper band.
Mark positions approximately 6–8 cm apart.
At each marker, attach yarn and ch enough stitches to fit comfortably around the rod.
Sl st back into the upper band.
Reinforce each attachment point with several small stitches.
All loops must contain the same number of chains or the curtain will hang at different heights.
Alternative Curtain-Ring Installation
For rings, work a row of evenly spaced ch-2 openings through the top band.
Position a ring through each opening.
Do not place rings only at the corners and center. A wide filet panel needs many support points to prevent the upper edge from sagging between them.
Calculating Finished Length
Measure from the actual curtain rod to the desired hem position.
Subtract the height of the hanging loops or rings.
Then subtract approximately 2–4% from the crochet body measurement if the cotton swatch shows noticeable vertical growth after hanging.
For example, if the required visible length is 240 cm and the swatch stretches 3% vertically:
240 × 0.03 = 7.2 cm
The unweighted panel may therefore need to finish around 233 cm before final hanging and adjustment.
Testing Vertical Stretch
A tabletop measurement is not sufficient for a curtain this long.
After approximately 80–100 cm has been crocheted, temporarily suspend the work from several clips for at least a few hours.
Measure its length before and after hanging.
Record the percentage of growth.
Use that measurement when deciding where to begin the lower border.
Adjusting the Pattern for Different Windows
| Window Type | Suggested Panel Width | Suggested Length |
|---|---|---|
| Small window | 70–90 cm | 120–160 cm |
| Standard bedroom window | 100–130 cm | 180–220 cm |
| Tall window | 120–140 cm | 220–250 cm |
| Extra-wide panel | 150–180 cm | 220–260 cm |
These dimensions are construction targets. Always calculate from the actual window and the blocked gauge swatch.
Making Two Matching Panels
If making a pair, crochet both curtains at the same time whenever possible.
Work approximately 20–30 rows on the first panel, then repeat those rows on the second.
Alternate between them throughout the project.
This reduces differences caused by changing hand tension over several weeks of work.
Use yarn from the same dye lot for both panels.
Color Variations
The dusty pink shade emphasizes the geometric filet pattern while still allowing substantial light through the openings.
The same construction can also be worked in:
- Ivory for a traditional lace appearance
- Sage green for a muted botanical palette
- Dusty lavender for a cooler pastel version
- Natural beige for a neutral linen-style effect
- Soft gray for a more contemporary geometric curtain
Yarn Quantity Calculation
Because window dimensions and cotton thickness vary, calculate yarn requirements from a blocked sample rather than relying only on a fixed gram estimate.
Make a 20 × 20 cm sample containing both open and filled filet sections.
Wash, dry, and weigh it.
If the 20 × 20 cm sample weighs 12 g, its area is 400 cm².
A 130 × 240 cm curtain has an area of:
130 × 240 = 31,200 cm²
Then:
31,200 ÷ 400 = 78
78 × 12 g = 936 g
Add approximately 10–15% for denser border sections, gauge variation, side edging, and finishing.
Blocking the Curtain
Blocking is particularly important for filet crochet because it determines the final geometry of the cells.
Wash or wet the completed curtain according to the yarn instructions.
Remove excess water without twisting.
Lay the curtain on a large clean surface.
Pin the top edge first.
Measure the width at the top, middle, and bottom. Adjust until those measurements match.
Next, pin both vertical edges.
Square the small diamond motifs and align the horizontal divider bands.
Finally, shape the large lower diamonds and scallops.
Allow the panel to dry completely before removing any pins.
Assembly and Finishing
- Measure the window and determine the required finished curtain width and length.
- Make and block a filet gauge swatch before calculating the foundation chain.
- Work the reinforced upper edge and establish the open filet grid.
- Repeat the small diamond sections with structural horizontal bands between them.
- Hang-test the work after approximately 80–100 cm to measure vertical stretch.
- Continue the main field until enough length remains for the deeper lower border.
- Work the large diamond section, lower openwork band, and scalloped hem.
- Add stable sc edging to both vertical sides and correct any visible waviness.
- Make evenly spaced hanging loops or reinforced openings for curtain rings.
- Wet-block the complete panel to its final measurements, dry it flat, then install it on the curtain rod.
7 Technical Tips
- Failure mode: the filet diamonds lean sideways. Check every vertical dc post after each pattern row; a misplaced post shifts every motif above it.
- Failure mode: the curtain becomes narrower toward the bottom. Measure its width every 20–30 rows and keep ch-2 spaces at a consistent tension.
- Failure mode: the top edge sags between hanging points. Space support loops or rings approximately 6–8 cm apart rather than supporting a wide panel only at a few locations.
- Failure mode: the finished curtain becomes too long. Hang-test at least 80–100 cm of fabric before calculating the final number of rows because cotton lace can lengthen under its own weight.
- Failure mode: the hem ruffles excessively. Reduce the number of dc stitches inside each scallop if the border circumference is growing faster than the curtain width.
- Failure mode: the two side edges have different lengths. Count side-edging stitches and use the same row-end ratio on both sides rather than adding stitches by eye.
- Failure mode: the blocked diamonds lose their shape after washing. Use a tightly spun cotton and reshape the panel to measured dimensions while damp instead of hanging it wet from the rod.
Care Instructions
Wash according to the cotton yarn label using cool or lukewarm water. Avoid aggressive twisting because long wet lace carries substantial weight.
Support the complete curtain when lifting it from the water.
After washing, reshape the filet cells and dry the curtain flat whenever space permits.
If the panel needs to be hung while slightly damp, distribute its weight across all hanging points and verify the finished length before it dries completely.
Conclusion
The success of a pink filet crochet curtain pattern depends less on complicated stitches than on accurate repetition over a very large number of rows. Start with a blocked gauge sample, calculate the width from complete filet cells, and hang-test the fabric before committing to the final length. The small diamonds can then repeat through the main field while larger motifs and scallops concentrate detail near the hem. Once blocked, install the panel using closely spaced support points so its upper edge remains level. Share the finished curtain on Pinterest or Instagram with #PinkFiletCrochetCurtain. Would you keep the dusty pink shown here or work the same diamond lace in ivory?








