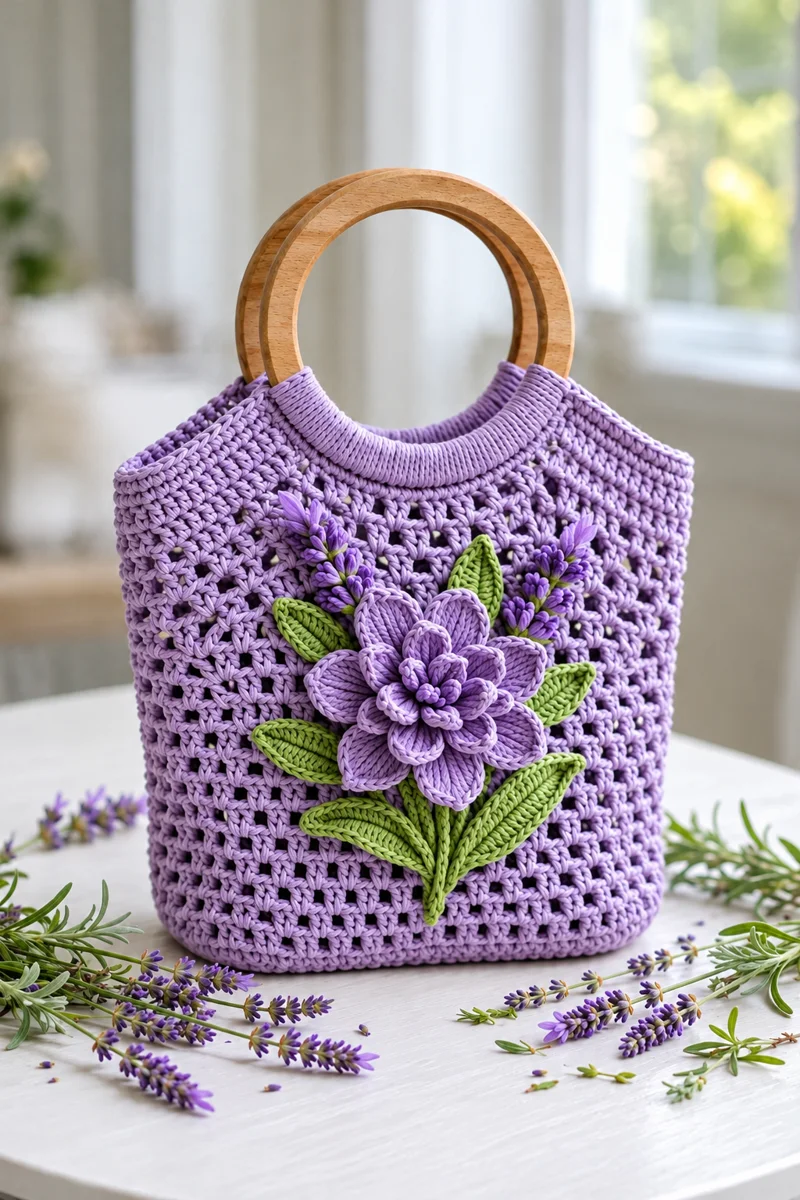
A lavender crochet tote bag needs a firm base, a stable upper edge, and enough space between its stitches to create a decorative openwork texture. This free lavender crochet tote bag pattern combines a rectangular body, circular wooden handles, layered crochet flowers, and green leaf appliqués. Designed for intermediate crocheters, the finished handbag measures approximately 30 cm wide and 29 cm tall, excluding the handles.
The Design: What Makes This Lavender Crochet Bag Different?
The main feature of this handbag is its three-dimensional floral arrangement. A large layered purple flower sits in the center, surrounded by green leaves and smaller lavender-inspired blossoms. The raised petals add depth without requiring a separate fabric panel.
The bag uses a compact base and an openwork body. This combination reduces unnecessary bulk while maintaining a recognizable rectangular silhouette. A reinforced upper edge supports the circular wooden handles.
Unlike a standard crochet tote, this floral crochet handbag requires careful placement of decorative elements. Attaching heavy appliqués too close to the upper edge can distort the bag’s shape. Positioning the main flower slightly below the center distributes the visual weight more evenly.
The crochet bag with wooden handles also benefits from a firm yarn. Cotton cord or tightly twisted cotton yarn provides better stitch definition than loosely spun acrylic.
Project Information
| Feature | Details |
|---|---|
| Skill level | Intermediate |
| Estimated time | 10–14 hours |
| Finished width | Approximately 30 cm |
| Finished height | Approximately 29 cm, excluding handles |
| Recommended hook | 4 mm |
| Construction | Flat base, worked-up body, sewn appliqués |
| Best use | Light everyday accessories |
These are proposed project specifications, not measurements verified from the photograph. Actual dimensions depend on yarn, tension, and blocking.
Materials and Tools
Yarn
- Lavender cotton cord yarn: approximately 300–350 g for the bag body and handle wrapping.
- Medium purple cotton yarn: approximately 40 g for the large flower.
- Dark violet cotton yarn: approximately 15 g for the flower center and small blossoms.
- Leaf green cotton yarn: approximately 30 g for leaves and stems.
Choose a firm cotton yarn suitable for a 4 mm crochet hook. Yarn quantities are planning estimates; they have not been measured against a completed sample.
Tools
- 4 mm crochet hook
- Two circular wooden handles, approximately 12–14 cm in outer diameter
- Yarn needle with a large eye
- Stitch markers
- Sharp scissors
- Measuring tape
- Sewing pins for arranging appliqués
- Optional fabric lining for additional structure
Crochet Abbreviations
| Abbreviation | Meaning |
|---|---|
| MR | Magic ring |
| ch | Chain |
| sc | Single crochet |
| hdc | Half double crochet |
| dc | Double crochet |
| tr | Treble crochet |
| sl st | Slip stitch |
| inc | Two stitches in the same stitch |
| dec | Decrease |
| BLO | Back loop only |
| st | Stitch |
| sp | Space |
All instructions use US crochet terminology. The bag is worked in joined rounds, while individual flowers and leaves are made separately.
Lavender Crochet Tote Bag Pattern – Step by Step
Part 1: Crochet the Rectangular Base
Yarn: Lavender cotton cord
Hook: 4 mm
The base is worked in rows to create a stable foundation.
Row 1: Ch 41. Sc in the second ch from the hook and in each remaining ch. (40 sc)
Rows 2–14: Ch 1, turn, sc in each st across. (40 sc)
The completed base should be a firm rectangle. Measure the piece before continuing. If the width differs significantly from the intended size, adjust the hook or yarn rather than stretching the base.
Do not fasten off.
Part 2: Build the Bag Sides
Work around all four edges of the rectangular base.
Round 1: Work 40 sc across the first long edge, 14 sc along the short edge, 40 sc across the opposite long edge, and 14 sc along the remaining short edge. Join with a sl st. (108 sc)
Round 2: Ch 1, sc BLO in each st around. Join. (108 sc)
Rounds 3–5: Ch 1, sc in each st around. Join. (108 sc)
The BLO round creates a defined fold between the flat base and the upright walls.
Part 3: Crochet the Openwork Body
This section creates a repeating mesh texture. Each round maintains 108 stitch positions.
Round 6: Ch 3 (counts as dc), dc in next st, *ch 1, skip 1 st, dc in next 2 sts*. Repeat from * to * around, finishing with ch 1, skip the final st. Join to the top of the beginning ch 3. (72 dc, 36 ch-1 spaces)
Round 7: Ch 1, sc in each dc and each ch-1 sp around. Join. (108 sc)
Rounds 8–23: Repeat Rounds 6–7 eight more times, alternating mesh rounds and solid sc rounds.
Rounds 24–26: Ch 1, sc in each st around. Join. (108 sc)
Check the height after Round 26. Add or remove complete two-round mesh repeats if your yarn produces a different height.
Keep the final three rounds firm. They form the upper reinforcement band for attaching the wooden handles.
Part 4: Reinforce the Upper Edge
Round 27: Ch 1, sc in every st around. Join. (108 sc)
Round 28: Repeat Round 27. (108 sc)
Fasten off and weave in the yarn tail.
The upper edge should remain level when the bag is placed flat. If it flares outward, check for accidental increases.
How to Attach the Wooden Handles
Use two circular wooden handles of equal diameter. The photograph shows lavender yarn wrapped around the lower section of each handle.
- Lay the bag flat and identify the center of the front and back panels.
- Position one wooden ring above the front opening and the second above the back opening.
- Mark an attachment area approximately 14–16 cm wide on each panel.
- Thread a yarn needle with a doubled length of lavender yarn.
- Pass the yarn through a top-edge stitch and around the wooden ring.
- Repeat closely spaced wraps along the lower arc of the handle, passing through successive upper-edge stitches.
- Return along the attachment section with a second pass for reinforcement.
- Repeat the process on the opposite side, keeping both handles centered.
For a cleaner appearance, wrap the exposed lower section of each wooden ring with additional lavender yarn. Keep the wrapping tight enough that the wood does not show between adjacent wraps.
Test both attachments with a light load before using the handbag. Wooden handles should not pull individual stitches out of alignment.
How to Crochet the Large 3D Purple Flower
The central decoration is a layered flower with overlapping petals. The following construction uses a small circular center and two petal layers.
Flower Center
Yarn: Dark violet
Round 1: Make 6 sc in MR. Join. (6)
Round 2: Inc in each st around. Join. (12)
Round 3: *Sc in next st, inc in next st*. Repeat six times. Join. (18)
Fasten off, leaving a 20 cm sewing tail.
Inner Petal Layer
Yarn: Medium purple
Join yarn to a stitch of the flower center.
Round 1: *Ch 2, skip 2 sts, sl st in next st*. Repeat six times to create six chain loops. (6 loops)
Round 2: In each ch-2 loop work (sc, hdc, 3 dc, hdc, sc). Repeat around. (6 petals)
Fasten off.
Outer Petal Layer
Yarn: Light purple
Attach yarn behind the inner petals at the base of the flower center.
Round 1: *Ch 4, sl st into the next suitable base stitch behind the petals*. Repeat six times, spacing the loops evenly. (6 loops)
Round 2: Work (sc, hdc, 5 dc, hdc, sc) into each ch-4 loop. (6 petals)
Fasten off, leaving a 25 cm sewing tail.
Arrange the outer petals behind the smaller petals. Sew the flower center securely through both layers.
For a fuller flower resembling the image, create a third petal layer using six ch-5 loops and work (sc, hdc, 7 dc, hdc, sc) into each loop.
Crochet Green Leaves (Make 6)
Yarn: Leaf green
Each leaf is worked around a foundation chain.
Round 1: Ch 13. Starting in the second ch from the hook, work sc, hdc, dc in each of the next 8 ch, hdc, sc, and 3 sc in the final ch. Continue along the opposite side of the chain with sc, hdc, dc in each of the next 8 ch, hdc, sc. Join with a sl st. (27 sts)
Fasten off, leaving a 25 cm sewing tail.
To create a visible center vein, use a yarn needle and a length of green yarn to embroider a line from the base toward the pointed tip.
Make six leaves, adjusting their positions during assembly. The leaves should extend outward from the central flower without covering the bag handles.
Small Lavender Flower Sprays (Make 2)
These narrow floral decorations are positioned above the large flower on both sides.
Green Stem
Row 1: Ch 19. Sl st in the second ch from the hook and in each remaining ch. (18 sl st)
Fasten off, leaving a sewing tail.
Small Purple Blossoms
Make approximately eight miniature blossoms per spray.
Round 1: Work 6 sc in MR. Join. (6)
Round 2: *Ch 3, sl st into the next st*. Repeat six times. (6 small petals)
Fasten off and leave a short sewing tail.
Sew the miniature blossoms along the green stem, alternating sides. Position the blossoms closer together near the upper section of the spray.
Repeat for the second spray.
How to Assemble the Floral Crochet Handbag
- Shape the bag: Lay the finished crochet body flat and align the corners of the rectangular base.
- Check the upper edge: Confirm that the opening is level and both panels have matching heights.
- Attach the handles: Secure the wooden rings to the reinforced upper edge using doubled yarn.
- Position the central flower: Place the large layered flower slightly below the midpoint of the front panel.
- Pin the flower: Use sewing pins to hold the petals in their intended positions.
- Sew the flower: Stitch through the flower base and the bag fabric without flattening the raised petals.
- Attach the leaves: Arrange three leaves on each side or distribute them around the flower as shown in the reference design.
- Add the lavender sprays: Position one small floral stem above each side of the central flower.
- Secure all yarn tails: Weave the ends through several stitches on the inside of the bag and trim excess yarn.
- Finish the handbag: Inspect the handle attachments, flower placement, and base shape. Add a fabric lining if the bag will carry small objects.
The completed handbag has a structured lavender body, two wooden handles, a raised central flower, and surrounding green and purple appliqués.
7 Technical Tips for Better Results
- Maintain accurate stitch counts. Place a stitch marker at the beginning of every round. The bag body should retain 108 stitch positions throughout the openwork section.
- Prevent base distortion. Measure the rectangular base after Row 14. Uneven tension between the starting chain and later rows can produce curved edges.
- Control the mesh spacing. Do not add extra chains between double crochet groups. Additional chains can cause the sides to expand beyond the intended width.
- Reinforce handle attachments. Use doubled yarn and a second pass of stitching around each wooden handle. A single loose row of attachment stitches may stretch under load.
- Preserve the flower’s raised texture. Sew through the base of each petal rather than its outer edge. Stitching around the entire petal perimeter will flatten the three-dimensional shape.
- Pin before sewing. Leave at least 2–3 cm between the highest floral decoration and the handle attachment area. This reduces crowding near the bag opening.
- Secure decorative yarn tails. Weave each tail through at least 4–5 cm of neighboring stitches. Short unsecured tails can work loose when the handbag is handled repeatedly.
How to Adjust the Size of Your Crochet Tote Bag
The width of the handbag is determined primarily by the starting chain of the rectangular base. To make a wider bag, increase the foundation chain and work additional single crochet stitches across every row.
The mesh pattern repeats over three stitch positions. When resizing, adjust the perimeter stitch count to a multiple of three so the openwork repeats fit evenly.
For a taller handbag, add complete pairs of mesh and solid rounds. Each additional pair maintains the original stitch arrangement.
To make a smaller handbag, reduce the number of foundation chains and the number of base rows. Recalculate the perimeter before beginning the side rounds.
Handle diameter also affects the final proportions. Smaller wooden rings suit compact handbags, while larger rings create a wider opening and more prominent handle detail.
Should You Add a Fabric Lining?
A lining is recommended when the bag will carry keys, cosmetics, pens, or other small objects. The openwork crochet body contains spaces through which narrow items may slip.
Cut two fabric panels using the finished bag as a template, allowing approximately 1 cm for seam allowances. Sew the side and bottom seams, then fold the upper edge inward.
Insert the lining into the crochet body with the seams facing outward toward the yarn fabric. Hand-stitch the upper edge to the inside of the bag, just below the wooden-handle attachment line.
Keep the lining slightly shorter than the crochet body so it does not pull on the base when the bag is filled.
How to Care for a Crochet Bag with Wooden Handles
Spot-clean the crochet fabric using a damp cloth and a mild detergent suitable for cotton. Avoid soaking untreated wooden handles, since prolonged moisture exposure may affect their finish.
After cleaning, reshape the bag and allow it to dry flat in a ventilated area. Do not suspend a wet handbag from its handles because the additional water weight may stretch the attachment stitches.
Store the bag upright with lightweight paper inside to help maintain its rectangular shape. Avoid compressing the raised floral decoration beneath heavier accessories.
Conclusion
This lavender crochet tote bag pattern combines a rectangular single crochet base, alternating openwork rounds, reinforced wooden handles, and individually sewn floral appliqués. The construction can be adapted by changing the foundation chain, body height, flower arrangement, or handle diameter. Before making a second version, record the finished measurements and actual yarn consumption from your completed bag.
For a closer match to the reference photograph, focus on the proportion of the large central flower and the placement of the green leaves. Save the finished handbag to Pinterest or share it on Instagram using #LavenderFloralCrochetBag.
Would you position the six green leaves symmetrically around the flower or arrange them in a more natural botanical pattern?









