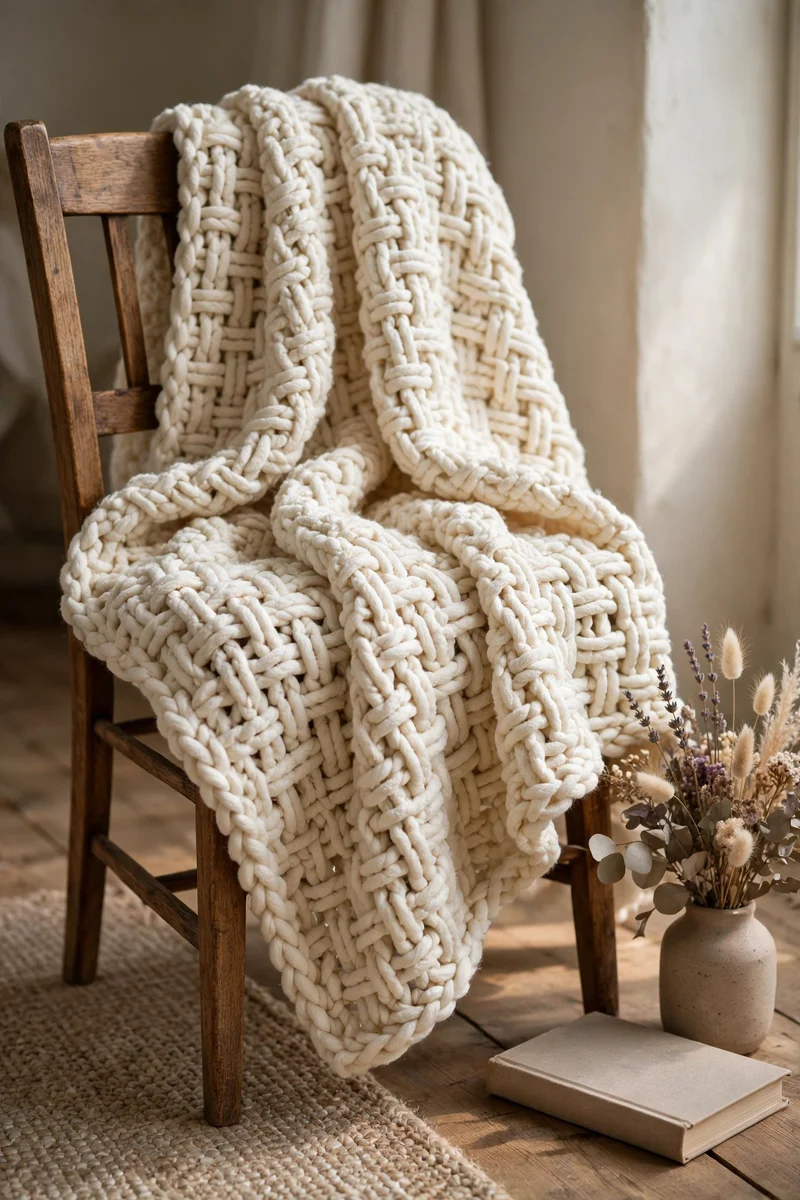
A basketweave blanket gets its raised checkerboard texture from alternating groups of front and back post double crochet stitches. This chunky basketweave crochet blanket pattern uses super bulky yarn, a large crochet hook, and a repeating eight-row stitch sequence to produce a thick, textured throw. The project is designed for intermediate crocheters who can identify stitch posts and maintain consistent tension across wide rows.
The Design: What Makes This Basketweave Blanket Different
The blanket shown in the reference image features oversized woven-looking sections, deep vertical ridges, and a substantial cream-colored border. Its texture resembles interlaced strips of yarn rather than a flat crochet fabric. To reproduce that appearance, the pattern uses front post double crochet (FPdc) and back post double crochet (BPdc) stitches.
Each group of four post stitches forms a raised or recessed block. After four textured rows, the stitch orientation reverses, creating the characteristic basketweave effect. The resulting fabric is thicker than ordinary double crochet and requires more yarn per square centimeter.
A common mistake when making a chunky crochet blanket is using a hook that is too small for the yarn. This compresses the post stitches, reduces flexibility, and makes the raised pattern difficult to distinguish. The hook must be large enough to accommodate the yarn while keeping the fabric structured.
The original image has an especially pronounced, oversized texture. The following pattern is a practical crochet interpretation of that design rather than an exact reconstruction of its unusually large interlocking strands.
Project Information at a Glance
| Feature | Details |
|---|---|
| Skill Level | Intermediate |
| Estimated Time | 15–25 hours |
| Finished Size | Approximately 120 × 150 cm (47 × 59 inches) |
| Recommended Hook | 10 mm (US N/P) |
| Yarn Weight | Super bulky / Category 6 |
| Construction | Flat rows with a four-stitch basketweave block |
| Color | Ivory or warm cream |
| Best For | Sofa throws and decorative blankets |
Finished measurements, time, and yarn usage are planning estimates. Make a gauge swatch before purchasing the full quantity of yarn.
Materials and Tools
Yarn
- Warm ivory or cream super bulky yarn (Category 6): approximately 1,800–2,400 g, depending on yarn density, gauge, and border width.
- Suggested yarn: Bernat Blanket or another soft super bulky yarn suitable for a 10 mm crochet hook.
- Optional border yarn: 150–250 g reserved from the total yarn quantity.
Yarn brands differ substantially in weight per meter. Compare the total meterage on the ball labels, not just the number of skeins. A short gauge swatch will provide a more reliable estimate than the blanket’s photographed appearance.
Tools
- 10 mm crochet hook, or the size needed to obtain a flexible fabric.
- Large-eye tapestry needle for weaving in ends.
- Stitch markers for identifying the first and last stitch of each row.
- Measuring tape for checking width and length.
- Scissors for cutting yarn.
Crochet Abbreviations
- ch: Chain
- sc: Single crochet
- dc: Double crochet
- FPdc: Front post double crochet
- BPdc: Back post double crochet
- sl st: Slip stitch
- st: Stitch
- rep: Repeat
- RS: Right side
- WS: Wrong side
This pattern uses US crochet terminology. The turning chain counts as one double crochet stitch, but it is not included in the four-stitch basketweave blocks.
Understanding the Basketweave Crochet Stitch
The basketweave pattern depends on the placement of post stitches. Unlike ordinary double crochet, which is worked into the top loops, a post stitch wraps around the vertical body of a stitch in the previous row.
Front Post Double Crochet (FPdc)
- Yarn over.
- Insert the hook from front to back and then to the front again around the post of the indicated stitch.
- Yarn over and pull up a loop.
- Yarn over and pull through two loops.
- Yarn over and pull through the remaining two loops.
The completed stitch projects toward the side of the fabric facing the crocheter.
Back Post Double Crochet (BPdc)
- Yarn over.
- Insert the hook from back to front and then to the back again around the indicated stitch post.
- Yarn over and pull up a loop.
- Complete the double crochet by pulling through two loops twice.
The completed stitch projects away from the crocheter, producing a recessed area on the working side.
Alternating these two stitch types creates the raised blocks. Their orientation must be adjusted when the work is turned so that the ridges remain aligned on the right side of the blanket.
Chunky Basketweave Crochet Blanket Pattern
Construction: The blanket is crocheted flat, turning after every row. Its main fabric contains 80 pattern stitches plus two edge stitches, giving a total of 82 stitches per completed row.
Foundation: Chain 84. Work the first double crochet into the fourth chain from the hook. The three skipped chains count as the first double crochet, producing 82 stitches in Row 1.
Step 1: Foundation Row
Row 1 (WS): Dc in the fourth chain from the hook and in every remaining chain. Turn. (82 sts)
This row provides the vertical posts required for the basketweave pattern. Count the stitches before proceeding. The first three skipped chains form the turning-chain edge stitch.
Step 2: First Basketweave Block
Row 2 (RS): Ch 3 (counts as dc), skip the first stitch, *FPdc around each of the next 4 stitches, BPdc around each of the next 4 stitches*. Repeat from * to * 10 times in total. Dc in the top of the turning chain. Turn. (82 sts)
Row 3 (WS): Ch 3 (counts as dc), skip the first stitch, *FPdc around each of the next 4 stitches, BPdc around each of the next 4 stitches*. Repeat 10 times. Dc in the top of the turning chain. Turn. (82 sts)
Row 4 (RS): Repeat Row 2. (82 sts)
Row 5 (WS): Repeat Row 3. (82 sts)
The first group of raised and recessed rectangles is now complete. Four textured rows form one half of the eight-row basketweave repeat.
Step 3: Reverse the Texture
Row 6 (RS): Ch 3 (counts as dc), skip the first stitch, *BPdc around each of the next 4 stitches, FPdc around each of the next 4 stitches*. Repeat 10 times. Dc in the top of the turning chain. Turn. (82 sts)
Row 7 (WS): Ch 3 (counts as dc), skip the first stitch, *BPdc around each of the next 4 stitches, FPdc around each of the next 4 stitches*. Repeat 10 times. Dc in the top of the turning chain. Turn. (82 sts)
Row 8 (RS): Repeat Row 6. (82 sts)
Row 9 (WS): Repeat Row 7. (82 sts)
The second group reverses the raised sections of the first group. This creates the alternating woven appearance visible across the blanket.
Step 4: Continue the Basketweave Repeat
Repeat Rows 2–9 until the main blanket measures approximately 145 cm in length, or until it reaches the desired length before adding the border. Finish after Row 5 or Row 9 for a complete four-row block.
Measure the blanket while it lies flat on a table or floor. Do not stretch the fabric during measurement. Thick yarn can expand when lifted, so measuring the hanging fabric may produce an inaccurate length.
The number of rows needed depends on the actual height of the post stitches. For example, a four-row block measuring 8 cm will produce a different total row count from a block measuring 10 cm. Use the measured length rather than an assumed fixed number of repeats.
Adding the Thick Crochet Border
The reference blanket has a substantial textured edge. A simple single crochet border followed by a raised finishing round provides structure without adding excessive bulk.
Border Round 1
With the right side facing, join the yarn at a corner.
- Ch 1 and work sc evenly along the first edge.
- Place 3 sc in the corner.
- Continue along the next edge, distributing stitches evenly.
- Work 3 sc in each remaining corner.
- Join with a sl st to the first sc.
Along the long edges, begin with approximately two single crochet stitches for every three double crochet row ends. Adjust the spacing if the border pulls inward or ripples.
Border Round 2
Ch 1 and work one sc into each stitch around the blanket. Work 3 sc in the center corner stitch at each corner. Join with a sl st.
Border Round 3
Repeat Border Round 2, keeping the corner increases aligned. Fasten off and leave a 15–20 cm yarn tail for weaving.
For a heavier edge, add one more round of single crochet. Check that the corners lie flat before adding extra thickness.
How to Adjust the Blanket Size
The stitch pattern uses a multiple of eight pattern stitches plus two edge stitches. Because the foundation chain includes three chains that form the first edge stitch, the starting chain is a multiple of eight plus four.
| Pattern Blocks | Foundation Chains | Stitches per Row |
|---|---|---|
| 6 | 52 | 50 |
| 8 | 68 | 66 |
| 10 | 84 | 82 |
| 12 | 100 | 98 |
| 14 | 116 | 114 |
These counts are exact for the stitch repeat, but the resulting widths depend on yarn thickness, hook size, and tension.
To calculate a custom width, crochet a swatch containing at least three complete eight-stitch blocks. Measure the central portion without stretching it. Divide the desired width by the measured width per block, then round to a whole number of blocks.
For the length, repeat the eight-row sequence until the fabric approaches the intended measurement. Remember to reserve enough yarn for the border.
Choosing the Right Yarn for a Chunky Blanket
Super bulky yarn creates thick raised sections and reduces the number of rows required for a large blanket. However, not all Category 6 yarns behave alike.
Chenille-style yarn produces a soft surface but may hide some of the definition between individual post stitches. Smooth, round yarn displays the stitch structure more clearly. A very thick tubular yarn can create an oversized woven effect closer to the reference photograph, although it may require a much larger hook and different stitch counts.
For a washable sofa throw, check the manufacturer’s washing and drying instructions. Large textured blankets become heavy when wet, particularly when made from dense yarn.
Before buying the entire quantity, crochet a 20 × 20 cm test swatch. Measure the yarn consumed and weigh the swatch if a kitchen scale is available. This helps estimate the quantity required for the complete project.
Seven Technical Tips for Better Basketweave Texture
- Mark the edge stitches: Place a stitch marker in the first and last stitch of every row. Missing an edge stitch can reduce the width by one stitch and distort the border.
- Check the stitch count: The main pattern must maintain 82 stitches in every completed row. A count of 81 or 83 indicates a missed or duplicated stitch.
- Control hook tension: If the raised blocks become rigid, test a hook 1 mm larger. A hook that is too small compresses the posts and reduces drape.
- Work around the correct post: Insert the hook around the vertical stitch body rather than through the top loops. Incorrect insertion produces ordinary double crochet instead of basketweave texture.
- Check each reversal: Change the stitch orientation after every four textured rows. Reversing after three or five rows creates uneven rectangular blocks.
- Pin before finishing: Lay the blanket flat and pin the corners to check its rectangular shape. If one edge is shorter, inspect the row ends before adding the border.
- Secure yarn tails: Weave each tail through at least 10–15 cm of surrounding stitches, changing direction once. Short tails can work loose when a heavy blanket is washed or stretched.
Common Basketweave Crochet Problems
Why Is My Blanket Curling?
Curling often results from tight foundation chains, dense post stitches, or an uneven border. Compare the width of the foundation edge with the width of the completed fabric. If the foundation is noticeably narrower, remake it with a larger hook or use a foundation double crochet technique adapted to the required stitch count.
Why Are My Basketweave Blocks Uneven?
Uneven blocks usually result from inconsistent post stitch placement or an incorrect row reversal. Count four stitches per block and four rows per orientation before changing the texture.
Why Is the Blanket Too Stiff?
Dense yarn and a small hook can produce a rigid fabric. Crochet a second swatch with a larger hook and compare how both samples drape. Increasing hook size may also increase the finished blanket dimensions.
Why Are the Edges Wavy?
Wavy edges may appear when the border contains too many stitches. Remove the border round and work fewer stitches along the row ends, keeping the corner increases consistent.
Finishing and Care Instructions
After completing the border, cut the yarn and pull the tail through the final loop. Use a large-eye tapestry needle to weave the tail through several nearby stitches, reverse direction, and trim the remaining yarn.
Lay the blanket flat and inspect all four sides. The edges should remain reasonably straight, with no noticeable pulling at the corners. Measure the finished width and length after the fabric has relaxed.
For chenille or plush yarn, follow the washing instructions on the yarn label. If machine washing is permitted, use a gentle cycle and avoid overloading the machine. Large blankets may require a commercial-capacity washer.
Dry the blanket according to the yarn manufacturer’s instructions. Avoid excessive heat when working with heat-sensitive synthetic fibers. Store the blanket folded rather than hanging it for long periods, since the weight of the fabric can stretch the stitches.
Frequently Asked Questions
Is the Basketweave Crochet Stitch Suitable for Beginners?
The basketweave stitch is best suited to crocheters who already know double crochet and can maintain consistent stitch counts. The main challenge is learning front and back post stitches and reversing their orientation at the correct rows.
How Much Yarn Is Needed for a Chunky Basketweave Blanket?
A 120 × 150 cm blanket may require approximately 1,800–2,400 g of super bulky yarn, but the actual amount depends on yarn construction and gauge. A weighed swatch gives a more accurate estimate for the chosen yarn.
Can I Use a Different Crochet Hook Size?
Yes. A larger hook creates a looser fabric, while a smaller hook produces tighter stitches. Changing hook size also affects the width, length, yarn consumption, and appearance of the finished blanket.
Can I Make This Blanket With Two Colors?
Yes. One option is to change colors after each complete eight-row repeat. Another is to use one color for the main fabric and a contrasting color for the border. Color changes should occur at the end of a row to keep the transition clean.
Does Basketweave Crochet Use More Yarn Than Regular Double Crochet?
Generally, yes. Post stitches wrap around existing stitches and create a thicker, more three-dimensional fabric. This construction typically consumes more yarn than a flat double crochet fabric of comparable dimensions.
Conclusion
This chunky basketweave crochet blanket pattern uses an eight-row repeat, 82-stitch working rows, and a structured single crochet border to create a thick rectangular throw. The finished dimensions depend on the selected yarn, hook size, and individual gauge, so measure the fabric regularly during construction.
Before beginning a full-size blanket, make a three-block swatch and check the appearance of the raised texture. Record the swatch dimensions and yarn consumption for future projects.
Share your finished blanket on Pinterest or Instagram using #ChunkyBasketweaveBlanket. Did you choose a smooth super bulky yarn for defined stitch blocks or a plush chenille yarn for a softer surface?









