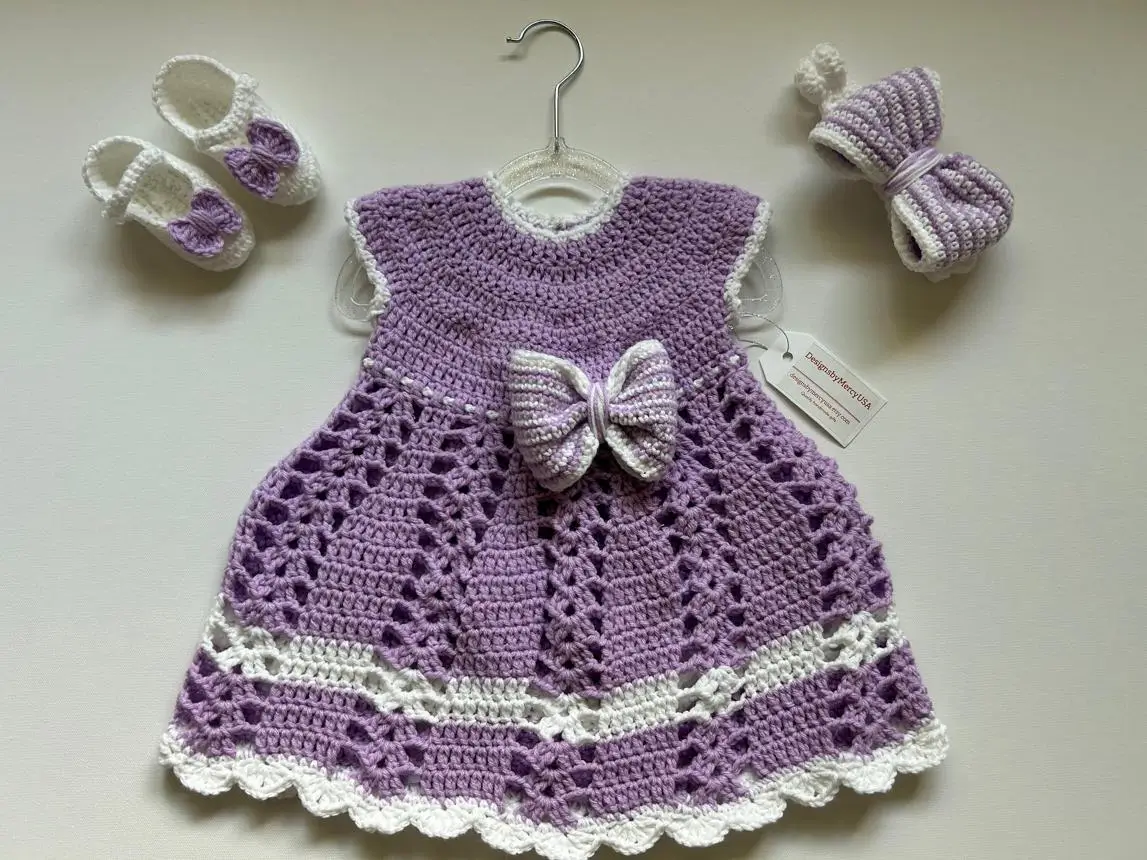
The lavender skirt changes from solid crochet to open lace before finishing in a crisp white scalloped edge, so the expansion has to be planned before the decorative rows begin. This crochet baby dress pattern is a photo-inspired construction for a sleeveless yoke dress with a large striped bow, matching baby shoes and a small striped hat. Use soft DK baby yarn with a 3.5–4 mm hook and size the garment from the child’s actual chest measurement.
The Design: What Makes This Baby Dress Different
The dress is built from the neckline downward. A compact round yoke creates the shoulders and upper bodice, then the work is divided for two armholes. Below the waist, increases are concentrated before and inside the lace sections so the skirt gains width without producing a heavy gathered seam.
The lower skirt alternates solid lavender panels with vertical openwork columns. A narrow white stripe interrupts the lavender near the hem, while the final white shell border repeats the pale edging around the neckline and armholes. The large lavender-and-white bow is made separately and attached only after the dress has been blocked. This prevents the bow from pulling the lightweight skirt out of alignment.
Project Information at a Glance
| Skill Level | Construction | Yarn | Hook | Set Includes |
|---|---|---|---|---|
| Intermediate | Top-down round yoke | DK / light #3 | 3.5–4 mm | Dress, bow, shoes and hat |
Materials and Tools
Yarn
- Lavender — soft DK/light #3 yarn — main dress, bow and accessories
- White — matching DK/light #3 yarn — neckline, armholes, hem stripe and accessory details
Choose a washable yarn intended for baby garments. Make the gauge swatch with the same hook and yarn that will be used for the dress.
Tools
- 3.5–4 mm crochet hook
- Yarn needle
- Scissors
- Stitch markers
- Measuring tape
- Blocking mat
- Rustproof blocking pins
Abbreviations
- ch — chain
- sc — single crochet
- hdc — half double crochet
- dc — double crochet
- tr — treble crochet
- sl st — slip stitch
- sp — space
- st/sts — stitch/stitches
- inc — increase
Sizing the Dress
Baby sizing varies considerably between yarns and individual children. Measure the chest before choosing the final stitch count.
Add approximately 4–6 cm of positive ease to the actual chest measurement. The completed bodice circumference should reach that number before the skirt begins.
| Approximate Age | Target Garment Chest | Approximate Dress Length |
|---|---|---|
| 0–3 months | 44–46 cm | 34–37 cm |
| 3–6 months | 46–49 cm | 37–40 cm |
| 6–12 months | 49–52 cm | 40–44 cm |
| 12–18 months | 52–55 cm | 44–48 cm |
| 18–24 months | 54–58 cm | 47–52 cm |
These are project targets rather than a substitute for the child’s measurements.
Gauge Swatch
Make a swatch at least 12 × 12 cm in hdc or dc.
Wash and dry it as the finished garment will be treated. Measure the central 10 cm and record both stitch and row gauge.
Use:
required circumference × stitches per cm = approximate bodice stitch count.
Round the result to a number compatible with the lace repeat selected for the skirt.
Pattern — Step by Step
Neckline Foundation
Yarn: Lavender.
Make a foundation chain that passes comfortably over the child’s head. If a smaller neck opening is preferred, leave a short back opening and add a button loop instead.
Join carefully without twisting.
Round 1: Ch 2. Work one hdc in each chain around. Join with sl st.
Round 2: Ch 2. Work hdc around, distributing increases evenly approximately every 5–7 stitches.
Round 3: Repeat the increase round, spacing the increases between those from the previous round.
The neckline must remain flat rather than forming a bowl.
Round Yoke
Continue in lavender.
Round 4: Ch 2, hdc around with evenly distributed increases.
Round 5: Ch 3, dc in each st around, increasing approximately 8–12 times across the round according to size.
Round 6: Ch 3, dc around. Place each increase between the previous round’s increase points.
Round 7: Repeat Round 6 if additional yoke depth is required.
Round 8: Work one hdc in every stitch without increasing.
Measure from the neckline to the underarm. Continue the yoke until that depth matches the intended size.
Divide for the Armholes
Lay the yoke flat and mark four positions: front left, front right, back right and back left.
The front and back sections should contain similar stitch counts. Each sleeve section occupies the remaining stitches between them.
Work across the back section.
Chain enough stitches to bridge the first underarm, usually approximately 4–7 cm depending on size.
Skip the sleeve stitches.
Work across the front.
Make the second underarm chain, skip the second sleeve section and finish the round.
Count the body stitches after the division and record the number.
Upper Bodice
Round 1: Ch 2. Hdc in each stitch and each underarm chain around.
Round 2: Ch 3. Dc in every stitch around.
Rounds 3–5: Repeat solid dc or hdc rounds until the bodice reaches the intended high-waist position.
Keep this area relatively dense. The photograph places most of the openwork below the upper bodice rather than directly across the chest.
Skirt Expansion Round
The skirt needs more circumference than the bodice.
Work one dc in each stitch while adding an increase approximately every 5–7 stitches.
For a fuller skirt, use more increases. For a straighter silhouette, increase less frequently.
Check the fabric after the next solid round. It should flare gently without rippling.
First Lavender Lace Section
A practical lace repeat for the photographed effect uses solid stitch groups separated by chain spaces.
Round 1: Ch 3. *Dc in next 4 sts, ch 2, skip 2 sts.* Repeat around. Adjust the final repeat symmetrically.
Round 2: Work dc into the dc stitches. Ch 2 over each ch-2 space.
Round 3: Repeat Round 2.
Round 4: Over selected solid groups work:
2 dc, ch 2, 2 dc
to introduce controlled expansion.
Open Diamond Lace
For a more open section similar to the vertical lace areas visible in the skirt:
Round 1: *Sc in next suitable space, ch 5, skip to next structural space.* Repeat around.
Round 2: Sl st into first ch-5 loop. *Sc in loop, ch 5.* Repeat around.
Round 3: Repeat, offsetting the attachment points slightly where needed to form diamond-shaped openings.
Round 4: Into each ch-5 loop work approximately 5 sc to create a stable foundation for the next solid section.
The exact number can be adjusted by one stitch where necessary to keep the skirt flat.
Solid Lavender Panel
Round 1: Ch 3 and work dc evenly around.
Round 2: Dc in every stitch.
Round 3: Repeat, adding a small number of evenly distributed increases if more skirt flare is required.
This dense band separates the two lace sections and gives the lower skirt enough weight to hang vertically.
Second Lace Section
Repeat the open diamond lace sequence.
Keep the openings aligned with the lace above where possible.
If the circumference has increased, add complete pattern repeats instead of stretching individual chain spaces.
White Decorative Stripe
Change to White.
Round 1: Ch 2, hdc evenly around.
Round 2: Ch 3, dc around.
Round 3: *Sc in next 3 sts, ch 3, skip 2 sts.* Repeat around.
The white band should remain narrow. Its function is to separate the lavender lower panel from the final hem rather than dominate the skirt.
Final Lavender Hem Section
Change back to Lavender.
Round 1: Work hdc evenly around.
Round 2: Dc around.
Round 3: Repeat the lace pattern used earlier or work a compact sequence of dc groups separated by ch-2 spaces.
Round 4: Hdc around to create a stable foundation for the white scallops.
White Scalloped Hem
Yarn: White.
Join at a side position.
Work:
*sc in next st, skip 2 sts, 5 dc in next st, skip 2 sts.*
Repeat around.
If the stitch count does not fit the six-stitch repeat exactly, distribute one or two adjustments along the back half of the dress.
The shells should lie flat. Crowded shells produce a ruffled hem.
White Neckline Edging
Join white yarn at the back neckline.
Round 1: Sc evenly around.
Round 2: Work *sl st, ch 2, sl st in next st* around for a compact picot-style finish.
Do not add excessive stitches around the neckline because that can make it flare outward.
White Armhole Edging
Work one round of white sc around each armhole.
At the underarm, skip an occasional stitch if the edge begins to ripple.
Add a second decorative round only if the opening remains flexible.
Large Lavender and White Bow
The bow is a major visual feature of the dress and should be constructed separately.
First Bow Wing
Use alternating Lavender and White rows.
Ch 13.
Row 1: Sc in second ch from hook and across. (12)
Rows 2–4: Ch 1, turn, sc across. (12)
Row 5: Increase once at each end. (14)
Rows 6–9: Sc across. (14)
Row 10: Decrease once at each end. (12)
Fasten off.
Second Bow Wing
Make an identical piece.
Bow Assembly
Place the two wings with their narrow ends meeting.
Wrap lavender yarn tightly around the center several times.
Crochet a small rectangular center band approximately 2–3 cm wide and wrap it around the gathered center.
Sew the band closed on the back.
Attach the bow at the front waist through the center only. Leave the outer wings relatively free so they retain dimension.
Matching Baby Shoes — Make Two
Yarn: White with Lavender bow.
Sole
Make a foundation chain approximately 2 cm shorter than the desired finished foot length.
Round 1: Work sc along one side of the chain, place 4–5 sc into the final chain, work back along the opposite side, then place 3–4 sc into the first chain.
Round 2: Hdc around, increasing several times at the toe and heel curves.
Round 3: Sc around without increasing.
The sole should lie flat.
Shoe Sides
Work one round of sc in the back loops only.
Then work 1–2 rounds of hdc without increases.
Shape the Toe
Mark the central toe section.
Work decreases across the marked stitches while maintaining normal stitches around the heel.
Repeat until the opening has the desired shape.
Shoe Strap
Chain enough stitches to cross the upper foot comfortably.
Work one row of sc back across the chain.
Sew one end securely to the shoe.
For a decorative version, make a tiny lavender bow and stitch it permanently to the top rather than using small detachable components.
Small Lavender Shoe Bow
Ch 5.
Work 4 sc across for three rows.
Make two small rectangles.
Pinch them together at the center and wrap with lavender yarn.
Sew firmly to the shoe.
Repeat for the second shoe.
Matching Striped Baby Hat
The accessory visible in the photograph is a small tapered hat with lavender-and-white stripes and a pom-pom.
Because head circumference changes rapidly during infancy, work from an actual measurement.
Hat Foundation
Begin at the crown with lavender.
Round 1: MR, 8 hdc. (8)
Round 2: 2 hdc in each st. (16)
Round 3: *Hdc, 2 hdc in next st.* Repeat. (24)
Round 4: *Hdc in next 2 sts, 2 hdc in next st.* Repeat. (32)
Continue increasing at the same rate until the crown diameter suits the required head circumference.
A useful calculation is:
head circumference ÷ 3.14 = approximate flat crown diameter.
Hat Body
Once the crown reaches the required diameter, stop increasing.
Work hdc rounds while alternating lavender and white every round or every two rounds.
Continue until the hat reaches the required depth.
White Hat Edge
Change to white.
Work one round of sc.
Add a second sc round if a firmer edge is required.
Pom-Pom
Make a small yarn pom-pom and attach it firmly to the crown.
For infant clothing, secure decorative elements with repeated sewn passes and inspect them before every use.
Optional Pointed Hat Shape
For a more tapered hat like the accessory in the image, begin with fewer stitches and increase more gradually.
Start with 6 hdc and increase only six stitches per round until the required crown circumference is reached.
This creates a longer, narrower crown instead of a standard rounded beanie shape.
Matching Striped Bow for the Hat
Make two small striped rectangles using alternating lavender and white rows.
Each rectangle can measure approximately 5–7 cm long depending on hat size.
Stack or overlap them, pinch at the center and wrap several times with lavender yarn.
Sew the bow to the hat rather than attaching it with a pin.
Adjusting the Skirt Fullness
The amount of flare is controlled primarily before the first lace section.
For a moderately flared dress, increase the bodice stitch count by approximately 20–30% before establishing the skirt pattern.
For a fuller skirt, increase closer to 35–45%, then distribute additional increases across later solid rounds.
Do not add a large number of increases directly into the open chain rounds. That can produce irregular holes and a wavy hem.
Making a Longer Dress
Add length inside the repeating skirt sections rather than adding many extra rows after the white stripe.
One additional solid round followed by two or three lace rounds can extend the skirt while preserving the original proportions.
Measure from the shoulder to the intended hem after every major section.
Yarn Estimation
The exact quantity depends on size, yarn construction, skirt fullness and gauge. Weighing a swatch provides a more reliable estimate than using the photograph.
For planning purposes, a small baby dress set in DK yarn may require several hundred grams across the two colors, with lavender accounting for most of the total.
Buy all lavender yarn for the dress from the same dye lot when possible because color differences become visible across the broad solid sections.
Assembly
- Complete the lavender round yoke and verify the neckline measurement before dividing for the sleeves.
- Mark equal front and back sections, form both underarms and crochet the upper bodice to the intended waist position.
- Increase for the skirt and work the alternating solid and openwork lavender sections.
- Add the narrow white decorative stripe, lower lavender section and white scalloped hem.
- Work the white neckline and armhole edging, then weave in all garment ends.
- Crochet the striped bow wings, assemble the bow and sew its center securely to the front of the dress.
- Make two matching shoes, checking that both soles have identical stitch counts and finished lengths.
- Add the shoe straps and permanently sew one lavender bow to each shoe.
- Crochet the striped hat to the required head measurement and securely attach its pom-pom and optional bow.
- Wash or damp-block the pieces according to the yarn label, dry them flat and inspect every decorative attachment before use.
The finished set consists of a lavender lace dress with white trim, a dimensional striped waist bow, matching shoes and a coordinated striped hat.
7 Technical Tips
- The neckline stands away from the neck: too many increases were placed in the first yoke rounds. Remove several increases before continuing because the problem becomes more visible after the white edging is added.
- The armholes pull upward: the underarm chains are too short. Measure the arm opening before continuing the bodice and add enough chains to provide approximately 1–2 cm of movement allowance beyond the body measurement.
- The skirt develops horizontal waves: the expansion round contains too many increases. Reduce the increase frequency before starting the lace because openwork exaggerates excess circumference.
- The lace diamonds become different sizes: a chain space has been added or omitted. Place a marker after every complete pattern repeat and recount the round before proceeding.
- The white hem ruffles heavily: too many shells are being fitted into the foundation. Remove one shell repeat at several evenly distributed points until the edge lies flat.
- The waist bow droops: its center attachment area is too narrow. Sew through approximately 2–3 cm of the bow center while leaving the outer wings free.
- The two shoes finish at different lengths: the increases at the toe or heel are inconsistent. Count every sole round and compare both pieces before building the sides.
Baby Garment Safety
Avoid loose beads, buttons or detachable decorations on garments intended for infants. The photograph shows decorative details, but a handmade version should favor securely crocheted or embroidered elements.
Keep ties short and avoid long cords around the neckline. Check bows, pom-poms and appliqués regularly for loose yarn.
The garment should also allow unrestricted movement through the chest, armholes and leg area.
Care and Finishing
Wash according to the yarn manufacturer’s instructions. Place the dress flat while damp and arrange the skirt into its natural flare.
Shape every white shell individually along the hem. Do not stretch the lace vertically because that can make the solid and openwork sections finish at different circumferences.
Dry the shoes and hat in their intended shapes rather than flattening them completely.
Conclusion
This lavender crochet baby dress pattern combines a practical top-down yoke with a more decorative lace skirt, allowing the chest and length to be adjusted before the hem is completed. Begin with a washed gauge swatch, calculate the bodice from the required chest measurement and test the fit before working the first lace section. Complete the dress before sizing the bow so its width can be judged against the finished bodice. The same lavender-and-white sequence can then be repeated across the shoes and hat for a coordinated set. Share the completed project on Pinterest or Instagram with #LavenderCrochetBabyDress. Would you keep the large bow at the front waist or move it to the back of the dress?









