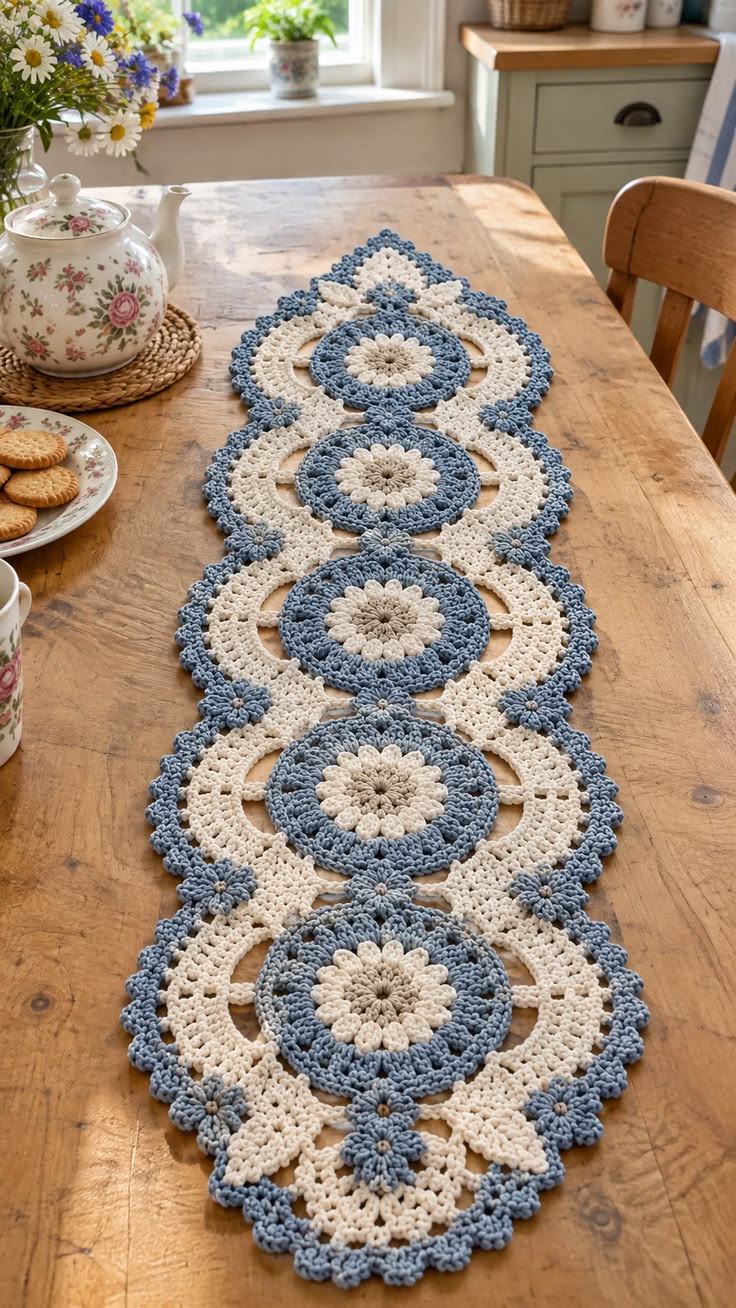
Five circular flower medallions have to meet without turning the center line of this runner into a chain of bulky seams. This floral medallion crochet table runner pattern uses separate blue-and-cream motifs, open side arches and small connector flowers to reproduce the structure visible in the reference. Use cotton or a cotton-blend DK yarn with a 3.5–4 mm hook. The finished width targets approximately 28–32 cm, while the length can be changed by adding or removing medallions.
The Design: What Makes This Table Runner Different
The runner is organized around large circular medallions rather than conventional squares. Each medallion begins with a cream flower, expands through a dusty-blue circular frame, then transitions into cream openwork sections that create the elongated outline. Small blue flowers sit between neighboring motifs and along the outer edge, disguising connection points that would otherwise look abrupt. A narrow blue scalloped border gives the runner a continuous silhouette.
The critical construction decision is to keep the decorative flower center independent from the joining structure. If every connection is made directly through the blue circular medallion, the runner can pinch between motifs. The cream arches distribute that tension across a wider area and keep the long edges relatively flat.
Project Information at a Glance
| Skill Level | Construction | Target Width | Hook | Best For |
|---|---|---|---|---|
| Intermediate | Joined circular medallions | 28–32 cm | 3.5–4 mm | Dining tables, consoles and sideboards |
Materials and Tools
Yarn
- Dusty Blue — DK/light worsted — medallion rings, small flowers and outer edging
- Warm Cream — DK/light worsted — central flowers, openwork frames and connecting arches
- Optional Beige — small amount for flower centers
Mercerized cotton gives the motifs stronger stitch definition. A soft cotton blend produces more drape but may require firmer blocking around the open arches.
Tools
- 3.5–4 mm crochet hook
- Yarn needle
- Scissors
- Stitch markers
- Blocking pins
- Blocking mat
- Measuring tape
Abbreviations
- MR — magic ring
- ch — chain
- sc — single crochet
- hdc — half double crochet
- dc — double crochet
- tr — treble crochet
- sl st — slip stitch
- sp — space
- st/sts — stitch/stitches
Finished Size and Layout
The runner shown uses approximately five large medallions arranged in a straight line. For this photo-inspired version, target a finished medallion section of approximately 26–30 cm across after the cream openwork has been added.
A five-medallion runner will generally finish around 120–150 cm long, depending on yarn, gauge and the amount of overlap created at each connection.
| Large Medallions | Approximate Runner Length | Suggested Use |
|---|---|---|
| 3 | 75–90 cm | Small table or console |
| 4 | 95–120 cm | Medium dining table |
| 5 | 120–150 cm | Long dining table |
| 6 | 145–175 cm | Large table |
| 7 | 170–200 cm | Extra-long table |
Make and block one complete medallion before deciding the final motif count.
Pattern — Step by Step
Cream Center Flower — Make One per Medallion
Yarn: Warm Cream.
Round 1: Make MR. Ch 1 and work 12 sc into the ring. Join with sl st. (12)
Round 2: Ch 1. Work 2 sc in every st around. Join. (24)
Round 3 — Petal Foundations: *Sl st in next st, ch 4, skip 1 st, sl st in next st.* Repeat around to create 12 evenly distributed loops.
Round 4 — Petals: Into each ch-4 loop work:
(sc, hdc, 3 dc, hdc, sc).
Repeat in all 12 loops.
Fasten off.
The finished center should form a dense daisy-like flower rather than a flat circular disk.
Dusty-Blue Circular Foundation
Yarn: Dusty Blue.
Join blue yarn behind the cream flower, working into the available foundation stitches rather than through the tips of the petals.
Round 1: Work 24 sc evenly around the flower base. Join. (24)
Round 2: Ch 3, dc in same st, 2 dc in every st around. Join. (48)
Round 3: Ch 3. *Dc in next st, 2 dc in next st.* Repeat around. Join. (72)
Check the work on a flat surface.
If the circle cups upward, the round needs slightly more expansion. If it ripples, reduce the rate of increase on the following round.
Blue Texture Round
Ch 1.
Work one hdc in each stitch around.
Join with sl st.
Do not increase unless the medallion has begun to cup.
This round creates the substantial blue ring visible around the cream flower.
Decorative Blue Edge Around the Circle
Work:
*sc in next 3 sts, ch 2, skip 1 st* around.
Adjust the final repeat if necessary so the spaces remain evenly distributed.
Into each ch-2 space on the following round work:
(sc, hdc, dc, hdc, sc).
These small arches soften the transition between the dense blue circle and the larger cream framework.
Fasten off.
Cream Openwork Frame
Yarn: Warm Cream.
Mark four points around the blue circle: top, bottom, left and right.
These markers determine the direction of the runner and prevent the openwork from becoming asymmetrical.
Round 1
Join cream yarn at the top marker.
Work:
*sc into the blue edge, ch 5, skip approximately one blue arch, sc into the next suitable point*.
Repeat around while maintaining equal loop sizes.
At the four marked points, use a slightly larger ch-7 loop.
Join.
Round 2
Into each regular ch-5 loop work:
(sc, hdc, 4 dc, hdc, sc).
Into each marked ch-7 loop work:
(sc, hdc, 3 dc, 2 tr, ch 3, 2 tr, 3 dc, hdc, sc).
The four larger sections establish the elongated framework around the circular center.
Large Cream Side Arches
The photograph contains prominent open spaces between the blue center and the cream outer sections. Do not fill those spaces with dense stitches.
Join cream yarn near one marked side.
Ch 12–16, depending on gauge.
Attach the chain to the next structural point with sc.
Repeat at the corresponding position on the opposite side.
Work back across each chain with evenly spaced sc or hdc.
The completed arch should lie flat without pulling the circular center outward.
Cream Leaf-Shaped Sections
The pointed cream sections between medallions can be formed from tapered rows.
Attach cream yarn to one large outer space.
Row 1: Work 9 hdc across the selected space. (9)
Row 2: Ch 1, turn. Skip first st, hdc across to final two sts, hdc2tog. (7)
Row 3: Ch 1, turn. Skip first st, hdc across, hdc2tog at end. (5)
Row 4: Ch 1, turn. Skip first st, hdc across, hdc2tog. (3)
Row 5: Hdc3tog. Ch 2 and fasten off.
Work sc evenly around the tapered section to define the edges.
Repeat at the required top, bottom and side positions.
Small Blue Connector Flowers
Make enough for the spaces between medallions and the decorative side points.
Yarn: Dusty Blue.
Round 1: MR, work 8 sc into ring. Join. (8)
Petals: In each stitch work:
(sl st, ch 2, 2 dc, ch 2, sl st).
Repeat around for eight compact petals.
Fasten off, leaving a 20 cm tail for attachment.
Optional Flower Center
With cream or beige yarn, make a French-knot-style embroidered center or attach a tiny crocheted knot.
For a table textile, crocheted or embroidered centers are preferable to loose beads.
Joining Two Large Medallions
Block the first two medallions before joining.
Place them end to end with the directional markers aligned.
Bring the two pointed cream sections toward each other.
Join the tips with several firm whip stitches using cream yarn.
Next, connect the adjacent cream arches with:
ch 3, sc into opposite arch, ch 3, sc back into first arch.
Repeat symmetrically on both sides of the center line.
Position one small blue flower over the central connection and sew through its center only.
The flower hides the structural join while its petals remain dimensional.
Join the Full Runner
Repeat the same connection between every pair of large medallions.
After joining three motifs, place the runner on a table and inspect the center line.
The medallions should form a straight axis.
If the runner bends at a connection, one side arch is shorter than its partner. Undo that connection and correct it before adding more motifs.
Dusty-Blue Outer Scalloped Edge
The blue edging ties the isolated medallions into one continuous runner.
Join blue yarn to an outer cream section.
Foundation Round
Work sc around the available outer edge.
Across large open areas, use chain bridges rather than stretching sc across the gap.
A useful starting bridge is:
ch 4 or ch 5, sc into the next structural point.
Scallop Round
Work around the foundation:
*sc, hdc, 3 dc, hdc, sc* into each suitable outer loop.
For smaller loops, reduce the shell to:
(sc, hdc, 2 dc, hdc, sc).
Maintain the same shell size along matching sections of the runner.
Decorative End Points
The two ends can be made more pointed than the long sides.
At each end, establish one large cream triangular section.
Begin with approximately 15 hdc across the available opening.
Decrease one stitch at each side on every row until three stitches remain.
Work those final three stitches together.
Edging the triangle with blue sc creates a clean point.
Add one small blue flower immediately below the point to repeat the connector-flower detail.
Blocking the Runner
Blocking is structural for this project because several circular and openwork components have to share one straight center line.
Pin the runner on a flat blocking surface.
Start with the center of every large medallion.
Measure from one center to the next. Keep this distance consistent throughout the runner.
Next pin the outermost left and right edges.
Shape the cream arches without stretching them beyond their natural length.
Finally pin each blue scallop individually.
Allow the runner to dry completely before removing the pins.
Adjusting the Width
For a narrower runner, reduce the cream outer framework rather than shrinking the blue central flower medallion.
For a wider runner, add one additional cream mesh round before the blue scalloped edging.
A finished width around 28–32 cm gives proportions similar to the photographed design.
Short Table Runner Version
Use three large medallions.
This version works well on a small dining table, coffee table or console.
Keep the decorative pointed sections at both ends so the shorter runner still has a finished composition.
Long Dining Table Version
Use five or six medallions.
Do not simply add motifs until the runner reaches the exact table length. Leave visible table surface at both ends unless an overhanging runner is specifically wanted.
Because every additional motif adds another connection, check the runner for lateral bending after each join.
Matching Placemat Version
One complete medallion can be adapted into a round or slightly oval placemat.
Omit the pointed joining section.
Complete the cream framework around all sides and add the blue scalloped edge.
Target approximately 30–36 cm across for a decorative place setting, adjusting the outer rounds according to the diameter of the dinnerware.
Matching Coaster Version
Use only the cream center flower and the first two dusty-blue rounds.
Add one cream sc round followed by a small blue scalloped edge.
Block to approximately 10–12 cm.
For drink coasters, cotton yarn is preferable because it handles moisture more predictably than many plush synthetic fibers.
Alternative Colorways
Sage and Cream
Replace dusty blue with muted sage green and retain the warm cream flower centers.
Navy and Ivory
A dark navy outer structure gives stronger contrast and emphasizes the circular medallions.
Dusty Rose and Cream
Use muted pink for the circular rings, connector flowers and scalloped edging.
Gray and White
Medium gray with soft white produces a neutral version suited to modern table settings.
Estimating Yarn
Do not calculate yarn from the photograph. Make one complete blocked medallion and weigh the blue and cream yarn separately.
For example, if one completed section uses 38 g cream and 28 g blue, a five-medallion runner would require approximately:
- Cream: 190 g before additional joining and end sections
- Blue: 140 g before the final border and connector flowers
Add approximately 15% for joins, edging, swatching and tension differences. These numbers are calculation examples only; replace them with the weight of your own test motif.
Assembly
- Crochet one cream center flower and complete its dusty-blue circular foundation as the master motif.
- Add the cream openwork frame, side arches and pointed sections, then block the complete master medallion.
- Measure the blocked motif and calculate how many medallions are required for the desired runner length.
- Crochet the remaining large medallions using the master motif as the size reference.
- Make the small dusty-blue connector flowers and keep their attachment tails uncut.
- Arrange all large motifs in a straight line and align their top and bottom directional points.
- Join neighboring cream sections first, then connect the matching side arches without pulling the medallions together.
- Sew a small blue flower over each major connection and add the remaining flowers at the decorative side positions.
- Work the blue foundation edging and scalloped outer border continuously around the assembled runner.
- Weave in every tail, block the complete runner to a straight center line and shape each scallop before drying.
The completed runner forms a continuous sequence of cream-centered blue floral medallions surrounded by open cream arches, small connector flowers and a dusty-blue scalloped edge.
7 Technical Tips
- The circular center becomes bowl-shaped: the blue rounds are expanding too slowly. Place the motif flat after every round and distribute additional increases before continuing with the cream framework.
- The medallion ripples: too many increases have been added around the blue circle. Remove the excess before blocking; blocking cannot permanently correct a heavily ruffled foundation.
- The runner curves sideways: the paired joining arches are different lengths. Measure corresponding left and right connections before fastening them permanently.
- The cream arches sag: their chains are too long for the selected yarn. Reduce each large arch by one or two chains rather than tightening the stitches used to cover it.
- The connector flowers distort the joins: the petals have been sewn down. Attach each small flower mainly through its center so it hides the seam without pulling the surrounding openwork inward.
- The blue border ruffles: too many shells are being forced around the perimeter. Remove one shell repeat wherever the edge begins forming a visible wave.
- The runner changes length after washing: the open chain sections have not been tested. Wash and block the master medallion before calculating a five- or six-motif table runner.
Care and Finishing
Follow the washing instructions for the chosen yarn. Cotton table runners can become substantially heavier when wet, so support the full piece when moving it after washing.
Dry the runner flat.
Do not hang it vertically while wet because the open cream arches can lengthen under the weight of the medallions.
After drying, reshape the cream center petals and small blue flowers with your fingers. Check that every joining flower remains firmly attached before placing the runner on the table.
Conclusion
The defining feature of this blue and cream floral medallion crochet table runner is the separation between the dense circular centers and the lighter structural framework around them. Complete one medallion first, block it, then use its actual dimensions to calculate the final runner length. Join neighboring motifs through the cream framework rather than pulling the blue circles together, and cover the major intersections with the small blue flowers. The same construction can be reduced to a placemat or coaster set. Share the finished runner on Pinterest or Instagram with #BlueFloralMedallionRunner. Would you keep all five center flowers cream, or alternate cream and dusty-blue centers along the table?









