Introduction
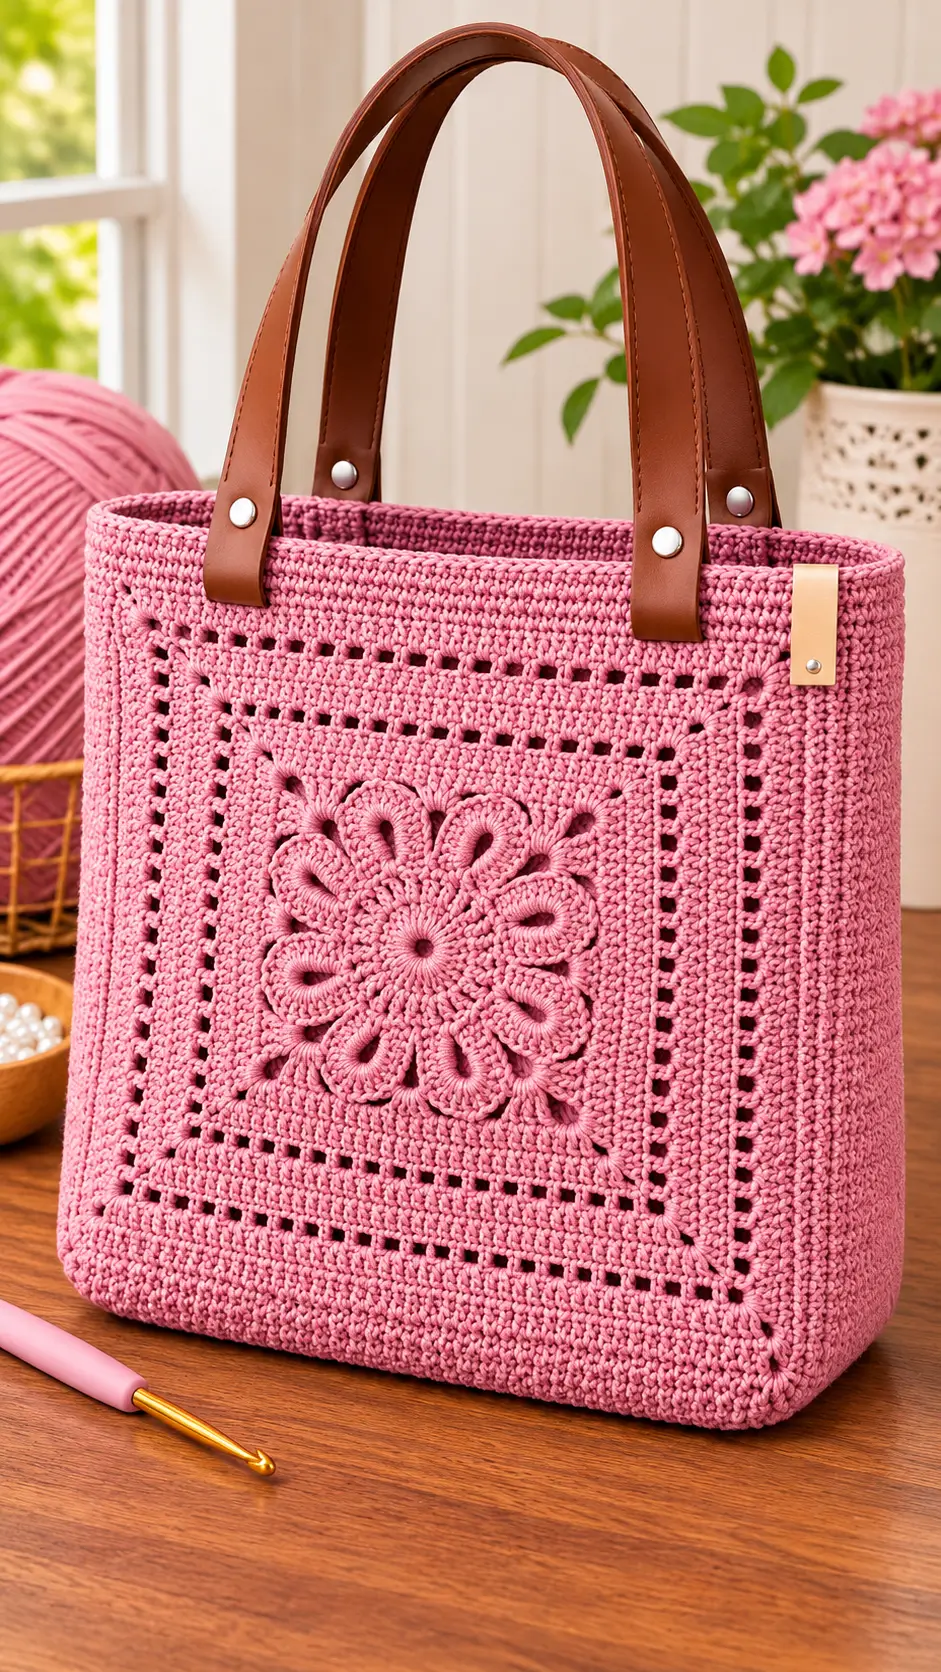
Four silver rivets hold brown handles above the raised flower on this pink tote. This pink floral crochet tote bag pattern uses worsted cotton, a 4 mm hook, an eight-petal applique, and an approximately 33 × 35 × 10 cm rectangular body. The construction is intermediate-level. Its dense walls and reinforced attachment points make it more practical for carrying small daily items than an entirely openwork bag.
The Design: What Makes This Floral Tote Different
Unlike an all-granny-square shopper, this version places one relief flower on a solid front wall. The dense single-crochet body carries the load; the applied panel is decorative. Keeping those functions separate reduces stretching around the openwork border when the bag holds objects.
A rectangular base produces defined corners and depth, rather than the curved bottom common in round totes. You will build the raised flower crochet applique with eight large chain-loop petals, then attach it to a nearly square backing panel.
The crochet bag with leather handles requires another structural decision: every rivet passes through a backing patch, never unsupported crochet stitches. An error is placing the central flower beneath handle attachment points. That forces seams to carry weight and pulls the petals out of alignment. Keep the flower centered and the handle load in the upper rim.
Project Info at a Glance
| Skill Level | Time | Finished Size | Hook | Best For |
|---|---|---|---|---|
| Intermediate | Varies by crocheter | Approx. 33 × 35 × 10 cm | 4.0 mm | Light errands, craft supplies, everyday storage |
The finished dimensions are calculated targets rather than measurements from a tested sample. Actual measurements depend on yarn, tension, and gauge.
Materials and Tools
Yarn
- Dusty pink — worsted #4, 100% cotton — approximately 350 g: For the rectangular base and main bag body. Suggested yarn: Knit Picks Dishie or Lion Brand 24/7 Cotton.
- Matching dusty pink — worsted #4 cotton — approximately 70 g: Reserved for the decorative framed panel and raised flower.
- Total estimated yarn — 420 g: Purchase 450–500 g if your gauge differs or you plan to enlarge the bag.
Using the same yarn weight and dye lot throughout the project keeps the floral decoration visually consistent with the body.
Tools
- 4.0 mm crochet hook for the main construction.
- 3.5 mm crochet hook (optional) for tighter decorative edging.
- Two brown leather or faux-leather handles, approximately 58–60 cm long and 2–2.5 cm wide.
- Four double-cap rivets with a matching setting tool.
- Four leather or canvas reinforcement patches, approximately 3 × 3 cm each.
- One tan decorative tab, approximately 2 × 4 cm.
- Additional small rivet for the decorative tab.
- Stitch markers for tracking rounds and corners.
- Yarn needle for sewing components together.
- Sharp scissors and measuring tape.
- Blocking pins for shaping the floral panel.
- Cotton lining fabric (optional).
- Plastic canvas base insert (optional).
Choose rivet post lengths according to the combined thickness of the leather, crochet fabric, and reinforcement material. Do not attach handles directly to unsupported crochet stitches.
Abbreviations and Gauge
| Abbreviation | Meaning |
|---|---|
| MR | Magic ring |
| sc | Single crochet |
| inc | Increase: 2 sc in the same stitch |
| dec | Single-crochet decrease |
| sl st | Slip stitch |
| ch | Chain |
| BLO | Back loop only |
| hdc | Half double crochet |
| dc | Double crochet |
| tr | Treble crochet |
| st | Stitch |
| sp | Space |
| RS | Right side |
An invisible decrease is made by passing the hook through the front loops of two adjacent stitches and completing one single crochet.
Gauge: Approximately 16 single crochet stitches and 17 rows per 10 cm using a 4 mm hook.
Make a 12 × 12 cm swatch and measure the central 10 cm without stretching the fabric. Adjust your hook size if the stitches are noticeably tighter or looser than the suggested gauge.
Pattern terminology: US crochet terms.
Pattern — Step by Step
The rectangular base is worked in turned rows. The bag walls are worked in a continuous spiral. The floral square and raised flower are crocheted separately and attached during assembly.
Rectangular Base (Make 1)
Yarn: dusty pink cotton.
Foundation: Chain 53.
Row 1: Sc in the second chain from hook and each remaining chain. Turn. (52)
Rows 2–18: Ch 1, sc in each stitch. Turn after Rows 2–17. (52 stitches per row)
The rectangle should measure approximately 32.5 × 10.5 cm at the suggested gauge.
Do not fasten off after Row 18.
Perimeter Round P1: Rotate the base and crochet around its outside edges:
- Work 16 sc along the first short side.
- Work 52 sc along the foundation edge.
- Work 16 sc along the second short side.
- Work 52 sc along the last long edge.
Total: 136 sc.
The corner positions are included in these counts. Do not add extra corner stitches.
Place a stitch marker in the first stitch of the following round.
Tote Body and Upper Rim (Make 1)
Yarn: dusty pink cotton. Work in a continuous spiral unless stated otherwise.
R1: Sc BLO around. (136)
R2–R15: Sc in each stitch. (136 per round)
R16–R30: Sc in each stitch. (136 per round)
R31–R45: Sc in each stitch. (136 per round)
R46: [Sc in next 3 stitches, ch 1, skip next stitch] × 34. (102 sc + 34 ch-1 spaces = 136 positions)
R47: Sc in every sc and every ch-1 space. (136)
R48–R60: Sc in each stitch. (136 per round)
R61: Work one loose sl st into each stitch around the opening. (136)
Fasten off and leave a 20 cm yarn tail.
The upper eyelet round creates a decorative band while keeping most of the tote fabric dense. Measure the body height before completing the final section, and adjust the number of plain rounds if necessary.
Front Floral Square (Make 1)
Yarn: dusty pink cotton. The square is worked in rows with a decorative outer border.
Foundation: Chain 37.
Row 1: Sc in second chain from hook and across. (36)
Rows 2–38: Ch 1, turn, sc across. (36 per row)
Fasten off the row-working yarn.
Mark the four corners. Join new yarn at a corner.
Decorative Square Border
Border R1: Work 36 sc along each of the four edges, including one stitch at each corner and distributing stitches evenly along the sides. Join. (144)
Border R2: Sc around, replacing the stitch at each marked corner with 3 sc. Mark the middle stitch of each new corner group. (152)
Border R3: Beginning at a marked corner, repeat on each side: sc in corner, [ch 1, skip next stitch, sc in next stitch] × 18, sc in the final stitch before the next corner. (80 sc + 72 ch-1 spaces = 152 positions)
Border R4: Sc into each stitch and chain space, working 3 sc in each marked corner. (160)
Border R5: Sc around, working 3 sc in each marked corner. (168)
Border R6: Beginning at a marked corner, repeat on each side: sc in corner, [ch 1, skip next stitch, sc in next stitch] × 20, sc in the final stitch before the next corner. (88 sc + 80 ch-1 spaces = 168 positions)
Border R7: Sc into each stitch and chain space, working 3 sc in each marked corner. (176)
Fasten off, leaving a 40 cm sewing tail.
Join the border rounds with slip stitches. Travel slip stitches used to reach a corner do not count toward the stated round totals.
Lay the square on a flat surface and block it into an even shape before attaching the flower.
Raised Eight-Petal Flower (Make 1)
Yarn: matching dusty pink cotton.
R1: 6 sc in MR. (6)
R2: Inc × 6. (12)
R3: [1 sc, inc] × 6. (18)
R4: [2 sc, inc] × 6. (24)
R5: [Sl st in next stitch, ch 18, skip next 2 stitches] × 8. Join the last chain to the first anchoring slip stitch. (8 chain loops)
R6: Into each chain-18 loop, crochet:
- 1 sc
- 2 hdc
- 6 dc
- 2 tr
- 6 dc
- 2 hdc
- 1 sc
Repeat the same stitch sequence around all eight loops. (20 stitches per petal, 160 stitches total)
R7: Sl st into each stitch of R6, moving around all eight petals. (160)
Fasten off and leave a 45 cm tail for sewing.
Work the petal stitches around the chain loops, rather than placing one stitch into each individual chain.
Shape the petals into elongated loops. The center should remain circular, with all eight petals distributed evenly around it.
For stronger raised detailing, add short surface slip-stitch lines along the centers of individual petals. These extra contours help reproduce the three-dimensional floral appearance of the reference bag.
Leather Shoulder Handles (Make 2)
Material: brown leather or faux leather.
Prepare two matching straps approximately 58–60 cm long.
Position two attachment points on the front wall and two corresponding points on the back wall.
Each point should sit approximately 8 cm inward from its nearest side edge.
Allow the lower end of each strap to overlap the upper crochet wall by at least 3 cm.
Punch holes that match the chosen rivet diameter. Place one reinforcement patch behind every attachment point.
Secure the four ends with suitable double-cap rivets, following the hardware manufacturer’s setting instructions.
Important: All four handle attachments must pass through the reinforced bag wall. Decorative crochet eyelets should not support the bag’s weight.
Tan Decorative Side Tab (Make 1)
Material: tan leather-look scrap.
Cut one small rectangle measuring approximately 2 × 4 cm.
Round the lower corners if desired.
Position the tab below the upper rim on the right side of the front panel.
Attach it with a small rivet and backing patch, or use strong hand stitching where appropriate.
This component is decorative and should not carry weight.
Optional Fabric Lining (Make 1)
Material: plain cotton fabric.
Cut a fabric rectangle measuring approximately 44 × 80 cm.
Fold it crosswise into a 44 × 40 cm pouch.
Sew both side seams with approximately 1 cm seam allowance.
Box the two lower corners to form roughly 10 cm of depth.
Fold the upper raw edge inward by approximately 2 cm.
Place the lining inside the crochet bag and adjust the upper fold to sit below the rim.
Stitch the lining into place, avoiding the handle rivets.
A fitted lining helps prevent keys and other small objects from catching on the decorative eyelet openings.
Assembly
- Shape the base. Turn the lower corners outward along the BLO ridge. Place the body on a level surface and check that it stands evenly.
- Check the body. Confirm that the opening still contains 136 stitch positions and that the front and back panels lie flat.
- Block the decorative square. Pin the corners into an even square and allow the cotton to dry completely.
- Attach the flower. Center the eight-petal applique on the decorative panel. Sew around the central circle and secure the base of every petal.
- Position the panel. Place it on the front of the tote, approximately 3–4 cm below the upper rim. Pin each edge before sewing.
- Sew the panel. Use small whip stitches along its outer solid border. Keep the eyelet openings free and avoid pulling the tote fabric inward.
- Insert the optional lining. Match the boxed lining corners to the bag base, fold the upper edge inward, and stitch it below the crochet rim.
- Attach the leather handles. Align the four strap ends, position the backing patches, and set the rivets according to the hardware instructions.
- Secure the decorative tab. Position it near the right upper front edge and attach it with its own backing or secure stitches.
- Finish the bag. Weave in all yarn ends, inspect the seams and rivets, and test the bag with a light load before regular use.
The completed tote has a rectangular cotton body, one raised floral front panel, two brown shoulder handles, and an optional fabric lining.
7 Technical Tips for a Better Crochet Tote Bag
- Mark the base corners. A misplaced corner marker can shift the 16-stitch short side and distort the intended 136-stitch circumference. Check all four corners before beginning the walls.
- Watch for bottom bowing. A base that bows more than 1 cm while empty can indicate loose tension or uneven perimeter stitches. Adjust the stitch distribution before building additional height.
- Maintain even eyelet tension. Oversized chain spaces can distort the decorative band and make the upper wall look uneven. Each chain-1 opening should remain close to the width of one single crochet stitch.
- Pin the flower before sewing. If one petal extends more than 1 cm farther from the center than its opposite petal, reshape it. Secure the bases before stitching down the remaining decorative edges.
- Check rivet post length. A post that is too short may not lock through the leather, crochet, and backing patch. An excessively long post may leave a loose, unstable attachment.
- Respect the panel-to-rim spacing. Placing the decorative square less than 3 cm below the rim can interfere with handle placement. Measure the position before stitching the square permanently.
- Secure every yarn tail. Tails woven through fewer than approximately 5 cm of dense stitches may work loose during use. Weave them through several neighboring stitches, changing direction before trimming.
Conclusion
The finished bag combines a dense cotton shell, two openwork borders, eight dimensional petals, and reinforced brown handles. Before using the pink floral crochet tote bag pattern for a second bag, record your actual gauge, panel width, final height, and yarn consumption; those four measurements make resizing repeatable.
Photograph the front square straight on to show petal alignment, then take a side view that documents the boxed base and handle placement. Save the finished project to Pinterest and share the construction details on Instagram with #PinkFloralTote.
Compare the photo against your sample: do all eight petal tips sit evenly inside the framed square, or does one need another attachment stitch?








