Introduction
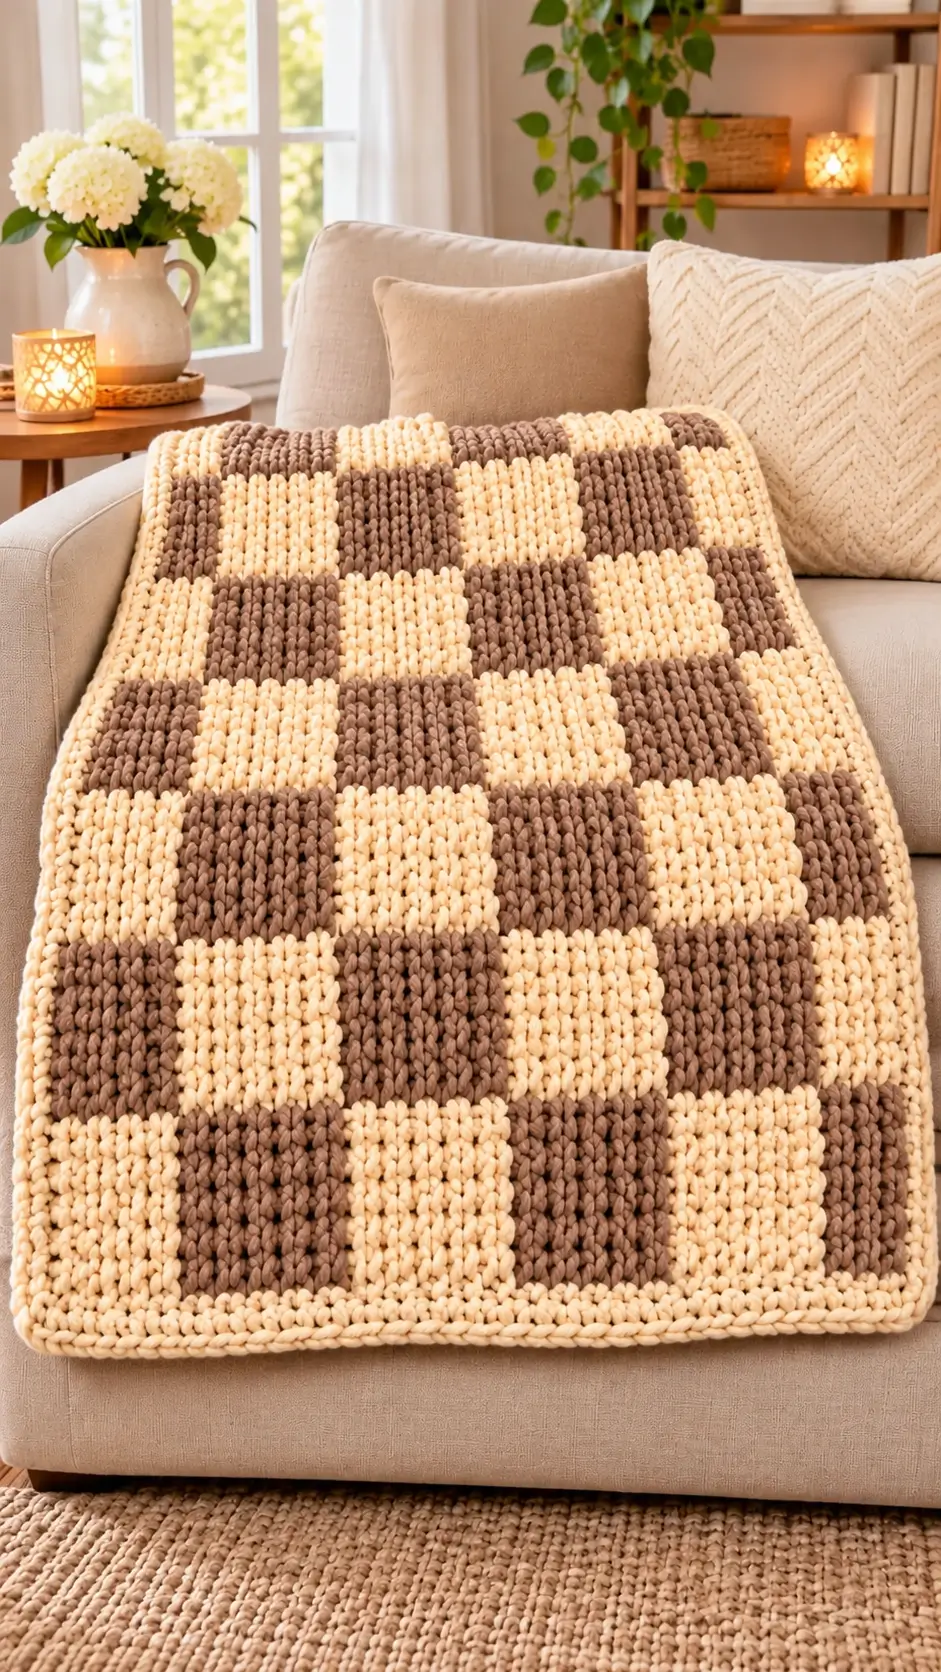
The cream checks on this taupe throw sit directly above brown checks, so a one-block shift would spoil the entire grid. This chunky checkerboard crochet blanket pattern translates that photographed layout into a two-color, single-crochet throw with a matching cream border. You’ll use super bulky chenille-style yarn and an 8 mm hook to make a projected 117 × 146 cm blanket. The project suits an intermediate crocheter who can manage color changes without carrying long floats.
The Design: What Makes This Checkerboard Throw Different
The photo shows large cream-and-taupe blocks, not fine gingham, framed by a pale border. This adaptation uses six checks across and eight down, producing 48 rectangular stitch sections without sewing together separate motifs. Every check is 13 single crochet stitches wide and 14 rows tall; with the reference yarn gauge, these dimensions should produce nearly square blocks. Individual yarn bobbins keep long taupe strands from showing through the cream sections. A single-crochet perimeter supplies the firm edge visible in the reference, while two border rounds frame the checks without adding fringe. One frequent mistake in two-color checkered crochet is counting the turning chain as a stitch, which pushes color boundaries sideways by one stitch per row. The written counts avoid that drift. This cream and taupe crochet throw uses intarsia crochet color changes, not carried-yarn tapestry crochet.
Project Info at a Glance
| Skill level | Time | Projected finished size | Hook | Best for |
|---|---|---|---|---|
| Intermediate colorwork | Not verified; depends on pace | 117 × 146 cm (46 × 57½ in), after border | 8 mm (US L/11) | Sofa throw and home décor |
Verification boundary: No measurable scale is present in the photograph. The dimensions above are calculated for this original adaptation from Bernat Blanket’s published gauge of 7 sc and 8 rows per 10 cm, not measurements from a completed sample. A separately published C2C checkerboard design measures 114.5 × 127 cm; it is not this pattern. Test your own gauge before committing to the full throw. Source: Bernat Blanket specifications.
Materials and Tools
Yarn
- Cream or warm ivory — #6 super bulky chenille — buy up to 1,200 g (four 300 g balls). Brand suggestion: Bernat Blanket in a suitable pale neutral; color availability varies. This is a purchasing allowance, not measured consumption.
- Taupe or mocha brown — #6 super bulky chenille — buy up to 1,200 g (four 300 g balls). Match the fiber, ball yardage, and weight of the cream yarn. This is also a purchasing allowance.
- Extra cream for the border — included in the four-ball cream allowance. Reserve one cream ball before beginning the checks so the final two rounds use the same shade and dye lot.
Bernat Blanket is 100% polyester, with 201 m / 220 yd per 300 g ball. Eight balls therefore provide 1,608 m / 1,760 yd of yarn. Your actual requirement depends on stitch tension and how much yarn the swatch consumes; the allocation has not been independently tested for this exact design. Manufacturer specifications.
Tools
- 8 mm crochet hook (US L/11), or the size needed to match the gauge.
- Six small yarn bobbins or separate center-pull yarn supplies for the alternating sections of each band.
- Nine locking stitch markers, including four for the corners and five for vertical color boundaries.
- Large-eye tapestry needle, scissors, tape measure, and digital kitchen scale for yarn estimation.
- Flat surface at least 120 × 150 cm for checking the checkerboard alignment before finishing.
Abbreviations
| Abbreviation | Meaning |
|---|---|
| ch | Chain |
| sc | Single crochet (US terminology) |
| sl st | Slip stitch |
| st(s) | Stitch(es) |
| RS / WS | Right side / wrong side |
| A / B | Cream / taupe |
| rep | Repeat |
| FO | Fasten off |
No increases, decreases, or magic rings are needed for this rectangular panel.
Gauge, Layout, and Stitch Math
Target gauge: 7 sc × 8 rows = 10 × 10 cm using an 8 mm hook and Bernat Blanket. Work a test swatch at least 14 stitches wide and 16 rows high, then measure the central 10 cm rather than the curled edges. The published gauge describes the yarn with an ordinary single-crochet fabric, and your own hand tension may differ.
For the main panel, work 78 sc wide × 112 rows long. Six blocks of 13 stitches give 78 stitches per row, and eight bands of 14 rows give 112 rows. Each check contains 182 sc, so the 48 checks contain 8,736 sc altogether. There are 24 cream checks and 24 taupe checks; the border uses cream.
At reference gauge, the unfinished panel is approximately 111.4 × 140 cm. Two rounds of edging may bring the size toward 117 × 146 cm, but that is a projection rather than a guaranteed dimension. To resize the pattern, add or remove whole columns of 13 stitches and whole horizontal bands of 14 rows; recalculate the side-border pickups after changing the row total.
Color chart: six checks across
Read each band from the blanket’s physical left edge to its physical right edge, not from whichever edge your hook happens to start on. Each cell below represents 13 sc × 14 rows.
| Band | Rows | Check 1 | Check 2 | Check 3 | Check 4 | Check 5 | Check 6 |
|---|---|---|---|---|---|---|---|
| 1 | 1–14 | A | B | A | B | A | B |
| 2 | 15–28 | B | A | B | A | B | A |
| 3 | 29–42 | A | B | A | B | A | B |
| 4 | 43–56 | B | A | B | A | B | A |
| 5 | 57–70 | A | B | A | B | A | B |
| 6 | 71–84 | B | A | B | A | B | A |
| 7 | 85–98 | A | B | A | B | A | B |
| 8 | 99–112 | B | A | B | A | B | A |
Pattern — Step by Step
Work flat in turned rows, not in a spiral. All rows have 78 sc; a turning ch 1 never counts as a stitch. The six vertical color sections are worked with separate bobbins, following the large-block intarsia method described by Crochet.com. This is a new photo-inspired pattern, not a transcription of an existing designer’s instructions.
Foundation Chain and First Band (Rows 1–14)
Yarn: A and B — method: original 6 × 8 checkerboard calculation.
Foundation: With A, make a loose ch 79. Work the foundation entirely in cream; the cream edging will cover this lower edge. Join B when the first taupe block begins in Row 1.
Row 1 (RS): Sc in second ch from hook and in next 11 ch with A; work the next sc in A, changing to B on its final pull-through (13 sc). Continue with 13 sc in B, changing to A on the last stitch; repeat the 13-stitch sections in A, B, A, B as the chart specifies. Total: 78 sc.
Row 2 (WS): Ch 1 and turn; work 13 sc in B, 13 sc in A, 13 sc in B, 13 sc in A, 13 sc in B, and 13 sc in A, changing color during each preceding stitch’s final pull-through. Total: 78 sc.
Rows 3–14: Repeat the physical color placement of Rows 1–2, alternating direction with each turn. Odd rows begin in A; even rows begin in B. Each row: 78 sc.
At every color boundary, bring the next strand up from below the active strand before completing the new-color stitch; this twists the yarns at the join and helps prevent a vertical slit. Leave unused bobbins attached within the band and do not carry either color behind 13 consecutive stitches. Once Row 14 is complete, cut all six working strands, retaining 15 cm tails.
Second Band (Rows 15–28)
Yarn: B, A, B, A, B, A — six freshly attached bobbins.
Row 15 (RS): Join B in the first stitch. Ch 1, then work 13 sc in B, 13 in A, 13 in B, 13 in A, 13 in B, and 13 in A. Total: 78 sc.
Row 16 (WS): Ch 1 and turn; work 13 sc in A, 13 in B, 13 in A, 13 in B, 13 in A, and 13 in B. Total: 78 sc.
Rows 17–28: Repeat the alternating row directions and keep every boundary at stitch positions 13, 26, 39, 52, and 65. Each row: 78 sc. Cut the six strands after Row 28, leaving 15 cm tails.
Remaining Six Bands (Rows 29–112)
Yarn: A and B, alternating according to the color chart.
Rows 29–42: Repeat the Row 1 color orientation. Each row: 78 sc.
Rows 43–56: Repeat the Row 15 color orientation. Each row: 78 sc.
Rows 57–70: Repeat the Row 1 color orientation. Each row: 78 sc.
Rows 71–84: Repeat the Row 15 color orientation. Each row: 78 sc.
Rows 85–98: Repeat the Row 1 color orientation. Each row: 78 sc.
Rows 99–112: Repeat the Row 15 color orientation. Each row: 78 sc.
Every band has exactly 14 rows. Mark each fourteenth row with a removable marker; changing color on Row 13 instead of Row 15 would shorten one check and spoil the staggered appearance. Fasten off the last six strands after Row 112, leaving 15 cm tails.
Cream Perimeter Border (Two Rounds)
Yarn: A — single crochet edging with three stitches in each corner.
With the right side facing, join cream at an upper corner. Work 3 sc in that corner, 76 sc across the interior top stitches, then 3 sc in the next corner. Down the long edge, work 98 evenly spaced sc across the 112 row ends: aim for seven stitches in every group of eight row ends. Repeat 3 sc in the lower corner, 76 sc across the foundation edge between the corners, 3 sc in the final corner, and 98 sc up the remaining side. Join with sl st. Border Round 1: 360 sc.
For Border Round 2, ch 1 and work one sc into every stitch except the middle stitch of each three-stitch corner group; work three sc into each of those four middle stitches. Join with sl st. Border Round 2: 368 sc. Fasten off with a 20 cm tail. The second round adds eight stitches because each of the four corner increases contributes two extra sc.
This pickup count is a starting point, not a substitute for checking the fabric. If either long side visibly draws inward, adjust its evenly spaced pickup count before completing Round 2; your measured gauge takes priority over the projected border total.
Assembly and Finishing — 10 Steps
- Lay the panel flat with its 78-stitch edges at the top and bottom, keeping the right side visible.
- Count six checks across the first band and confirm that no check has more or fewer than 13 stitches.
- Verify eight bands down the blanket and confirm that every band contains 14 rows.
- Check the four panel corners for a 90-degree shape before adding the outer border.
- Inspect the color junctions for gaps; close visible openings by weaving the adjacent yarn tails through the underside of the join.
- Weave in all internal ends through several neighboring stitches on the wrong side; reverse direction once to reduce slipping.
- Attach the cream border yarn and work the first round using the marked corners and measured side spacing.
- Complete the second border round while watching for rounded corners, tight sides, or an outward ripple.
- Measure the blanket in both directions and record the finished dimensions, yarn mass, and any gauge differences.
- Follow the yarn label’s wash instructions and dry as directed before photographing or storing the finished throw.
The completed item is one rectangular checkerboard panel with an integrated cream border.
Seven Technical Tips for Clean Checkered Colorwork
- Stitch markers: Place a marker after stitches 13, 26, 39, 52, and 65 on Row 1. A marker that shifts one stitch to the right exposes a counting error before it repeats through 14 rows.
- Color-change timing: Complete the final pull-through of stitch 13 with the next block’s color. Changing after that stitch creates one incorrectly colored stitch at every boundary.
- Bobbins: Use six individual yarn supplies during each band, rather than drawing taupe behind a full cream check. A 13-stitch float can snag during use and may show through pale chenille.
- Turning chains: Count exactly 78 sc after every row and exclude the ch 1 from that total. Treating a turning chain as a stitch causes the vertical boundaries to drift.
- Chenille tension: Compare a washed and dried 10 × 10 cm swatch against the target seven stitches and eight rows. Dense tension can produce stiff checks, while loose tension can expose small gaps.
- Pinning and measuring: Measure the four outer edges before working the border, not just the center line. A discrepancy greater than roughly 2 cm across corresponding edges signals inconsistent row height or missed stitches.
- Tail weaving: Leave approximately 15 cm at each color-section end and reverse the needle’s direction during weaving. Short, straight tails are more likely to pull free from smooth polyester chenille.
Resizing the Blanket Without Breaking the Checks
Use the same 13-stitch block width for a smaller lap blanket, but reduce the pattern to four columns and six bands. That makes a 52-stitch-wide panel with 84 rows and 24 checks; follow the same alternating A/B logic. At the published gauge, the panel alone would measure approximately 74 × 105 cm, before edging. The shorter throw also requires fewer active bobbins per band.
For a wider sofa blanket, work eight columns of 13 stitches for 104 sc across while keeping the eight bands. The panel would measure roughly 149 × 140 cm before its border, giving a nearly square piece. Increasing the number of columns changes the number of separate yarn supplies needed for each band; eight columns require eight bobbins. Do not add random stitches between existing checks, since that would make interior rectangles different widths.
Changing the yarn weight also changes the math. A category #5 bulky yarn may need more stitches for the same physical check size than category #6 chenille, while jumbo finger-knit yarn may need fewer. Make a fresh swatch, calculate stitches per 10 cm, and choose whole-number blocks before ordering the remaining yarn.
Yarn Planning and Care
A reliable yarn estimate begins with a measured swatch, not a photograph. Weigh a dry 10 × 10 cm swatch without excessively long tails, then multiply its mass by the planned blanket area divided by 100 square centimeters. For this projected 117 × 146 cm blanket, that area ratio is approximately 171; add a practical margin for tails and tension differences. The swatch-based calculation is more useful than copying quantities from a different C2C or knitted pattern.
Separate the estimate by color because the cream border uses yarn beyond the 24 cream checks. If the cream strand runs out midway through Round 2, a replacement with a slightly different shade may create a visible line around the edge. Reserve the border supply first, then use the remaining cream for the checks. Keep the color labels or dye-lot information until the piece is finished.
Bernat Blanket’s product information specifies a delicate machine-wash cycle and gentle tumble drying. Consult the label on the exact yarn bought, particularly if substituting another chenille blend. Avoid ironing polyester chenille because high heat can flatten or damage the plush pile. Care source.
Common Questions
Can I work the checkerboard without sewing squares together?
Yes. This version is a single flat panel made with six distinct color sections per band, then edged in cream. The trade-off is a collection of ends at horizontal color changes, which must be woven into the underside rather than hidden in assembly seams.
Why not carry one strand across every cream check?
A continuous carried strand can be easier to manage, but dark yarn may remain visible inside light stitches. The intarsia technique keeps the colors separate, providing cleaner cream blocks at the cost of additional bobbins and ends. Crochet.com explains the difference between these methods at its intarsia guide.
Is this identical to the blanket in the photograph?
No exact stitch identification or measurement can be established from that image alone. The chart copies the visible design decisions—large alternating neutral checks and a light border—using an original single-crochet construction. Its original stitch structure may be knitted or use another knit-look technique.
Can a beginner complete the pattern?
Someone comfortable with sc, turning rows, counting stitches, and basic two-color changes can learn the method. The technically demanding part is maintaining six clean color columns over 112 rows; a small two-column practice swatch is a useful first test.
Conclusion
This chunky checkerboard crochet blanket pattern translates the photographed cream-and-taupe layout into a measured, repeatable six-column color chart. Its 48 checks use 78 stitches per row over 112 rows, followed by two rounds of cream edging. Those stitch counts are internally consistent, but the finished dimensions and yarn consumption remain projections until a sample is made. Before purchasing all eight suggested balls, work a 10 cm swatch, record the gauge, and weigh it for a more accurate yarn estimate. Save the completed color chart to Pinterest and share your finished measurements on Instagram with #CreamTaupeCheckerboardBlanket. Would you keep the border cream, as pictured, or change it to taupe?








