Introduction
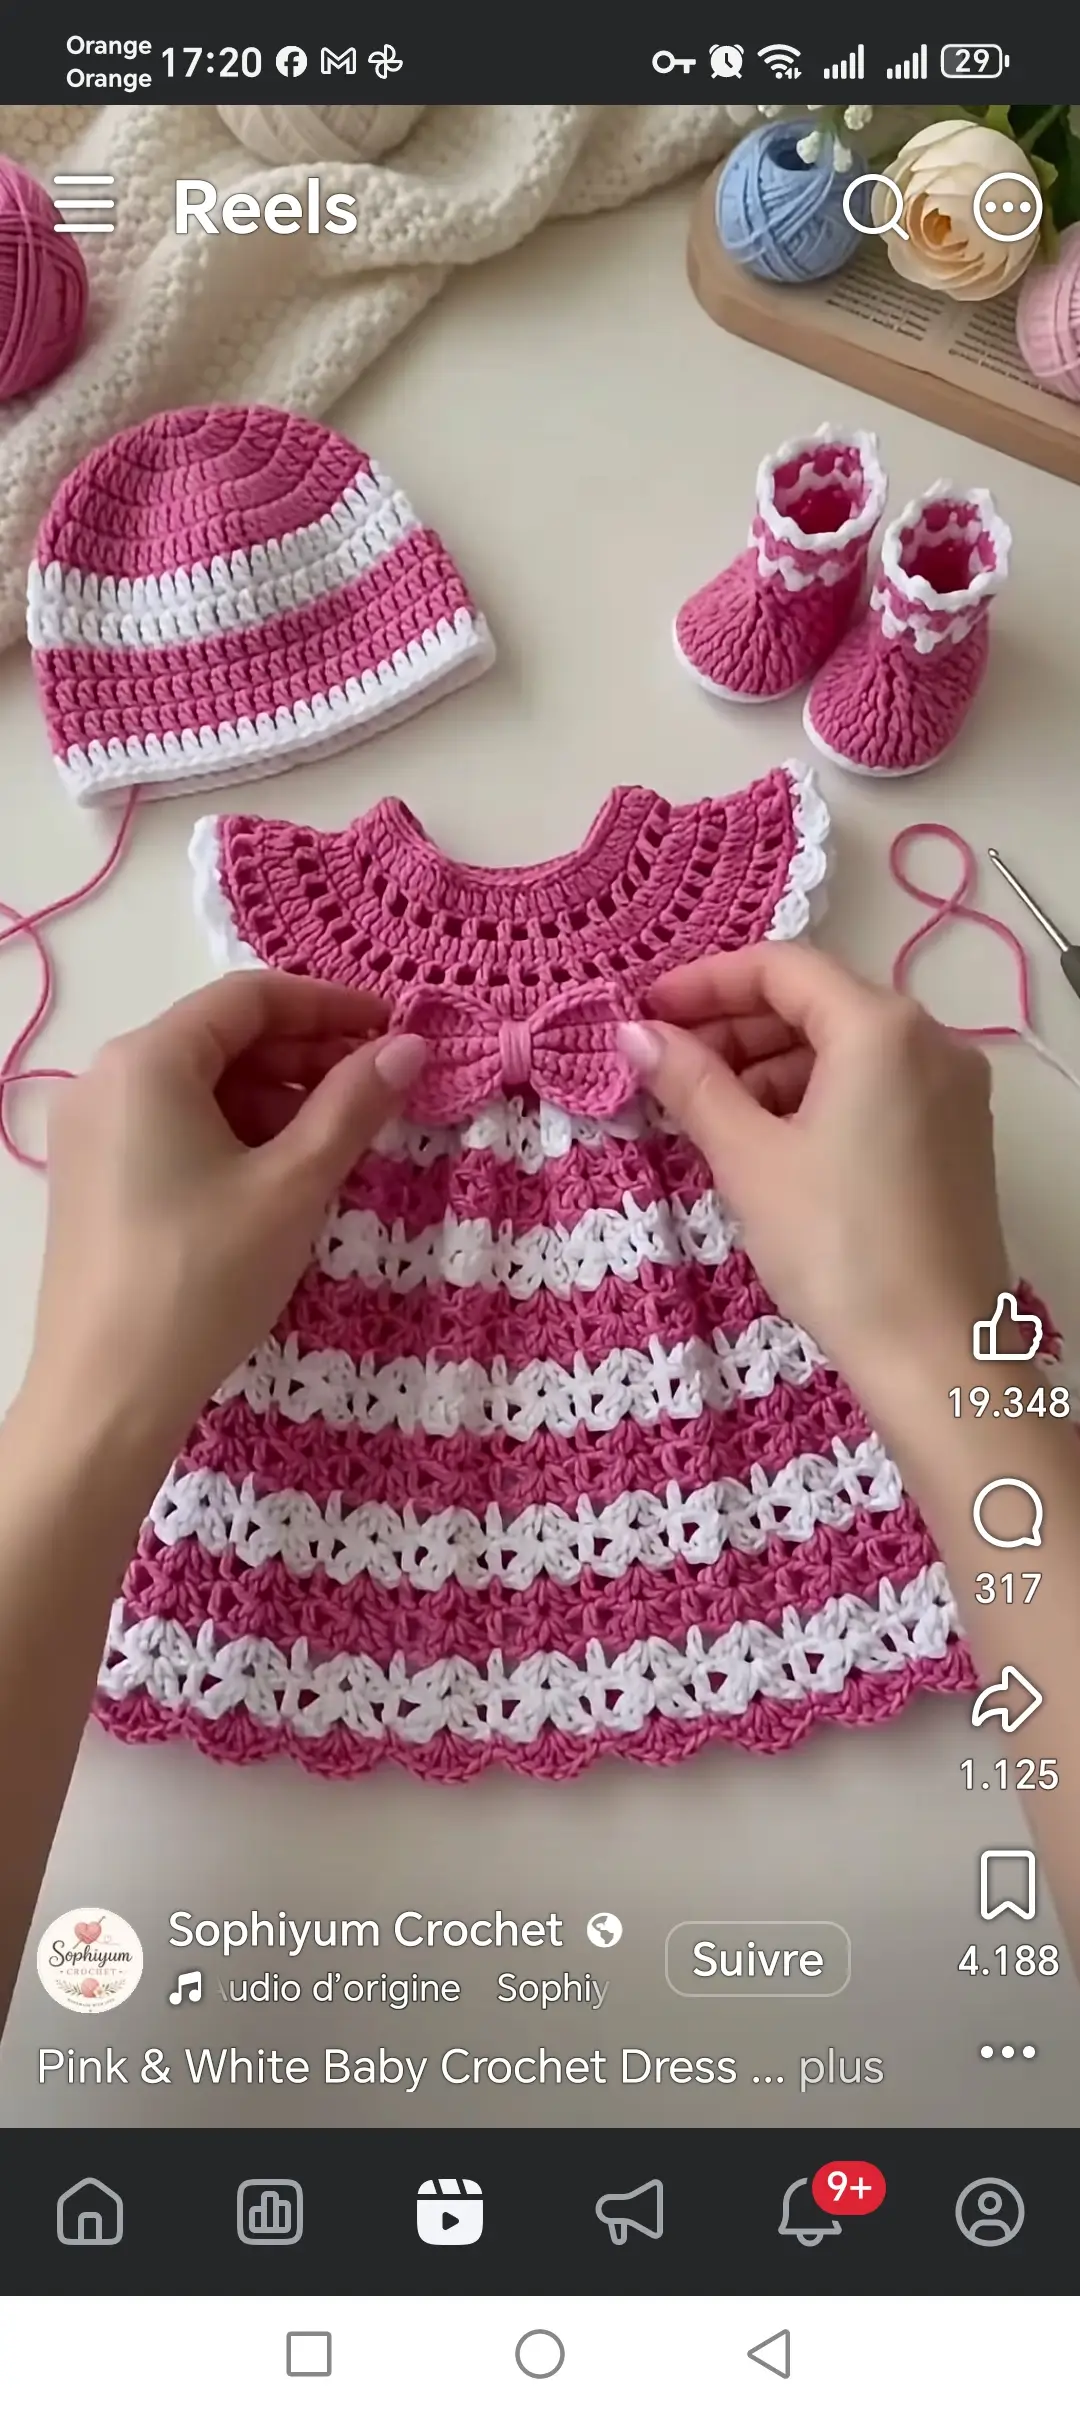
The oversized waist bow changes the construction of this dress because the skirt needs enough structure to support it without pulling the bodice forward. This pink and white crochet baby dress pattern uses a round yoke, openwork upper section, striped shell skirt, scalloped hem, and a separate dimensional bow. A matching striped hat and cuffed booties complete the photo-inspired set. Sport or light DK cotton yarn gives the stitches definition without making the garments excessively heavy.
The Design: What Makes This Baby Dress Set Different
The dress is built around three distinct textures. The round yoke uses compact stitches interrupted by controlled eyelets, giving the neckline stability while keeping the upper section lighter than a solid fabric. Below the waist, alternating pink and white shell rows create horizontal stripes with more visual depth than ordinary double crochet.
The large pink bow is made separately and attached only after the dress has been blocked. That sequence matters. Sewing a heavy bow onto an unblocked waist can distort the front of a small garment.
The matching hat repeats the same pink-and-white stripe sequence, while the booties use pink uppers, white soles, and layered white cuff edging. Together they form a coordinated crochet baby outfit without requiring identical stitch construction in every piece.
Project Info at a Glance
| Skill Level | Main Construction | Yarn | Suggested Hook | Set Includes |
|---|---|---|---|---|
| Intermediate | Top-down round-yoke dress | Sport / light DK cotton | 3.0–3.5 mm | Dress, hat, booties and bow |
Materials and Tools
Yarn
- Rose pink — sport or light DK cotton/cotton blend — main color
- White — same yarn weight — contrast stripes, edging and bootie soles
Tools
- 3.0–3.5 mm crochet hook
- Yarn needle
- Scissors
- Stitch markers
- Measuring tape
- Blocking mat
- Rust-resistant blocking pins
- Optional small buttons for a back-neck opening
Abbreviations
- MR — magic ring
- ch — chain
- sc — single crochet
- hdc — half double crochet
- dc — double crochet
- tr — treble crochet
- sl st — slip stitch
- sp — space
- st/sts — stitch/stitches
- RS — right side
- WS — wrong side
Sizing the Set
Use the intended child’s measurements instead of assigning the pattern to a fixed age. Yarn thickness, hook size, stitch tension, and body proportions can change the finished dimensions substantially.
For the dress, record:
- Chest circumference
- Neck opening circumference
- Shoulder-to-waist measurement
- Armhole depth
- Waist-to-hem measurement
- Desired total dress length
For the hat, measure around the head and from the crown to the desired lower edge.
For the booties, measure the baby’s foot from heel to longest toe. Build the sole slightly longer than the measured foot so the finished bootie does not compress the toes.
Gauge Swatch
Crochet a minimum 12 × 12 cm swatch using pink yarn and the intended hook.
Work several rows of hdc and several rows of the shell pattern described below. Wash or damp-block the swatch, allow it to dry, then measure the central 10 cm.
Record both stitch and row gauge.
Required stitches = desired finished measurement × stitches per cm.
The shell section should also be tested because shell stitches can produce a different width from plain hdc even when the same hook is used.
Dress — Round Yoke
The upper section begins at the neckline and expands gradually toward the chest. A short back opening can be added if the neckline does not stretch sufficiently to pass over the head.
Foundation
With pink yarn, make a foundation chain long enough to fit the required neckline measurement.
Do not join immediately if a back opening is required.
Yoke Row 1
Ch 2 and work hdc evenly across the foundation.
Turn.
Yoke Row 2
Ch 2.
Work hdc across while distributing increases evenly through the row.
A practical method is to divide the stitch count into 8 equal sections and place one increase near each marker.
Yoke Row 3 — Eyelet Row
Work:
*dc in next 2 sts, ch 1, skip 1 st.*
Repeat across while preserving the required increases at the marked sections.
Yoke Row 4
Work hdc in each dc and one hdc into each ch-1 space.
Continue expanding the yoke until it reaches the required armhole depth.
Separating the Sleeves
Lay the yoke flat and divide it into five sections:
- Right front
- Right sleeve
- Back
- Left sleeve
- Left front
Place markers at all four underarm points.
Work across the first front section, chain enough stitches to span the first underarm, skip the sleeve stitches, crochet across the back, create the second underarm chain, skip the second sleeve section, and finish across the remaining front.
If the dress has a back opening, join the work after sufficient neckline clearance has been established.
Upper Bodice
Work several rounds of hdc below the armholes.
The bodice should lie close enough to support the skirt and bow but should not be stretched around the chest.
Finish the bodice approximately at the natural waist or slightly above it. The photo-inspired silhouette uses a high waist so the skirt can flare freely.
White Sleeve Edging
Join white yarn at one armhole.
Work one round of sc evenly around the opening.
For the decorative edge, repeat:
*sl st in next st, 4 dc in next st, sl st in next st.*
Adjust spacing around the underarm so the edging remains flat.
Repeat on the second armhole.
Waist Foundation
With pink yarn, work one round of sc around the bottom of the bodice.
Place 8 markers evenly around this round.
These markers establish the skirt increase points.
Work one hdc increase near each marker on the first skirt round. The skirt should begin to flare without producing large folds directly below the waist.
Striped Shell Skirt
The skirt alternates pink and white textured bands. Change color at the end of a complete round and carry neither yarn loosely across long vertical distances.
Pink Shell Round
With pink yarn:
*skip 2 sts, 3 dc in next st, ch 1, 3 dc in same st, skip 2 sts, sc in next st.*
Repeat around, adjusting the spacing slightly if required by the actual stitch count.
Pink Foundation Round
Work hdc around, placing increases evenly when more circumference is required.
White Shell Round
Change to white.
Work the same shell sequence:
*skip 2 sts, 3 dc, ch 1, 3 dc in next st, skip 2 sts, sc in next st.*
White Foundation Round
Work hdc evenly around.
Continue alternating the colors down the skirt.
Controlling the A-Line Shape
The skirt should widen gradually rather than expanding sharply after every color change.
Use 8 evenly spaced increase points. Add one stitch near each marker only when additional width is required.
A useful starting interval is one increase round every 4–6 rounds.
Lay the dress flat after each increase round. Waves indicate excess expansion. A skirt that hangs almost vertically needs additional increases.
Stop increasing during the final section if the lower circumference is already wide enough.
Pink Scalloped Hem
Finish the final stripe in pink.
Preparation Round
Work sc evenly around.
Scallop Round
Repeat:
*skip 2 sts, 7 dc in next st, skip 2 sts, sc in next st.*
Continue around.
The shell spacing may be adjusted by one stitch in selected repeats to make the final distribution even.
Optional Definition Round
Work one sc into each stitch around the scallops. Place 2 sc into the center stitch of each shell if additional definition is required.
Large Pink Bow
The bow is constructed separately so its dimensions can be checked against the finished bodice before attachment.
Bow Panel
With pink yarn, chain enough stitches to create a rectangle approximately 12–16 cm wide for a small baby dress. Adjust this measurement to the garment.
Row 1: hdc across.
Row 2: ch 1, sc across.
Row 3: ch 2, hdc across.
Repeat Rows 2–3 until the panel is approximately 5–7 cm high.
Fasten off.
Shaping the Bow
Fold the two short ends slightly toward the center.
Pinch the middle into several even pleats.
Wrap pink yarn firmly around the center 8–12 times.
Secure on the back.
Bow Tails — Make 2
Chain to the desired tail length.
Work hdc across.
Turn and work alternating rows of sc and hdc until each tail reaches approximately 3–4 cm wide.
For an angled end, decrease one stitch at each side across the final few rows.
Fasten off.
Position both tails behind the central bow and sew them securely to the bow rather than relying only on stitches through the dress.
Attaching the Bow
Block the dress before attaching the bow.
Position the bow at the center front of the waist.
Sew through the center wrap and several points along the inner edges of the bow loops.
Do not sew the complete outer edge flat. Leaving the outer portions free maintains the dimensional shape.
Secure the upper sections of the tails so their weight does not pull entirely on the center wrap.
Matching Pink and White Crochet Hat
The hat is worked from the crown downward.
Crown Round 1
With pink yarn, make an MR.
Work 12 dc into the ring.
Join with sl st.
Crown Round 2
Ch 2.
Work 2 dc in each stitch around. (24 sts)
Crown Round 3
*dc in next st, 2 dc in next st.* Repeat around. (36 sts)
Crown Round 4
*dc in next 2 sts, 2 dc in next st.* Repeat around. (48 sts)
Continue the same increase principle until the crown diameter matches the required head circumference.
Use:
Crown diameter ≈ finished head circumference ÷ 3.14.
Hat Sides
Once the crown reaches the required diameter, stop increasing.
Work dc or hdc evenly around until the hat approaches the required depth.
Change to white and work a contrast stripe.
Return to pink for the next band.
Add another white stripe near the lower section, matching the photographed color sequence.
Hat Lower Edge
Finish with white yarn.
Work one round of sc.
Add a second sc round if a firmer lower band is required.
Check the circumference before fastening off. The lower edge should stretch comfortably without becoming loose.
Matching Crochet Booties — Make 2
Both booties must be made from the same stitch counts and checked against each other after every major section.
White Sole
With white yarn, chain according to the required foot length.
Beginning in the second chain from the hook, work sc along the chain.
Place 4–6 sc into the final chain to turn around the toe.
Continue along the opposite side of the foundation chain.
Place 3–5 sc into the heel end.
Join.
Sole Round 2
Work hdc around, increasing around both the heel and toe curves.
Keep the sides of the sole relatively straight.
Sole Round 3
Work sc around with additional increases only where required to keep the sole flat.
Stop when the sole is approximately 0.5–1 cm longer than the measured foot.
Pink Bootie Upper
Change to pink.
Work one round through the back loops only. This creates a visible edge between the sole and upper.
Work 1–2 rounds of hdc without increases.
Mark the center front.
Begin decreasing around the toe across approximately the front third of the stitches.
Keep the side and heel stitches unchanged.
Continue until the opening is reduced to the required ankle circumference.
Layered White Bootie Cuff
Join white yarn around the ankle.
Work one round of sc.
For the first ruffle:
*sl st, 4 dc in next st, sl st in next st.*
Repeat around.
For a second tier, join white yarn one round below the first ruffle and repeat the shell sequence.
This produces the layered white cuff visible in the photo-inspired set.
Optional Pink Cuff Detail
For stronger contrast, work a narrow pink sc round between the two white ruffle layers.
Keep this round firm enough to define the cuff but loose enough for the bootie to pass comfortably over the foot.
Matching the Stripe Sequence
Plan the dress colors before beginning the skirt.
A balanced sequence is:
- Pink bodice
- White accent at sleeves
- Pink skirt band
- White shell band
- Pink shell band
- White shell band
- Pink lower band
- Pink scalloped hem
Repeat selected stripes on the hat rather than reproducing every dress stripe. Too many narrow color changes can make a small hat visually fragmented.
Yarn Quantity Planning
Exact yarn consumption depends on garment size, fiber, gauge, skirt flare, and bow dimensions.
Make the gauge swatch first, then weigh it.
After completing the bodice, weigh the work again. Crochet approximately 10 cm of skirt and record how much yarn that section consumes.
Use the measured consumption to estimate the remaining skirt.
Add a reserve for the large bow, hat, booties, edging, swatching, and finishing. Pink will require substantially more yarn than white because it forms the bodice, most of the skirt, bow, hat, and bootie uppers.
Alternative Color Combinations
- Dusty rose and ivory
- Turquoise and white
- Lavender and cream
- Sage green and ivory
- Peach and white
- Soft blue and cream
Use the darker or stronger shade for the bow and dominant skirt sections if you want the waist decoration to remain the focal point.
Assembly
- Make and block the gauge swatch, then calculate the dress measurements from the intended wearer.
- Crochet the round yoke, divide for the armholes, and complete the pink bodice.
- Add the white sleeve edging and check both armholes for equal circumference.
- Crochet the striped A-line skirt, distributing increases evenly through the required sections.
- Finish the dress with the pink scalloped lower border and block it to its final measurements.
- Make the pink bow panel and two tails, assemble them, then sew the completed bow to the center waist.
- Crochet the pink-and-white hat from the crown downward and finish its lower edge in white.
- Make two identical white soles, add the pink bootie uppers, and shape both toes with matching decreases.
- Add the layered white cuffs, weave in every yarn tail, and inspect all joins and decorative attachments.
- Wash or damp-block the pieces according to the yarn care instructions and allow the complete set to dry flat.
The completed set consists of one striped dress with a dimensional bow, one coordinating hat, and two matching cuffed booties.
7 Technical Tips
- Keep the two armholes within 5 mm of the same depth. Unequal sleeve divisions can make the round neckline rotate toward one shoulder.
- Check the skirt after every increase round. Ripples forming immediately below an increase row indicate that additional stitches are being added faster than the fabric can absorb them.
- Measure the bow against the blocked bodice before attaching it. A bow wider than roughly half the front waist can overpower a small dress and pull the fabric outward.
- Change stripe colors at the same side of the dress. Randomly positioned joins can create visible steps across the pink and white bands.
- Measure both bootie soles before beginning the uppers. A difference of only 5 mm becomes more noticeable after the toe decreases are completed.
- Do not tighten the bootie cuff to match the ankle measurement exactly. The opening still has to pass over the heel, so test its usable stretched circumference before fastening off.
- Anchor the bow through several waist stitches rather than one central point. Concentrating its weight on one stitch can stretch the bodice and make the bow rotate downward.
Blocking and Finishing
Block the dress before the final bow attachment whenever possible. Shape the neckline first, align the armholes, and spread the skirt into an even A-line silhouette.
Shape each lower scallop separately. Do not stretch the hem into a complete circle unless that is the intended skirt shape.
Block the bow panel and tails flat before assembling them.
For the hat, shape the crown over a rounded form or lay it flat without stretching the lower band.
The booties should be shaped by hand while damp. Keep both soles and cuff heights equal.
Care and Safety
Use the washing instructions supplied for the selected yarn. Cotton and washable cotton blends are practical choices for frequently cleaned baby garments.
Raised trims and the bow benefit from gentle washing in a laundry bag. Drying flat reduces stretching, particularly when the dress is wet.
Inspect the bow and all decorative stitching periodically. If buttons or other small detachable components are added, they require particular care on garments intended for babies and young children.
Conclusion
This pink and white crochet baby dress pattern builds the complete look from a round pink yoke, striped shell skirt, scalloped hem, dimensional waist bow, coordinating hat, and matching booties. Begin with the child’s actual chest, head, and foot measurements, then calculate the stitch counts from a blocked swatch instead of relying on an age label. Once the first dress is complete, the same construction can be adapted to turquoise, lavender, sage, or softer neutral combinations. Photograph the finished set together for Pinterest or Instagram using #PinkBowCrochetBabySet. For this design, would you keep the oversized center bow or replace it with two smaller side bows?








