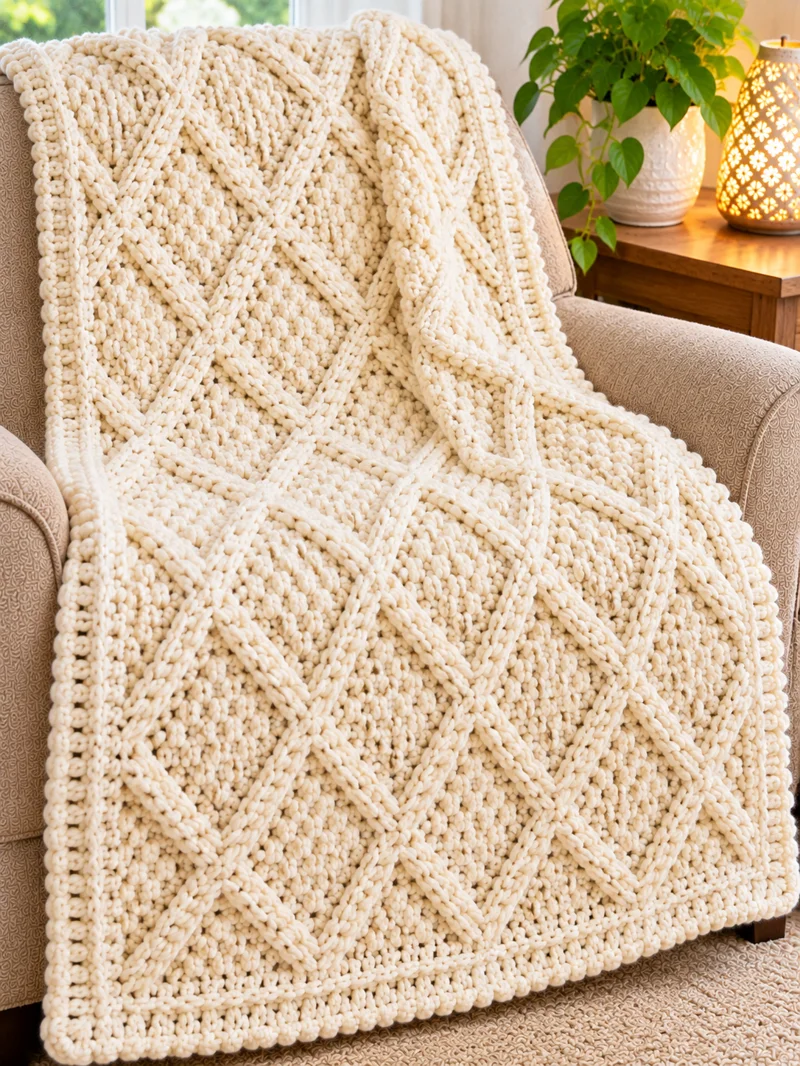
The diamond ridges on this ivory throw need to remain visible even where the blanket folds over an armchair. This chunky diamond crochet blanket pattern uses super bulky chenille yarn, an 8 mm hook, a textured rectangular base, and applied crochet lattice strips. The proposed 120 × 150 cm throw suits intermediate crocheters who want a dimensional surface without working complicated cable crossings into every row.
The Design: What Makes This Diamond Blanket Different
The main feature is a repeating diamond lattice formed by raised diagonal lines. Instead of working those lines directly into the fabric with crossed front-post stitches, this adaptation builds them separately and attaches them to the blanket surface.
That construction has three practical advantages. First, the underlying textured crochet throw remains rectangular, so its width can be checked independently of the decorative pattern. Second, the lattice can be pinned and adjusted before permanent attachment, helping maintain consistent diamond spacing. Third, the border conceals the ends of the applied strips.
A common mistake with a diamond stitch crochet blanket is pulling diagonal ridges too tightly. The background fabric then puckers between crossings.
This chunky crochet cable-style blanket avoids that problem by using flexible strips with enough length to follow the surface without tension.
Pattern note: This is an original, photo-inspired adaptation using separately crocheted lattice strips. It is not a reconstruction of the exact stitches in the reference photograph. The finished size and yarn quantities are estimates, and the complete pattern has not been physically tested.
Project Info at a Glance
| Detail | Specification |
|---|---|
| Skill Level | Intermediate |
| Estimated Time | 18–28 hours |
| Target Finished Size | 120 × 150 cm (47 × 59 in) |
| Crochet Hook | 8 mm (US L/11) |
| Yarn Weight | #6 Super Bulky |
| Construction | Textured rows, applied lattice, border |
| Terminology | US crochet terms |
| Best For | Sofa throws, armchair blankets, home décor |
Materials and Tools
Yarn
- Warm ivory or cream — #6 Super Bulky — approximately 2,100–2,700 g total — Bernat Blanket or comparable chenille yarn.
- Main blanket panel — approximately 1,500–1,900 g — matching ivory yarn.
- Raised diamond lattice — approximately 400–550 g — matching yarn.
- Border and finishing — approximately 200–250 g — matching yarn.
These yarn amounts are preliminary planning estimates rather than measured consumption from a completed sample. Purchase matching dye lots when possible, and use a weighed swatch to refine the total.
Tools
- 8 mm crochet hook, or the size needed to match your gauge.
- Large-eye tapestry needle for sewing the lattice strips.
- Locking stitch markers for counting and positioning.
- Flexible measuring tape for checking diamond spacing.
- Rustproof pins or removable clips for temporary placement.
- Scissors for cutting yarn.
- Flat blocking surface for measuring the finished blanket.
Choosing the Right Yarn
Chenille creates thick, rounded stitches and makes the raised diamond pattern prominent. Its pile can also obscure stitch tops, particularly when the yarn and background are the same color.
Use a light-colored work surface and count stitches at the end of each row. If the chenille is difficult to sew through, use a smooth coordinating yarn for attachment stitches on the reverse side.
Bernat Blanket is a category 6 super bulky polyester chenille yarn. Standard 300 g balls contain approximately 201 m (220 yd), and the manufacturer’s recommended crochet hook is 8 mm.
Manufacturer reference: Bernat Blanket Yarn – Yarnspirations.
Crochet Abbreviations
| Abbreviation | Meaning |
|---|---|
| ch | Chain |
| sc | Single crochet |
| hdc | Half double crochet |
| dc | Double crochet |
| sl st | Slip stitch |
| BLO | Back loop only |
| FLO | Front loop only |
| st(s) | Stitch(es) |
| RS | Right side |
| WS | Wrong side |
| rep | Repeat |
| FPdc | Front-post double crochet |
All instructions use US crochet terminology. Turning chains do not count as stitches unless otherwise stated.
Gauge and Sizing
Use approximately 7 single crochet stitches and 8 rows per 10 cm as an initial reference. This is the manufacturer’s plain single-crochet gauge, not a verified gauge for the textured stitch pattern below.
Work a swatch measuring at least 15 × 15 cm. Measure the central 10 cm after the fabric has rested.
The pattern begins with 85 stitches across the body panel. At 7 stitches per 10 cm, that corresponds to approximately 121 cm before the border. Because the textured stitch may produce a different width, adjust the foundation chain according to your own swatch.
The target dimensions are approximate. The border increases the overall width and length.
Chunky Diamond Crochet Blanket Pattern – Step by Step
Part 1: Crochet the Textured Blanket Base
Yarn: Warm ivory, super bulky chenille.
This base uses alternating single crochet and double crochet stitches to create a dense, textured surface.
Foundation: Ch 86.
Row 1: Sc in the second ch from the hook and in each remaining ch. Turn. (85 sts)
Row 2: Ch 1, sc in first st, *dc in next st, sc in next st; repeat from * across. Turn. (85 sts)
Row 3: Ch 1, sc in first st, *dc in next st, sc in next st; repeat from * across. Turn. (85 sts)
Rows 4–112: Repeat Row 3. (85 sts per row)
Row 113: Ch 1, sc in each st across. (85 sts)
Fasten off and weave in the yarn ends.
The alternating stitch sequence is worked into the stitch directly below it, so the single crochets stack above single crochets and the double crochets above double crochets. The resulting fabric has an organized, raised texture rather than a flat single-crochet surface.
At the reference plain-sc row gauge, 113 rows would measure approximately 141 cm. The actual textured-row height must be measured. Work additional repeats or stop earlier as needed to reach the desired length before edging.
Part 2: Plan the Diamond Lattice
Lay the blanket flat with the right side facing upward.
The diamond lattice is created by two sets of diagonal crochet strips. One set slopes from lower left to upper right. The second slopes from upper left to lower right.
For a practical layout, divide the blanket into an approximate four-column by five-row grid. The intersections of the diagonals form elongated diamonds.
Mark the first set of diagonal paths with removable stitch markers. Measure between parallel paths at several points to maintain consistent spacing.
Repeat for the opposite diagonal direction.
A useful starting spacing is approximately 24–30 cm between adjacent parallel diagonal lines, measured perpendicular to each line. The final layout should be adjusted to the actual dimensions of the blanket.
Do not sew the lattice in place yet.
Part 3: Make the Raised Crochet Lattice Strips
Yarn: Warm ivory, super bulky chenille.
Each raised strip is worked separately. Its length depends on the diagonal path marked on the blanket.
Foundation: Ch to the required path length, allowing a small amount of additional length for placement.
Row 1: Sc in the second ch from the hook and in each ch across. Turn.
Row 2: Ch 1, sc in each st across.
Fasten off, leaving a 25 cm sewing tail.
Make enough strips to cover every marked diagonal path. The exact number and lengths depend on where the paths intersect the blanket edges.
Before cutting the yarn, place each strip along its marked route. The strip should lie flat without pulling the underlying fabric.
For more pronounced ridges, work a third row of slip stitches along the center of the strip. This increases height and creates a cord-like appearance.
Part 4: Attach the First Set of Diagonals
Position the first family of parallel diagonal strips on the right side of the blanket.
Start near one lower corner and work toward the opposite upper edge.
Use removable clips to hold the strips in place. Check that the distance between adjacent strips remains consistent.
Thread a tapestry needle with matching yarn. Sew through the lower edge of each strip and the surface stitches of the blanket, catching enough fabric to hold the strip securely without pulling through to create deep indentations.
Space attachment stitches approximately 2–3 cm apart, reducing that distance near strip ends.
Continue until all strips in the first direction are attached.
Part 5: Attach the Crossing Diagonals
Place the second family of strips across the first to complete the diamond shapes.
At each intersection, position one strip above the other. Alternate the crossing order where practical to create the appearance of an interwoven lattice.
Pin the entire second set before sewing.
Check the width and height of several diamonds. Uneven shapes usually indicate that one diagonal strip has been pulled more tightly than its neighbors.
Sew the strips to the base, adding a secure attachment stitch at every crossing.
The raised diamond pattern should remain visible without distorting the blanket’s rectangular outline.
Part 6: Crochet the Blanket Border
Yarn: Warm ivory, super bulky chenille.
The border stabilizes the blanket and covers the exposed ends of the applied lattice.
Round 1: Join yarn at a corner. Ch 1, work sc evenly around the blanket, placing 3 sc in each corner. Join with sl st.
Along the top and bottom, work approximately one sc into each stitch. Along the sides, distribute stitches according to the measured row gauge rather than forcing one sc into every row.
Round 2: Ch 1, sc in each st around, working 3 sc into the center corner stitch at each corner. Join with sl st.
Round 3: Ch 1, work sc in BLO around, maintaining the same three-stitch corner treatment. Join with sl st.
Round 4: Ch 1, sc in each st around, again increasing at the corners. Join with sl st.
Fasten off and weave in the yarn ends.
The exact stitch total depends on the number of side-edge stitches picked up in Round 1. Keep the edge flat and check for rippling after every round.
For a thicker border, add one or two more rounds of sc. Stop when the border is approximately 4–6 cm wide.
Part 7: Finish the Blanket
Inspect every diamond intersection and attachment point.
Weave yarn tails through several stitches on the reverse side, changing direction at least once. Chenille can shed fibers from cut ends, so avoid leaving very short tails.
Lay the blanket flat and check its shape. Smooth the surface by hand and adjust any sections that appear compressed.
Do not iron chenille yarn. If washing is needed, follow the manufacturer’s care instructions.
The completed blanket has a textured rectangular base, a raised diamond lattice, and a substantial enclosing border.
Assembly and Finishing Checklist
- Place the completed blanket base on a flat surface, right side facing up.
- Measure its width and length at three different positions.
- Mark the center of each edge to establish a symmetrical layout.
- Position the first diagonal strips, keeping their spacing consistent.
- Pin the second set of diagonal strips across the first to form diamonds.
- Compare diamond widths and adjust any visibly uneven intersections.
- Sew the first diagonal set to the base without stretching the fabric.
- Attach the crossing set, securing every intersection.
- Crochet the outer border, covering the ends of the diagonal strips.
- Weave in all yarn tails, inspect the reverse side, and measure the completed blanket.
The finished project should lie flat, with raised diagonal ridges and a border that does not curl.
7 Technical Tips for a Better Diamond Crochet Blanket
- Mark every row: Missing a stitch in the 85-stitch foundation can make one side narrower than the other. Count all 85 stitches at the end of each row and use markers at 20-stitch intervals.
- Check chenille tension: Tight stitches can compress the yarn pile and make the blanket unnecessarily stiff. Compare the working fabric against the 10 cm gauge swatch after every 15–20 rows.
- Measure diagonal spacing: Uneven spacing produces diamonds with noticeably different widths. Check at least three distances between each pair of parallel strips before attaching them.
- Avoid tight attachment stitches: Pulling the sewing yarn too firmly causes puckering beneath the lattice. Keep the strips flat and use attachment points approximately 2–3 cm apart.
- Control border increases: Too many stitches along the side edges can produce a wavy border. If rippling appears, remove the affected round and reduce the number of picked-up stitches.
- Secure chenille ends: Short yarn tails may loosen after repeated handling or washing. Leave approximately 15–20 cm for weaving, changing direction through the reverse-side stitches.
- Check the finished measurements: A difference of even 1 cm per 10 cm in gauge becomes significant across a large blanket. Measure the panel before adding the lattice and again after completing the border.
How to Customize the Diamond Blanket
Make a Larger Throw
To create a blanket approximately 150 × 180 cm, increase the foundation chain according to your measured stitch gauge.
At seven stitches per 10 cm, a 150 cm panel requires approximately 105 stitches. Add one turning chain for a starting chain of 106.
Continue the textured stitch pattern until the panel reaches the desired length.
A larger blanket also requires additional diagonal strips. Maintain the original diamond spacing rather than stretching the existing design across the larger surface.
Make a Smaller Lap Blanket
For a lap blanket measuring approximately 90 × 120 cm, begin with a narrower foundation chain.
At the reference gauge, 63 stitches correspond to approximately 90 cm. Chain 64 to begin.
Adjust the number of rows after measuring the textured stitch gauge. Use fewer diagonal paths while maintaining consistent diamond proportions.
Change the Diamond Size
The lattice can be adapted without changing the base stitch pattern.
Smaller diamonds create a denser decorative surface and require more diagonal strips. Larger diamonds create a more open pattern with fewer crossings.
For a 120 cm-wide blanket, diamond widths around 24–30 cm provide a reasonable starting point. Test the spacing with removable markers before committing to the design.
Choose a Different Color
Warm ivory makes the raised stitch structure easy to see. Sage green works well with neutral and botanical interiors, while charcoal creates a more subdued lattice effect.
Terracotta emphasizes the sculptural surface of the blanket. For the closest appearance to the reference photograph, choose a consistent warm cream shade for the background, lattice, and border.
Frequently Asked Questions
Is this chunky diamond crochet blanket suitable for beginners?
The base uses simple single and double crochet stitches, but the lattice requires accurate measurement, positioning, and sewing. A crocheter comfortable with basic stitches and finishing techniques should be able to follow the instructions.
Can I make the diamonds directly into the crochet fabric?
Yes. Some diamond lattice blankets use front-post double crochet stitches to build diagonal ridges as the fabric grows. That method creates an integrated surface rather than an applied decoration.
The method in this article is different: the diagonal strips are made separately and sewn to the base.
How much yarn do I need?
For the proposed throw, allow approximately 2,100–2,700 g of super bulky yarn as an initial budget. That corresponds to roughly 7–9 balls of 300 g Bernat Blanket yarn.
The final amount depends on your gauge, diamond spacing, and border width. Weigh a completed swatch and a sample lattice strip to refine the estimate before buying all the yarn.
Can I use regular worsted-weight yarn?
Yes, but the fabric will be thinner and the dimensions will change significantly if you follow the same stitch counts. Make a new gauge swatch and calculate the required foundation chain and rows.
How do I wash the completed blanket?
For Bernat Blanket yarn, the manufacturer specifies machine washing on a delicate cycle and gentle tumble drying. Do not iron or bleach it.
Check that the attachment yarn, if different from the main yarn, has compatible care requirements.
Why does my blanket curl at the edges?
Curling may result from tight tension, an uneven number of side-border stitches, or diagonal strips that are too short. Examine the base before attaching the lattice to identify which construction stage introduced the distortion.
Conclusion
This chunky diamond crochet blanket pattern combines a dense textured base with separately constructed diagonal ridges, creating a prominent lattice without requiring complex cable stitches throughout the blanket. The most important construction checks are consistent panel gauge, evenly spaced diagonal paths, and attachment stitches that do not distort the fabric.
Before making the full-size throw, crochet and measure a 15 cm swatch, then test one lattice crossing to assess its thickness and flexibility. Save the project to Pinterest or share your completed blanket on Instagram using #ChunkyDiamondCrochetBlanket.
Would you prefer the diagonal strips to cross visibly at each intersection or lie flat in a continuous diamond outline?









