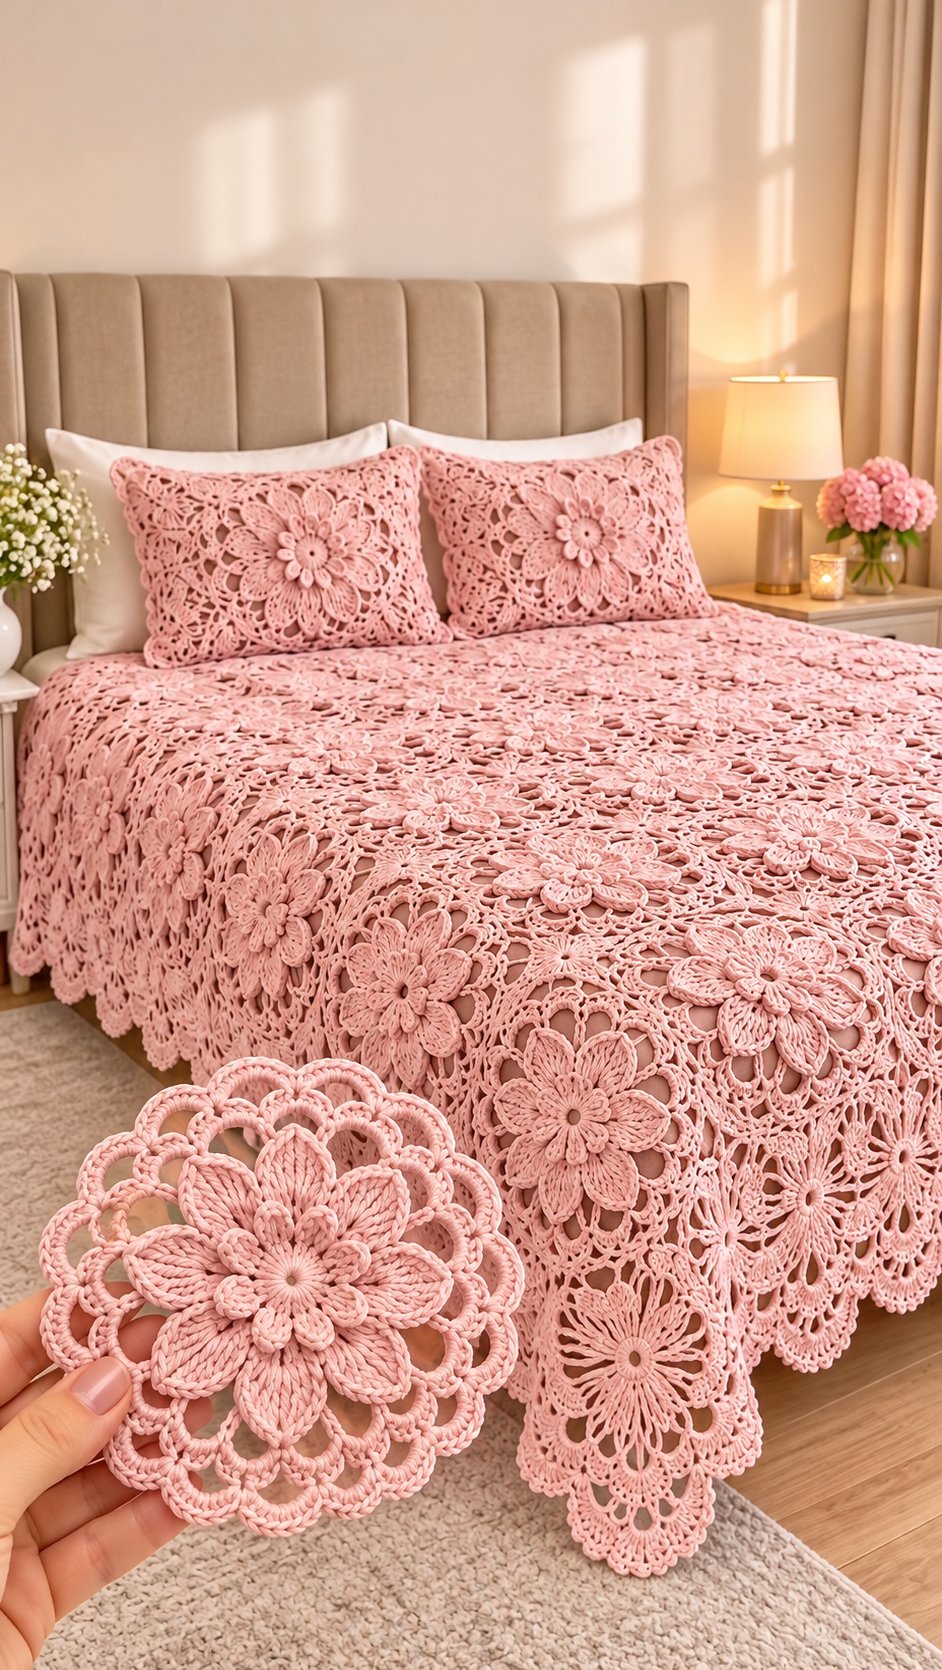
Pink Crochet Flower Bedspread Pattern – Floral Lace Blanket and Matching Pillow Covers
Pattern type: Original, photo-inspired interpretation
Skill level: Intermediate
Terminology: US crochet terms
Construction: Raised flower granny squares joined into lace panels
Introduction
The layered pink flowers on this bedspread sit above an open lace framework, creating raised petals without covering the spaces between motifs. This pink crochet flower bedspread pattern uses DK cotton yarn, a 3.5 mm hook, and individually joined floral squares. Designed for intermediate crocheters, the proposed 180 × 210 cm bedspread can be resized through its motif layout. Matching pillow covers complete the set, while modular construction allows damaged sections to be repaired individually. This pattern is an original interpretation of the photographed design and has not been tested on a physical sample — please crochet one motif first and adjust the stitch counts to your yarn and gauge.
The Design: What Makes This Floral Bedspread Different
Three construction decisions define this floral lace crochet blanket. First, each flower is worked in raised petals above its foundation round, creating dimensional texture while keeping the reverse relatively flat. Second, the petals are surrounded by open chain spaces, which reduce fabric density and establish the lace structure.
The third decision concerns the outer square. Four corner groups provide regular joining points, so individual motifs can be assembled into a rectangular bedspread without forcing circular flowers directly against one another.
A common mistake when making a crochet flower motif is tightening the chain arches behind the petals. This pulls the flowers inward and distorts the square corners.
The photographed design contains more elaborate petal layers than this simplified interpretation. The pattern below prioritizes repeatable stitch counts, consistent joins, and a practical construction method.
Project Info at a Glance
| Feature | Details |
|---|---|
| Project | Floral crochet bedspread and two pillow covers |
| Skill level | Intermediate |
| Estimated time | 80–140 hours; planning estimate |
| Proposed finished size | 180 × 210 cm before border |
| Crochet hook | 3.5 mm |
| Yarn weight | DK / Category 3 cotton |
| Main color | Dusty blush pink |
| Construction | Raised flower granny squares |
| Motifs | 168 for bedspread + 18 for pillows |
| Pillow size | Approximately 45 × 45 cm |
| Best for | Decorative bed covering and matching cushion fronts |
| Terminology | US crochet terms |
The measurements assume that each completed motif blocks to exactly 15 × 15 cm. The 3.5 mm hook and DK cotton combination is supported by comparable published patterns, but the dimensions of this new motif have not been physically tested.
Materials and Tools
Yarn
For the closest visual interpretation, use one continuous dusty-pink shade throughout the bedspread and matching pillow fronts.
- Dusty blush pink DK cotton: Main motifs, joining seams, and border. A smooth cotton such as a suitable DK line from DROPS or another manufacturer is a practical starting choice.
- Matching dusty-pink cotton: Optional separate supply for pillow edging and sewing.
- Optional darker rose cotton: Small quantities for contrasting flower centers, if a two-tone version is preferred.
The photographed piece appears monochromatic, so accent yarn is not required.
How Much Yarn Will You Need?
An accurate quantity depends on the actual weight of one completed square.
Use this calculation:
Total yarn (g) = (186 × M + B) × 1.10
Where M = measured grams per completed motif, B = estimated grams for joins, borders, and pillow finishing, 186 = total floral motifs for the bedspread and two pillow fronts, and 1.10 = allowance for approximately 10% extra yarn.
For example, if one blocked motif weighs 12 g and the joins, borders, and pillow finishing require another 350 g: (186 × 12 + 350) × 1.10 = 2840.2 g. That gives a provisional purchase quantity of approximately 2.85 kg, not a verified requirement.
Comparable published cotton bedspreads vary considerably in yardage and weight, making a weighed sample more useful than a generic yarn estimate.
Tools
- 3.5 mm crochet hook
- Tapestry needle for joining and finishing
- Scissors
- Locking stitch markers
- Measuring tape
- Digital kitchen scale for yarn calculations
- Blocking mats and rustproof pins
- Two 45 × 45 cm pillow inserts
- Two fabric pillow backs or plain pillow covers
- Matching sewing thread and needle
A 3.0 mm hook may produce a firmer fabric, while a 4.0 mm hook may open the lace. Make a complete sample before deciding which hook gives the required square measurement.
Crochet Abbreviations
| Abbreviation | Meaning |
|---|---|
| MR | Magic ring |
| ch | Chain |
| sc | Single crochet |
| hdc | Half double crochet |
| dc | Double crochet |
| tr | Treble crochet |
| sl st | Slip stitch |
| inc | Two single crochets in one stitch |
| dec | Single crochet decrease |
| BLO | Back loop only |
| sp | Space |
| st / sts | Stitch / stitches |
| sk | Skip |
| rep | Repeat |
| RS | Right side |
| WS | Wrong side |
| FO | Fasten off |
An invisible decrease is made through the front loops of two adjacent stitches, but decreases are not required for this flat lace design.
Pattern Notes and Gauge
This original floral square uses joined rounds rather than a continuous spiral.
Beginning chains do not count as stitches unless a round specifically says otherwise. Slip stitches used to close rounds also do not count toward the stated stitch totals.
The pattern has four raised petals and a square lace background. This produces a related floral appearance, although it does not duplicate the many layered petals visible in the photograph.
Target gauge: One completed and blocked square measures 15 × 15 cm.
If your square measures 14 cm, a 12-column layout will measure approximately 168 cm rather than 180 cm. Adjust the hook, add another outer round, or change the number of squares.
Crochet Flower Motif — Make 186
Yarn: Dusty blush pink. Original photo-inspired construction; stitch totals are calculated from the instructions below.
Round 1: Flower Center
Make a magic ring.
R1: Work 6 sc into MR. Pull the ring closed. Join with sl st to first sc. (6 sc)
Round 2: Expand the Center
R2: Ch 1, work 2 sc in each stitch around. Join with sl st. (12 sc)
The center now has 12 evenly distributed stitches.
Round 3: Petal Foundations
R3: Ch 1, repeat [sc in next st, ch 4, sk next 2 sts] four times. Join with sl st to first sc. (4 sc, 4 ch-4 spaces)
Four foundation arches are formed around the center.
Round 4: Raised Flower Petals
R4: In each ch-4 space, work (sc, hdc, 3 dc, hdc, sc). Repeat for all four spaces. Join with sl st to the first sc. (4 petals; 28 stitches total)
Each petal contains seven stitches. The double crochet stitches form the rounded upper section, while the shorter stitches narrow the base.
Do not fasten off.
Round 5: Background Lace Arches
R5: Working behind the petals, sl st into the nearest R3 anchoring sc. Ch 1, sc in that anchor, ch 5. Repeat [sc in the next R3 anchoring sc, ch 5] three times. Join with sl st to the first sc. (4 sc, 4 ch-5 spaces)
Keep the new arches behind the raised flower rather than across its front.
Round 6: Form the Square
R6: Sl st into the first ch-5 space. Ch 3 (counts as first dc), work (2 dc, ch 2, 3 dc) in the same space, ch 1. In each of the next three ch-5 spaces, work (3 dc, ch 2, 3 dc), ch 1. Join with sl st to top of beginning ch-3. (24 dc, 4 ch-2 corner spaces, 4 ch-1 side spaces)
The motif now has four corners.
Round 7: First Lace Expansion
R7: Sl st across to the first ch-2 corner space. Ch 3 (counts as dc), (2 dc, ch 2, 3 dc) in that corner, ch 1, 3 dc in the next ch-1 side space, ch 1. Repeat the following sequence for each remaining side: (3 dc, ch 2, 3 dc) in corner, ch 1, 3 dc in side space, ch 1. Join to beginning ch-3. (36 dc, 4 ch-2 corner spaces, 8 ch-1 side spaces)
There is one three-double-crochet group between each pair of corners.
Round 8: Outer Lace Square
R8: Sl st to the first ch-2 corner. Ch 3 (counts as dc), (2 dc, ch 2, 3 dc) in the corner, ch 1. Work 3 dc in each of the next two ch-1 spaces, placing ch 1 between groups and after the second group. Repeat this corner-and-side sequence three more times. Join with sl st. (48 dc, 4 ch-2 corner spaces, 12 ch-1 side spaces)
Fasten off, leaving a 20 cm tail for sewing.
The completed square has four corners, three ch-1 side spaces per side, and a raised flower at its center.
Blocking the Floral Motifs
Place one finished motif on a blocking mat with the right side facing upward.
Pin the four corners into a square, measuring 15 cm between opposite edges. Open the chain spaces without stretching the central flower flat.
Lightly dampen the motif using a method suitable for the chosen yarn. Allow it to dry completely before removing the pins.
Measure all four sides. If the square is not consistent, adjust the hook or tension before making the remaining 185 motifs.
For repeatability, keep a written record of the hook size, blocked measurements, and weight of the first finished square.
How to Join the Flower Motifs
A flat joining method is preferable for this design because the raised flower should remain the main textured element.
Bedspread Layout
Arrange 168 motifs into 12 columns and 14 rows. Target panel size: 180 × 210 cm before edging.
Flat Slip-Stitch Joining
Place two squares side by side with right sides facing upward.
Insert the hook through the corresponding outer edge loops of both motifs.
Draw matching yarn through both loops and the loop on the hook.
Continue across the side, matching each corner and three-double-crochet group.
At chain spaces, use a slip stitch through the corresponding chain arches without pulling them closed.
Finish the seam at the next corner.
Repeat until all 12 squares in the first row are joined.
Complete the remaining 13 rows.
Join the long horizontal edges of adjacent rows using the same method.
Lay the panel flat and inspect the joins for puckering.
The exact number of joining slip stitches depends on which outer loops you select. Match the structural groups rather than adding extra stitches to compensate for uneven tension.
A joined motif construction is also used in published floral bedspread patterns, although the joining method varies by design.
Scalloped Crochet Border Pattern
The photograph features a broad, intricate floral edge. The following border is a simpler shell interpretation that can be worked around the assembled panel.
Border Round 1: Foundation
Join yarn at a corner of the bedspread.
Work sc evenly along each edge, placing 3 sc at each corner. Use the outer stitches and chain spaces as anchor points.
Join with sl st.
Count the foundation stitches and record the total before beginning the next round.
Border Round 2: Openwork Foundation
Ch 1, sc in the first stitch.
Repeat [ch 3, sk 2 sts, sc in next st] along the edge.
At corners, adjust the number of skipped stitches so the chain arches remain flat. Join with sl st.
The number of arches will depend on the foundation count and corner adjustments.
Border Round 3: Decorative Shells
Sl st into the first ch-3 space.
Work 5 dc in the space, then sc in the next ch-3 space.
Repeat this alternating shell-and-anchor sequence along the edge.
At each corner, place an additional shell or chain arch if necessary to prevent pulling. Check the corner on a sample before repeating it around the full bedspread.
Border Round 4: Picot Detail
Work a sl st along the edge to the center stitch of the next shell.
Ch 3, sl st into the first chain to form a picot.
Continue around the border, placing one picot at the center of each shell and using slip stitches to travel between shells.
Fasten off and weave in the yarn tails.
Border adjustment: The shell placement is a flexible edging recipe rather than a fixed-count border. Test it along two joined motifs and one corner first; the final repeat may need spacing adjustments.
Matching Crochet Flower Pillow Covers
The two pillows in the photograph repeat the raised floral center and lace background of the bedspread.
For this version, make two approximately 45 × 45 cm decorative fronts.
Pillow Front Panels — Make 2
Each pillow front requires nine floral squares.
Work R1–R8 of the main motif pattern for each square, then block every motif to 15 × 15 cm.
Arrange the squares into three columns and three rows.
Join them using the flat slip-stitch method.
Each front should measure approximately 45 × 45 cm before edging, subject to gauge and seam width.
Pillow Front Edging
Join yarn at one corner.
R1: Work sc evenly around the panel, placing 3 sc at each corner. Join with sl st. (Count depends on edge placement.)
R2: Ch 1, work sc in each stitch, placing 3 sc in each corner’s center stitch. Join with sl st. (Previous count + 8 sts.)
Fasten off, leaving a 30 cm sewing tail.
Pillow Backing and Assembly
Cut or obtain a suitable fabric pillow back, allowing for seam allowances and a closure.
A ready-made plain cotton pillow cover is a practical option. Attach the crochet panel to its front by hand-sewing through the outer crochet stitches, keeping the lace square and centered.
Alternatively, make a separate fabric envelope backing and stitch it to the crocheted front along all four edges, leaving the envelope overlap functional.
Do not sew through the center flowers. Their raised structure should remain independent of the backing.
Repeat for the second pillow.
Assembly and Finishing — 10 Steps
- Complete the floral motifs. Make 168 squares for the bedspread and 18 additional squares for the pillow fronts.
- Block the squares. Bring every motif to the selected gauge and allow it to dry.
- Arrange the bedspread. Place the main motifs into a 12 × 14 rectangular layout.
- Align the flower faces. Position all raised petals on the right side of the finished panel.
- Join the horizontal rows. Connect adjacent squares using flat slip stitches.
- Connect the rows. Work across the longer seams without tightening the lace openings.
- Add the decorative border. Complete the foundation, openwork, shell, and picot rounds.
- Prepare the pillow fronts. Join nine squares for each of the two covers and add their finishing rounds.
- Attach the pillow backing. Sew the crochet fronts to the prepared fabric covers.
- Finish the set. Weave in loose yarn ends, inspect all joins, and block the completed pieces as needed.
The completed set consists of one floral lace bedspread and two matching pillow covers.
7 Technical Tips for a Professional Finish
- Mark every corner. Place a stitch marker in each ch-2 corner space during R6–R8. A missing corner group can distort the square and prevent adjacent motifs from aligning.
- Measure the first ten motifs. If one square measures 15 cm and another measures 15.8 cm, the difference can accumulate across the bedspread. Block all samples to the same dimensions before joining.
- Control flower-center tension. Pull the magic ring firmly enough to close the center hole without compressing the surrounding stitches. An excessively tight center can make the raised petals curl inward.
- Avoid overworking the lace arches. Maintain consistent tension in every ch-4 and ch-5 space. Shortened arches pull the petals backward and make the floral square uneven.
- Pin before sewing. Place markers at both ends and the midpoint of each joining seam. Joining unmatched sections can produce visible puckering across a large blanket.
- Weave yarn tails in two directions. Pass each tail through at least 5–6 stitches, reverse direction, and secure it through another group of stitches. A tail woven in only one direction may work loose during laundering.
- Test the finished fabric’s weight. Weigh ten completed squares and multiply the average by the full motif count before committing to the final size. A large cotton bedspread can become heavy enough to stretch its openwork joins.
Frequently Asked Questions
Is this pink crochet flower bedspread pattern suitable for beginners?
The pattern is best suited to intermediate crocheters who already understand magic rings, double crochet groups, chain spaces, and joining motifs.
A beginner familiar with granny squares can practice the floral motif separately before attempting the full bedspread.
Can I use acrylic yarn instead of cotton?
Yes. DK acrylic yarn can be substituted, but the finished fabric may behave differently during blocking.
Cotton generally provides well-defined stitches and stable floral shapes. Acrylic may produce a lighter finished blanket, depending on the yarn selected.
Always make and measure a sample after substituting fibers.
How many crochet flower motifs do I need for a queen-size bedspread?
The proposed design uses 168 motifs for a 180 × 210 cm panel, assuming each square measures 15 cm.
For another size, divide the desired width and length by the measured motif dimensions, then round to whole motif counts.
For example, a 210 × 240 cm panel made from 15 cm squares requires 14 columns and 16 rows, or 224 motifs before edging.
Can I make the flower petals more dimensional?
Yes. You can experiment with additional petal layers worked into separate foundation arches behind the original flower.
However, adding petals changes the yarn consumption and may increase the thickness of the finished fabric. Test the revised motif before using it throughout the bedspread.
How should I wash a crochet lace bedspread?
Follow the care instructions for the chosen yarn.
For cotton lace, gentle washing and flat drying are often appropriate, but the full bedspread may be too heavy for some household washing machines.
Support the wet fabric when lifting it to prevent the weight from stretching the joins. Reshape the edges while drying.
Can I make a smaller floral crochet blanket?
Yes. Use fewer motifs while retaining the same joining and border techniques.
A panel of 8 × 10 squares, each measuring 15 cm, produces an approximate 120 × 150 cm blanket before edging.
The same method can be adapted to decorative throws, cushion panels, or table coverings.
Conclusion
This pink crochet flower bedspread pattern combines dimensional floral motifs, square lace foundations, flat joins, and a scalloped border into a coordinated bedroom set. Its modular structure allows the finished measurements to be changed without redesigning the central flower.
Before purchasing yarn for the complete project, crochet one motif, block it, and record its dimensions and weight. That sample establishes the material requirement and determines whether the proposed layout fits your bed.
Save the pattern to Pinterest for reference, and share completed projects on Instagram using #PinkFloralCrochetBedspread. For this design, would you keep every flower dusty pink, or introduce a darker rose shade in the raised centers?









