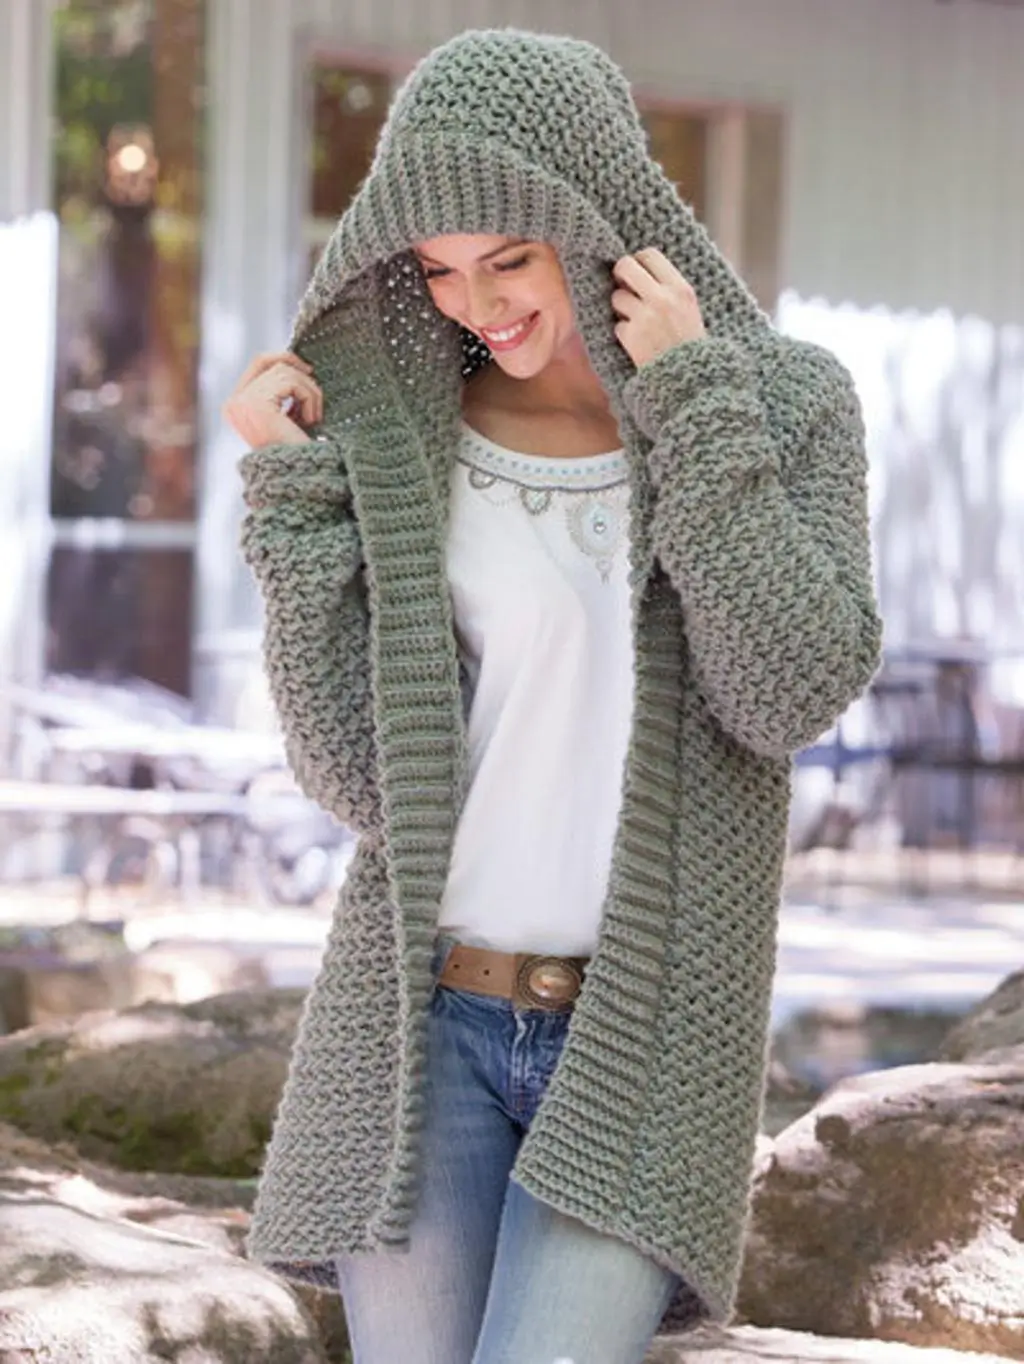
The hood on this cardigan is deep enough to become part of the collar rather than sitting only at the neckline. This hooded crochet cardigan pattern combines a long open-front body, relaxed sleeves, a textured sage-green stitch and a wide ribbed band running continuously around the fronts and hood. The construction below is photo-inspired and measurement based, making it practical to adjust for different adult sizes.
The Design: What Makes This Hooded Cardigan Different
The cardigan uses three contrasting textures for structural reasons. A dense textured stitch covers the body and sleeves, giving the long garment enough substance to hang cleanly. The front opening uses a firmer ribbed band, which controls stretching along the vertical edges and continues around the hood for a consistent finish. Finally, the hood is intentionally oversized. Its extra depth creates the folded, draped shape visible around the face instead of producing a tight cap-style hood. The body is worked with generous positive ease and minimal waist shaping. That relaxed geometry also makes sizing easier because the back and front panels can be calculated directly from the wearer’s measurements.
Project Information at a Glance
| Skill Level | Construction | Fit | Hook | Best For |
|---|---|---|---|---|
| Intermediate | Seamed panels with attached hood | Relaxed, 15–25 cm positive ease | 5.5–6.5 mm | Long autumn/winter cardigan |
Materials and Tools
Yarn
- Sage Green — #4 worsted or light #5 bulky yarn — approximately 1200–1800 g depending on size and length
The yarn quantity is a project estimate rather than a measurement taken from the photographed garment. A long hooded cardigan consumes considerably more yarn than a standard hip-length cardigan, particularly when the hood and wide front bands are included.
Tools
- 5.5–6.5 mm crochet hook, adjusted to yarn and gauge
- Large-eye yarn needle
- Scissors
- Locking stitch markers
- Flexible measuring tape
- Blocking mats or a large flat surface
Abbreviations
- ch — chain
- sc — single crochet
- hdc — half double crochet
- dc — double crochet
- sl st — slip stitch
- BLO — back loop only
- st/sts — stitch/stitches
- RS — right side
- WS — wrong side
Finished Measurements
The cardigan in the reference has a relaxed silhouette extending approximately to the upper or mid thigh. Instead of copying one fixed size, calculate the garment from the wearer’s measurements.
| Measurement | Recommended Target |
|---|---|
| Finished chest circumference | Actual bust + 15–25 cm |
| Body length | 75–90 cm |
| Armhole depth | 20–26 cm |
| Sleeve length from underarm | 42–50 cm |
| Upper sleeve circumference | Upper arm + 8–14 cm |
| Hood depth | 32–38 cm |
| Front band width | 5–7 cm |
Gauge Swatch
Make a swatch at least 15 × 15 cm using the selected yarn and hook.
Wash or wet-block the swatch using the same method planned for the finished cardigan. Let it dry completely before measuring.
Record:
- Stitches per 10 cm
- Rows per 10 cm
- Fabric thickness
- Amount of vertical stretch
The final stitch count must come from this swatch. Long cardigans magnify small gauge errors, so a difference of only one stitch per 10 cm can substantially change the finished circumference.
Main Textured Stitch
A simple alternating half-double-crochet texture produces a dense surface without making the garment excessively complicated.
Row 1: Hdc in second ch from hook and in every ch across. Ch 1, turn.
Row 2: Hdc BLO in every st across. Ch 1, turn.
Row 3: Hdc in every st across. Ch 1, turn.
Repeat Rows 2–3.
For a more pronounced texture, replace the standard hdc row with alternating front-loop and back-loop hdc. Test this variation first because a heavily textured stitch consumes more yarn and can make a long cardigan substantially heavier.
Calculate Your Cardigan Width
Measure the bust at the fullest point.
Add approximately 15–25 cm of positive ease.
For example:
Actual bust = 100 cm
Desired ease = 20 cm
Finished circumference = 120 cm.
For an open cardigan, the two front panels do not have to meet completely at center front. The ribbed edging adds additional width after assembly.
Back Panel
Calculate the back width as approximately half the desired finished circumference.
For a 120 cm finished circumference:
Back panel target width: approximately 60 cm.
Chain enough stitches to reach the calculated back width according to the blocked gauge.
Back Panel Pattern
Row 1: Hdc in second ch from hook and across. Ch 1, turn.
Row 2: Hdc BLO across. Ch 1, turn.
Row 3: Hdc across. Ch 1, turn.
Repeat Rows 2–3 until the panel reaches the required body length.
A target of approximately 75–90 cm produces the long silhouette visible in the reference.
Fasten off, leaving a long tail for shoulder seaming.
Left Front Panel
Each front panel should be narrower than half the back because the cardigan remains open at center front.
A practical starting width is approximately 40–45% of the back-panel width.
If the back measures 60 cm, each front panel can begin at approximately 24–27 cm before the front edging is added.
Chain to the calculated width.
Work the same textured pattern as the back until the panel matches the back length.
Fasten off.
Right Front Panel
Make a second panel identical to the first.
Before assembly, place the back and both fronts flat with the top edges aligned.
Confirm that both front panels have identical row counts. A difference of even several rows can become visible once the front band is attached.
Shoulder Assembly
Place the front panels against the back panel with right sides facing.
Join each shoulder from the outer edge toward the neckline.
Leave a central back-neck opening approximately 18–22 cm wide, adjusting this measurement to the wearer.
A mattress seam or slip-stitch seam can be used.
Armhole Placement
Lay the joined body flat.
Measure downward from each shoulder approximately 20–26 cm depending on the required size.
Place a stitch marker at that point on both the front and back edges.
The space between the shoulder and marker becomes the armhole.
Repeat on the opposite side.
Side Seams
Starting at the lower hem, join each front panel to the corresponding back edge.
Stop at the armhole marker.
Do not stretch either panel while seaming.
Repeat on the opposite side.
Relaxed Sleeves
The photographed cardigan has loose sleeves rather than fitted sleeves. The upper sleeve therefore needs substantial positive ease.
Measure around the fullest part of the upper arm and add approximately 8–14 cm.
Use this measurement as the sleeve width.
Sleeve Foundation
Chain enough stitches to reach the calculated upper-sleeve width.
Row 1: Hdc across.
Row 2: Hdc BLO across.
Row 3: Hdc across.
Repeat Rows 2–3.
Continue until the sleeve reaches approximately 42–50 cm from underarm to wrist, minus the planned cuff depth.
Sleeve Taper
The reference has volume through the upper sleeve but a narrower wrist.
To reproduce that proportion, decrease gradually through the lower half of the sleeve.
Work one decrease at each end of a decrease row.
Space decrease rows approximately every 4–6 rows.
Continue until the lower sleeve circumference is only slightly larger than the wrist.
Do not reduce to the exact wrist measurement because the ribbed cuff will gather the remaining width.
Make Two Sleeves
Make the second sleeve with the same starting stitch count, number of rows and decrease placement.
Compare both pieces before seaming.
Fold each sleeve lengthwise with right sides facing and seam from cuff edge toward the upper arm.
Attach the Sleeves
Turn the cardigan body inside out.
Insert one sleeve into its armhole with right sides together.
Align the sleeve seam with the cardigan side seam.
Pin the sleeve center to the shoulder seam.
Add markers between these two points before sewing.
Join evenly around the armhole without stretching either layer.
Repeat for the second sleeve.
Ribbed Cuffs
The cuff should be firm enough to control the volume of the sleeve.
Join sage yarn at the wrist.
Chain approximately 11–15, depending on the desired cuff depth.
Row 1: Sc in second ch from hook and across. Sl st into the next two sleeve-edge stitches. Turn.
Row 2: Skip the two sl sts. Sc BLO across the cuff. Ch 1, turn.
Row 3: Sc BLO across. Sl st into the next two sleeve-edge stitches. Turn.
Repeat Rows 2–3 around the wrist.
Join the first and last cuff rows with sl sts.
Fasten off.
Repeat on the second sleeve.
Oversized Hood
The hood is one of the defining features of this cardigan. A shallow hood will not reproduce the draped frame around the face.
Join yarn at one front neckline edge.
Work evenly around the neckline and finish at the opposite front neckline edge.
Hood Row 1: Hdc evenly around the neckline. Ch 1, turn.
Hood Row 2: Hdc BLO across. Ch 1, turn.
Hood Row 3: Hdc across. Ch 1, turn.
Continue the established texture.
Adding Hood Depth
Work until the hood measures approximately 32–38 cm from the neckline.
Test the depth before closing it.
Fold the hood upward around the head. The upper edge should pass comfortably over the crown without pulling the cardigan neckline upward.
If it feels tight, add additional rows.
Close the Hood
Fold the hood in half so the two upper edges meet.
Join the top seam with mattress stitch or a loose slip-stitch seam.
A tight seam can create a pointed peak at the back of the head.
Keep the seam flexible and distribute the stitches evenly.
Wide Ribbed Front and Hood Band
The broad band visible in the reference runs from one lower front corner, around the hood and down the opposite front edge.
This section can be made with attached vertical ribbing.
Join yarn at the lower right front corner.
Chain approximately 11–15 for a 5–7 cm band.
Row 1: Sc in second ch from hook and across. Sl st into the next two cardigan-edge stitches. Turn.
Row 2: Skip the two sl sts. Sc BLO across. Ch 1, turn.
Row 3: Sc BLO across. Sl st into the next two cardigan-edge stitches. Turn.
Repeat the last two rows while traveling upward along the first front, around the hood opening and down the second front.
Working Around the Hood Curve
The hood curve requires more ribbing length than a straight front edge.
If the band begins pulling the hood inward, attach the ribbing more slowly around the curve. For example, work an attachment into one edge stitch instead of advancing through two stitches on selected rows.
If the band begins to flare, advance through slightly more edge fabric.
Check the hood every 8–10 ribbing rows rather than waiting until the entire band is finished.
Bottom Hem
The photographed cardigan has a simple lower edge rather than a decorative border.
Join yarn at one lower corner.
Row 1: Sc evenly across the entire lower edge. Ch 1, turn.
Row 2: Sc BLO across.
Fasten off.
If more structure is required, add one additional BLO sc row.
Optional Pockets
Pockets are not clearly visible in the reference, so treat them as an optional modification.
For each pocket, make a rectangle approximately 16–19 cm wide × 18–21 cm high using the main textured stitch.
Add one or two rows of BLO sc across the top.
Pin the pockets symmetrically to the lower front panels and sew along the sides and bottom only.
Yarn Quantity Calculation
The most accurate way to estimate yarn is to weigh a blocked gauge swatch.
Make a 20 × 20 cm swatch and weigh it.
Then calculate the approximate total fabric area of:
- Back panel
- Two front panels
- Two sleeves
- Hood
- Cuffs
- Front band
For example, if a 20 × 20 cm swatch weighs 22 g, its area is 400 cm².
If the estimated garment area is 26,000 cm²:
26,000 ÷ 400 = 65 swatch units.
65 × 22 g = 1430 g.
Add approximately 10–15% for seams, ribbing, gauge differences and adjustments.
This calculation is an example. Weighing the actual swatch made from your chosen yarn gives a more useful result than relying on a universal skein count.
Shorter Cardigan Version
For a hip-length cardigan, reduce the back and front panels to approximately 55–65 cm.
Keep the hood and sleeve proportions unchanged unless the wearer also requires a smaller overall size.
A shorter body substantially reduces yarn consumption.
Long Cardigan Version
For a mid-thigh version similar to the reference, aim for approximately 80–90 cm from shoulder to hem.
For a coat-length version, increase the body toward 95–105 cm, but test the weight of the yarn first.
Dense worsted or bulky yarn can become heavy at coat length and may stretch vertically after washing.
Alternative Yarn Weights
DK Yarn
DK yarn creates a lighter cardigan with more movement. Use a smaller hook appropriate for the yarn and recalculate every stitch count from the new gauge.
Worsted Yarn
Worsted weight provides a useful balance between texture and garment weight and is a practical choice for the photographed silhouette.
Bulky Yarn
Bulky yarn creates stronger stitch definition but adds substantial weight. Keep the body slightly shorter or use a more open stitch if the swatch feels heavy.
Assembly
- Block the back and both front panels to their calculated measurements before joining.
- Seam the shoulders while leaving the planned 18–22 cm back-neck opening.
- Mark identical armhole depths on both sides of the body.
- Join the side seams from the hem to the armhole markers.
- Seam each sleeve and attach it with the sleeve seam aligned to the body side seam.
- Add the ribbed cuffs and compare both cuff circumferences before fastening off.
- Crochet the hood directly around the neckline and close its upper seam.
- Work the continuous ribbed band up one front, around the hood and down the second front.
- Finish the lower hem and weave every yarn tail through several stitches in two directions.
- Block the completed cardigan to its final measurements and let it dry flat before hanging or wearing.
The completed cardigan should hang evenly at both front edges, with a deep hood, relaxed sleeves and a stable ribbed opening.
7 Technical Tips
- The front edges become different lengths: one panel contains a different row count. Count both front panels before shoulder assembly and keep their finished lengths within approximately 1 cm.
- The shoulders stretch downward: the yarn is too heavy for a loose seam. Use a firm mattress seam and reinforce the shoulder over the final 1–2 cm nearest the neckline.
- The sleeve twists after assembly: its seam was not aligned with the cardigan side seam. Pin the underarm and shoulder points first, then divide the remaining armhole into four equal sections before sewing.
- The hood pulls backward: its depth is insufficient. Test the hood before closing the top and add rows until it measures approximately 32–38 cm from the neckline.
- The front ribbing waves: too much ribbing has been attached to too little cardigan edge. Reduce attachment frequency and test a 15–20 cm section flat before continuing.
- The cardigan grows after washing: the yarn has significant vertical stretch. Wash the gauge swatch before calculating the body length and base all row measurements on the blocked gauge.
- The cuffs remain too loose: the sleeve was not gathered enough during attachment. Make the ribbed cuff 2–4 cm smaller than the relaxed wrist-area circumference and distribute the sleeve edge evenly around it.
Care and Blocking
Use the washing method specified on the selected yarn label. Before treating the complete cardigan, test the gauge swatch for shrinkage, stretching and surface changes.
After washing, place the cardigan flat. Align both front edges, straighten the side seams and shape the hood symmetrically.
A long wet cardigan should be supported rather than lifted by the shoulders because the added water weight can stretch the upper body and neckline.
Conclusion
The defining measurements in this sage green hooded crochet cardigan pattern are the relaxed chest circumference, deep hood and continuous ribbed front band. Start by washing and measuring a large gauge swatch, then calculate the back and front panels from the required finished chest measurement rather than relying on a generic stitch count. Check the cardigan body before adding sleeves, because body length is easiest to alter at that stage. Once the fit is correct, add the oversized hood and finish the opening with firm BLO ribbing. Share the finished version on Pinterest or Instagram with #SageHoodedCrochetCardigan. Would you keep the deep hood shown here or reduce it for a closer-fitting neckline?









