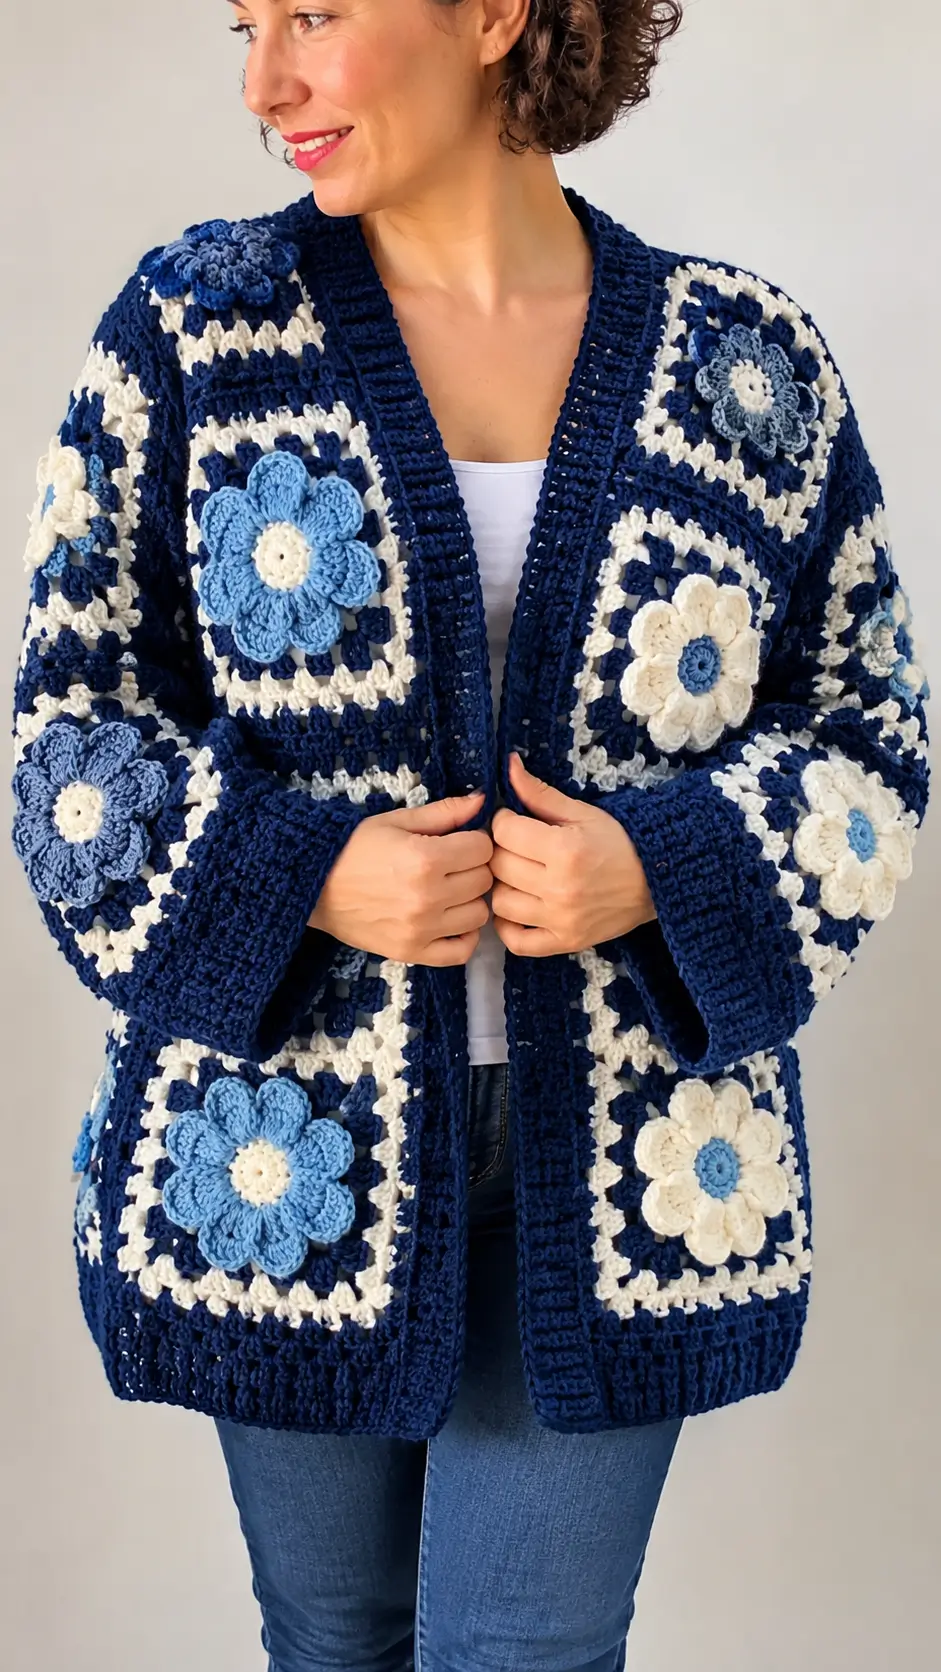
The oversized flowers on this cardigan must stay dimensional while the navy granny-square fabric bends around shoulders, elbows and hips. This photo-inspired blue floral granny square crochet cardigan combines navy blue, ivory and light-blue yarn with raised flower appliqués, an open front, wide cuffs and a substantial ribbed border. The modular construction also makes the finished measurements easier to adjust before joining.
The Design: What Makes This Crochet Cardigan Different
The garment uses two visual structures at once. Navy-and-ivory granny squares create the actual wearable fabric, while separate dimensional flowers are attached to selected squares. Some flowers use light-blue petals with ivory centers; others reverse the colors. That controlled variation keeps the cardigan from looking like a repeated block grid.
A deep navy border runs around the neckline and both front edges. Wide matching cuffs stabilize the sleeves, while a dense lower band gives the cardigan enough weight to hang vertically. The flower appliqués should be added after the squares are blocked and joined. Attaching them earlier makes seams harder to control and can crush petals during assembly.
Project Information at a Glance
| Skill Level | Construction | Suggested Hook | Yarn | Fit |
|---|---|---|---|---|
| Intermediate | Modular granny-square cardigan | 5.0 mm | Worsted weight #4 | Relaxed / oversized |
Materials and Tools
Yarn
- Deep Navy Blue — worsted weight #4 — main square color, seams, cuffs and front border
- Warm Ivory — worsted weight #4 — contrasting granny rounds and flower petals
- Light Blue — worsted weight #4 — dimensional flower petals and selected centers
A smooth yarn gives the granny-square openings and flower edges clearer definition. Use the same yarn family for all three colors so the blocked squares remain consistent.
Tools
- 5.0 mm crochet hook
- Yarn needle
- Scissors
- Locking stitch markers
- Blocking mats
- Blocking pins
- Flexible measuring tape
Abbreviations
- MR — magic ring
- ch — chain
- sc — single crochet
- hdc — half double crochet
- dc — double crochet
- tr — treble crochet
- sl st — slip stitch
- sp — space
- st/sts — stitch/stitches
- BLO — back loop only
- RS — right side
- WS — wrong side
Before Crocheting the Cardigan
Make and block one complete square before calculating the garment. A useful target for this style is approximately 16–18 cm per square after blocking.
Record three measurements:
- blocked square width
- blocked square height
- weight of one finished square
The actual square measurement is more important than following a fixed garment size. Changing yarn, hook size or tension changes the entire cardigan.
Main Navy and Ivory Granny Square
Make the number required for your selected garment dimensions.
Round 1 — Navy
Make a MR.
Ch 3, work 2 dc into the ring, ch 2.
Repeat [3 dc, ch 2] three more times.
Join to the top of the beginning chain.
You now have four 3-dc clusters and four corner spaces.
Round 2 — Ivory
Join ivory in any corner.
In the corner work:
(3 dc, ch 2, 3 dc)
Ch 1.
Repeat the same corner group in each remaining corner, with ch 1 between groups.
Join and fasten off.
Round 3 — Navy
Join navy in a corner.
Work:
(3 dc, ch 2, 3 dc) in the corner.
Ch 1, 3 dc in the next side space, ch 1.
Repeat around, working the full corner group in every corner.
Join.
Round 4 — Ivory
Continue the established granny-square structure.
Work (3 dc, ch 2, 3 dc) in each corner and 3 dc in every ch-1 side space, with ch 1 between clusters.
Join and fasten off.
Round 5 — Navy
Repeat the established granny construction in navy.
Check the square after this round. Add another navy round if necessary to reach the planned blocked dimension.
Solid Navy Structural Round
The final round creates a more stable edge for garment assembly.
Join navy in any corner.
Ch 1 and work sc evenly around the square.
Work:
(sc, ch 2, sc)
in each corner.
Join and fasten off.
Block the square to approximately 16–18 cm or to your chosen master measurement.
Light Blue Dimensional Flower
The large blue flowers can be made separately and sewn onto selected granny squares.
Flower Center — Ivory
Make a MR.
Round 1: Ch 1, 10 sc in ring. Join. (10)
Round 2: Ch 1, 2 sc in each stitch around. Join. (20)
Fasten off.
Light Blue Petal Foundation
Join light blue to the back loops of the center.
Work:
[sc in next 2 stitches, ch 7]
Repeat around to form 10 petal loops.
Light Blue Petals
Into each ch-7 loop work:
sc, hdc, 3 dc, 2 tr, 3 dc, hdc, sc
Repeat in every loop.
Join with sl st and fasten off.
Shape each petal individually rather than pressing the flower completely flat.
Ivory Flower with Blue Center
For the contrasting flowers visible across the cardigan, reverse the flower colors.
Work the center in light blue.
Use ivory for the ten petal loops and petals.
Keep the same stitch count so both flower versions finish at approximately the same diameter.
Optional Smaller Layered Flower
The shoulder area can use a slightly smaller flower to reduce bulk.
Make a center with 10 sc.
Create five ch-6 loops evenly around the center.
Into each loop work:
sc, hdc, 3 dc, hdc, sc
Add a second layer behind the first using five ch-8 loops.
Work:
sc, hdc, 2 dc, 3 tr, 2 dc, hdc, sc
into each loop.
This version produces a compact layered flower suitable for the shoulder or upper sleeve.
Flower Placement
Do not place a large dimensional flower on every square.
A balanced layout can alternate:
- light-blue flower with ivory center
- ivory flower with blue center
- plain navy-and-ivory granny square
- smaller layered flower
Avoid placing the thickest flowers directly under the arm. Repeated friction in that area can distort petals and make the cardigan uncomfortable.
Keep the largest flowers on the front panels, upper sleeves, shoulders and lower front sections.
Attaching the Flowers
Block the granny square first.
Position the flower at the center.
Pin it at four opposite points.
Sew only the flower center and approximately the inner 2–3 cm of each petal.
Leave the outer petal sections unattached.
This preserves the dimensional appearance while keeping the flower secure enough for a wearable garment.
Calculating the Cardigan Size
Measure around the fullest part of the bust and add approximately 15–25 cm for the relaxed fit shown in the image.
For example:
Bust measurement: 100 cm
Desired positive ease: 20 cm
Target garment circumference: 120 cm
If one blocked square measures 17 cm:
120 ÷ 17 = 7.05
The modular layout must then be adjusted to a practical number of square widths while allowing for the open front and the width added by the navy front bands.
Always compare the assembled panels against an existing cardigan that fits correctly before joining the shoulders permanently.
Back Panel
Arrange enough squares to reach the required back width.
For many adult sizes, a starting layout may use approximately 3–4 squares across, depending on the blocked motif size.
Continue the grid until the panel reaches the desired length.
The cardigan shown has a lower-hip length, so measure from the shoulder to the planned hem rather than relying on a fixed row count.
Front Panels
Create two narrower rectangular panels.
Each panel can begin at approximately 1–2 square widths, depending on the garment size and desired front opening.
Lay the front panels beside the back panel before joining.
Leave enough center-front space for the wide navy border.
The finished border can add several centimeters to each front edge.
Shoulder Assembly
Place one front panel against the back with right sides facing.
Join the shoulder squares using navy yarn.
A slip-stitch seam through the outer loops creates a defined but relatively flat join.
Repeat for the opposite shoulder.
Leave the center back open for the neckline.
Side Seams and Armholes
Place the garment flat.
Measure downward from each shoulder to establish the armhole.
The armhole circumference should include approximately 8–12 cm of ease beyond the upper-arm measurement for the relaxed sleeve shown in the photograph.
Mark both sides with locking stitch markers.
Join the side seams from the hem upward, stopping at the markers.
Granny Square Sleeves
The sleeves are intentionally roomy.
Arrange granny squares into rectangular sleeve panels.
Measure the panel around the upper arm before joining it into a tube.
Do not rely on a fixed number of squares. The required circumference depends on the blocked motif size and the wearer’s arm measurement.
Join the long sleeve edges with navy yarn.
Attach the upper sleeve evenly around the armhole.
Distribute any small amount of extra fabric gradually rather than gathering it into one section.
Wide Navy Crochet Cuffs
The photograph uses substantial navy cuffs that control the volume of the granny-square sleeves.
Join navy around the wrist edge.
Foundation Round: Work sc evenly around the sleeve opening.
For the ribbing:
Ch 13.
Row 1: Starting in the second chain, work 12 sc. Sl st into the next two foundation stitches. Turn.
Row 2: Skip the two slip stitches. Work 12 sc BLO. Ch 1 and turn.
Row 3: Work 12 sc BLO. Sl st into the next two foundation stitches. Turn.
Repeat Rows 2–3 around the complete wrist.
Join the first and final ribbing rows.
This produces a cuff approximately 8–10 cm deep, depending on gauge.
Lower Navy Hem Band
The lower edge needs more structure than the granny-square fabric.
Join navy at one lower front corner.
Work one round or row of sc evenly across the hem.
Add several rows of hdc or sc until the band measures approximately 5–8 cm.
For additional texture, work alternate rows through the back loops.
Check the width after every two rows. The hem should lie flat rather than pulling the cardigan inward.
Wide Front and Neck Border
Join navy at the lower corner of the right front.
Work evenly up the first front edge, around the back neckline and down the opposite front edge.
Row 1: sc evenly around the complete opening.
Row 2: hdc in each stitch.
Row 3: sc BLO in each stitch.
Row 4: hdc in each stitch.
Repeat Rows 3–4 until the band measures approximately 6–9 cm.
The image shows a substantial front border, so a narrow one-row edging will not produce the same proportion.
Preventing the Front Border from Waving
Do not automatically place one stitch into every row end.
Make the first foundation row while the cardigan lies flat.
If the border ripples, too many stitches were added.
If the front edge pulls upward, there are too few.
Correct the foundation row before adding the remaining border width. Extra rows will magnify an incorrect stitch ratio.
Joining the Granny Squares
Use navy yarn for most seams so the construction lines blend into the dominant color.
Place two squares with right sides facing.
Slip stitch through the corresponding outer loops.
Keep the seam relaxed.
After joining one complete row of squares, lay it flat and measure its total length.
If the joined strip is noticeably shorter than the combined blocked square measurements, the joining stitches are too tight.
Suggested Garment Lengths
| Style | Approximate Shoulder-to-Hem Length |
|---|---|
| Short Cardigan | 50–60 cm |
| Hip Length | 65–75 cm |
| Lower Hip | 75–85 cm |
| Long Cardigan | 85–100 cm |
The photographed version is best treated as a relaxed hip-to-lower-hip cardigan. Measure the intended wearer before selecting the number of vertical motif rows.
Estimating Yarn
Modular garments are easier to estimate by weight than by generic yardage.
Complete one representative granny square, including its flower if applicable, and weigh it.
For example, if the average finished unit weighs 60 g and the cardigan requires 30 units:
60 × 30 = 1,800 g
Then add yarn for the cuffs, hem, seams and front border.
Allow approximately 10 percent additional yarn for swatching, repairs and color balancing.
This calculation is only an example. Use the actual weight of your own master square before purchasing the full quantity.
Planning the Three Colors
Navy should remain the dominant structural color.
Ivory creates contrast between granny rounds and prevents the garment from becoming visually solid.
Light blue works best as the accent rather than an equal third background color.
Before joining, spread every square on the floor and distribute the light-blue flowers across the complete garment. Avoid placing several identical flowers in one vertical column unless a deliberately symmetrical layout is wanted.
Alternative Color Combinations
- Forest Garden: deep green, ivory and sage
- Rose: burgundy, cream and dusty pink
- Neutral: chocolate brown, oatmeal and beige
- Coastal: navy, white and aqua
- Autumn: dark brown, cream and burnt orange
Assembly
- Make and block one master granny square, then record its exact width and weight.
- Crochet the required navy-and-ivory squares and block every piece to the same measurement.
- Arrange the back and two front panels, checking the combined dimensions against the intended wearer.
- Join the shoulder seams, then join the side seams while leaving measured openings for the sleeves.
- Construct the sleeve panels, join them into tubes and attach them evenly around the armholes.
- Add the wide navy cuffs and confirm that both cuffs have identical finished depth.
- Crochet and attach the light-blue and ivory dimensional flowers to the selected blocked squares.
- Work the structured navy hem band around the lower edge.
- Add the wide navy front and neckline border, correcting any rippling before the final rows.
- Weave in every yarn tail, wash according to the yarn label and block the completed cardigan to its final measurements.
The finished cardigan should hang vertically at the front while the dimensional flowers remain raised above the navy-and-ivory granny-square fabric.
7 Technical Tips
- Square-size variation: keep all blocked motifs within approximately 5 mm of the master square. Larger differences accumulate across a garment panel and distort the side seams.
- Heavy flower appliqués: attach each large flower through its center and the inner 2–3 cm of the petals. Sewing only the center allows the flower to sag after washing.
- Tight shoulder seams: compare the joined shoulder width with the unjoined pieces. A seam shortened by more than about 1 cm should be removed and worked with looser slip stitches.
- Restrictive armholes: add 8–12 cm of ease to the measured upper-arm circumference. A decorative oversized sleeve still needs enough room for a shirt underneath.
- Wavy front band: inspect the first navy foundation row before adding more border rows. Rippling at this stage means the stitch pickup rate is too high.
- Unequal cuffs: count the ribbing rows on the first cuff and repeat exactly that number on the second. Measuring only the relaxed circumference can hide a difference in rib count.
- Garment stretching: weigh several completed squares before making the full set. A heavily decorated worsted-weight cardigan can become substantial, so its expected final weight should be calculated before assembly.
Care and Blocking
Support the cardigan when it is wet. Lifting a saturated modular garment by the shoulders can stretch the seams and neckline.
Lay it flat and arrange the front edges parallel.
Match both sleeves to the same length.
Shape the hem without stretching the granny-square openings.
Finally, lift and arrange each dimensional flower petal individually. The flowers should retain their relief rather than being pressed flat into the squares.
Conclusion
This blue floral granny square crochet cardigan combines a practical modular garment structure with dimensional flower appliqués in navy, ivory and light blue. Start with one blocked 16–18 cm master square, calculate the body from the wearer’s measurements, and assemble the undecorated panels before attaching the flowers. That sequence keeps the seams accessible and protects the raised petals during construction. The next practical step is to make one granny square and one blue flower, block them together and record their finished weight and dimensions. Save the design to Pinterest or share your finished version on Instagram with #BlueFloralGrannyCardigan. Would you alternate the blue and ivory flowers randomly, or arrange them in a symmetrical pattern?









