Cream Basketweave Crochet Blanket Pattern with Red Border
Introduction
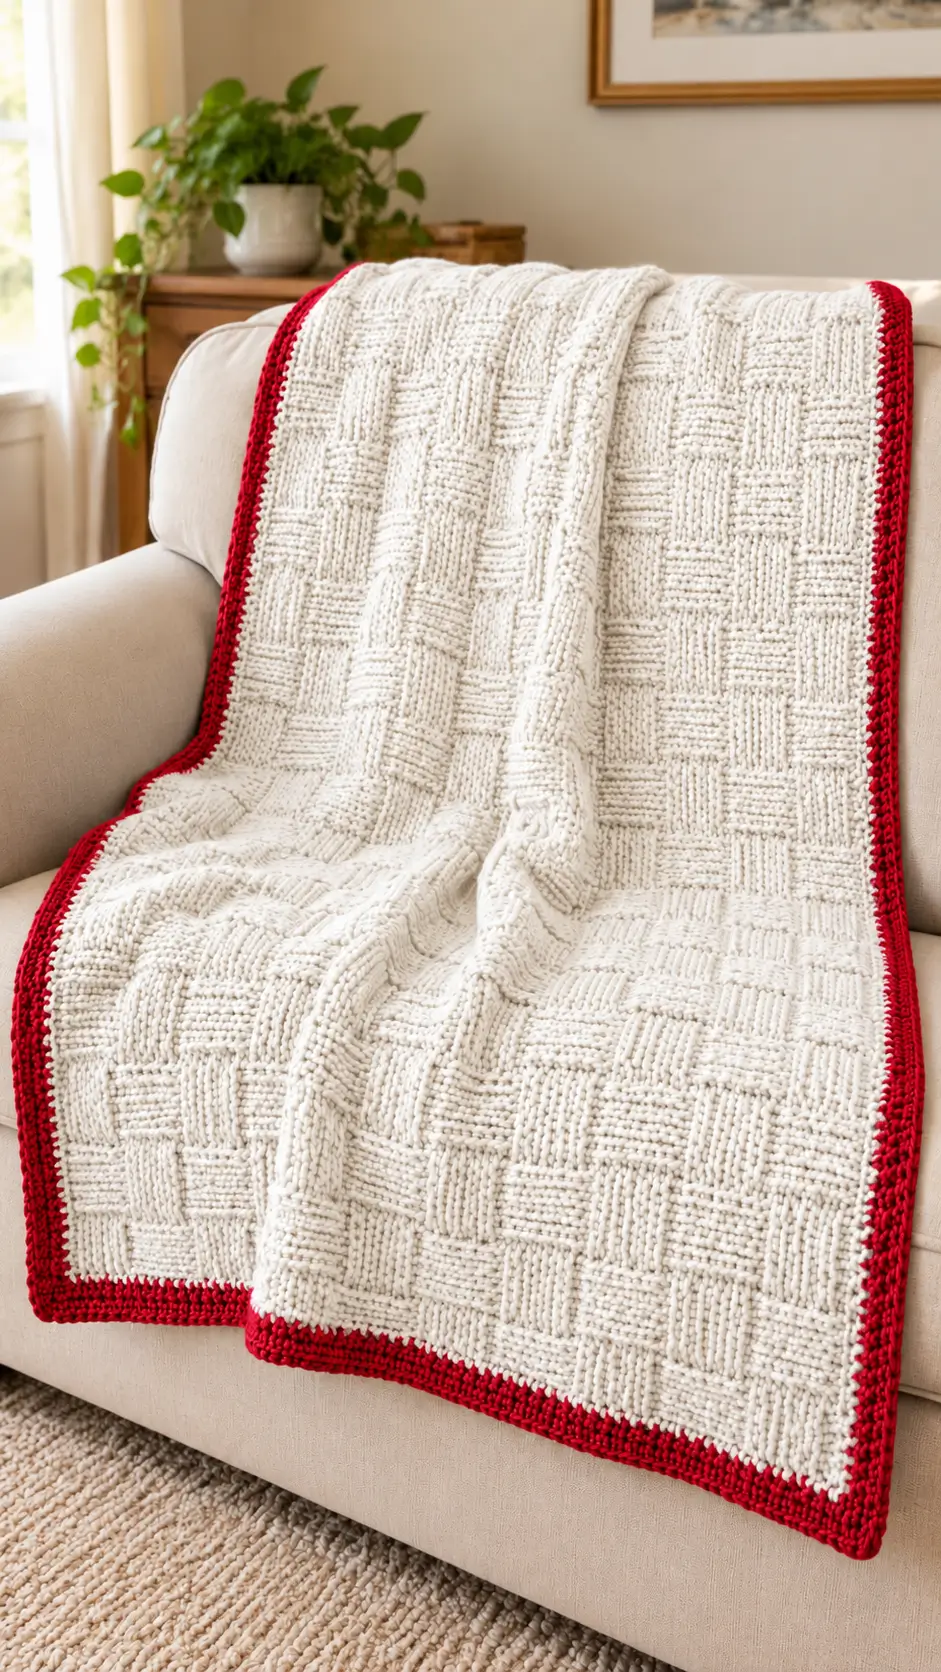
The red rim around this cream basketweave throw acts like a frame: it separates the raised blocks from the background on all four sides. This basketweave crochet blanket pattern uses DK yarn, front-post and back-post double crochet, and a six-round contrasting border. At the reference gauge, the proposed throw measures approximately 102 × 151 cm. It suits an intermediate crocheter who wants a repeatable, one-piece sofa blanket with a clearly defined edge.
The Design: What Makes This Blanket Different
The photographed blanket combines a light center, rectangular raised blocks, and a narrow red perimeter. This interpretation uses twelve-stitch-wide panels and ten-row-high bands, allowing the vertical and horizontal textures to read as substantial tiles instead of short ribs. A cream foundation supports the woven effect without introducing color changes into the main fabric. Two cream edging rounds create a transition before four red rounds form the visible outline. That color order keeps the bright border separate from the raised center.
For a cream crochet throw, the chief structural concern is edge distortion: dense post stitches can contract while looser border stitches spread outward. A red border crochet blanket therefore needs measured side-edge spacing, not a fixed guess at every row end. Another frequent mistake is changing post direction on every turned row; that produces ribbing rather than stable basketweave blocks.
Project Info at a Glance
| Skill level | Time | Finished size | Hook | Best for |
|---|---|---|---|---|
| Intermediate (post stitches required) | Multi-session; no verified hourly estimate | About 102 × 151 cm, calculated, not sample-tested | 6.0 mm body; 6.5 mm border | Sofa throw, textured home décor |
What is verified? Jo to the World Creations reports a 91 × 91 cm finished blanket, DK yarn, 6.0 mm body hook, 6.5 mm border hook, and a 15-stitch/11-row gauge over 10 cm. The larger 102 × 151 cm size above is a calculation using that published gauge, not a measurement of the pictured blanket or a tested sample of this new stitch repeat. See the reference pattern.
Materials and Tools
Yarn
- Cream or warm ivory — DK / category 3 — allow approximately 1,350–1,500 g — suggested equivalent: Loops & Threads Luxe Merino or another smooth DK yarn with a similar meterage.
- Deep red or cranberry — matching DK / category 3 — allow approximately 125–150 g — use the same yarn line when possible to prevent different shrinkage and stitch height.
These are purchase allowances, not verified consumption. The source blanket lists 1,775 yards for its 34-inch-square body and 185 yards for its border, with 410 yards per 150 g skein. Scaling the area and perimeter to the new body gives approximately 1,230 g of cream and 96 g of red before gauge differences, swatching, yarn joins, or a safety margin. Do not label those projections as measured yarn use. Yardage and skein specifications.
Tools
- 6.0 mm crochet hook for the cream textured center.
- 6.5 mm crochet hook for the transition and red edging; adjust after laying the first border round flat.
- Stitch markers, including four removable corner markers and two edge markers.
- Tapestry needle with a large eye for weaving ends through the dense fabric.
- Tape measure, scissors, and a notebook for swatch dimensions.
- No stuffing, safety eyes, sewing hardware, or separate motifs are needed.
Use smooth, solid-colored yarn for the first swatch. Strong marling can visually obscure the alternating post direction. If a substitute yarn has substantially different yardage per 100 g, recalculate the number of skeins from meters rather than copying the gram allowance.
Abbreviations
| Abbreviation | Meaning |
|---|---|
| ch | chain |
| sc | single crochet |
| hdc | half double crochet |
| dc | double crochet |
| FPdc | front-post double crochet |
| BPdc | back-post double crochet |
| sl st | slip stitch |
| st / sts | stitch / stitches |
| RS / WS | right side / wrong side |
| rep | repeat |
Technique note: An FPdc passes the hook around the vertical post from the front; a BPdc passes around that post from the back. The stitch is completed like a normal dc. This flat blanket has no decreases, so the invisible decrease technique used in amigurumi does not apply.
Pattern — Step by Step
Construction: Work the cream panel back and forth in turned rows, then crochet the border in joined rounds. Unlike amigurumi, this design is not worked in a spiral. Ch-1 turning chains do not count as stitches. All terminology is US crochet terminology.
Gauge Swatch and Sizing Check
Before chaining the full width, work a sample of at least 26 body stitches: 24 pattern stitches plus two hdc edge stitches. Complete at least 22 rows so that the two contrasting post-stitch bands can be measured. The planning gauge is 15 stitches and 11 rows per 10 cm, borrowed from a published basketweave blanket; your sample may differ because this pattern has larger blocks.
Measure the fabric after laying it flat without stretching. At the reference gauge, 146 stitches span about 97.3 cm, and 161 rows reach about 146.4 cm before edging. Six edging rounds are expected to add roughly 2–3 cm per side, but that border dimension has not been experimentally confirmed. If the swatch is narrower, use a larger hook or add a complete 24-stitch repeat. For an oversized swatch, change the hook or remove a full repeat.
Foundation Row (Cream)
Yarn: cream DK. Stitch multiple: 24 + 2 working stitches; source for post-stitch method: Daisy Farm Crafts. Counts below are original calculations for this adaptation.
Foundation: Ch 148.
Row 1 (RS): Dc in the third chain from the hook and in every chain to the end. (146 dc)
Mark the first and last stitch. There are 144 internal stitches for the textured repeat and two outer edge stitches. The 144 internal stitches divide evenly into six 24-stitch groups or twelve 12-stitch panels. There are no increases or decreases in this flat rectangle.
Raised Basketweave Center (Cream)
Yarn: cream DK. Each completed row contains 146 stitches: one hdc edge stitch, 144 post stitches, and one hdc edge stitch.
Pattern A — Rows 2–11: Ch 1, turn. Hdc in first stitch; [FPdc around each of next 12 stitches, BPdc around each of next 12 stitches] × 6; hdc in last stitch. (146 sts per row)
Pattern B — Rows 12–21: Ch 1, turn. Work 1 hdc in first stitch; [BPdc around each of next 12 stitches, FPdc around each of next 12 stitches] × 6; hdc in last stitch. (146 sts per row)
Rows 22–41: Repeat Rows 2–21 in order. (146 sts per row)
Rows 42–61: Repeat Rows 2–21. (146 sts per row)
Rows 62–81: Repeat Rows 2–21. (146 sts per row)
Rows 82–101: Repeat Rows 2–21. (146 sts per row)
Rows 102–121: Repeat Rows 2–21. (146 sts per row)
Rows 122–141: Repeat Rows 2–21. (146 sts per row)
Rows 142–161: Repeat Rows 2–21. (146 sts per row)
The first band uses Pattern A for ten full rows; the next uses Pattern B for ten. Every succeeding 20-row cycle repeats that change. Because you turn the work after every row, repeating the same named FPdc/BPdc order within a band keeps the visible blocks oriented consistently. Switching directions every single row would interrupt their relief.
After Row 161, check the width at both ends and in the middle. Record all three measurements; a difference greater than about 2 cm indicates changing tension or an incorrect stitch count. Do not fasten off yet. The cream preparation border starts at the Row-161 ending corner.
Cream Transition Border (2 Rounds)
Yarn: cream DK. Change to 6.5 mm hook. For general edge and corner technique, see Ambassador Crochet.
The count below uses a deliberately specified side-edge pickup ratio. There are 159 intermediate row ends between the top and bottom corners on each side, corresponding to Rows 2–160. Work 3 sc over every pair of row ends, distributed as 2 sc in one row end and 1 sc in the next, then work 2 sc in the remaining row end. That creates 239 side stitches on each long side. If this density visibly ripples, revise the pickup ratio and recalculate all subsequent border totals; a flat border matters more than reproducing the projected counts.
Border Round 1 — cream: Beginning at the Row-161 ending corner (top right in this working orientation), make 3 sc in its corner stitch. Work 1 sc in each of the next 144 stitches along the top; make 3 sc in the top-left corner stitch. Work 239 sc along the left side as described above. Make 3 sc in the bottom-left corner; sc across the 144 middle foundation stitches; make 3 sc in the bottom-right corner. Work 239 sc up the right side. Sl st to first sc. (778 sc)
Border Round 2 — cream: Ch 1. Sc in every stitch, but make 3 sc in the center stitch of each marked corner’s 3-sc group. Sl st to join. (786 sc)
Fasten off cream after Round 2, leaving a 20 cm tail.
The cream border forms the narrow transition visible beneath the red band. Move the corner markers to the center stitch of each newly made 3-sc group at the end of every round.
Red Outer Border (4 Rounds)
Yarn: deep red DK. Work with the 6.5 mm hook unless a flat test indicates that the border needs another size.
Border Round 3 — red: Join red at a corner. Ch 1, sc around, working 3 sc into the marked center stitch of each corner group. Join with sl st. (794 sc)
Border Round 4 — red: Ch 1, sc around, working 3 sc into each marked corner center. Join with sl st. (802 sc)
Border Round 5 — red: Ch 1, sc around, working 3 sc into each marked corner center. Join with sl st. (810 sc)
Border Round 6 — red: Ch 1, sc around, working 3 sc into each marked corner center. Join with sl st. (818 sc)
Fasten off after the join, leaving a 20 cm tail to weave through the red edge. The base count rises by exactly eight stitches per round: each of four corners adds two stitches while the straight sides remain unchanged. A neat corner turns at 90 degrees without pointing or curling. If the red border flares, remove the latest round and use a slightly smaller hook or a revised pickup count; do not compensate by stretching the cream center.
Why the Row and Border Counts Work
The working width is 6 × 24 + 2 = 146 stitches. Every pattern row replaces one existing stitch with one stitch, so the count stays 146 through Row 161. There are eight 20-row texture cycles after the foundation: 1 + (8 × 20) = 161 rows.
For the first edging round, the arithmetic is 4 corners × 3 + 2 short sides × 144 + 2 long sides × 239 = 778 sc. Each later round adds 4 × 2 = 8 sc because each corner’s center stitch becomes three stitches. These formulas are checkable; actual side pickup spacing still needs to be assessed on the crochet fabric.
Finishing and Border Assembly (10 Steps)
- Place the rectangular body on a flat surface with Row 161 at the top, then verify that it still contains 146 stitches.
- Inspect both long edges for skipped end stitches before applying any border.
- Change to the 6.5 mm hook and mark all four body corners.
- Work the first cream preparation round, following the stated side-edge pickup ratio.
- Lay the piece flat to check the corners; change the pickup spacing now if the edge waves or contracts.
- Work the second cream round, shifting markers to the center of each 3-sc corner group.
- Join deep red at a corner and work the first contrasting round without cutting the cream tail too short.
- Add the remaining three red rounds, checking the stitch count and shape after every circuit.
- Weave cream tails through cream stitches and red tails through red stitches for at least 8–10 cm, reversing direction once.
- Launder or block according to the yarn label, dry flat, and measure the final dimensions.
The finished item is a one-piece textured throw with a six-round, two-color crochet border.
7 Technical Tips
- Stitch-marker drift: Place markers in the first and last working stitches of each 146-stitch row. If the marker shifts inward, the end hdc was probably skipped.
- Too-firm post stitches: If a 24-stitch sample pulls in by more than 1 cm compared with its foundation, the post wraps are too tight. Try a 0.5 mm larger hook before making the full panel.
- Incorrect block direction: Photograph Rows 2 and 12 before continuing, because these should show opposite raised-panel alignment. Switching FPdc and BPdc on every row produces uninterrupted ribs rather than ten-row blocks.
- Border ruffling: The suggested side pickup is 239 sc over 159 intermediate row ends. If the first round forms waves when laid flat, reduce the pickup density before starting Round 2.
- Border tightening: A red frame that curves inward has too few effective edge stitches or a hook that is too small. Compare its laid-flat dimensions with the cream body after every round.
- Uneven rectangular corners: Put three sc into each marked corner center, not into three different corner stitches. The resulting two-stitch increase per corner keeps the border-count sequence predictable.
- Loose finishing tails: Leave a 20 cm red tail, then weave at least 8–10 cm through neighboring red stitches with a change of direction. A short, straight tail is more likely to emerge after washing.
Adjusting the Blanket for a Different Sofa
Width follows a multiple of 24 + 2 working stitches, and the foundation chain count is always the working stitch total plus two. For a narrower version, work 122 stitches from a chain of 124; for a wider version, work 170 stitches from a chain of 172. Both preserve complete post-stitch blocks because 122 = 5 × 24 + 2 and 170 = 7 × 24 + 2.
Length changes are less disruptive. Add or subtract 20 complete pattern rows to preserve a full pair of ten-row raised-block bands. At the cited reference gauge, 20 rows correspond to approximately 18 cm before edging. Gauge matters: the larger post-stitch modules can behave differently from the smaller modules in the source blanket.
For another yarn category, make a swatch rather than substituting the hook size alone. Bulky fibers may produce a much larger and heavier throw, while thinner DK yarn can expose more gaps around the post stitches. The red edging should use the same fiber composition and care requirements as the cream center.
Care, Blocking, and Photographing the Texture
Post-stitch fabric is relatively thick. When washing, follow the yarn manufacturer’s temperature and drying instructions, and support the entire blanket when wet so its own weight does not lengthen the rows. Avoid hanging it from one corner. To dry flat, reshape the top, bottom, and two long edges without pulling the corners into points.
For product photographs, spread one section flat to show how the twelve-stitch panels alternate, then fold another section so the red border remains visible against the cream. Photograph the face of the post stitches from a slightly oblique angle; direct overhead lighting can flatten the apparent relief. Include one full-blanket image and a close-up of a corner to document the count and border construction.
Conclusion
This cream-and-red throw depends on two measurable features: the placement of the raised post-stitch panels and the rate at which the border picks up the row ends. Record your swatch gauge before committing to the full 146-stitch foundation. Then complete the 161-row center and check the first cream edging round on a level surface. The basketweave crochet blanket pattern can be scaled by whole 24-stitch width repeats and 20-row height repeats, but yarn quantities must be recalculated for any new size. Save a full-view photograph to Pinterest and post a corner close-up on Instagram with #CreamRedBasketweaveBlanket. Which width of red edging best matches the cream blocks in your finished throw?