Introduction
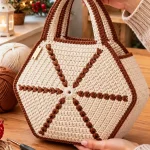
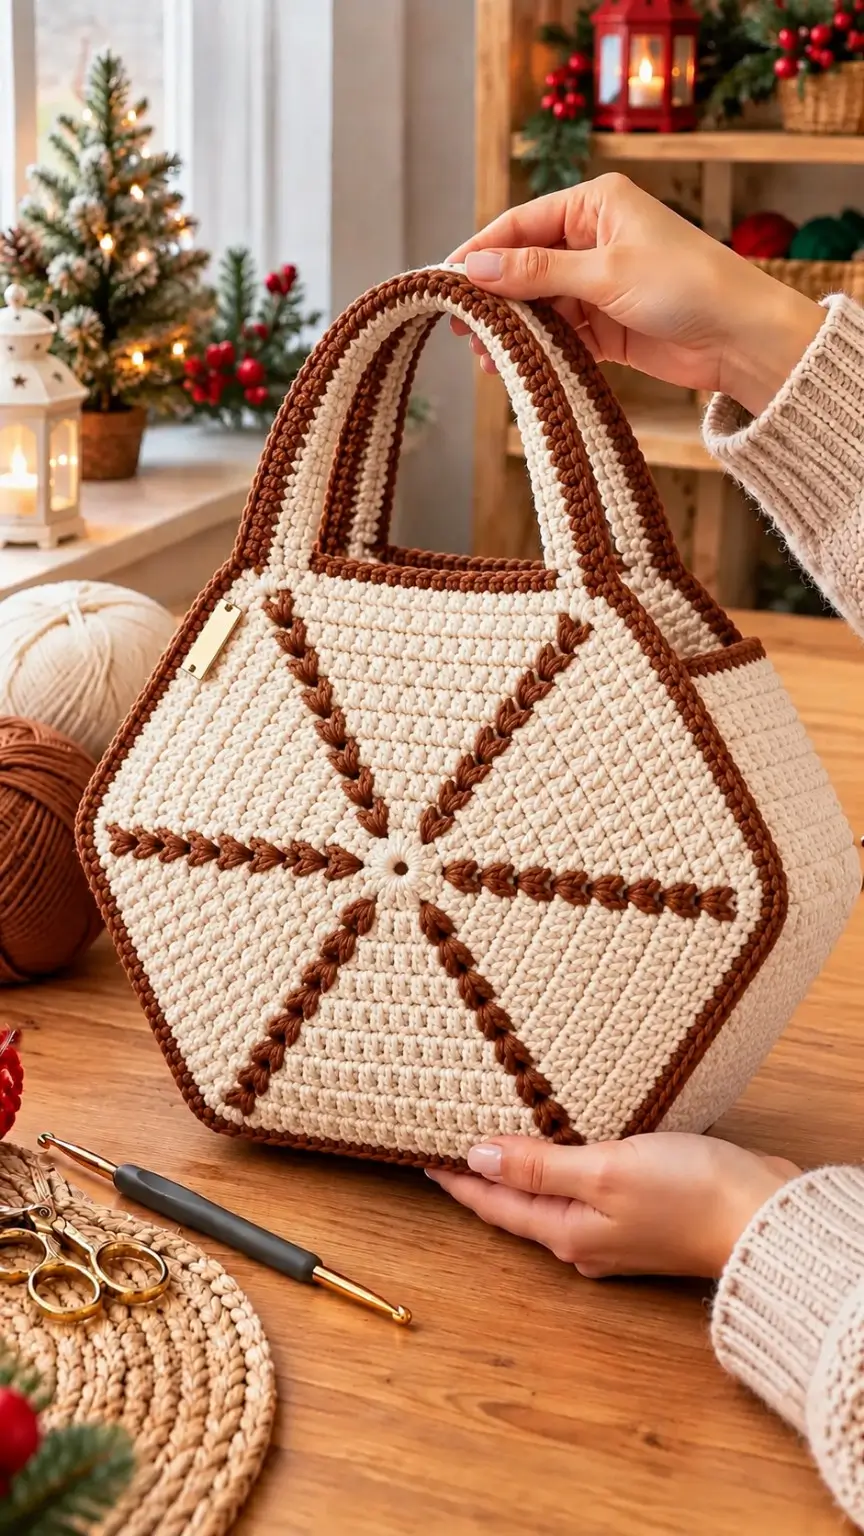
Eight cocoa-brown spokes converge at a cream rosette on the front of this square-sided handbag. This crochet starburst tote bag pattern uses firm single crochet, a U-shaped gusset, surface embroidery, and two wide handles to reproduce the photograph’s main construction features. The calculated target is approximately 30 × 30 × 10 cm, excluding handles, using worsted cotton and a 4 mm hook. It is an intermediate project suited to a reusable project bag.
The Design: What Makes This Starburst Tote Different
The front motif is not a conventional sunburst granny square. An uninterrupted cream panel carries eight raised brown rays, keeping the fabric dense enough to contain small belongings. A circular rosette hides their inner ends and defines the center. Brown perimeter trim makes uneven corner seams easy to spot.
A separate U-shaped strip forms the sides and bottom. This construction gives the bag a 10 cm depth rather than the flat silhouette of a two-panel market bag. Two wide straps distribute carrying force across separate attachment points.
The common error is stitching the spokes before marking a shared midpoint. On a cream and brown crochet bag, even a two-stitch shift makes the diagonal lines asymmetric.
Project Info at a Glance
| Skill level | Active time | Target finished size | Hook | Best for |
|---|---|---|---|---|
| Intermediate | Allow 10–15 hours; planning estimate | ~30 cm wide × 30 cm high × 10 cm deep; calculated, not sample-tested | 4.0 mm | Small projects, a notebook, everyday lightweight items |
Gauge target: 14 single crochet stitches × 19 rows = 10 × 10 cm, based on the manufacturer’s published 4 mm crochet gauge for Lion Brand 24/7 Cotton. Make and measure your own swatch; the project dimensions depend on matching that gauge. A tighter fabric needs more rows or stitches to reach the same external dimensions.
Construction: Two solid panels, one long U-shaped gusset, two separate handles, a circular flower center, embroidered rays, brown edging, and an optional label. The photo alone cannot identify its maker, exact yarn, hidden lining, or original stitch sequence. These instructions are an independent, photo-inspired reconstruction rather than the original designer’s pattern.
Materials and Tools
Yarn
- Cream or ecru — worsted-weight (#4) cotton — purchase 400 g (four 100 g skeins): Suggested yarn: Lion Brand 24/7 Cotton in Ecru, or an equivalent firm cotton. This is a purchasing allowance, not a weighed quantity from the photographed bag.
- Chocolate or coffee brown — worsted-weight (#4) cotton — purchase 100 g (one 100 g skein): Suggested yarn: Lion Brand 24/7 Cotton in Coffee Beans or equivalent yardage. The contrast color covers surface rays, edging, and handle outlines.
Lion Brand lists this yarn at 170 m per 100 g and recommends a 4 mm hook for its published crochet swatch. Comparable crochet totes use markedly different quantities according to fabric density; save the band from every skein and use your own gauge to track consumption.
Tools
- 4.0 mm crochet hook, or the size required for the stated gauge.
- Tapestry needle with an eye wide enough for doubled brown yarn.
- Locking stitch markers, at least eight; tape measure, scissors, and rustproof blocking pins.
- Optional cotton lining fabric, sewing needle, matching thread, and a removable base insert made to fit the completed bag.
- Optional small faux-leather or wooden label, reproducing the small tag visible near the left handle base.
No safety eyes, toy stuffing, or wire are needed because the object is a functional tote, not an amigurumi figure.
Abbreviations
ch = chain; sc = single crochet; inc = two sc in one stitch; dec = single-crochet two stitches together; sl st = slip stitch; MR = magic ring; BLO = back loop only; RS = right side; WS = wrong side; st(s) = stitch(es); row = work back and forth; rnd = work around the center.
An invisible decrease takes the front loops of the next two stitches together before completing one sc; the flat bag panels do not require it.
Stitch-count convention: Turning chains and joining slip stitches do not count as stitches unless specifically stated. A row range such as Rows 2–57 (42 each) means every individual row in that range ends with 42 sc. Work panels and straps in turned rows; only the rosette is made in rounds.
Pattern — Step by Step
Front Panel (Make 1)
Yarn: cream. Count source: original rectangular construction, checked by standard crochet arithmetic.
Foundation: Ch 43.
Row 1: Sc in second ch from hook and in the next 41 ch; ch 1, turn (42).
Rows 2–57: Sc in each of the 42 sts; ch 1 and turn after Rows 2–56 only (42 each row).
Fasten off after Row 57, leaving a 25 cm sewing tail. The target panel is 30 × 30 cm at the specified gauge. Mark the center between stitches 21 and 22 and between Rows 28 and 29; temporary contrasting thread makes that intersection visible on the front.
For a flatter base seam, steam-block or wet-block the panel to the target rectangle as permitted by the yarn label. Do not pull one corner farther than another. Keep the RS facing outward when the bag is assembled.
Back Panel (Make 1)
Yarn: cream. Count source: same standard rectangular construction.
Foundation: Ch 43.
Row 1: Sc in second ch from hook and across the remaining chains; ch 1, turn (42).
Rows 2–57: Sc in every stitch, ch 1 and turn after Rows 2–56 (42 each row).
Fasten off, leaving a 25 cm tail. Compare the width and height with the front before sewing: both rectangles should have 42 stitch columns and 57 worked rows. If the measurements disagree, check gauge rather than stretching the smaller panel excessively. The back remains plain, matching the unobstructed cream area suggested by the image’s side view.
U-Shaped Side and Bottom Gusset (Make 1)
Yarn: cream. Count source: original flat-strip arithmetic; the 57/57/57 allocation follows the measured gauge ratio.
Foundation: Ch 15.
Row 1: Sc in second ch from hook and across; ch 1, turn (14).
Rows 2–171: Sc in each stitch; ch 1 and turn after Rows 2–170 (14 each row).
Fasten off with a 40 cm tail. Place markers immediately after Row 57 and Row 114, dividing the strip into three equal 57-row sections. At the stated gauge, each section is approximately 30 cm long and the 14-stitch width is approximately 10 cm. The middle section becomes the bottom; the other sections rise along the left and right edges.
Fold the strip into a U without creasing the lower corners sharply. Place the lower panel corners opposite the markers. The side edges join row-to-row, 57 rows against 57 rows. Along the bottom, 57 gusset row ends meet 42 panel stitches; ease the extra row ends evenly with whip stitches, attaching two adjacent gusset row ends at one panel stitch at approximately 15 distributed points. This is a seam-matching instruction, not an instruction to change either piece’s stitch count.
Cream Handles (Make 2)
Yarn: cream. Count source: original 7-stitch-wide flat strap.
Foundation: Ch 8.
Row 1: Sc in second ch from hook and across; ch 1, turn (7).
Rows 2–90: Sc across; ch 1 and turn after Rows 2–89 (7 each row).
Fasten off, leaving a 35 cm tail at each end of each strap. Each handle has a calculated length of approximately 47 cm and width of 5 cm before load and finishing. The final handle drop will be shorter than half its full length because both ends overlap the body.
With brown yarn, work one surface slip stitch into each row-end space along each long side of each strap, aiming for 90 surface stitches on each long edge. Keep the brown yarn relaxed: tight edging shortens the strap and forms a crescent. For heavier use, sew a narrow cotton twill tape along the inside of each handle before attaching it to the bag.
Flower Center (Make 1)
Yarn: cream. Source: standard six-stitch magic-ring increase math.
Rnd 1: Work 6 sc in MR (6).
Rnd 2: Inc × 6 (12).
Rnd 3: [Sc 1, inc] × 6 (18).
Rnd 4: [Sc 2, inc] × 6 (24).
Sl st to the next stitch without counting the join (24). Fasten off, leaving a 30 cm tail. This four-round disk covers the innermost joins of the rays. To suggest small petals, use the cream tail to make six equally spaced, shallow radial embroidery stitches around its circumference rather than adding a bulky fifth round.
Keep the disk flat. If it cups, loosen the working tension or remake it with a hook 0.5 mm larger; adding an extra increase would change its intended size. Position it only after the eight brown rays are complete.
Raised Brown Starburst Rays (Make 8)
Yarn: brown. Source: original surface-embroidery layout based on the image; stitch totals depend on path length and are not crocheted rounds.
Lay the front panel with its first row at the bottom. Use the marked intersection as the motif center. Mark eight outer targets: the center of the top, bottom, left, and right edges, plus four points approximately 2 cm inside the panel’s corners. The diagonal spokes should end at equal distances from their nearest corner seams.
Thread a tapestry needle with doubled brown yarn. Start near the central mark and work a line of short chain embroidery stitches outward to each target. Keep each embroidered chain about 8–10 mm long, catching only the top portion of the cream stitches so the bag interior stays relatively smooth. A narrow surface slip-stitch line is an alternative, but it sits flatter than the raised, leaflike stitches in the photograph.
Finish each spoke with a 15 cm tail on the WS. Sew along the remaining seven marked paths, checking the geometry after spokes two, four, and six. The center disk will hide overlaps, so do not stack knots directly under the circle.
Brown Outer Piping and Upper Rim (Make 1 continuous rim; optional separate face outlines)
Yarn: brown. Source: original counts from two 42-stitch panel openings plus two 14-stitch gusset ends.
After joining the panels and gusset, attach brown at the rear top corner.
Rim Rnd 1: Sc once in each of the 42 front top stitches, 14 stitches across the first gusset end, 42 back top stitches, and 14 stitches across the second gusset end (112).
Rim Rnd 2: Sc in each stitch around (112).
Sl st to the first stitch without adding an extra stitch. Fasten off, leaving 20 cm for the final join. Do not draw this edging tight; measure the opening before and after the second round.
For the prominent outlined front face, work relaxed brown surface slip stitches along the seam from upper-left corner to lower-left corner, across the bottom, and upward to upper-right. Repeat on the back if desired. Along each front or back side, use approximately one slip stitch per row end; along the bottom, use one per original panel stitch. These outer outlines are decorative and do not replace the main structural seams.
Optional Hanging Label Tab (Make 1)
Yarn: brown; add the purchased label only if desired.
Foundation: Ch 7.
Row 1: Sc in second ch from hook and across; ch 1, turn (6).
Rows 2–6: Sc across; ch 1 and turn after Rows 2–5 (6 each row).
Fasten off with a 20 cm tail. Fold the tab over a bag-edge stitch at the upper left and sew it down away from the handle seam. Attach a premade label using its own manufacturer-approved fasteners; a stiff tag must not rub directly against the strap yarn.
Assembly
- Place the front panel RS up. Confirm the eight brown spokes radiate evenly from the marked midpoint, then secure their ends on the WS without pulling the fabric inward.
- Center the cream rosette over the point where the rays meet. Stitch its outer round in place using the 30 cm tail, leaving the center unstuffed and flat.
- Lay the gusset WS against the front panel WS at the left upper corner. Match the first 57 gusset rows to the front panel’s 57-row side, pinning at the quarter points.
- Follow the gusset around the first lower corner and across the front panel bottom. Spread the 57 gusset row ends across the 42 bottom stitches, easing the extra 15 catches at regular intervals.
- Continue up the opposite side, matching the remaining 57 gusset rows to the 57 panel rows. Check that the two free gusset ends stop level with the panel opening.
- Attach the back panel to the opposite long edge of the gusset using the same side–bottom–side sequence. Use firm whip stitches, working through sturdy loops rather than through only one loose strand.
- Turn the tote RS out and straighten both lower corners. Work the two-round brown upper rim around its 112-stitch opening.
- Pin handle ends on the inside of each panel, spanning front-panel stitches 7–13 and 30–36, seven stitches per attachment. Place the second handle on the back at the same stitch positions, inserting each end roughly 5 cm below the top.
- Sew every handle end in a boxed rectangle with a diagonal X across the overlapping portion; pass through multiple rows of panel fabric. Add the brown outer piping, then the optional label tab, keeping both away from load-bearing handle stitches.
- Weave each remaining tail through at least 5 cm of neighboring stitches, reverse direction once, then trim. Add an optional fabric lining or flexible base insert only after measuring the assembled interior.
The finished object has two solid faces, a full-depth gusset, a central flower motif, and independently anchored handles.
Seven Technical Tips
- Stitch-marker drift: Moving the marker one stitch during a 42-stitch panel can displace the visual center by roughly 7 mm at the stated gauge. Count the last stitch of every fifth row before turning.
- Stuffing firmness: Do not place fiberfill inside the rosette or gusset; a 10 cm-deep carry bag relies on fabric tension, not stuffing. A bulging rosette prevents the middle of the front face from lying flat.
- Invisible-decrease error: The rosette grows by six stitches each round, from 6 to 24; no decrease belongs in that sequence. An accidental sc2tog creates a pucker that can be mistaken for intentional petal shaping.
- Motif placement timing: Mark the eight rays before attaching the circular center, keeping the four diagonals approximately 2 cm in from each corner. Sewing the disk first hides the exact midpoint and makes one ray likely to finish off-axis.
- Yarn and tension mismatch: Smooth worsted cotton gives clearer embroidery than velvet or loosely twisted chenille, which can obscure individual surface chains. If a 10 cm swatch measures fewer than 14 stitches across, use a smaller hook or recalculate the panel width.
- Pinning the gusset: Distribute 57 gusset rows along each 57-row side before beginning the seam. The bottom needs 15 evenly spaced shared catches because 57 gusset row ends must meet 42 panel stitches.
- Tail weaving and handle stretch: Weave tails at least 5 cm and reverse direction once to reduce unraveling. Before use, test both handles with approximately 1 kg of nonbreakable contents and inspect each boxed attachment for movement.
Pattern Adjustment, Lining, and Care
For a narrower tote: Remove seven stitches from each panel and five rows from each of the three gusset sections only after recalculating the physical proportions from a new swatch. Do not shorten the gusset arbitrarily; its overall length must still match the left side, bottom edge, and right side.
For a taller tote: Add the same number of rows to the front and back, plus that number of rows to each vertical gusset section. The bottom segment stays unchanged when width is unchanged. Move the midpoint marker upward by half the added panel height to keep the rosette centered.
For an interior lining: Measure the finished internal height, opening, and bottom depth. Draft a fabric insert that follows the assembled profile, add your chosen seam allowance, and hand-stitch it below the brown rim without piercing the visible front embroidery. A lining reduces small-object snagging but does not substitute for strap reinforcement.
For cleaning: Follow the actual yarn band rather than general cotton advice. Remove any rigid base and detachable tag before laundering; lay the tote flat to recover the square profile if hanging would stretch the wet handles.
The photograph is a design reference, not a substitute for a test sample. Check actual gauge, bag capacity, and strap movement before publishing exact finished measurements as confirmed results.
Conclusion
This crochet starburst tote bag pattern separates decorative surface work from load-bearing construction. The 42-stitch panels establish width; the 171-row gusset supplies depth; two seven-stitch handles carry the load. That separation makes changes easier to calculate without distorting the central rosette. Before cutting yarn, crochet a 10 cm swatch, confirm the row gauge, and mark the eight spoke endpoints on a paper outline. Share a finished front-panel close-up on Pinterest and a handle-attachment detail on Instagram with #CrochetStarburstTote. If you remake the bag in other colors, which brown spoke layout preserves the clearest eight-ray symmetry: straight lines or leaf-shaped embroidered chains?