Introduction
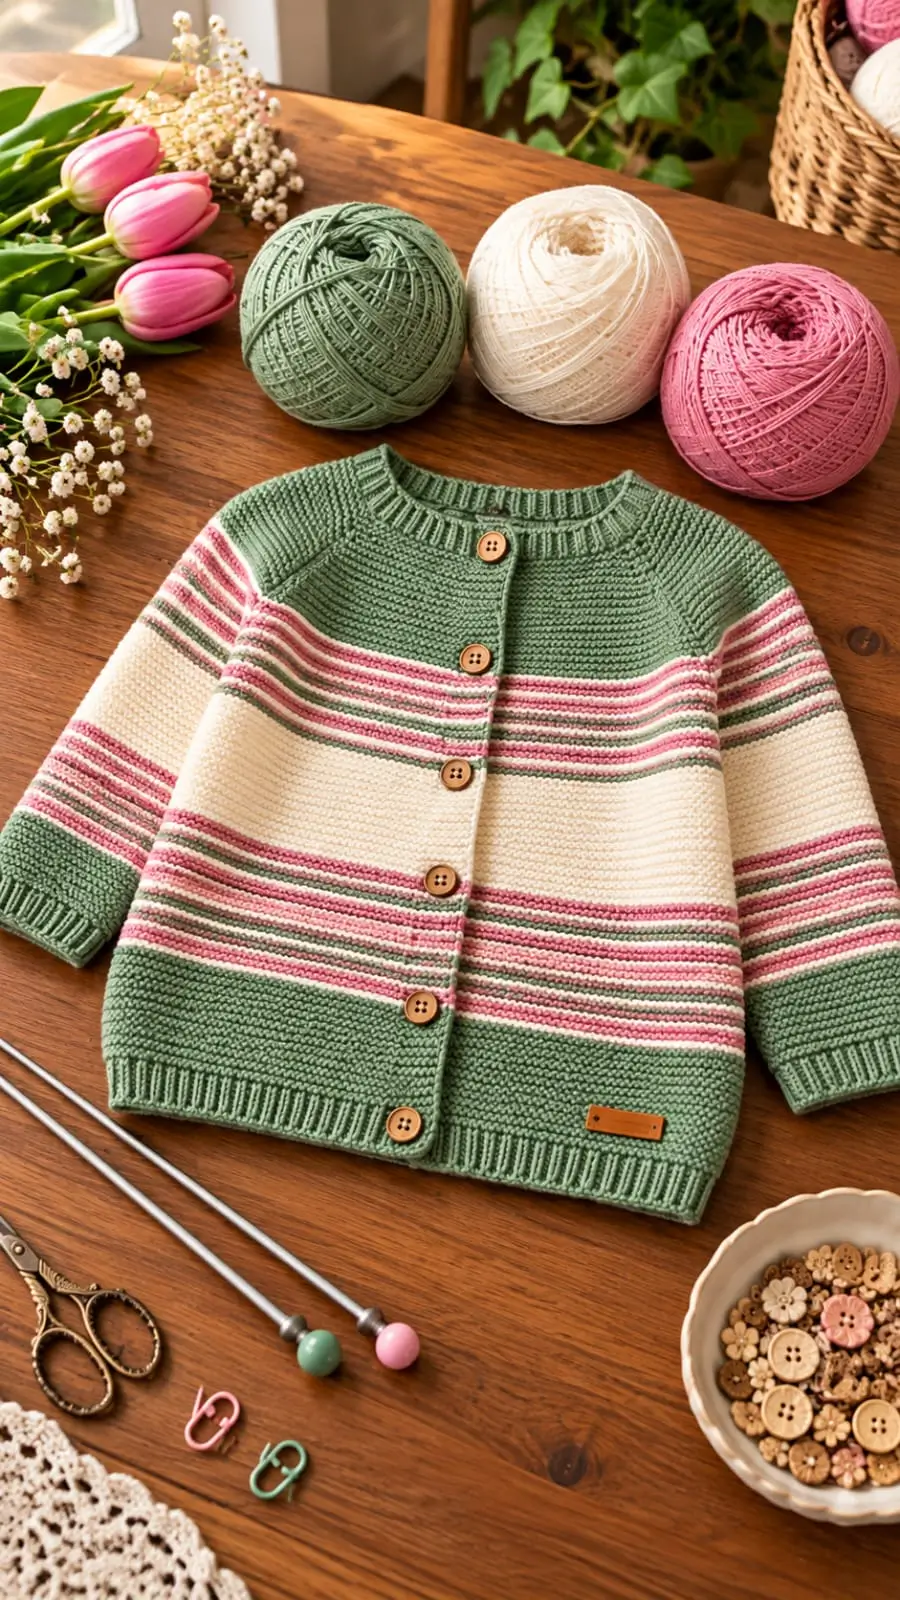
Six wooden buttons control the opening of this sage-green raglan, so band placement matters as much as stripe placement. This striped toddler cardigan knitting pattern is an original, photo-inspired project worked in DK yarn with 4 mm needles for a target buttoned chest near 59 cm. It includes two shaped sleeves, integrated front bands and specific color changes. An intermediate knitter can follow the written checkpoints to make a practical layering garment.
The Design: What Makes This Cardigan Different
The photograph shows a round-neck cardigan with a sage yoke and lower border, cream panels, rose stripes, long sleeves and six wooden-style buttons. A small tan label is also visible near the hem. Visible ridges do not reveal the exact knitting stitch. This design uses stockinette between garter-stitch bands, creating a repeatable gauge rather than claiming to reproduce an unidentified original pattern. The top-down raglan cardigan begins with four marked lines, allowing sleeve depth and chest width to grow together. Next, narrower bands of rose and cream break up broad green sections without requiring stranded colorwork. Five-stitch front bands are knitted alongside the body; this keeps buttonholes aligned and removes a separate pickup step. A common error in a DK baby cardigan is measuring the width before the bands overlap. Here, chest estimates account for one overlapping band.
Project Info at a Glance
| Item | Working specification |
|---|---|
| Skill level | Intermediate: raglan increases and small-circumference knitting |
| Time | Depends on the knitter; not independently measured |
| Finished size | Calculated target: approximately 59 cm chest, 36 cm length |
| Needle sizes | 4 mm main; 3.5 mm ribbing |
| Gauge | 22 stitches and 30 rows = 10 × 10 cm in blocked stockinette |
| Intended fit | Approximate toddler 2–3 years; compare the child’s actual measurements |
| Construction | Top-down, flat body, sleeves worked in the round |
| Best for | Layering over a shirt without bulky shoulder seams |
Sizing disclosure: These are calculations for the original instructions below, not measurements taken from the photograph. A published 2-year cardigan from Yarnspirations measures 57 cm at the finished chest; other designs differ. Gauge and fit must be checked on the actual knitter’s sample.
Materials and Tools
Yarn
Purchase one washable DK yarn line in three solid colors. Using a single base yarn avoids differences in stretch and stitch definition between stripe sections.
- Sage green — DK — 150 g: main yoke, borders and cuffs; DROPS Karisma or a similar DK.
- Warm cream — DK — 100 g: central panels and contrast stripes; same brand and fiber blend.
- Dusty rose pink — DK — 50 g: narrow decorative stripes; same brand and fiber blend.
These quantities are purchase allowances, not verified consumption . The pictured yarn’s brand, fiber and weight cannot be established by appearance. A published size-2 child cardigan in DROPS Karisma specifies 250 g in one color, which provides a useful comparison; this three-color sample allows up to 300 g.
Tools
- 4 mm circular needles , approximately 80 cm cable, or the size needed to obtain gauge.
- 3.5 mm needles for neckline, cuffs and lower ribbing.
- Six 10–12 mm buttons , selected after testing the knitted buttonhole.
- Eight removable markers to bracket four single-stitch raglan lines, plus one sleeve-round marker.
- Scrap yarn or two stitch holders for sleeve stitches.
- Tapestry needle , scissors, tape measure and a row counter.
- Optional washable hem label , attached securely only after blocking if copying the photograph’s small rectangular tag.
Loose buttons present a choking risk for young children. Attach them firmly, inspect them before every wear and follow the child’s caregiver’s safety requirements.
Gauge and Abbreviations
Wash and dry a gauge swatch according to the yarn label. Measure its central 10 cm rather than the cast-on edge. If there are more than 22 stitches across 10 cm, try larger main needles; if fewer, try smaller ones. A difference of two stitches per 10 cm changes the planned body circumference by several centimeters.
CO cast on; BO bind off; k knit; p purl; RS right side; WS wrong side; st/sts stitch/stitches; M1R make one right; M1L make one left; k2tog knit two together; ssk slip, slip, knit; yo yarn over; sl m slip marker. Garter band means knit its stitches on both RS and WS rows.
For an ssk, slip two stitches knitwise one at a time, insert the left needle through their fronts and knit them together. This paired left-leaning decrease sits opposite k2tog at the sleeve underarm.
Pattern — Step by Step
Read the construction before casting on. This is an original working pattern derived from the garment’s visible color arrangement, not a transcription of a designer’s unpublished instructions. Row numbers for buttonholes begin at yoke row 1 and exclude the six neckline rows. The edge bands always remain five stitches wide.
Neckline and Front Bands
Using sage and 3.5 mm needles, CO 62 sts . Work six flat rows, knitting the first and last five stitches on every row and working k1, p1 rib as established across the middle 52 stitches. Do not join the cardigan into a circle: the front opening stays flat.
Change to 4 mm needles. From one front edge to the other, divide the 62 stitches as follows:
5 band | 6 front | 1 raglan | 8 sleeve | 1 raglan | 20 back | 1 raglan | 8 sleeve | 1 raglan | 6 front | 5 band
Place a marker directly before and after each single raglan stitch. There are eight markers in all. Confirm the sections sum to 62 before starting the first increase row.
Raglan Yoke
RS odd-numbered rows 1–39: Knit the five-stitch band. At every marked raglan stitch, work M1R, sl m, k1, sl m, M1L ; knit between raglan sections. Knit the final five-stitch band. Each RS increase row adds exactly eight stitches.
WS even-numbered rows 2–40: Knit five band stitches, purl across the interior, then knit the remaining five band stitches. The number of stitches stays unchanged.
| Increase row | Total sts | Increase row | Total sts |
|---|---|---|---|
| 1 | 70 | 21 | 150 |
| 3 | 78 | 23 | 158 |
| 5 | 86 | 25 | 166 |
| 7 | 94 | 27 | 174 |
| 9 | 102 | 29 | 182 |
| 11 | 110 | 31 | 190 |
| 13 | 118 | 33 | 198 |
| 15 | 126 | 35 | 206 |
| 17 | 134 | 37 | 214 |
| 19 | 142 | 39 | 222 |
After every even-numbered WS row, retain the count shown for the preceding RS row. Finish yoke row 40 with 222 sts . The sections now read: five band, 26 front, one raglan, 48 sleeve, one raglan, 60 back, one raglan, 48 sleeve, one raglan, 26 front, five band.
Use sage for rows 1–26; cream 27–28; rose 29–30; cream 31–32; sage 33–34; cream 35–36; rose 37–38; and cream 39–40. Carry unused yarn up the edge only for short gaps. Cut and weave long unused floats to prevent snagging.
Separate Sleeves from Body
On the next RS row, work 5 band + 26 front + 1 raglan = 32 sts . Place the next 48 sleeve stitches on scrap yarn. CO 4 underarm sts . Knit the next 1 raglan + 60 back + 1 raglan = 62 sts . Place the second 48 sleeve stitches on hold. CO another 4 underarm sts . Knit the final 1 raglan + 26 front + 5 band = 32 sts .
The new body count is 32 + 4 + 62 + 4 + 32 = 134 sts . Four original raglan stitches belong to the body. Do not count held sleeve stitches twice. The two sleeves each begin with 48 held stitches; they will acquire four more at the underarm.
Body and Stripe Placement
Work 53 flat rows on the 134 body stitches, keeping the outer five stitches in garter stitch. Knit the interior on RS rows and purl it on WS rows. Keep the front opening straight; there are no body decreases.
| Body rows | Color | Number of rows |
|---|---|---|
| 1–2 | Rose | 2 |
| 3–4 | Cream | 2 |
| 5–6 | Sage | 2 |
| 7–8 | Cream | 2 |
| 9–11 | Rose | 3 |
| 12–30 | Cream | 19 |
| 31–32 | Rose | 2 |
| 33–34 | Cream | 2 |
| 35–36 | Rose | 2 |
| 37–38 | Sage | 2 |
| 39–40 | Cream | 2 |
| 41–43 | Rose | 3 |
| 44–45 | Cream | 2 |
| 46–53 | Sage | 8 |
The broad cream field occupies rows 12–30. If you change its length for a different wearer, change the placement of the later buttonholes by the same number of rows.
Switch to 3.5 mm needles and knit 10 further rows in sage. Keep five garter stitches at each edge; work k1, p1 rib as established across the 124 interior stitches. BO loosely in pattern. At the stated row gauge, the neckline, yoke, body and hem total approximately 36 cm, subject to differences between stockinette and rib.
Left Sleeve (Make 1)
Return the 48 held stitches to 4 mm needles. Pick up and knit the four matching underarm stitches for a total of 52 sts . Arrange the stitches for magic loop or double-pointed needles, place a marker at the underarm midpoint and work in rounds.
On sleeve rounds 5, 10, 15, 20, 25, 30, 35, 40, 45 and 50 , decrease one stitch on either side of the underarm with k1, ssk , work to the last three stitches, then k2tog, k1 . Each decrease round removes two stitches. Work all other rounds without shaping.
| After round | Sleeve stitch count |
|---|---|
| Pickup | 52 |
| 5 | 50 |
| 10 | 48 |
| 15 | 46 |
| 20 | 44 |
| 25 | 42 |
| 30 | 40 |
| 35 | 38 |
| 40 | 36 |
| 45 | 34 |
| 50 | 32 |
| 54 | 32 |
Use rose on rounds 1–2, cream 3–4, sage 5–6, cream 7–8, rose 9–11, cream 12–30, rose 31–32, cream 33–34, rose 35–36, sage 37–38, cream 39–40, rose 41–43, cream 44–45 and sage 46–54.
Switch to 3.5 mm needles; work 12 rounds of k1, p1 rib in sage across 32 sts, then BO elastically. Check cuff circumference against the child before sewing in ends. The knitted underarm-to-cuff length is approximately 22 cm at the target row gauge, with ribbing subject to its own tension.
Right Sleeve (Make 1)
Repeat the left sleeve’s pickup, colors, decrease rounds and cuff instructions exactly. Both sleeves must finish with 32 sts before ribbing. Compare their underarm lengths laid flat, not by stretching one sleeve against the other.
When joining a new stripe color, place its start at the underarm marker. This moves minor join irregularities away from the outer arm. Weave in each tail on the wrong side without pulling the striped columns out of alignment.
Six Buttonholes and Buttons
Place a buttonhole in the chosen front garter band on global yoke/body rows 7, 25, 43, 61, 79 and 97 . These are all RS rows when yoke row 1 is RS. Rows 43, 61 and 79 fall on body rows 3, 21 and 39; row 97 falls on hem row 4.
For each five-stitch buttonhole band, work k2, yo, k2tog, k1 in place of five plain knit stitches. The result is still five stitches. This one-row opening suits a small button only after testing; larger buttons may need a two-row buttonhole. Sew six buttons onto the opposite band at the exact same heights, using secure thread or doubled yarn.
Assembly and Finishing
- Lay the cardigan flat with the front bands overlapping and the neckline centered.
- Confirm that the body measures close to the calculated chest width before blocking.
- Check that each raglan line has twenty pairs of increases with no dropped stitches.
- Close small underarm gaps with the yarn tails without drawing in the armhole.
- Compare both sleeves for equal color sequence, decrease placement and cuff length.
- Pin each of the six buttons opposite its completed buttonhole.
- Sew buttons through the band securely and check whether each can be pulled loose; stitch an optional hem label above the lower rib if it is appropriate for the wearer’s age.
- Weave stripe ends into matching-color stitches on the wrong side.
- Wash gently according to the yarn label, then lay the cardigan flat to its intended dimensions.
- After drying, measure the chest and length again and record the actual gauge for the project notes.
The cardigan is complete when the fronts close evenly and no button or yarn tail is loose.
Seven Technical Tips
- Marker drift: If a raglan marker moves across a stitch, the eight-increase count can become six or ten. Keep two markers around each single raglan stitch and recount after every RS row.
- Underarm bulk: Bulky yarn tails under the sleeve join create a raised lump that can distort the sleeve shape. Divide tails between adjacent wrong-side stitches rather than knotting all four at one underarm point.
- Wrong decrease direction: Two k2tog decreases make both sleeve edges lean the same way and can twist the shaping line. Use ssk near the start and k2tog near the end of each specified round.
- Buttonhole timing: A forgotten hole on yoke row 25 shifts the six-button spacing by approximately 6 cm. Mark rows 7, 25, 43, 61, 79 and 97 on a row counter before knitting.
- Stripe tension: Rose yarn carried too tightly along several rows can pucker the front edge by 5 mm or more. Cut long floats, leave room at changes and check the band laid flat.
- Pinning mismatch: Attaching a button without overlapping both bands first can leave the neckline gaping by one stitch width. Pin through the actual hole into the opposite five-stitch band before sewing.
- Tail visibility: Weaving a pink tail through cream stitches can create a visible line across a pale stripe. Carry each tail horizontally through five or six same-color wrong-side stitches.
Troubleshooting and Fit Adjustments
If the chest is too small: First check whether the blocked swatch actually contains 22 stitches per 10 cm. Do not add an arbitrary number of stitches after the sleeves are separated: that produces a sudden width change directly below the armholes. For a larger garment, recalculate raglan shaping and sleeve depth together, or use a separately graded published pattern. The intended 59 cm buttoned chest is a target, not a guarantee.
If the neck seems wide: Test it with the plackets overlapped and the top button closed. A flat, open neckline looks wider than the fastened garment. The six neckline rib rows may also relax after washing. Adjusting only needle size changes width and height; make another swatch before restarting.
If the sleeves are short: Measure from the underarm, not from the collar. The planned sleeve has 54 stockinette rounds and 12 cuff rounds. Additional plain rounds may be inserted before the cuff, but space them equally on both sleeves and extend the sage area to avoid disturbing the pink stripe alignment.
If the bands curl: Their five garter stitches should lie flatter than stockinette, but a loose edge can still stretch. Check edge tension and avoid aggressively stretching the plackets while blocking. Sew buttons only after the garment has dried.
If the stripes step at sleeve joins: This is a normal possibility with stripes worked in a spiral of rounds. Place joins at the underarm where their shift is less visible, or apply a jogless-stripe method after practicing it on a small sample.
Related Patterns
- Free Baby and Toddler Striped Cardigan — A listed seamless raglan option in DK yarn. View the free-pattern listing . [INTERNAL LINK NEEDED: free DK toddler cardigans]
- Children’s Classic Raglan Cardigan — A published top-down, one-piece DK design with ribbing. View its Ravelry details . [INTERNAL LINK NEEDED: raglan shaping guide]
- Pretty Stripes Child Cardigan — A free top-down striped design in fingering-weight yarn. View its Ravelry details . [INTERNAL LINK NEEDED: color-change techniques]
- Running Circles Cardigan — A free child-size knitting pattern with recorded dimensions and yarn requirements. View DROPS instructions . [INTERNAL LINK NEEDED: measuring children’s knitwear]
Sources and Verification Notes
The Craft Yarn Council yarn standards place DK/light-worsted yarn in a typical range of 21–24 knitted stitches per 10 cm and roughly 3.75–4.5 mm needles. Stylecraft’s Kid’s Striped Cardigan lists a 22-stitch gauge and 4 mm needles. Yarnspirations’ Fun and Flouncy Cardigan gives a finished size-2 chest of 57 cm. DROPS Running Circles Cardigan lists 250 g for its size-2 version, although it is a different pattern. Wool and the Gang documents a single-row yarn-over buttonhole. Health Canada warns that loose clothing buttons are a small-part hazard.
None of these sources identifies the exact garment in the photo. All cast-on figures, increases, sleeve decrease intervals, stripe rows and color allowances above are an original calculation. Test knit and block a sample before presenting the pattern as a finished, size-certified design.
Conclusion
This striped toddler cardigan knitting pattern translates the photographed green yoke, cream field, rose bands and six-button front into a measurable top-down project. The central control points are 62 stitches at cast-on, 222 after the raglan, 134 across the separated body and 32 at each sleeve cuff. Record the blocked gauge and actual chest before making a second size; those measurements give more useful feedback than age labeling alone. Share a flat-lay photograph on Pinterest and an underarm detail on Instagram with #SageRoseCardigan . For the next sample, would a wider cream panel or an additional rose stripe better match the pictured sleeve layout?