Introduction
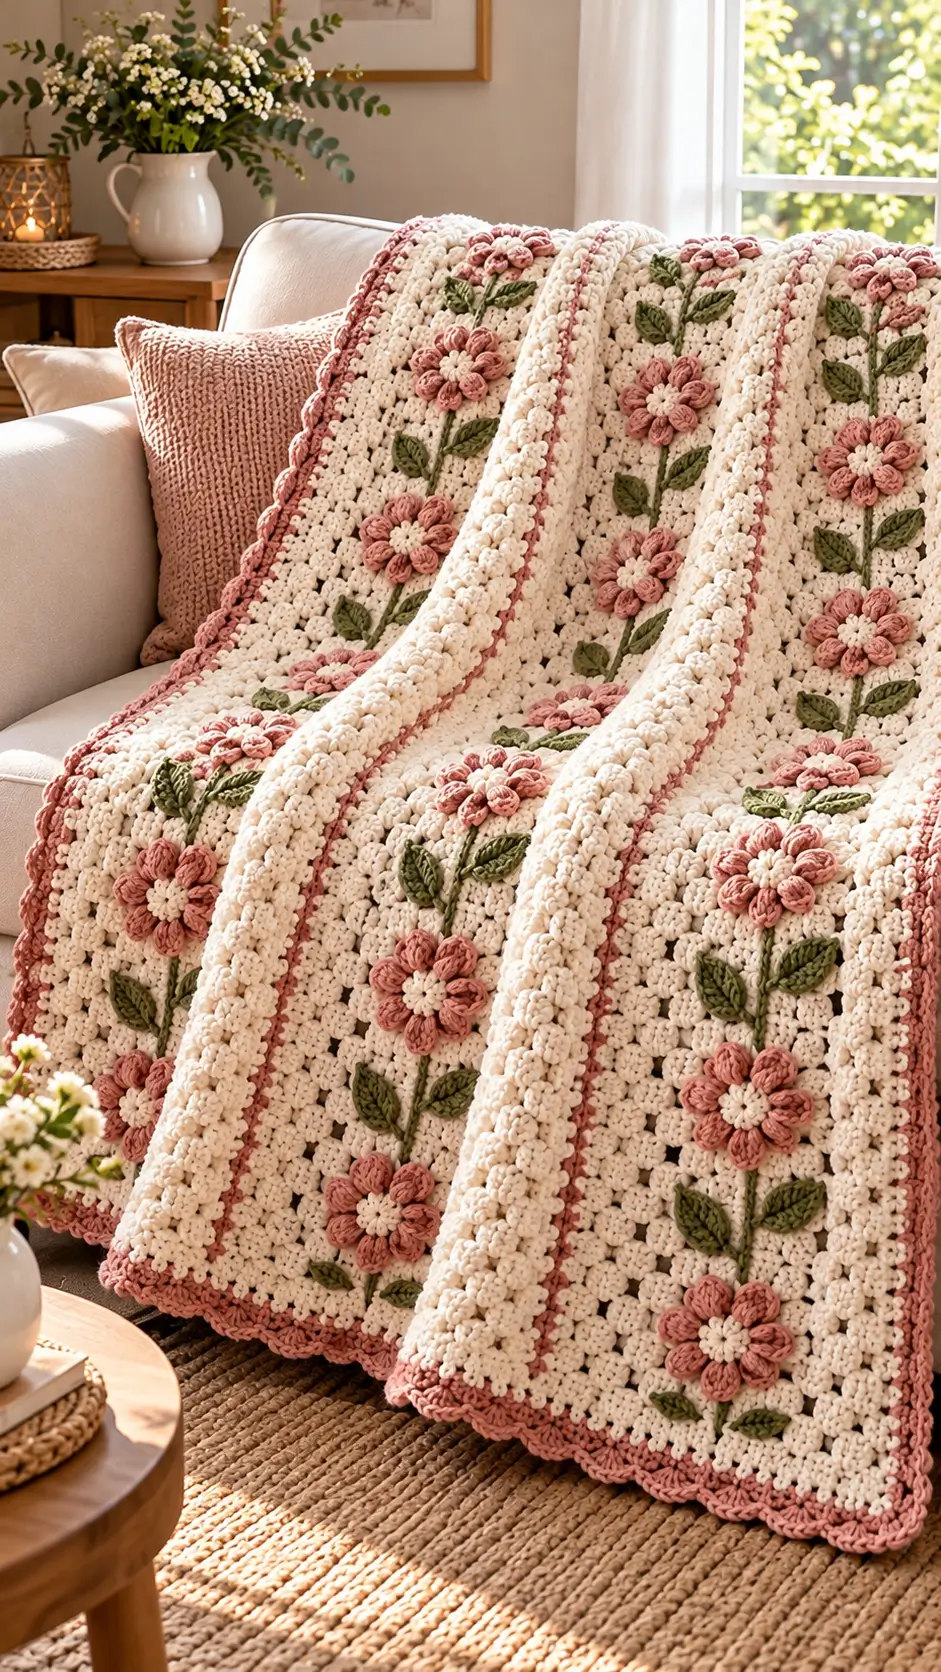
Five dusty-rose blossom columns run between four raised ivory ribs, with paired olive leaves positioned like climbing vines. This 3D floral crochet blanket is a photo-inspired construction project using medium-weight yarn, a 5 mm hook, and separately attached floral appliqués. The planned throw measures approximately 120 × 148 cm at the stated gauge and suits intermediate crocheters. Its panel-free base keeps the vines aligned and avoids bulky joining seams.
The Design: What Makes This Pink Rose Throw Different
The photograph shows flowers arranged vertically rather than scattered evenly over granny squares. That distinction determines the construction: a continuous cream rectangle provides an uninterrupted ground for five parallel stems. Four raised ribs divide the field without introducing seams that might shift under the weight of the flowers.
Each dusty-pink bloom uses two tiers of six petals, while a small cream disk covers the central joins. Olive leaves are attached in opposing pairs; stitching their central veins down prevents the tips from curling into neighboring flowers. The pink scalloped edging repeats the blossom color without overpowering the cream surface.
A common mistake in a raised flower crochet blanket is sewing every petal flat. Attach only the petal bases so the outer edges retain their shape. This floral crochet afghan benefits from measuring the stem spacing before any appliqués are sewn.
Project Info at a Glance
| Skill Level | Time | Finished Size | Hook | Best For |
|---|---|---|---|---|
| Intermediate (design assessment) | Not independently verified | Target ~120 × 148 cm at design gauge; not measured from photo | 5 mm (H-8) | Decorative sofa throw |
Size verification: Yarnspirations publishes a different Flower Patch Blanket at 122 × 147.5 cm, which is a useful real-world throw-size reference, not the dimensions of the photographed item: https://www.yarnspirations.com/products/bernat-flower-patch-crochet-blanket . The dimensions above are calculated for this original reconstruction.
Materials and Tools
Yarn
- Warm cream / off-white — #4 worsted — estimated 1,200–1,500 g, including background, raised dividers, flower centers, and cream edging — suggested range: Caron One Pound.
- Dusty rose / muted pink — #4 worsted — estimated 250–350 g, including 25 blossoms, seam accents, and outer shells — choose a matching worsted acrylic.
- Olive / moss green — #4 worsted — estimated 120–180 g, for 50 leaves and five embroidered stems — choose a similar gauge and fiber blend.
- Cream reserve for centers — approximately 40 g within the cream allowance, not an additional purchase.
These are planning estimates, not weighed measurements from the photograph or a completed test sample. Caron One Pound is sold as approximately 453.6 g / 742 m per skein; the manufacturer classifies it as #4 worsted and recommends a 5 mm hook: https://www.yarnspirations.com/products/caron-one-pound-yarn . Purchasing four cream skeins and one skein of each accent allows a reserve, but you should weigh a fabric swatch before calculating final consumption.
Tools
- 5 mm (H-8) crochet hook for the base and most appliqués.
- 4.5 mm hook, optional, for flowers that spread or lose definition.
- Tapestry needle, scissors, locking stitch markers, measuring tape, blocking mats, and rust-resistant pins.
- Removable fabric markers or short contrast yarn strands for the flower centers and stem axes.
No stuffing or safety eyes are used. This is a blanket, not a stuffed amigurumi figure.
Abbreviations
MR = magic ring; ch = chain; sc = single crochet; dc = double crochet; hdc = half double crochet; sl st = slip stitch; inc = two single crochets in one stitch; BLO = back loop only; FLO = front loop only; st/sts = stitch/stitches; RS = right side; rep = repeat.
All instructions use US crochet terminology. Turning chains do not count as stitches unless specifically stated. Flower rounds are joined with a slip stitch; the blanket base is worked flat in turned rows. An invisible decrease works through the front loops of two adjacent stitches before completing one single crochet, but decreases are not required for this flat project.
Gauge, Sizing, and Yarn Calculation
The design gauge is 14 pattern stitches and 12 rows per 10 × 10 cm in alternating single and double crochet with the 5 mm hook. This is a target to test, not a published gauge for the pictured blanket. Crochet a minimum 16 × 16 cm swatch, measure its central 10 cm, and change hook size if needed. The lemon-peel texture alternates single and double crochet: https://www.hookedbyrobin.com/blog/crochet-lemon-peel-stitch .
At that gauge, 160 stitches produce about 114.3 cm of fabric width, while 170 rows produce about 141.7 cm of length. Allow roughly 3 cm of effective border width on each edge for a target near 120 × 148 cm. The shell border may grow or contract with blocking. Do not claim an exact finished size until the blanket has been measured.
To estimate yarn, weigh the dry 10 × 10 cm swatch in grams. Multiply its mass by roughly 162 for the 114.3 × 141.7 cm main area, then add separate allowances for flowers, ribs, stems, and edging. This measured calculation is more dependable than transferring yardage from another blanket design.
Pattern — Step by Step
Original, untested photo-inspired instructions; they are not a transcription of the photographed maker’s pattern. Work the base in turned rows and the flower centers in joined rounds.
Cream Textured Blanket Base (Make 1)
Yarn: warm cream. Stitch structure: alternating sc and dc, adapted as a standard lemon-peel fabric.
Foundation: Ch 161.
Row 1 (RS): Sc in second ch from hook, dc in next ch; rep [sc in next ch, dc in next ch] to end. (160 sts: 80 sc, 80 dc)
Row 2: Ch 1, turn; sc in first dc, dc in next sc; rep across. (160 sts: 80 sc, 80 dc)
Rows 3–170: Repeat Row 2, always placing sc over dc and dc over sc. (160 sts per row; 170 rows total)
Fasten off with a 20 cm tail and weave it into the wrong side. Mark the upper and lower edges before turning the fabric to decorate it. A count of 160 worked stitches is maintained across every row; neither the starting chain nor the turning chain adds a stitch.
Dusty-Rose Layered Flowers (Make 25)
Yarn: dusty rose. Counts below are original appliqué construction math, not copied from another flower pattern.
R1: 6 sc in MR; join. (6 sc)
R2: Inc × 6; join. (12 sc)
R3: [Sc, inc] × 6; join. (18 sc)
R4: [Sc in BLO of next st, ch 3, skip 2 sts] × 6; join. (6 anchor sc and 6 ch-3 arches)
R5: In every ch-3 arch work [sc, hdc, 3 dc, hdc, sc]. Join. (42 worked sts; 6 inner petals)
R6: Behind the petals, insert the hook into the unused FLO of an R3 anchor stitch. Repeat [sl st into the next unused anchor FLO, ch 5] × 6, spacing six new loops evenly; join. (6 anchor sl sts and 6 ch-5 arches)
R7: Work [sc, hdc, 5 dc, hdc, sc] in each ch-5 arch; join. (54 worked sts; 6 outer petals)
Fasten off, leaving a 25 cm sewing tail. Shape the six outer petals without pinning them flat; work one sample first to check that its diameter suits a roughly 23 cm-wide floral lane. A smaller hook is preferable to loose stitches when petal edges flop forward.
Cream Flower Centers (Make 25)
Yarn: warm cream. Standard six-stitch circular increase.
R1: 6 sc in MR; join. (6 sc)
R2: Inc × 6; join. (12 sc)
Fasten off with an 18 cm tail. Sew each flat disk over the flower’s starting circle using small stitches around the perimeter, not through the raised pink tips. This center covers joins while leaving the petals independent.
Olive Crochet Leaves (Make 50)
Yarn: olive green. An original two-sided chain leaf; a separately published leaf-size comparison is available at https://www.ravelry.com/patterns/library/leaf-31 .
Leave an 18 cm starting tail, then ch 11.
Side A: Beginning in second chain from hook, work sl st, sc, hdc, dc in each of next 4 ch, hdc, sc, sl st. (10 worked sts)
Turn around the foundation-chain end with ch 1; the chain is not a stitch.
Reverse side: Working along the unused underside loops, repeat sl st, sc, hdc, 4 dc, hdc, sc, sl st. (10 worked sts)
Join with sl st and fasten off. (20 worked sts total, excluding the joining slip stitch and turning chain). Weave the finishing tail toward the center vein, leaving the starting tail for attachment. Each bloom receives two leaves, one angled left and the other right.
Five Embroidered Olive Stems (Make 5)
Yarn: olive green. Surface embroidery, not a stitch-counted crochet round.
With the rectangle right side up, mark five long vertical axes at base-stitch columns 16, 48, 80, 112, and 144. Sew an olive line along each axis with short backstitches approximately 5–8 mm long. Begin and finish roughly 8–10 cm inside the top and bottom edges, rather than carrying the line through the scalloped border.
Do not drag the yarn tight across the back. A stem that shortens the fabric will form a ridge unrelated to the planned cream dividers.
Raised Cream Divider Ribs (Make 4)
Yarn: warm cream. Narrow BLO strips sewn onto the blanket surface.
Foundation: Ch 5.
Row 1: Sc in second ch from hook and in each remaining ch. (4 sc)
Row 2: Ch 1, turn, sc in BLO of each st. (4 sc)
Rows 3 onward: Repeat Row 2, 4 sc per row, until the strip matches the unbordered blanket’s measured length, approximately 142 cm at design gauge. Count the completed strip rows individually; their number will differ from the blanket’s 170 lemon-peel rows because single-crochet row height is different.
Fasten off with a 25 cm tail. Center the ribs on stitch columns 32, 64, 96, and 128; attach the long edges with small, relaxed stitches. These strips lie on top of the blanket and do not add four new panels of width.
Dusty-Rose Lines Beside the Ribs (Make 4)
Yarn: dusty rose. Surface slip stitch; no separate foundation is required.
Join pink at the lower end of a cream rib, inserting the hook through the blanket just beside the rib. Make one surface slip stitch every 1–2 base rows to form a thin vertical accent. Fasten off at the opposite end. Repeat at all four cream ribs, keeping the line on the same side of each strip. This duplicates the image’s narrow pink divisions without requiring a second border around every floral lane.
Cream Foundation and Pink Scalloped Border (Make 1)
Yarn: cream for R1–R3, dusty rose for R4. The pickup plan below is calculated for the 160-stitch, 170-row rectangle.
R1: Attach cream at a corner. Make 160 sc along each horizontal edge, and along each vertical edge place 1 sc into each of 170 row ends plus 1 extra sc in every sixth row end (28 extras per side). Work the corners as 3 sc, counting one normal edge stitch at each corner and two additional corner stitches. Mark the middle corner stitch. (724 sc total: 320 horizontal + 396 vertical + 8 corner extras)
R2: Sc in every stitch, working 3 sc into each marked corner stitch instead of one; move markers to the new center stitches. (732 sc: 724 + 8)
R3: Repeat R2 in cream, again making a three-sc corner increase. (740 sc: 732 + 8)
R4: Change to dusty rose. Repeat [sc in next st, skip 1 st, 5 dc in next st, skip 1 st] all the way around. (185 shells; 1,110 worked sts; all 740 previous-round stitches consumed). Join with sl st and fasten off with a 25 cm tail.
The shell repeat is deliberately divisible around the full circumference. If blocking reveals flared corners, reduce hook size for R4 rather than omitting stitches; the count is the reference for this exact layout. Related scallop-edging mechanics are shown in https://thecaffeinatedsnail.com/crochet-lemon-peel-stitch-blanket/ .
Flower Placement and Construction Checks
Within each of the five lanes, place flower centers near base rows 20, 53, 86, 119, and 152. That produces 25 flowers and 50 leaves. Move individual blossoms by one or two rows if a leaf would touch a raised divider. Arrange the opposing leaves diagonally above each flower, keeping their tips outside the cream divider strips.
Use temporary markers to test one entire lane before sewing. The image also shows pink trim close to the main border, so leave an undecorated strip of at least 6 cm between an end blossom and the outer scallops. Mark all five axes with a ruler; eyeballing the columns can gradually move the last vine toward a border.
Assembly
- Check the base dimensions. Measure the blocked or relaxed cream rectangle, confirm that each of its 170 rows still contains 160 stitches, and identify the right side.
- Work the perimeter. Complete three cream border rounds and the final dusty-rose shells before placing any flowers, so the outer frame is already fixed.
- Mark five flower lanes. Use columns 16, 48, 80, 112, and 144 as centers; run a removable guide thread down each vertical path.
- Sew the olive stems. Backstitch one line per lane without pulling the blanket shorter; test the back surface for loose floats.
- Attach the center disks to the flowers. Use 25 cream disks, one per pink bloom, covering their central ring while avoiding petal tips.
- Pin the flowers. Set five blossoms along each stem at the designated rows and confirm an equal margin near the pink scalloped edge.
- Attach the flower bases. Sew around the first three pink rounds only, leaving the two outer petal rows free to stand above the blanket.
- Add leaf pairs. Fix 50 leaves beside their assigned flowers; stitch the center vein of each leaf and leave the outer halves slightly raised.
- Apply raised dividers and pink accents. Sew four cream BLO strips along columns 32, 64, 96, and 128, then work one pink surface-slip-stitch line beside each strip.
- Finish the reverse. Weave tails back through at least 5 cm of neighboring stitches, remove temporary markers, and lay the blanket flat for its final width and length measurements.
The completed construction contains one base, 25 flowers, 25 cream centers, 50 leaves, four raised ribs, four pink surface lines, five embroidered stems, and one four-round border.
7 Technical Tips
- Lost edge stitch: Place a marker through the first and last worked stitch of every tenth base row. A decrease from 160 to 159 stitches will gradually tilt all five vine axes.
- Ruffled foundation border: On each side, count 170 row ends and add one extra pickup in exactly 28 positions. Too many pickup stitches cause waving before the pink shells are added.
- Loose flower centers: The opening circle must contain exactly 6 sc before the first increase. An oversized magic ring leaves a visible hole beneath the 12-stitch cream center.
- Flattened petals: Catch only the base of the petals when attaching each 3D flower. Sewing through their outer tips removes the raised effect present in the reference photo.
- Unequal ribs: Measure each four-stitch BLO divider against the actual blanket length rather than copying the base’s 170-row count. Plain single crochet and lemon peel produce different row heights.
- Distorted leaf veins: Limit attachment stitches to a central line and keep both side edges free. Pulling a leaf’s full 20-stitch outline tight makes the olive shapes appear narrower.
- Visible reverse-side tails: Weave each tail at least 5 cm through matching-color stitches, change direction once, and trim only after inspection. A dark green tail carried across the cream ground will show on the wrong side.
Related Patterns
- Flower Granny Square Blanket — a motif-based alternative with photographs and video. [INTERNAL LINK NEEDED: flower granny square tutorial]
- Crochet Lemon Peel Stitch — the reversible background texture used in this reconstruction. [INTERNAL LINK NEEDED: crochet stitch library]
- Simple Flower and Leaf Appliqué — a separate small floral motif for coordinating projects. [INTERNAL LINK NEEDED: crochet leaf patterns]
- Bernat Flower Patch Blanket — an official full-size floral blanket reference. [INTERNAL LINK NEEDED: crochet blanket collection]
Conclusion
The primary construction decision is to finish the cream rectangle before attaching raised petals, leaves, and dividers. Doing so gives each of the five floral columns a fixed center line and prevents border adjustments from displacing the vine layout. Check the gauge swatch, then measure the first completed blossom and leaf against the width of one lane before making the remaining sets. The 3D floral crochet blanket should be photographed both flat and draped so its raised texture and shell edging remain visible. Share the final project on Pinterest and Instagram with #PinkRoseFloralThrow, noting yarn brand and measured dimensions. Which of the five rose columns would you offset to imitate the irregular flower spacing in the reference photo?