Introduction
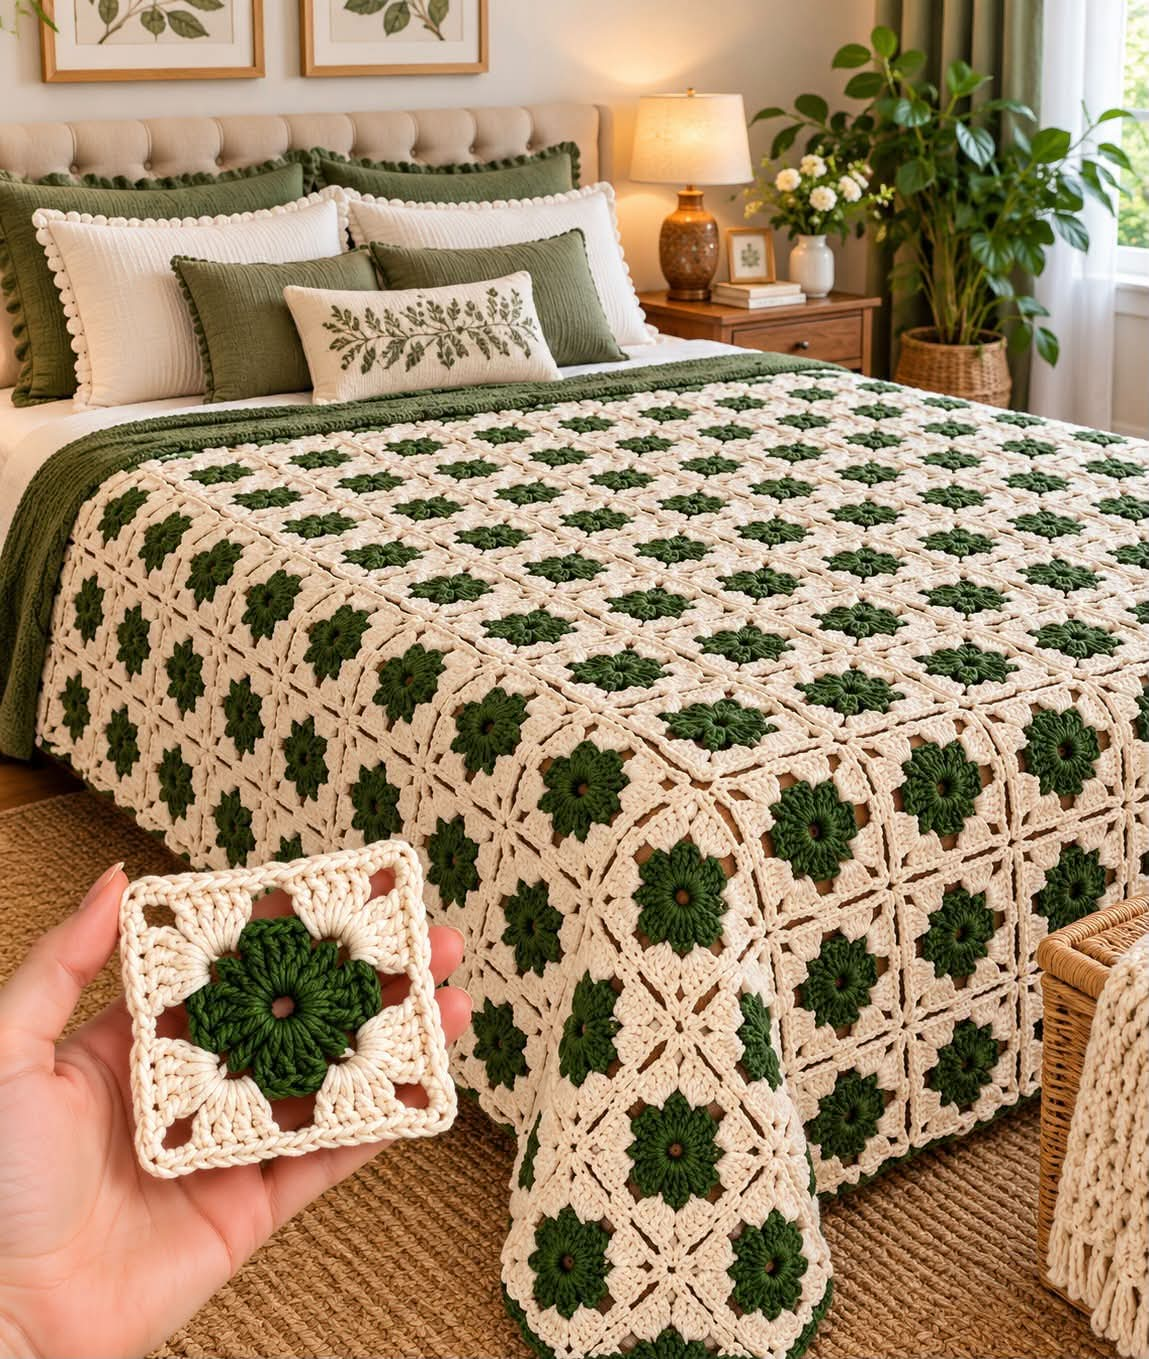
Eight dark-green petals have to stay visible after the cream corners are added, or this motif loses the flower-grid effect shown across the bed. This green flower granny square crochet blanket uses raised forest-green centers surrounded by an open ivory square framework. Worked as separate motifs and joined into a large bedspread, the construction is suited to intermediate crochet skills and can be resized from a throw to a full bed cover.
The Design: What Makes This Flower Granny Square Different
The motif depends on contrast between a dense flower and an open background. Eight green petal sections radiate from a small center opening, giving the flower substantially more texture than a conventional flat granny-square center. Cream stitches begin behind that flower and expand into four pronounced corners, leaving open spaces around the petals instead of filling the entire square.
A second decision concerns the join. Narrow cream seams remain visible between neighboring motifs, turning individual squares into a continuous geometric grid while keeping each green flower isolated.
The common mistake with this crochet flower granny square blanket is tightening the first cream round. If those chain spaces are too short, the green center cups upward and the finished squares become difficult to join evenly.
Project Info at a Glance
| Skill Level | Construction | Target Motif Size | Hook | Best For |
|---|---|---|---|---|
| Intermediate | Individual joined flower squares | Approx. 13–15 cm | 4.0–4.5 mm | Throws and bedspreads |
The motif dimensions above are a target for this photo-inspired construction rather than measurements taken from the photographed blanket. Crochet one complete square and block it before calculating the final blanket grid.
Materials and Tools
Yarn
- Forest green — worsted weight #4 — flower centers
- Warm ivory or cream — worsted weight #4 — square backgrounds, joins and border
Cream will require considerably more yarn than green because it forms most of every square as well as all joining seams and the outer border. Purchase the cream yarn from one dye lot when planning a bed-sized project.
Tools
- 4.0–4.5 mm crochet hook
- Worsted weight #4 yarn
- Yarn needle
- Scissors
- Locking stitch markers
- Tape measure
- Blocking mats
- Rust-resistant pins
Abbreviations
- MR — magic ring
- ch — chain
- sl st — slip stitch
- sc — single crochet
- hdc — half double crochet
- dc — double crochet
- tr — treble crochet
- sp — space
- st/sts — stitch/stitches
- BLO — back loop only
An invisible decrease is worked through the front loops of two adjacent stitches before completing one single crochet, reducing the visible gap produced by a conventional decrease.
Green Flower Granny Square Pattern
This is an original construction based on the visible structure of the uploaded photograph rather than an exact transcription of a published pattern. The flower is completed first. Cream yarn is then attached behind the petals and converted into a square.
Green Flower Center
Yarn: forest green.
Round 1: Make a MR. Ch 1 and work 16 sc into the ring. Join with sl st to the first sc. (16 sts)
Do not close the center so aggressively that the ring disappears completely. A very small opening suits the flower appearance visible in the photograph.
Green Petal Round
Round 2: Ch 1.
Across the first two stitches work:
(sc, hdc, 3 dc, hdc, sc)
Repeat the sequence across each following pair of stitches.
Join with sl st. (8 petals)
Each petal uses two foundation stitches, producing eight evenly distributed sections around the 16-stitch center.
Raised Petal Texture
The flower in the photograph appears denser than a single flat round. Add a second pass to increase definition.
Sl st to the base of the first petal.
Work one surface sl st or loose sc along the center of the petal toward its outer edge.
Return to the flower center on the wrong side.
Repeat through all eight petals.
Alternatively, omit this step if the selected yarn already produces sufficiently raised petals.
Fasten off the green yarn, leaving a tail long enough to secure the center on the reverse side.
Cream Foundation Behind the Flower
Yarn: warm ivory or cream.
Turn the flower slightly so the rear attachment points are accessible.
Join cream yarn behind any petal.
Round 3: Ch 1, sc around the rear structure between two petals, ch 4.
Repeat around the flower.
Join with sl st. (8 ch-4 spaces)
Lay the motif flat before proceeding. The cream chains should surround the flower without pulling the petal tips toward the center.
First Cream Openwork Round
Sl st into the first ch-4 space.
Round 4: Ch 3, work 3 dc into the same space, ch 2.
Work 4 dc into the next ch-4 space, ch 2.
Repeat around.
Join with sl st.
The motif remains roughly circular at this point. Four of the spaces will become corners in the next round.
Turning the Flower into a Square
Place markers in four evenly distributed chain spaces. Each marked position becomes a corner.
First Squaring Round
Round 5: Sl st to the first marked space.
Ch 3 and work:
(2 dc, ch 3, 3 dc)
in the same corner space.
Ch 2, work 3 dc into the next available space, ch 2.
At the following marked corner work:
(3 dc, ch 3, 3 dc)
Continue this structure around all four sides.
Join with sl st to the beginning ch-3.
Check that the green flower remains centered before beginning the next round.
Open Corner Round
Round 6: Sl st into the next chain space.
Ch 3 and work 2 dc in the same space.
Ch 3, then work 3 dc in the next space.
At each corner work:
(3 dc, ch 4, 3 dc)
Continue around, maintaining ch-3 spaces along each side.
Join with sl st.
The larger chain spaces reproduce the open cream framework visible between neighboring flowers in the photograph.
Outer Square Round
Round 7: Ch 1, sc in each dc and work 3 sc into each side chain space.
At every corner ch-4 space work:
(2 sc, ch 2, 2 sc)
Continue around and join with sl st.
Fasten off, leaving a tail of approximately 15 cm.
Checking the Finished Motif
Place the square on a flat surface without stretching it.
The green flower should occupy roughly half the width of the square. Four cream corners should remain clearly visible, and open spaces should separate the petals from the outer framework.
If the center rises significantly, the cream foundation chains are probably too tight. Increasing the ch-4 spaces to ch-5 is preferable to attempting to flatten severe cupping through blocking alone.
If the square edge waves, reduce excess stitches in the outer cream rounds or move down one hook size for the background.
Blocking the Granny Squares
Blocking is important because a bedspread magnifies small dimensional differences between motifs.
Dampen the finished square according to the yarn care instructions.
Pin all four corners first.
Measure both diagonals. Adjust the pins until the measurements match.
Pin the midpoint of each side.
Target approximately 13–15 cm square, depending on yarn and tension.
Do not pin through the green petals. The flower should retain its raised texture while the cream background dries flat.
Allow every square to dry completely before removing it from the blocking surface.
How Many Granny Squares Are Needed?
Calculate the motif count only after blocking the first finished square.
Use:
Desired blanket width ÷ blocked square width = number of squares across
Desired blanket length ÷ blocked square height = number of squares down
If one blocked motif measures 14 cm, a grid of 10 squares measures approximately 140 cm before accounting for joining and the outer border.
A 12-square length measures approximately 168 cm before border adjustments.
That produces a starting grid of:
10 × 12 = 120 motifs
For a larger bedspread, a grid such as 12 × 14 = 168 motifs provides considerably more coverage.
These are planning examples. Measure the intended mattress and decide how far the blanket should drop over each side before selecting the final grid.
Estimating Yarn for a Large Blanket
The most reliable method is to weigh one completed motif.
Make one green-and-cream square, weave in its ends and weigh it on a digital kitchen scale.
For example, if one square weighs 25 g and the blanket requires 120 motifs:
25 g × 120 = 3,000 g
Add approximately 10–15% for joining, the border, gauge variation and spare yarn.
To estimate colors separately, weigh the green flower before adding cream. Then weigh the completed square. The difference is approximately the cream consumption per motif.
This method is more accurate than assigning a fixed gram quantity to a photograph whose exact yarn and dimensions cannot be verified.
Arranging the Squares
The photograph uses one green flower color throughout the blanket, so no color-sequence planning is required.
Lay all blocked motifs with the right sides facing upward.
Rotate any square that appears slightly different so its strongest corner aligns with the rest of the grid.
Check every flower center. Loose green tails should be corrected before joining because the back of the flower becomes harder to access afterward.
Stack the motifs into labeled rows once the layout has been approved.
Joining the Granny Squares
A visible cream join matches the photographed blanket and reinforces the geometric grid.
Flat Slip-Stitch Join
Place two squares side by side with right sides facing upward.
Join cream yarn at corresponding corners.
Insert the hook through the edge loop of the first square and the corresponding edge loop of the second.
Work one loose slip stitch.
Continue across the complete edge.
Match every stitch or chain-space position before making the next joining stitch.
Fasten off at the opposite corner.
Join all motifs into horizontal rows first. Connect those rows using the same method.
Keeping the Join Flat
The joining seam must not be shorter than the blocked motif edge.
After connecting the first two squares, lay them flat and measure across the seam.
If both squares pull toward the center, the slip stitches are too tight.
Increase loop height rather than adding random stitches.
Repeat this test after joining the first complete row. Correcting tension early prevents a bed-sized grid from developing permanent ridges.
Cream Blanket Border
The photographed blanket finishes with a relatively restrained cream edge rather than a contrasting border.
Border Round 1
Join cream yarn at any outer corner.
Ch 1 and work sc evenly around the complete blanket.
At each blanket corner work:
(2 sc, ch 2, 2 sc)
Join with sl st.
Border Round 2
Ch 3.
Dc in each stitch around.
At each corner ch-2 space work:
(2 dc, ch 2, 2 dc)
Join with sl st.
Openwork Border Round
Ch 1 and sc in the first stitch.
Repeat:
ch 3, skip 2 sts, sc in next st
around the sides.
At each corner work:
(sc, ch 5, sc)
Continue around and join.
Final Edge
Sl st into the first ch-3 space.
Work 4 dc into the space.
Sl st into the next anchoring stitch or space.
Repeat around the perimeter.
At the corners, increase to 5–6 dc if necessary so the edge turns without pulling inward.
Fasten off and weave the tail into the cream border.
Making the Green Flowers More Dimensional
The flower should remain slightly raised above the cream square without becoming bulky enough to interfere with the blanket’s function.
When attaching cream yarn, work behind the green petals rather than through their outer edges.
Do not sew the petal tips to the background.
After blocking, lift each green petal slightly with your fingers.
If additional relief is wanted, work the petal round with front-post stitches or add loose surface crochet through the middle of each petal.
Avoid adding thick knots to the flower center. A bedspread containing more than 100 motifs amplifies even small raised areas.
Making a Smaller Throw
The same green flower granny square crochet blanket motif works for a sofa throw without altering the individual square.
With 14 cm blocked motifs:
| Grid | Motifs | Approx. Size Before Border |
|---|---|---|
| 6 × 8 | 48 | 84 × 112 cm |
| 8 × 10 | 80 | 112 × 140 cm |
| 10 × 12 | 120 | 140 × 168 cm |
| 12 × 14 | 168 | 168 × 196 cm |
Joining and border rounds will add to these dimensions.
Making the Motif More Open
For a lighter blanket, increase selected cream chain spaces by one chain.
For example, replace a ch-3 side space with ch-4 while retaining the same corner structure.
Test the change on one square before repeating it. Additional chain length affects both the openness and the blocked dimensions.
Do not enlarge the green flower at the same time. Changing the flower and cream framework simultaneously makes it difficult to determine which modification caused a sizing problem.
Making the Motif More Solid
Replace selected cream chain spaces with hdc or dc stitches if fewer openings are preferred.
Keep the corners open enough to maintain square geometry.
A useful modification is to replace ch-3 along the sides with hdc, ch 1, hdc.
This adds fabric without turning the background into a completely solid square.
Make and block one modified motif beside the original before selecting the version for a full blanket.
Assembly
- Crochet one complete green flower and check that all eight petals are evenly distributed.
- Add the cream rear foundation without catching the visible tips of the green petals.
- Work the open cream rounds and establish four evenly spaced corners.
- Complete one full square, weave its tails and block it to the selected target dimension.
- Calculate the blanket grid from the blocked measurement and make the remaining motifs.
- Block every square to the same dimensions before arranging the complete blanket.
- Join individual motifs into horizontal rows using relaxed cream slip stitches.
- Connect the finished rows and check the grid for ridges or compressed seams.
- Work the cream perimeter rounds and final decorative edge around the assembled blanket.
- Block the completed bedspread lightly, then reshape the green flowers without flattening their petals.
The finished blanket should form a regular cream grid with one raised eight-petal green flower centered inside every square.
7 Technical Tips for Better Flower Granny Squares
- Count exactly 16 stitches in the green foundation. An extra or missing stitch prevents eight two-stitch petal sections from being distributed evenly around the center.
- Keep every cream ch-4 foundation loop the same length. A loop even several millimeters shorter than its neighbors can pull one side of the green flower upward.
- Measure both diagonals during blocking. If one diagonal differs by more than approximately 5 mm, adjust the corner pins before the square dries.
- Keep the green flower near the center of the 13–15 cm square. An off-center flower becomes particularly obvious after four neighboring cream seams form a geometric grid around it.
- Use loose slip stitches when joining motifs. A seam that finishes even 5 mm shorter than each square edge can create visible ridges across a bed-sized blanket.
- Pin the cream corners rather than the green petals. Pulling the petals outward during blocking flattens their raised texture and can permanently stretch the flower diameter.
- Weave each joining tail through at least 5 cm of matching cream stitches. Short tails can work free because a large blanket repeatedly flexes along its joining lines during use and washing.
Choosing the Green Yarn
The photograph uses a dark botanical green rather than a bright emerald shade. Forest, moss, pine and deep olive are suitable color families.
Stitch definition matters because the petals rely on texture more than color variation. A smooth plied yarn will show the individual dc stitches more clearly than a heavily brushed fiber.
If two green yarns are being considered, crochet one flower from each and place them against the selected cream yarn. The darker option will generally produce stronger contrast, while a muted olive creates a lower-contrast botanical effect.
Keep the same green yarn throughout the bedspread unless deliberate color variation is part of the design. Small dye-lot differences become visible when identical flowers are arranged in a regular grid.
Choosing the Cream Background
Pure white creates a sharper contrast than the photographed blanket. Warm ivory, natural, oatmeal or soft cream will reproduce the lower-contrast appearance more closely.
The background yarn also needs consistent thickness. It forms the corners, joins and border, so any change in gauge affects the entire blanket geometry.
Before purchasing the full quantity, make one complete motif and wash it according to the intended care method. Measure the square before and after drying.
If the yarn changes dimension substantially, calculate the blanket using the washed measurement rather than the fresh blocked measurement.
Finishing the Bedspread
Inspect every four-square intersection before the final border is added. These junctions concentrate several joining seams and are the most likely locations for visible gaps.
Repair loose intersections with matching cream yarn.
Check the reverse side for unsecured green tails next.
After completing the border, wash the blanket according to the yarn label and support its full weight when wet.
Dry it flat when practical. Arrange the corners of the blanket first, then straighten the joining grid.
Before the fabric is fully dry, reshape each green flower by hand so its petals remain distinct from the cream background.
Conclusion
The eight-petal center is the measurement to establish first in this green flower granny square crochet blanket. Make one complete green-and-cream motif, block it to the chosen 13–15 cm target, and calculate the blanket grid from that actual dimension. Keep the cream foundation relaxed so the flower stays flat, then use consistent joining tension to preserve the geometric grid across the bed. Your next practical step is to crochet and weigh one finished sample square before buying the full yarn quantity. Save the design to Pinterest or share the finished blanket on Instagram with #GreenFlowerGrannyBlanket. Would you keep every flower forest green, or alternate forest and olive centers?