Introduction
A maple-leaf runner fails visually when every point touches its neighbor and the five-lobed outlines disappear. This crochet maple leaf table runner pattern uses separate burgundy, burnt-orange, olive and cream leaves arranged in an overlapping mosaic. Cotton yarn, a 4.5 mm hook and careful blocking create defined veins and pointed edges. The modular construction suits intermediate crocheters and can be lengthened for almost any dining table.
The Design: What Makes This Maple Leaf Runner Different
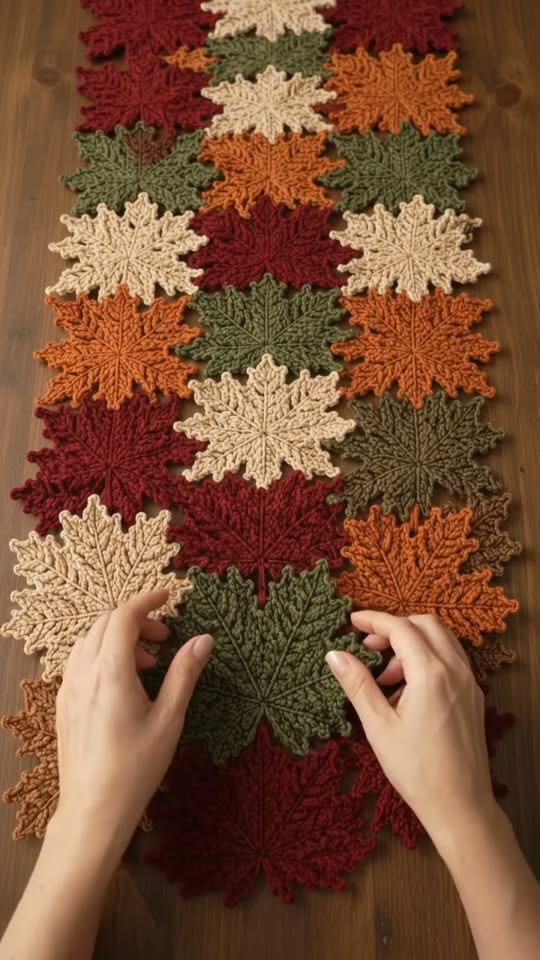
The photographed runner has no conventional rectangular background. Individual maple leaves become the fabric itself, overlapping enough to form a continuous strip while leaving their outer points visible. That decision keeps the project lighter and makes each autumn color part of the structure rather than an appliqué.
Leaf proportion matters next. A recognizable maple motif needs a dominant center lobe, two substantial side lobes and two shorter lower lobes. Deep valleys separate those sections. Raised-looking stitch lines then radiate from the center toward the points, creating the vein structure visible across the photograph.
A common mistake with a crochet autumn leaf runner is joining motifs before blocking. Even small differences in leaf width accumulate across several rows, causing the finished runner to curve. Block every motif to the same target dimensions first.
Project Info at a Glance
| Skill Level | Construction | Leaf Size | Hook | Best For |
|---|---|---|---|---|
| Intermediate | Separate joined maple motifs | Approx. 14–15 cm | 4.5 mm | Dining tables, consoles and autumn displays |
A published maple leaf coaster made with weight-4 cotton and a 4.5 mm hook measures approximately 5.5 × 4.5 inches, or about 14 × 11.5 cm. Another cotton maple-leaf design is approximately 6 inches across. Those measurements provide a useful reference range for a runner assembled from individual leaves rather than establishing the exact dimensions of the photographed motifs.
Materials and Tools
Yarn
- Deep burgundy — worsted weight #4 cotton — approximately 100–150 g
- Burnt orange — worsted weight #4 cotton — approximately 100–150 g
- Muted olive — worsted weight #4 cotton — approximately 100–150 g
- Warm cream — worsted weight #4 cotton — approximately 100–150 g
The amounts above are planning allowances for a multi-motif runner, not measurements taken from the photographed project. Make and weigh one finished leaf before purchasing yarn for a precisely sized runner.
Tools
- 4.5 mm crochet hook
- Worsted weight #4 cotton yarn
- Yarn needle
- Scissors
- Locking stitch markers
- Tape measure
- Blocking mats
- Rust-resistant pins
Abbreviations
- MR — magic ring
- ch — chain
- sl st — slip stitch
- sc — single crochet
- hdc — half double crochet
- dc — double crochet
- tr — treble crochet
- dtr — double treble crochet
- sp — space
- st/sts — stitch/stitches
An invisible decrease is worked through the front loops of two adjacent stitches before completing one single crochet; it produces a less prominent reduction than a standard decrease.
Crochet Maple Leaf Pattern
This is an original photo-inspired construction, not a transcription of a published maple leaf pattern. Published designs confirm that maple motifs are commonly worked in the round and shaped with combinations of chains, single crochet, double crochet and taller stitches. This version concentrates on producing the broad, heavily veined leaves visible in the reference image.
Leaf Center
Yarn: burgundy, orange, olive or cream.
Round 1: Make a MR. Ch 1 and work 6 sc into the ring. Join with sl st. (6)
Round 2: Ch 1, 2 sc in each stitch around. Join. (12)
Round 3: Ch 1, (sc, 2 sc in next st) ×6. Join. (18)
The compact 18-stitch center keeps the five lobes close enough to read as one leaf.
First Lower Lobe
Ch 5.
Beginning in the second chain from the hook, work:
sl st, sc, hdc, dc.
Sl st into the next available center stitch.
Ch 3. Beginning in the second chain, work:
sl st, sc.
Anchor with sl st into the center.
This forms the first short lower section. It should remain noticeably smaller than the upper side lobe.
First Upper Side Lobe
Ch 8.
Beginning in the second chain from the hook, work:
sl st, sc, hdc, dc, tr, dc, hdc.
Anchor with sl st.
Ch 5.
Beginning in the second chain, work:
sl st, sc, hdc, dc.
Anchor again.
These adjacent points create the serrated edge on the first large side section.
Central Maple Lobe
The central lobe establishes the overall height of the leaf.
Ch 11.
Beginning in the second chain from the hook, work:
sl st, sc, hdc, dc, tr, dtr, tr, dc, hdc, sc.
Anchor to the center with sl st.
Ch 6.
Beginning in the second chain, work:
sl st, sc, hdc, dc, tr.
Anchor with sl st.
Ch 11 and repeat the tall-point sequence:
sl st, sc, hdc, dc, tr, dtr, tr, dc, hdc, sc.
Anchor with sl st.
The tallest central point should extend beyond both upper side lobes after blocking.
Second Upper Side Lobe
Mirror the first upper section.
Ch 5 and work:
sl st, sc, hdc, dc.
Anchor with sl st.
Ch 8 and work:
sl st, sc, hdc, dc, tr, dc, hdc.
Anchor to the center.
Second Lower Lobe
Ch 3 and work:
sl st, sc.
Anchor to the center.
Ch 5 and work:
sl st, sc, hdc, dc.
Anchor with sl st.
Lay the motif flat before continuing. The two upper side lobes should be approximately symmetrical, while the lower pair should remain shorter.
Building the Leaf Surface
The first construction pass establishes the skeleton. A second pass broadens the lobes and creates the dense surface visible in the photograph.
Work along the side of the first lower point using sc stitches.
As the point rises, graduate the stitch heights:
sc → hdc → dc
At the point work:
(dc, ch 2, sl st in second ch from hook, dc)
Reverse the stitch sequence as you descend:
dc → hdc → sc
Work one tight sl st in the valley.
For the large upper lobes, use:
sc → hdc → dc → tr
At each major point work:
(tr, ch 2, sl st in second ch from hook, tr)
Reverse the sequence toward the next valley.
For the tallest center point, graduate through:
sc → hdc → dc → tr → dtr
At the tip work:
(dtr, ch 2, sl st in second ch from hook, dtr)
Reverse the sequence on the opposite side.
Continue around the remaining lobes and join near the lower center.
Defining the Serrated Edge
The photographed motifs have more than five visible tips. The five main lobes carry smaller secondary points, which make the silhouette more botanical.
During the final perimeter pass, work sc along relatively straight sections.
At a secondary point work:
(sc, ch 2, sl st in second ch from hook, sc)
At a major point work:
(hdc, ch 3, sl st in second ch from hook, sl st in next ch, hdc)
Use one sl st in the deepest part of every valley.
Avoid adding identical picots at equal intervals. Secondary points should cluster around the five principal lobes rather than creating a circular saw-tooth edge.
Crochet Stem
Continue from the bottom center.
Foundation: Ch 7.
Beginning in the second chain from the hook work:
sl st, sc, sc, hdc, hdc, sc.
Work 2 sc into the lower center of the leaf.
Turn and crochet along the opposite side of the chain:
sc, hdc, hdc, sc, sc, sl st.
At the stem tip work:
ch 2, sl st in second ch from hook.
Fasten off.
Keep the stem approximately 2–3 cm long. Longer stems create unnecessary bulk where neighboring motifs overlap.
Raised Central Vein
The leaves in the photograph have prominent central ribs. Add the vein after completing the main silhouette.
Use the same yarn color as the leaf.
Place the motif right side up.
Insert the hook near the stem junction and pull up a loop from the back.
Work loose surface slip stitches toward the tallest center point.
Stop approximately 5–8 mm before the tip.
Fasten off on the wrong side.
Surface stitches should sit on top of the leaf without drawing the underlying fabric inward.
Side Veins
Return to the lower center.
Surface crochet one diagonal vein toward the left upper lobe.
Repeat toward the right upper lobe.
Add a shorter vein toward each lower lobe.
The finished leaf now has five principal veins radiating from the stem junction.
For additional texture, add one or two short branches from each upper vein toward a secondary point.
Stop all branch veins before reaching the perimeter.
Blocking Every Maple Leaf
Do not join the motifs immediately after crocheting.
Dampen each leaf according to the yarn manufacturer’s care directions and place it on a blocking mat.
Pin the center point first.
Next, pin the two large upper side lobes.
Pin the two lower lobes at matching angles.
Pull every secondary point outward.
Push each valley toward the center.
Straighten the stem last.
Target approximately 14–15 cm across the widest points when using worsted cotton and a 4.5 mm hook. The actual measurement depends on yarn and tension.
Color Plan for the Autumn Runner
The photograph uses four repeated colors rather than a fixed stripe sequence:
| Color | Visual Role | Suggested Share |
|---|---|---|
| Deep burgundy | Darkest contrast | 25% |
| Burnt orange | Warm mid-tone | 25% |
| Muted olive | Cool autumn contrast | 25% |
| Warm cream | Lightest value | 25% |
Equal quantities are easy to plan, but the arrangement should not repeat mechanically. Avoid creating obvious horizontal rows containing only one color.
How Many Leaves Are Needed?
The exact motif count depends on the blocked leaf dimensions, desired runner length and amount of overlap.
For a runner approximately 35–40 cm wide, use about three leaves across at the broadest points.
A practical medium runner can contain approximately 24–30 motifs. A longer dining-table version may require 30–40 leaves.
Do not calculate length by multiplying the leaf height by the number of rows because neighboring motifs overlap.
Instead, block six sample leaves and arrange them in the intended configuration. Measure the length added by one complete staggered repeat. Use that real measurement to calculate the final quantity.
Planning the Leaf Mosaic
Lay every finished leaf on a large flat surface before joining.
Start with a central vertical line of motifs.
Rotate neighboring leaves slightly left and right.
Add another staggered line along each side.
Overlap the outer point of one motif onto the lower lobe of the next by approximately 1–2 cm.
Keep the stems mostly hidden beneath neighboring leaves.
The finished arrangement should have an irregular natural edge rather than a perfectly straight rectangle.
Take a photograph of the final arrangement before sewing. It provides a placement reference if the motifs are moved during assembly.
Joining the Maple Leaves
Use matching yarn wherever possible.
Place the first two leaves in their planned overlapping position.
Thread a yarn needle with approximately 40 cm of matching yarn.
Sew through the backs of the overlapping stitches for approximately 3–4 cm.
Do not sew around the entire overlapping perimeter.
Add a second small attachment point near another lobe if the motif rotates.
The objective is to create a stable runner while allowing the exposed points to remain independent and dimensional.
Alternative Slip-Stitch Join
If you prefer crocheting the motifs together, overlap two leaves with the right sides facing upward.
Insert the hook through corresponding back loops in the overlap area.
Pull matching yarn through and work loose slip stitches for approximately 5–8 stitches.
Fasten off and weave both ends into the reverse side.
Keep these joins short. A continuous seam across several lobes makes the runner rigid and can flatten the leaf texture.
Creating a Straight Runner Center
An assembled motif runner can begin curving if the overlap changes from one side to the other.
After joining every two or three rows, place a tape measure along the center axis.
The central motif junctions should remain within approximately 1 cm of that line.
If the strip begins moving left, increase the overlap slightly on the left side of the next row or reduce it on the right.
Make these corrections gradually. A large correction in one row creates a visible kink.
Making a 120 cm Table Runner
For a runner around 120 cm long, begin by making approximately 28 leaves.
A starting color allocation is:
- 7 burgundy leaves
- 7 burnt-orange leaves
- 7 olive leaves
- 7 cream leaves
Block all 28 motifs before assembly.
Arrange them with approximately three motifs contributing to the width and use staggered overlaps down the length.
Do not join the final four motifs until the assembled section has been measured. They can be added or omitted to bring the runner closer to the intended length.
Making a Longer Dining-Table Runner
For a runner around 150–180 cm, begin with approximately 36–40 motifs.
Keep the width relatively stable instead of adding more leaves across. Increasing width and length simultaneously can turn the project into a table mat rather than a runner.
Continue the four-color distribution without establishing a rigid repeating order.
Place light cream leaves beside burgundy or olive where possible. The value difference makes overlapping edges easier to distinguish.
Making a Narrower Runner
A narrow console-table version can use approximately two leaves across.
Alternate the motifs diagonally so one leaf extends to the left and the next extends to the right.
Overlap them near the lower side lobes rather than directly through the center.
This construction uses fewer motifs while retaining the maple silhouette along both edges.
Assembly
- Crochet one test maple leaf and block it before committing to the full set.
- Record its finished width, height and yarn weight as the production standard.
- Make the required burgundy, burnt-orange, olive and cream motifs using identical hook size and tension.
- Add the raised center and side veins before blocking each leaf to the target dimensions.
- Arrange all dried motifs on a flat surface in a staggered three-leaf-wide mosaic.
- Rotate neighboring leaves so their major points remain visible instead of stacking directly on top of one another.
- Photograph the complete arrangement and mark the center line before moving any motifs.
- Sew or slip-stitch neighboring leaves together only through 3–4 cm overlap zones.
- Check the runner’s center alignment after every two or three joined rows and correct small deviations immediately.
- Weave all joining tails into matching motifs, then block the assembled runner lightly without flattening its raised veins.
The completed runner should form a continuous autumn mosaic while retaining clearly visible individual maple silhouettes along both outer edges.
7 Technical Tips for a Better Maple Leaf Runner
- Block every motif to within 5 mm of the same target width. Larger differences accumulate across three adjacent leaves and can force one side of the runner outward.
- Keep the center lobe 15–20% taller than the upper side lobes. Equal-height lobes produce a star-shaped motif and weaken the maple profile.
- Use tight slip stitches at every major valley. Tall stitches in these locations fill the indentation and merge neighboring lobes into one rounded edge.
- Keep surface-crochet veins relaxed. Tight veins shorten the leaf from center to point and cause the motif to cup before assembly.
- Limit structural overlap to approximately 1–2 cm. Greater overlap hides the lower lobes and makes the runner noticeably thicker through the center.
- Secure each overlapping pair across at least 3 cm. A single attachment stitch acts as a hinge and allows leaves to rotate when the runner is moved.
- Check center alignment after every two or three rows. A lateral error of only 5 mm per row can shift a long runner several centimeters by the opposite end.
Why Cotton Works for a Maple Leaf Runner
Cotton provides the stitch definition needed for pointed lobes and raised vein lines. It also responds well to blocking, which is important when dozens of independent motifs must fit into one continuous arrangement.
Published maple leaf coaster designs frequently specify cotton. One Ravelry pattern uses Aran cotton and a 2 mm hook for a leaf approximately 6 inches across, while an intermediate Ribblr maple-leaf coaster uses weight-4 cotton with a 4.5 mm hook for a motif approximately 5.5 × 4.5 inches.
The difference illustrates why yarn label alone cannot determine finished size. Hook size, stitch structure and personal tension all matter.
If the runner will be washed regularly, make a blocked test leaf and launder it before producing the full set. Record any dimensional change after drying.
Keeping Raised Veins Visible
Use the same color for the body and veins to reproduce the monochromatic texture in the photograph.
The surface stitches rely on shadow rather than color contrast. Slightly larger surface loops make the ridge easier to see.
Do not pull the vein yarn from one branch to another across the reverse side. Fasten off each short vein separately if necessary. Long floats can snag during assembly and pull neighboring sections inward.
After the final blocking, run a fingertip beneath each raised vein and reposition any section pressed flat by the pins.
Maintaining the Autumn Color Balance
Burgundy is the darkest color and can dominate the composition if several motifs are clustered together. Separate large burgundy areas with cream or orange.
Olive acts as a neutral mid-tone between the warmer shades. Place it throughout the runner rather than restricting it to one section.
Cream produces the strongest visual break. A few evenly distributed cream leaves make individual silhouettes easier to read where the motifs overlap heavily.
Before joining, photograph the arrangement in grayscale on a phone if possible. Large patches with nearly identical values become easier to identify without the distraction of hue.
Finishing and Blocking the Complete Runner
After all motifs are connected, lay the runner on a large flat surface.
Measure the full length through the center rather than along either irregular edge.
Check the width at the top, middle and bottom.
Lightly dampen the assembled runner if the yarn permits wet blocking.
Pin only the outermost maple points and major center positions. Do not stretch every leaf independently at this stage because that can place excessive tension on the joins.
Allow the runner to dry completely.
Remove the pins and lift the free points slightly with your fingers so the overlapping construction remains visible.
Storage and Care
Follow the yarn manufacturer’s washing instructions, particularly for deep burgundy and burnt-orange cotton.
Test saturated colors for dye release before washing them together with cream motifs.
Support the runner’s full weight when wet. Lifting a soaked runner from one end can place unnecessary stress on the small overlap joins.
Dry it flat and reshape the five main lobes of any leaf that moves during laundering.
For seasonal storage, roll the runner loosely around a tube or fold it only between motif rows. A hard fold directly through a blocked maple leaf can distort its raised center vein.
Conclusion
The overlapping construction is what separates this crochet maple leaf table runner pattern from a conventional rectangular runner with appliqués. Start by making one 14–15 cm leaf, block it and record its finished measurements before producing the remaining motifs. Keep the central lobes longest, preserve deep valleys and work the surface veins loosely enough for every leaf to stay flat. Burgundy, burnt orange, olive and cream can then be staggered into a continuous autumn mosaic. Your next step is to make four test leaves—one in each color—and compare their blocked dimensions. Save the project to Pinterest or share the finished runner on Instagram with #AutumnMapleLeafRunner. Would you arrange the cream leaves evenly or cluster them as lighter focal points?