Introduction
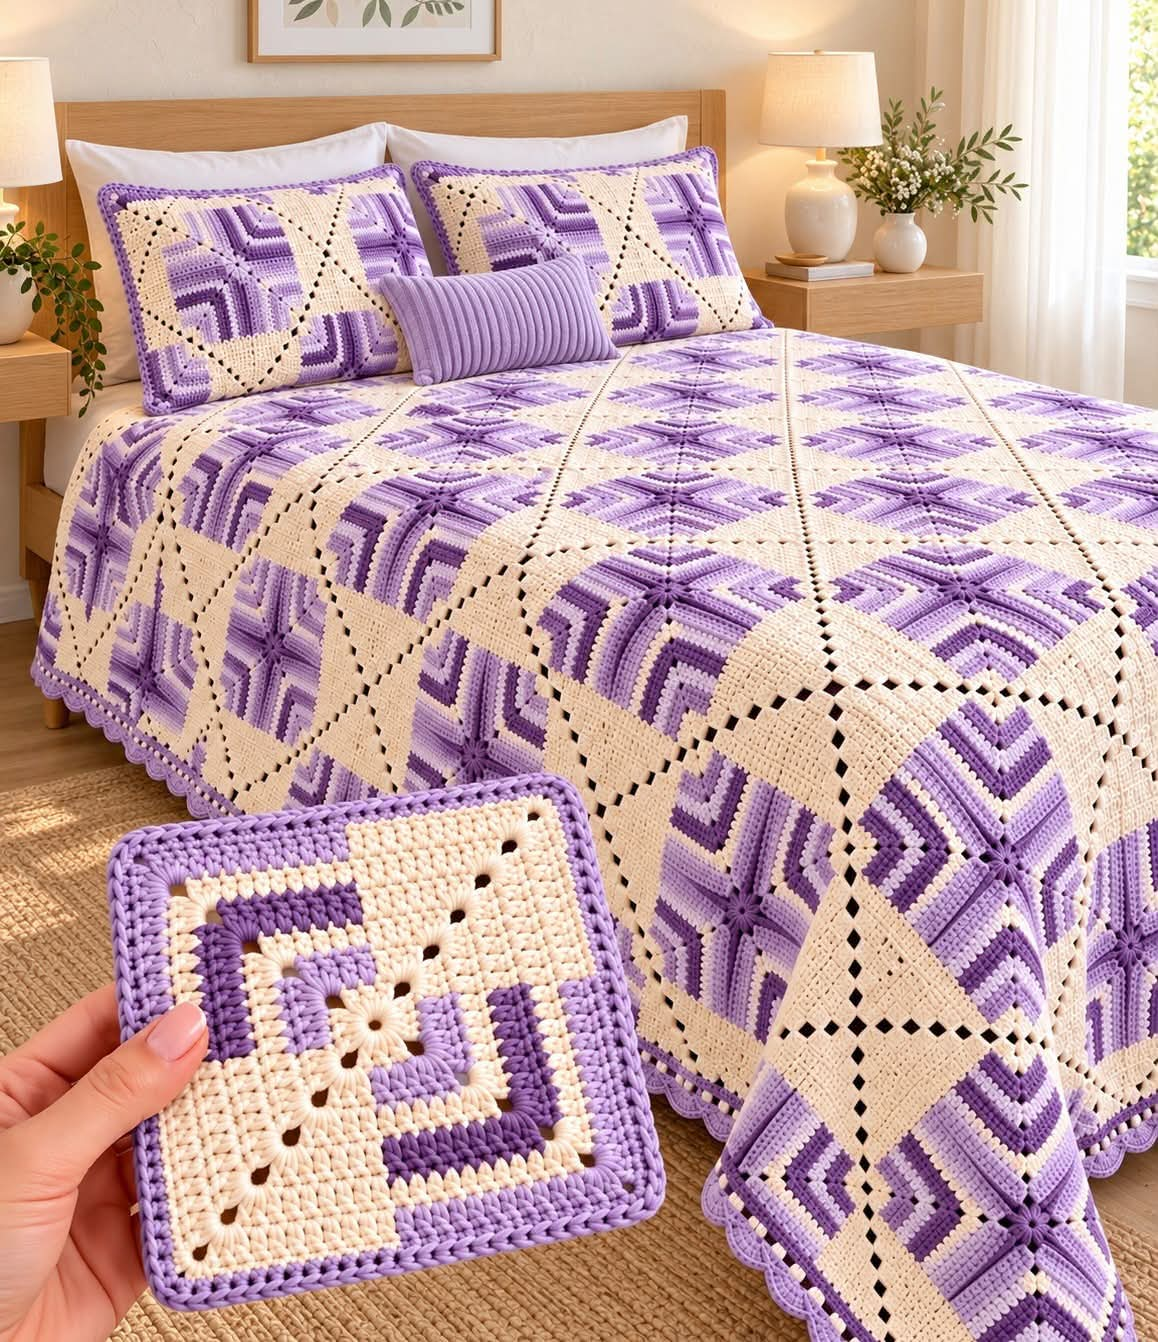
Each purple corner turns ninety degrees before the next one begins, so one misplaced square breaks the diamond geometry across the entire bed. This lavender granny square crochet bedspread pattern combines log-cabin-style color bands, cream eyelet panels, three lavender tones and matching pillow fronts. Use DK yarn with a 4.0–4.5 mm hook for an intermediate modular bedspread built from individually blocked squares.
The Design: What Makes This Bedspread Different
The photographed block is not a conventional granny square. Its center expands through stepped lavender and cream bands, while broad cream sections introduce regularly spaced eyelets. When neighboring squares are rotated, those cream sections meet visually and form large diamonds across the bedspread. That orientation is structural; changing one block by ninety degrees interrupts the repeated geometry.
Log-cabin crochet commonly builds outward by adding strips around a center, and published examples use both DK and worsted yarn. One documented DK construction recommends 4.5–5.5 mm hooks, while a classic log-cabin blanket example uses 5.5 mm worsted yarn and produces 23 cm blocks. 0 For this finer photo-inspired bedspread, target 20–22 cm squares using a smaller 4.0–4.5 mm hook.
Project Info at a Glance
| Skill Level | Construction | Target Square | Hook | Best For |
|---|---|---|---|---|
| Intermediate | Modular geometric log-cabin squares | 20–22 cm | 4.0–4.5 mm | Bedspreads, throws and matching pillow fronts |
Materials and Tools
Yarn
- Warm cream — DK #3 — main background and eyelet sections
- Light lavender — DK #3 — first purple band
- Medium lavender — DK #3 — secondary geometric bands
- Deep purple — DK #3 — contrast bands and selected centers
Choose yarns from the same range whenever possible. The geometric pattern depends on identical stitch height and fabric density across all four colors.
Do not buy the full bedspread quantity from a generic estimate. Crochet one complete square, weigh it, record the amount of each color, then multiply those figures by the required number of blocks. Sample weighing is also recommended when planning log-cabin blankets because yarn consumption changes with fiber, tension and final dimensions. 1
Tools
- 4.0–4.5 mm crochet hook
- DK #3 yarn
- Yarn needle
- Scissors
- Locking stitch markers
- Tape measure
- Blocking mats
- Rust-resistant pins
- Digital kitchen scale
Abbreviations
- ch — chain
- sl st — slip stitch
- sc — single crochet
- hdc — half double crochet
- dc — double crochet
- sp — space
- st/sts — stitch/stitches
- RS — right side
- WS — wrong side
- FO — fasten off
Pattern — Geometric Lavender Square
This is an original photo-inspired construction designed to reproduce the color rhythm and geometric effect of the reference rather than copy a published pattern. Make one complete sample and use it as the master block for the entire bedspread.
Center Ring
With light lavender, ch 6.
Join with sl st to form a ring.
Round 1
Ch 3.
Work:
3 dc, ch 3
four times into the ring.
Join.
You now have four small sides separated by four corners.
Round 2
Continue in light lavender.
Sl st to the first corner.
In each corner work:
(2 dc, ch 2, 2 dc)
Dc in each stitch along the side.
Repeat around.
FO.
First Medium-Lavender Band
Join medium lavender in one corner.
Ch 2.
Hdc in each stitch along the first side.
At the corner work:
(2 hdc, ch 2, 2 hdc)
Continue around.
Join and FO.
First Cream Band
Join cream in a corner.
Work one hdc in every stitch.
At each corner work:
(2 hdc, ch 2, 2 hdc)
Join and FO.
This narrow cream line separates the lavender tones and makes the stepped geometry easier to read from a distance.
Deep-Purple Band
Join deep purple.
Work hdc around the square.
Maintain the same corner formula:
(2 hdc, ch 2, 2 hdc).
FO.
Second Lavender Band
Change to light lavender.
Work another complete hdc round.
Maintain four ch-2 corners.
FO.
Creating the Stepped Log-Cabin Effect
The next sections are worked back and forth rather than as complete rounds.
Mark the four sides A, B, C and D.
Keep those labels fixed throughout the block.
Strip A — Cream
Join cream at the beginning of Side A.
Row 1: Ch 2, hdc evenly across the entire side. Turn.
Row 2: Ch 2, hdc across. Turn.
Row 3: Repeat Row 2.
FO.
Strip B — Medium Lavender
Rotate the square ninety degrees.
Join medium lavender along Side B, including the edge of the cream strip just completed.
Work 3 rows of hdc.
FO.
Strip C — Cream
Rotate again.
Work 3 hdc rows across the new full edge.
FO.
Strip D — Deep Purple
Rotate again.
Work 3 hdc rows across the complete edge.
FO.
Adding progressively longer strips around a central block is the defining construction principle of log-cabin crochet. Published versions similarly instruct the maker to maintain fixed side labels and add each new strip across the full expanded edge. 2
Second Log-Cabin Cycle
Repeat the same four-side process, changing the color sequence to:
light lavender → cream → medium lavender → cream.
Work two or three rows per strip depending on the size of the master square.
Do not continue adding strips once the block approaches the target measurement.
Cream Eyelet Section
The reference contains broad cream sections with a diagonal line of square openings. Add this feature to selected cream strips rather than every cream area.
On the first cream row, hdc across normally.
On the second row, work:
hdc in next 4 sts, ch 1, skip 1 st.
Repeat across, adjusting the beginning and end so the openings remain centered.
On the following row, hdc in each stitch and work one hdc into every ch-1 space.
Diagonal Eyelet Shift
For the next eyelet row, move each opening one or two stitches sideways.
For example:
hdc in next 5 sts, ch 1, skip 1 st.
Continue at regular intervals.
On the next decorative row, begin after six stitches.
The gradual shift produces the diagonal perforated line visible through the cream sections.
Final Squaring Round
Once the block measures approximately 19–21 cm, join light lavender at any corner.
Work sc evenly around the entire square.
At each corner work:
(sc, ch 2, sc).
Join.
Lavender Structural Border
Ch 2.
Hdc in every stitch around.
At each corner work:
(2 hdc, ch 2, 2 hdc).
FO.
Block to approximately 20–22 cm square.
Blocking the Master Square
Measure the square horizontally, vertically and across both diagonals.
The horizontal and vertical measurements should differ by no more than approximately 5 mm.
The two diagonals should also be nearly equal.
If one diagonal is significantly longer, the log-cabin strips were probably worked at different tensions.
Correct the master before producing the remaining blocks.
Color Sequence Variation
The bedspread does not require every square to have an identical purple sequence.
Prepare three controlled variants:
- Square A: light lavender dominant
- Square B: medium lavender dominant
- Square C: deep purple used more strongly near the center
Keep the cream sections in the same structural locations. The eyelet geometry needs to continue across neighboring blocks even when the purple shade order changes.
Orientation Marker
Before cutting the final yarn tail, place a locking marker in the same corner of every square.
Treat that corner as the top.
This small step prevents one of the most common problems in geometric modular blankets: accidentally rotating an individual square during assembly.
Planning the Bedspread Grid
Assuming a blocked square of 21 cm, approximate dimensions before the final border are:
| Grid | Squares | Approx. Size |
|---|---|---|
| 5 × 6 | 30 | 105 × 126 cm |
| 6 × 8 | 48 | 126 × 168 cm |
| 8 × 10 | 80 | 168 × 210 cm |
| 9 × 11 | 99 | 189 × 231 cm |
| 10 × 12 | 120 | 210 × 252 cm |
Published modular log-cabin blankets demonstrate that block-based construction scales naturally by changing the number of squares, and a documented crochet log-cabin block measures 23 cm after blocking. 3 Measure your own blocked master before selecting the final grid.
Creating the Large Diamond Layout
Lay all squares on a floor or large table before joining.
Start with four blocks.
Rotate them so their broad cream sections point toward a shared center.
The cream areas should combine visually into one large diamond.
Repeat that four-block arrangement across the bedspread.
Photograph the layout from directly above.
Inspect every block orientation before sewing.
Why Orientation Matters
The lavender strips create directional movement.
When four correctly rotated squares meet, their stepped bands form a pinwheel or nested-diamond effect.
A single incorrectly rotated block breaks both the cream eyelet line and the lavender rhythm.
Do not rely on memory during assembly. Keep the orientation marker attached until the square is joined on at least two sides.
Flat Slip-Stitch Joining
A flat slip-stitch join works particularly well here because the seam can become part of the geometric grid. Flat slip-stitch methods are documented for modular granny-square blankets and produce a defined but relatively flat connection. 4
Lay two squares side by side with right sides facing upward.
Using cream, insert the hook through corresponding edge loops.
Work loose slip stitches from corner to corner.
Do not pull the joining yarn tight.
The squares should remain completely flat when opened.
Joining the Rows
Join all squares into horizontal rows first.
Place each completed row back into the planned layout.
Check the diamond orientation again.
Then join the rows vertically.
Working all horizontal seams followed by vertical seams is also used in modular crochet blanket construction because it keeps the grid organized. 5
Alternative Invisible Join
If you do not want visible cream seams, use mattress stitch with a yarn needle.
Mattress stitch produces a flatter and less visible join than raised crochet seams, while slip-stitch joins create a more noticeable decorative line. 6
For this particular design, a subtle cream seam is useful because it reinforces the geometric framework.
Estimating Yarn
Weigh one finished square after all tails have been woven in.
Suppose one 21 cm sample weighs 42 g.
For 80 squares:
42 g × 80 = 3,360 g
Add the joining yarn and border separately.
Then add approximately 10% for swatching, tension differences and repairs.
This is only a calculation example. Actual consumption should come from your master square.
Estimating Each Color
For better accuracy, weigh the yarn balls before and after making one sample.
For example, if one square uses:
- 18 g cream
- 10 g light lavender
- 8 g medium lavender
- 6 g deep purple
Multiply each figure by the required square count.
For 80 squares, the sample calculation becomes:
Cream: 1,440 g
Light lavender: 800 g
Medium lavender: 640 g
Deep purple: 480 g
Add border and joining requirements afterward.
Matching Pillow Fronts
The reference uses the same geometric blocks on two large pillow shams.
For a rectangular pillow front, arrange approximately 3 squares × 2 squares, depending on blocked size and pillow dimensions.
Rotate the squares so the cream sections create one continuous central diamond.
Join with the same cream flat slip-stitch method used for the bedspread.
Pillow Border
Join cream around the completed pillow front.
Work one sc round.
At each corner work:
(sc, ch 2, sc).
Change to medium lavender.
Work one hdc round with:
(2 hdc, ch 2, 2 hdc)
at every corner.
Finish with a light-lavender sc round.
Simple Pillow Back
For a less bulky reverse, work the back as one solid panel.
With cream, chain to the required pillow width.
Row 1: Hdc in third chain from hook and across.
Row 2: Ch 2, turn, hdc across.
Repeat until the panel matches the finished front.
Block both pieces to identical dimensions before joining.
Joining the Pillow
Place the front and back with wrong sides together.
Using medium lavender, sc through both layers along three sides.
Insert the pillow form.
Close the fourth side permanently or add buttons if a removable cover is preferred.
Bedspread Border — Foundation
Join cream at one outer corner after all squares have been assembled.
Work sc evenly around the complete blanket.
At each corner work:
(2 sc, ch 2, 2 sc).
Place approximately the same number of stitches along opposite sides.
Second Border Round
Continue in cream.
Ch 2.
Hdc in every stitch.
At each corner work:
(2 hdc, ch 2, 2 hdc).
Lavender Border Round
Change to medium lavender.
Work hdc around.
Maintain the same corner increases.
This narrow purple line visually closes the geometric grid.
Scalloped Outer Edge
Change to light lavender.
Skip 2 stitches.
Work 5 dc in the next stitch.
Skip 2 stitches.
Sc in the next stitch.
Repeat around.
Adjust the spacing slightly near each corner so one shell sits symmetrically across the corner area.
Optional Two-Tone Scallop
For an edge closer to the photographed look, work the scallops in light lavender and add a final medium-lavender surface slip stitch along their bases.
Keep that final line loose.
A tight decorative slip-stitch round can contract the entire bedspread perimeter.
Making a Smaller Throw
Use a 5 × 6 or 6 × 7 block arrangement.
Maintain the four-square diamond grouping wherever possible.
If the final grid has an odd number of rows, continue the established orientation rather than forcing every edge to end with a complete diamond.
Making a Larger Bedspread
Add complete rows and columns of blocks.
Do not enlarge each individual square after the master has been established.
Changing square dimensions midway makes the seam grid difficult to align.
For a generous bedspread with side drop, measure the mattress width, add twice the desired drop, then divide that figure by the blocked square width.
Assembly
- Crochet one complete lavender-and-cream geometric block, including the eyelet section and final squaring border.
- Block the master square to approximately 20–22 cm and record its horizontal, vertical and diagonal measurements.
- Make the remaining squares, keeping a permanent orientation marker in the same corner of every block.
- Block all motifs to the master measurement before arranging them into the final bedspread grid.
- Rotate groups of four squares so their cream sections form the large diamonds visible across the reference design.
- Join the squares into horizontal rows using a relaxed flat slip-stitch seam, checking the orientation after every block.
- Join the completed rows vertically and inspect the full bedspread for uninterrupted cream eyelet lines and lavender pinwheel shapes.
- Work the cream structural border around the complete blanket, followed by the lavender finishing rounds.
- Add the scalloped outer edge and construct matching pillow fronts from the same oriented geometric blocks.
- Weave in all tails, lightly block the complete bedspread and straighten the seam grid before allowing it to dry fully.
The finished bedspread should display a regular square grid with large cream diamonds and repeating lavender stepped motifs running continuously across the surface.
7 Technical Tips
- Keep every square within 5 mm of the master measurement. A 5 mm error repeated across ten blocks can create a 5 cm discrepancy at the opposite side of the bedspread.
- Mark the same corner of every square before cutting the final yarn. A ninety-degree rotation is enough to break the large cream diamond running across four neighboring blocks.
- Shift eyelets by a consistent one or two stitches per decorative row. Irregular shifts produce a broken diagonal rather than the clean dotted line visible in the cream panels.
- Keep the flat slip-stitch join visibly relaxed. A seam even 5 mm shorter than each square edge can produce deep channels through the finished blanket.
- Measure both diagonals during blocking. If one diagonal exceeds the other by more than about 5–8 mm, correct the block before it enters the assembly grid.
- Work no increases along a straight log-cabin strip. Accidental increases make the strip flare and prevent the next side from forming a true ninety-degree corner.
- Weave every color-change tail through at least 5 cm of dense stitches. Avoid hiding structural ends along eyelet openings because those spaces provide less friction.
Color Planning
Cream should remain the dominant background because it separates the purple geometry. Light lavender carries most of the secondary visual area, while medium lavender and deep purple create depth inside the stepped blocks.
For a balanced starting ratio, allocate approximately 45% cream, 25% light lavender, 18% medium lavender and 12% deep purple. Treat those percentages as a purchasing guide rather than exact consumption figures.
Lay at least twelve finished squares together before producing the entire bedspread. A color sequence that looks balanced on one block can become repetitive once dozens of motifs are placed side by side.
Care and Final Blocking
Follow the washing instructions for the selected yarn.
Support the full weight of the bedspread when wet.
Lay it flat and straighten the horizontal seams first, followed by the vertical seams.
Check several large cream diamonds with a tape measure. Their opposite sides should remain visually balanced.
Shape the scalloped border last.
Do not stretch the cream eyelet sections more aggressively than the lavender areas; uneven blocking can distort the ninety-degree geometry even when the individual squares were originally accurate.
Conclusion
The four-square orientation is the measurement that controls this lavender granny square crochet bedspread pattern. Start with one 20–22 cm master block, block it accurately, then place four samples together before committing to the full color sequence. Keep every orientation marker attached until assembly, shift the cream eyelets consistently and work the joining seams with enough slack to preserve the blocked dimensions. The next practical step is to make one complete sample and weigh each color separately so the bed-size yarn requirement can be calculated from real consumption. Save the finished layout to Pinterest or share it on Instagram with #LavenderLogCabinBedspread. Would you keep the three lavender shades, or replace the darkest purple with sage green?