Introduction
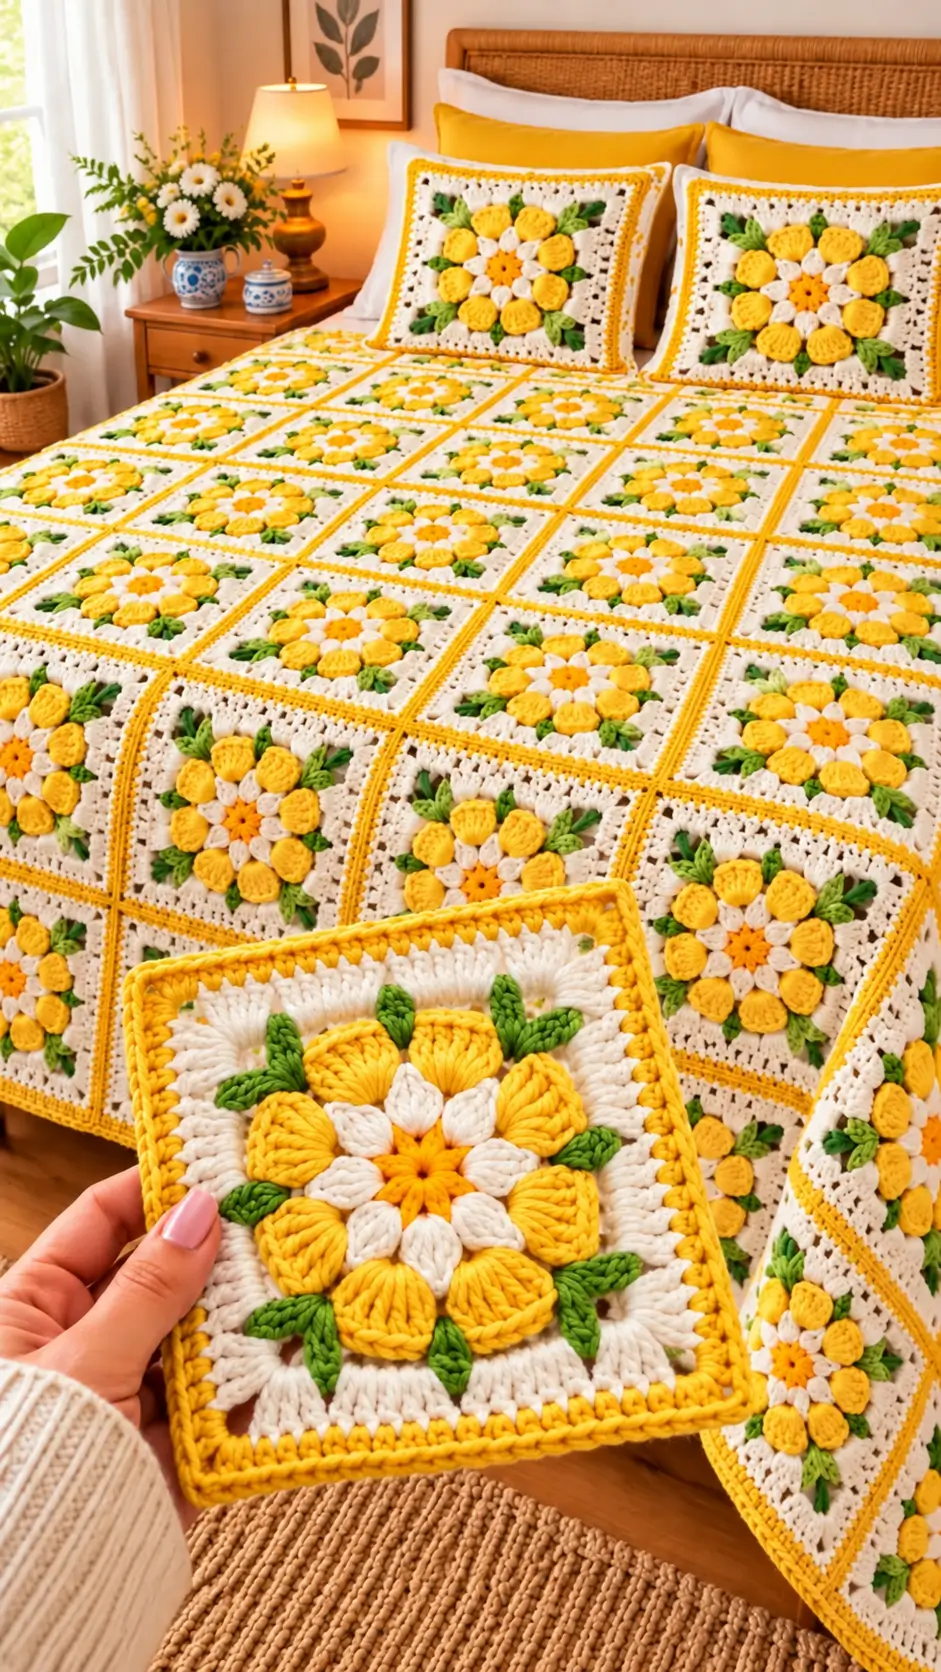
Eight golden petals surrounding a white flower ring give this bedspread its distinctive layered appearance. This crochet flower granny square blanket pattern uses worsted-weight yarn, a 5 mm crochet hook, and individually joined floral motifs to create a proposed 150 × 180 cm bedspread before edging. Designed for intermediate crocheters, the construction also supports matching pillow covers. Each square can be completed separately, making color consistency and damaged-motif replacement easier to manage.
The Design: What Makes This Floral Blanket Different
This 3D flower granny square combines an orange central disc, eight white inner petals, eight raised yellow petals, and small green leaves against a cream background. Unlike a conventional sunflower motif, the flower contains a contrasting white ring that separates the orange center from the outer yellow layer.
The cream background provides visual spacing between adjacent flowers. Golden borders define the square grid and make the joined bedspread resemble the photographed arrangement.
Green leaves are positioned around the flower rather than covering the corners. This keeps the corners available for joining and reduces excess thickness where four squares meet.
A common mistake in a crochet sunflower blanket is allowing dimensional petals to distort the surrounding square. The floral crochet bedspread avoids that problem by attaching decorative elements to a stable square base.
Project Info at a Glance
| Project Detail | Specification |
|---|---|
| Skill Level | Intermediate |
| Estimated Time | 70–110 hours for bedspread |
| Target Size | 150 × 180 cm before edging |
| Square Size | Target 15 × 15 cm |
| Crochet Hook | 5 mm |
| Yarn Weight | Worsted / Category 4 |
| Construction | Joined floral squares |
| Main Stitches | sc, hdc, dc, tr, sl st |
| Best For | Bedspreads, throws and pillow covers |
Measurements, time and yarn quantities are planning estimates for an original photo-inspired design. A physical sample is required to confirm the finished specifications.
Materials and Tools
Yarn
Choose a smooth, washable worsted-weight yarn. Cotton blends produce defined petals, while acrylic generally makes a lighter large blanket.
For a proposed 120-square bedspread, use the following quantities as initial purchasing estimates:
- Cream white yarn: Worsted weight, approximately 1,400 g. Suggested brand: Caron One Pound.
- Golden yellow yarn: Worsted weight, approximately 600 g. Suggested brand: Red Heart Super Saver.
- Orange yarn: Worsted weight, approximately 100 g. Suggested brand: Red Heart Super Saver.
- Leaf green yarn: Worsted weight, approximately 150 g. Suggested brand: Caron One Pound.
These quantities are estimates rather than measured consumption. Crochet and weigh one complete sample motif, then calculate the required yarn from its actual color-by-color usage. Purchase additional yarn for joining, borders, and gauge differences.
Tools
- 5 mm crochet hook, adjusted after testing gauge.
- Blunt tapestry needle for sewing and finishing.
- Locking stitch markers for identifying corners.
- Scissors for trimming yarn.
- Measuring tape for checking square dimensions.
- Blocking mats and rustproof pins for shaping motifs.
- Digital kitchen scale for measuring yarn consumption.
Safety eyes and toy stuffing are not required. For matching pillow covers, add suitable cushion inserts and fabric or crocheted backing panels.
Crochet Abbreviations
| Abbreviation | Meaning |
|---|---|
| MR | Magic ring |
| ch | Chain |
| sc | Single crochet |
| hdc | Half double crochet |
| dc | Double crochet |
| tr | Treble crochet |
| inc | Two single crochet stitches in one stitch |
| dec | Single crochet decrease |
| sl st | Slip stitch |
| BLO | Back loop only |
| st / sts | Stitch / stitches |
| sp | Space |
| RS | Right side |
| WS | Wrong side |
Pattern terminology: US crochet terms.
An invisible decrease works through the front loops of two adjacent stitches to reduce visible bulk, although this design primarily uses increases and grouped stitches.
Free Crochet Flower Granny Square Blanket Pattern – Step by Step
This original pattern is inspired by the photographed floral blanket. It is not a recovered pattern from the image. The instructions use joined rounds instead of continuous spirals because the flower and square require distinct color changes and controlled corners.
Each motif has a cream square base with a separately attached dimensional flower and leaves. This construction makes the stitch counts easier to check and helps maintain consistent flower placement.
Part 1: Cream Granny Square Base (Make 120)
Yarn: Cream white. Original construction using standard granny-square geometry.
Start with a magic ring.
R1: Ch 3 (counts as first dc), 2 dc into MR, ch 2. Repeat [3 dc, ch 2] three more times. Join with sl st to top of beginning ch 3. (12 dc, four ch-2 corners)
R2: Sl st into first corner space. Ch 3, 2 dc, ch 2, 3 dc in same corner. Ch 1. Work [3 dc, ch 2, 3 dc] in each remaining corner, with ch 1 between corners. Join. (24 dc, four ch-2 corners, four ch-1 side spaces)
R3: Sl st into corner. Work [3 dc, ch 2, 3 dc] in each corner and [3 dc] in each side ch-1 space. Ch 1 between neighboring groups. Join. (36 dc)
R4: Repeat the same corner treatment, placing one 3-dc group in every side ch-1 space. Ch 1 between groups. Join. (48 dc)
R5: Continue the established granny-square sequence. Each corner receives [3 dc, ch 2, 3 dc], and each side space receives 3 dc. Join. (60 dc)
R6: Repeat the corner and side sequence. Join. (72 dc)
R7: Repeat. Join. (84 dc)
R8: Repeat. Join. (96 dc)
At the end of R8, the square contains four ch-2 corners and seven ch-1 spaces along each side between the corner groups.
Measure the sample before proceeding. Add or remove complete granny rounds if necessary, but every blanket motif must have the same number of rounds and edge spaces.
Fasten off, leaving a 15 cm yarn tail.
Part 2: Orange Flower Center (Make 120)
Yarn: Orange.
R1: 6 sc in MR. Join. (6)
R2: Inc in every stitch. Join. (12)
R3: [Sc 1, inc] × 6. Join. (18)
R4: [Sc 2, inc] × 6. Join. (24)
R5: Sc in each stitch around. Join. (24)
Fasten off, leaving a 20 cm sewing tail.
The center should remain relatively flat. If the disc curls, check that all increases were completed. A missing increase changes the circular geometry and may make the white petals uneven.
Part 3: White Inner Petals (Make 8 Per Flower)
Yarn: Cream white.
Each petal is crocheted separately and sewn around the orange center.
R1: Ch 6. Beginning in the second chain from the hook, work sc, hdc, dc, hdc, sc. (5 sts)
R2: Ch 1, turn. Sc, hdc, dc, hdc, sc. (5 sts)
R3: Ch 1, turn. Sc in each stitch. (5 sts)
Fasten off, leaving a 15 cm tail.
Make eight petals for each flower.
Position the narrower end of every petal near the orange disc. Arrange the petals evenly before sewing. Slight overlap is acceptable, but keep the white layer visible between the orange center and the yellow petals.
Part 4: Raised Yellow Outer Petals (Make 8 Per Flower)
Yarn: Golden yellow.
R1: Ch 8. Starting in the second chain from the hook, work sc, hdc, dc, tr, dc, hdc, sc. (7 sts)
R2: Ch 1, turn. Work sc, hdc, dc, tr, dc, hdc, sc. (7 sts)
R3: Ch 1, turn. Sc in each stitch across. (7 sts)
R4: Ch 1, turn. Work sc, hdc, dc, tr, dc, hdc, sc. (7 sts)
Fasten off with a 20 cm sewing tail.
The alternating tall stitches create a raised center section. For additional relief, fold the petal slightly along its vertical centerline before attaching its narrow base.
Arrange eight yellow petals around the white ring, keeping their bases close to the orange center and their outer ends pointing toward the edges of the cream square.
The photographed flowers appear more rounded and puffed than these flat-worked petals. A puff-stitch or padded-petal variation would require separate testing.
Part 5: Green Crochet Leaves (Make 8 Per Square)
Yarn: Leaf green.
R1: Ch 7. Starting in the second chain from the hook, work sc, hdc, dc, dc, hdc, sc. (6 sts)
R2: Ch 1, turn. Sc, hdc, dc, dc, hdc, sc. (6 sts)
R3: Ch 1, turn. Sc in each stitch across. (6 sts)
Fasten off, leaving a 15 cm sewing tail.
Make eight leaves for each square.
Place leaves in pairs between the yellow petals, with their pointed ends extending toward the cream background. Position two pairs diagonally toward opposite corners, then distribute the remaining leaves to balance the composition.
Avoid placing leaves directly over the square’s corner chain spaces. Those openings are required for clean joining.
Part 6: Yellow Square Border (Make 120)
Yarn: Golden yellow.
Join the yellow yarn in any corner ch-2 space of the cream base.
R1: Ch 3, 2 dc, ch 2, 3 dc in the first corner. Work 3 dc in each side ch-1 space, with ch 1 between groups. In every subsequent corner, work [3 dc, ch 2, 3 dc]. Continue around and join. (108 dc)
R2: Sl st into the nearest corner. Work [3 dc, ch 2, 3 dc] in each corner and 3 dc in each side ch-1 space, separating neighboring groups with ch 1. Join. (120 dc)
Fasten off, leaving a 20 cm tail.
Check that the finished square lies flat and that the four corners form approximately 90-degree angles. Border rounds increase the motif’s dimensions, so the target 15 cm measurement must be checked after this stage, not after the cream base alone.
Part 7: Attaching the Floral Appliqué
Lay one completed cream-and-yellow square right side up.
Position the orange center in the middle, then arrange the white petals underneath its edge. Add the yellow outer petals around the white layer, with green leaves between selected petals.
Sew each piece using matching yarn and small stitches through the back of the appliqué and the upper strands of the base fabric.
Do not pull the sewing thread tightly enough to gather the square. The flower should remain dimensional while the cream background stays flat.
Repeat the process for all motifs, using the first finished square as a placement template.
Part 8: Joining the Blanket Squares
For a proposed 150 × 180 cm bedspread before edging, arrange 120 squares into 10 columns and 12 rows, assuming each completed motif measures 15 cm.
Place two squares with right sides facing. Using cream yarn and a tapestry needle, whipstitch through corresponding edge loops. Match corners and group positions precisely.
Join squares into horizontal rows first. Then connect the completed rows, aligning every four-square intersection.
Alternatively, use a slip-stitch join on the wrong side for a more pronounced surface ridge.
The photographed blanket has visible yellow grid lines. To imitate that appearance, use golden-yellow joining yarn and keep the joins exposed on the right side.
Part 9: Outer Blanket Border
Join cream yarn at one outer corner after the complete blanket has been assembled.
Border R1: Work sc evenly along each outer edge. At every corner, place [sc, ch 2, sc] in the corner space. Join.
Border R2: Work dc in each stitch along the sides. At every corner ch-2 space, work [2 dc, ch 2, 2 dc]. Join.
Change to golden-yellow yarn.
Border R3: Work sc around the entire blanket, with [sc, ch 2, sc] at each corner. Join.
Border R4: Work one round of reverse single crochet, also called crab stitch, around the edge. At corners, add enough spacing to prevent pulling.
Fasten off and weave in the ends.
The border should lie flat after blocking. If the outer edge ripples, reduce excess stitches along the sides. If it pulls inward, add stitches evenly rather than increasing only at the corners.
Part 10: Matching Crochet Flower Pillow Covers
The photograph includes two coordinating pillow covers with the same floral square design.
For a 45 × 45 cm cushion insert, use a 3 × 3 arrangement of 15 cm squares for the front panel, then account for seam allowance and the desired fit.
Make nine complete floral squares per pillow front. Join them using the same technique as the blanket.
For the back, create a plain crocheted panel or use two overlapping fabric pieces. An envelope closure allows the insert to be removed for washing.
Join the front and back around three sides, then finish the fourth side according to the closure style.
For two matching pillows, make 18 additional floral motifs beyond the 120 planned for the bedspread. Recalculate the yarn allowance before beginning the pillow covers.
Assembly – 10 Steps
- Complete one full sample square, including its flower, leaves, and yellow border.
- Measure the sample after blocking and record the finished width.
- Weigh the yarn used in each color and calculate the quantity needed for the selected number of squares.
- Crochet all cream square bases using the same hook and round count.
- Make and attach the orange centers and white inner petals.
- Attach the yellow outer petals and green leaves, matching their placement to the sample.
- Add yellow borders and block all motifs to consistent dimensions.
- Arrange the squares into the selected grid and join them into a single blanket.
- Crochet the outer border and assemble the matching pillow covers.
- Weave in every loose end, inspect the joins, and complete the final blocking.
The completed textile consists of repeated floral squares joined into a rectangular bedspread with optional matching cushions.
7 Technical Tips for Better Results
- Control square dimensions. A 3 mm size difference across 10 squares creates a 3 cm width variation. Measure after blocking rather than relying on unblocked dimensions.
- Mark all four corners. Missing a ch-2 corner space can make the next border round asymmetric. Use removable stitch markers until every corner is completed.
- Avoid over-tight joining. A join that is shorter than the adjacent square edge will cause puckering. Lay the joined pair flat after every seam and check for pulling.
- Maintain consistent petal spacing. Eight petals around a circle require approximately 45 degrees of separation. Pin all petals before sewing the first one.
- Check the center diameter. A center disc that is too large can hide the white inner petals. Test the layered arrangement before attaching the orange disc permanently.
- Prevent leaf distortion. Tight sewing along the full length of a leaf may flatten its raised profile. Attach the base and selected central points while leaving the outer edges free.
- Secure yarn tails thoroughly. Short tails may work loose during laundering. Leave at least 15 cm for most finishing ends and weave through several stitch paths.
Care and Washing
Follow the yarn manufacturer’s care label, especially when mixing fibers. Cotton, acrylic, and wool can respond differently to heat and agitation.
A large joined blanket becomes substantially heavier when wet. Support the full textile during lifting, avoid pulling it from one corner, and dry it in a position that does not stretch the seams.
For dimensional flower petals, a gentle wash and flat drying method will generally preserve the raised construction better than aggressive mechanical drying. Test the laundering method on the sample square before washing the full bedspread.
Conclusion
This crochet flower granny square blanket pattern uses a repeated square structure to organize orange centers, white inner petals, yellow outer petals, and green leaves into a consistent floral arrangement. The finished dimensions depend on the blocked size of each motif, the joining method, and the outer border.
Before making the full bedspread, complete one square and confirm its measurements, yarn usage, and petal placement. Use those results to calculate materials for the blanket and matching pillows.
Save the project to Pinterest or share your completed squares on Instagram using #YellowFlowerGrannySquareBlanket.
Would you position the green leaves diagonally between the yellow petals, as shown in the photograph, or arrange them symmetrically around all four corners?