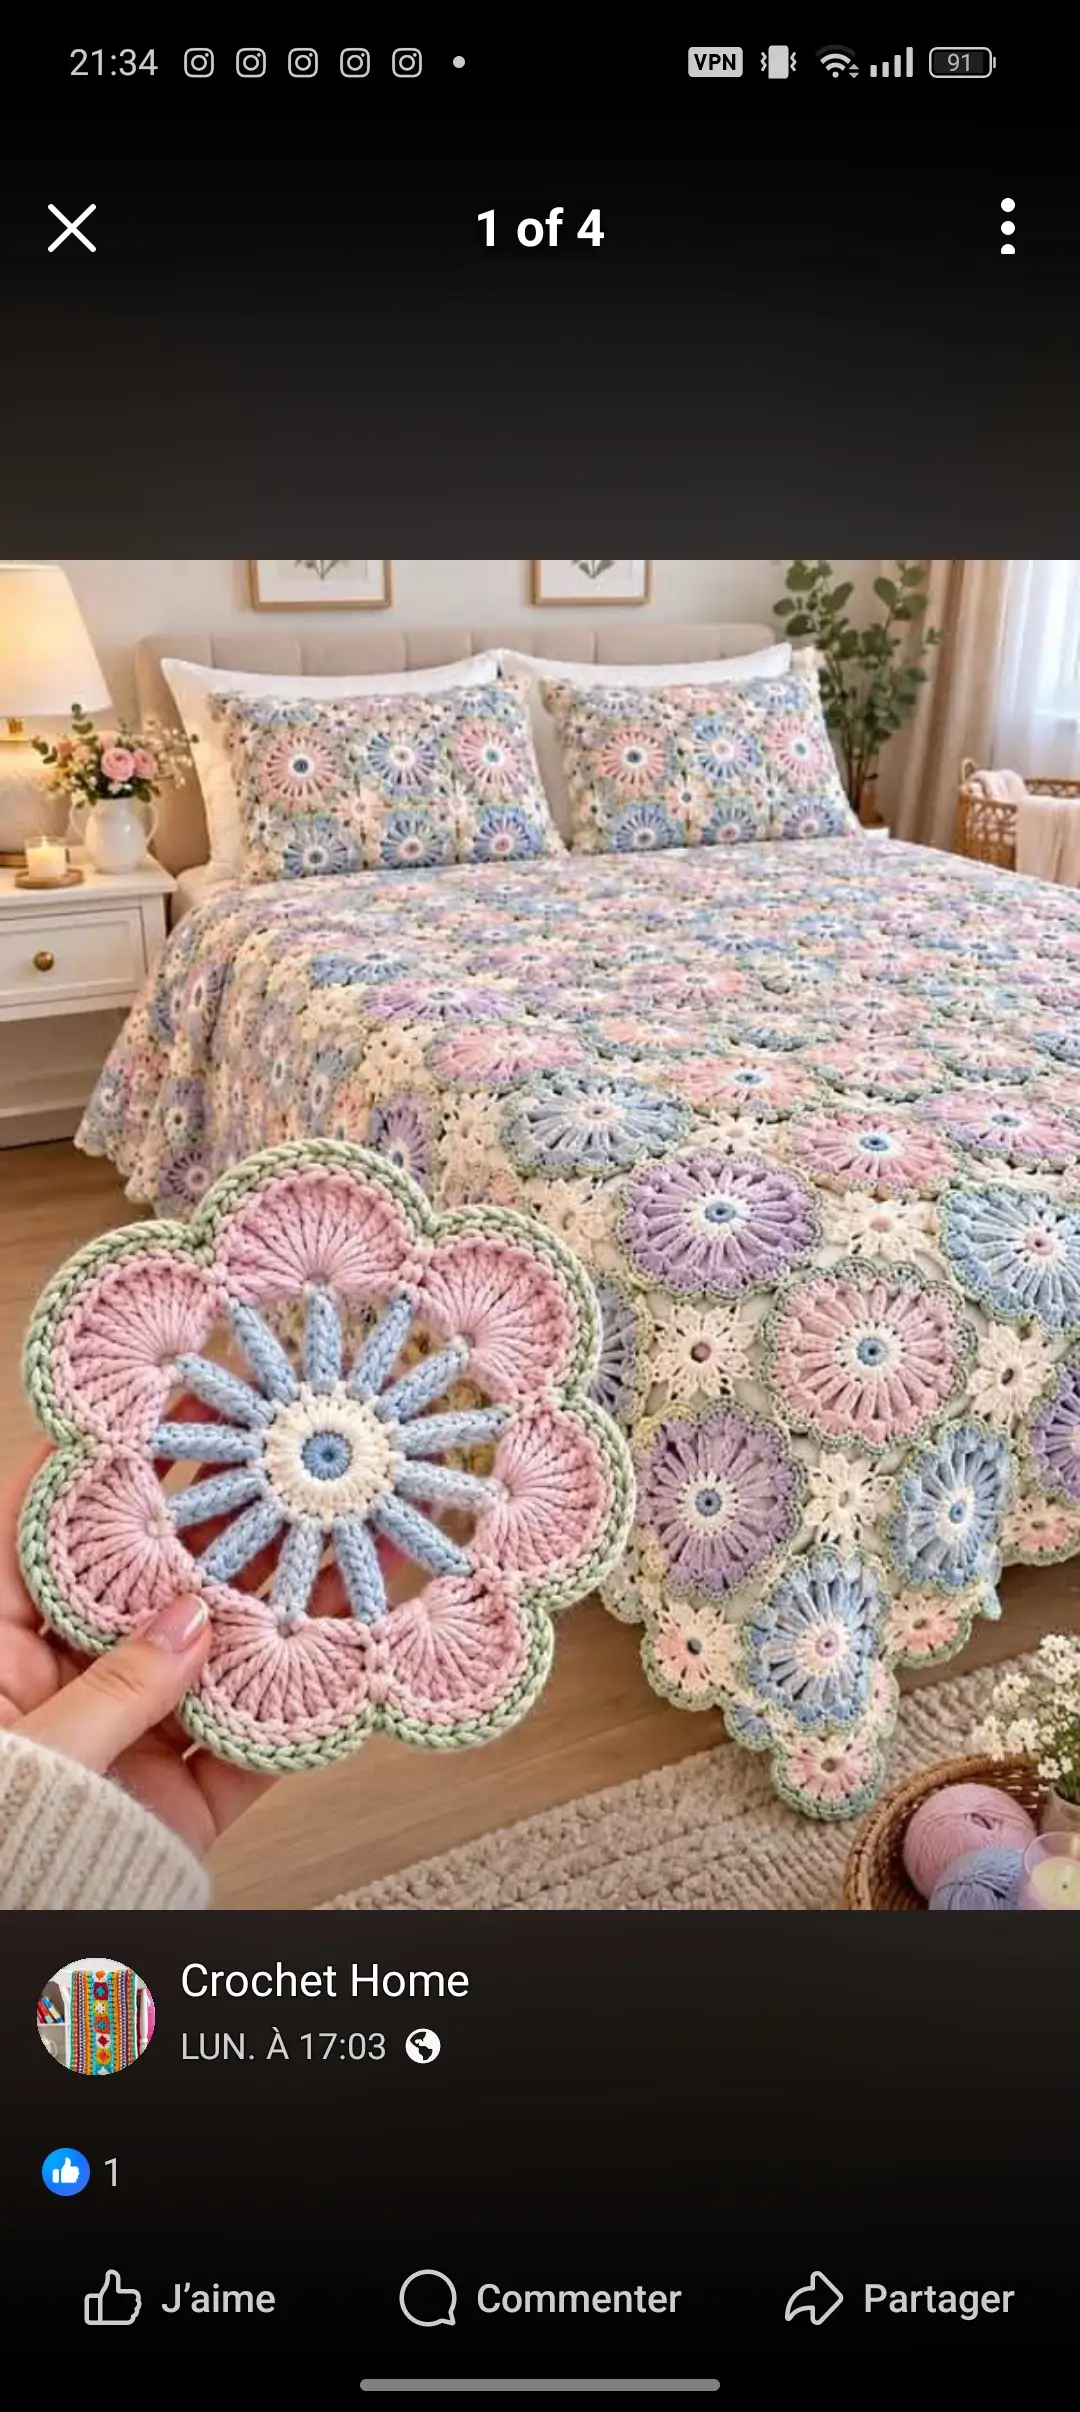
The open center of each purple flower is the structural clue in this bedspread: the petals must stay raised while the surrounding green round carries the joining tension. This photo-inspired purple flower granny square crochet bedspread combines ivory centers, lavender dimensional petals, sage-green outer petals and cream joining motifs. The construction is modular, so the finished blanket can be resized by changing the number of motifs rather than rewriting the flower.
The Design: What Makes This Floral Bedspread Different
The main motif is built as a layered flower rather than a conventional flat granny square. An ivory circular center supports ten elongated lavender petals. A second layer in sage green expands the flower and creates a broad scalloped outline. Cream stitches around the outer edge provide a neutral joining zone and prevent the purple petals from disappearing into neighboring motifs.
Smaller cream floral connectors fill the spaces between the large motifs. This matters structurally. Joining large rounded flowers directly at only a few points can create gaps and excessive tension between motifs. The smaller connectors distribute that tension while adding the lace-like cream pattern visible across the bedspread.
The most common failure is tightening the petal bases. If the lavender petals are crowded at the center, the motif cups instead of lying flat after blocking.
Project Information at a Glance
| Skill Level | Construction | Main Motif Size | Suggested Hook | Best For |
|---|---|---|---|---|
| Intermediate | Joined floral motifs | Approximately 18–21 cm | 4.5–5.0 mm | Bedspreads, throws and pillow covers |
Materials and Tools
Yarn
- Ivory/Cream — worsted weight #4 — flower centers, connectors and joining details
- Lavender Purple — worsted weight #4 — raised main petals
- Sage Green — worsted weight #4 — outer petal layer
A washable cotton, cotton-acrylic blend or smooth acrylic yarn works well for this construction. Keep all three colors within the same yarn weight and preferably the same yarn family so the motifs block to consistent dimensions.
Tools
- 4.5–5.0 mm crochet hook
- Yarn needle
- Scissors
- Locking stitch markers
- Blocking pins
- Blocking mats
- Flexible measuring tape
Abbreviations
- MR — magic ring
- ch — chain
- sc — single crochet
- hdc — half double crochet
- dc — double crochet
- tr — treble crochet
- sl st — slip stitch
- sp — space
- st/sts — stitch/stitches
- FLO — front loop only
- BLO — back loop only
Finished Motif Measurements
Use the measurements below as project targets rather than fixed gauge requirements.
- Main flower motif: approximately 18–21 cm across after blocking
- Ivory center: approximately 4–5 cm across
- Lavender flower layer: approximately 12–14 cm across
- Complete sage outer layer: approximately 18–21 cm across
- Flower relief: approximately 1–2 cm
Make one complete master motif before calculating the final blanket dimensions.
Pattern — Main Flower Motif
Ivory Center
Yarn: Ivory/Cream
Round 1: Make a MR. Ch 1 and work 10 sc into the ring. Join with sl st. (10)
Round 2: Ch 1. Work 2 sc in each stitch around. Join. (20)
Round 3: Ch 1. Work 1 sc in each stitch around. Join. (20)
Round 4: Ch 1, sc in same stitch, ch 2, skip 1 stitch. Repeat [sc in next stitch, ch 2, skip 1] around. Join. You should have 10 chain spaces.
Fasten off the ivory yarn.
Lavender Petal Layer — 10 Petals
Yarn: Lavender Purple
Join lavender yarn in any ch-2 space.
Petal 1: Ch 8.
Beginning in the second chain from the hook, work:
sc, hdc, dc, 2 tr, dc, hdc.
Work 5 dc around the remaining side/base area of the petal chain space to create a rounded lower section, then sl st back into the same center space.
Move to the next ch-2 space with a sl st.
Repeat the petal construction in every ch-2 space around until there are 10 lavender petals.
The petals should remain separate through most of their length. Do not sew their side edges together.
Fasten off.
Adding Definition to the Purple Petals
If the petals collapse inward, add one surface-crochet line through the center of each petal.
Join lavender yarn near the petal base.
Work loose surface slip stitches toward the tip.
Stop approximately 5 mm before the end of the petal.
This creates the raised central line visible in dimensional floral crochet without making the outer edge stiff.
Sage Green Foundation Round
Yarn: Sage Green
Turn the flower so the back is facing you.
Join sage yarn behind one lavender petal.
Round 1: Ch 1, sc securely around the foundation area behind the petal, ch 5, sc behind the next petal.
Repeat around to create 10 green foundation loops.
Check the flower before continuing. The loops should sit behind the lavender petals rather than pulling them outward.
Sage Green Outer Petals — 10 Petals
Work the following into each ch-5 loop:
sc, hdc, 3 dc, 3 tr, 3 dc, hdc, sc
This creates a broad rounded sage petal behind every lavender petal.
Repeat in all 10 loops.
Join with sl st.
At this stage the motif should have ten lavender inner petals and ten larger sage outer petals.
Shaping the Sage Petals
Work one additional round around the sage layer if a stronger scalloped outline is required.
Sl st to the side of the first green petal.
Work sc evenly up the first side.
At the top work:
(sc, ch 2, sc)
Continue with sc down the opposite side.
Work a sl st in the valley between petals.
Repeat around all ten petals.
The ch-2 section produces a subtle tip rather than a completely round scallop.
Cream Outer Definition
Yarn: Ivory/Cream
The photograph shows a narrow cream line defining the outer green sections. This can be reproduced with a light edging.
Join cream at a valley between two sage petals.
Work loose surface slip stitches or single crochet around the outside of each green petal.
At each tip, work:
sc, ch 1, sc
Continue around the motif.
Keep this edging relaxed. A tight cream round will curl the green layer upward.
Blocking the Master Flower
Block the first completed motif before producing the full set.
Pin opposite petals first.
Measure the diameter.
Rotate the measuring tape 90 degrees and measure again.
The two measurements should differ by no more than approximately 5 mm.
Then pin the remaining petals so all ten points are evenly distributed.
Record the blocked diameter. Use that number for every blanket calculation.
Small Cream Connector Flower
The spaces between the large motifs are filled with smaller cream flowers.
Yarn: Ivory/Cream
Round 1: MR, ch 1, 8 sc in ring. Join. (8)
Round 2: Ch 3, 2 dc in same stitch, ch 3, sl st in same stitch.
Sl st into the next stitch.
Repeat the petal sequence around to create eight small petals.
Fasten off.
For a flatter connector, replace each pair of dc with hdc.
Alternative Openwork Connector
For larger spaces between motifs, make a lace connector instead of a compact flower.
Round 1: MR, 8 sc. Join. (8)
Round 2: Ch 4, skip 1 stitch, sc in next stitch. Repeat around.
Round 3: Into each ch-4 space work (sc, hdc, 2 dc, hdc, sc).
This produces a larger cream flower that can connect four neighboring main motifs.
Planning the Bedspread Layout
Arrange the blocked motifs on a flat surface before joining them.
The photo-inspired layout alternates large purple-and-green flowers with smaller cream connectors. The large motifs remain the dominant visual unit while the cream sections create breathing space between them.
If the blocked main motif measures approximately 20 cm, the following layout provides useful starting dimensions before the final border:
| Main Motifs Across | Main Motifs Long | Approximate Coverage |
|---|---|---|
| 5 | 6 | 100 × 120 cm plus connectors |
| 6 | 8 | 120 × 160 cm plus connectors |
| 8 | 10 | 160 × 200 cm plus connectors |
| 9 | 11 | 180 × 220 cm plus connectors |
| 10 | 12 | 200 × 240 cm plus connectors |
The actual finished measurement depends on the amount of overlap or spacing introduced by the connector motifs.
Joining the Main Motifs
Block every large flower before joining.
Lay the motifs with their green outer petals touching.
Use cream yarn for the joining stitches.
Attach neighboring motifs at selected outer petal tips and valleys rather than sewing every edge together.
A practical connection uses three points between neighboring flowers:
- one upper petal connection
- one central valley connection
- one lower petal connection
This keeps the floral outline visible while preventing large unsupported gaps.
Adding the Cream Connector Flowers
Place one small cream flower into each open space created by four neighboring main motifs.
Pin the connector before sewing.
Attach one petal to each surrounding motif.
If the opening remains too large, attach four additional petals diagonally.
The connector should lie flat. It must not pull the four large motifs toward its center.
Join-As-You-Go Option
The connector flowers can also be attached during their final round.
Instead of completing the center chain at a joining point, work:
ch 1, sl st into the corresponding green or cream edge of the neighboring motif, ch 1.
Continue the connector petal.
This method reduces sewing but requires the entire layout to be planned before joining begins.
Outer Bedspread Border
Once all motifs are connected, work a cream foundation around the complete perimeter.
Border Round 1
Join cream yarn at a stable outer petal valley.
Work sc evenly around the blanket.
Use ch spaces to bridge deeper gaps between motifs.
At each blanket corner, work:
(sc, ch 2, sc)
Border Round 2
Work hdc around.
At each corner work:
(2 hdc, ch 2, 2 hdc)
Border Round 3 — Openwork
Work:
sc, ch 3, skip 2 stitches
Repeat around.
Adjust the final repeat near each corner rather than forcing an incorrect stitch count.
Border Round 4 — Scallops
In each ch-3 space work:
(sc, hdc, 3 dc, hdc, sc)
Repeat around.
Fasten off.
Optional Sage Border Detail
For more green around the perimeter, work one sage round before the final cream scallops.
Use one sc in each stitch and three sc in each corner space.
Return to cream for the final decorative round.
This small color change visually connects the blanket edge to the sage petals inside the bedspread.
Matching Floral Pillow Covers
The same motifs can be used for the matching pillow covers visible in the image.
Arrange the main flowers across the front according to the pillow dimensions.
For a standard rectangular pillow, three large motifs across and two motifs high can form the decorative center when the motif size suits the insert.
Fill the gaps with cream connector flowers.
Add cream border rounds until the panel matches the pillow measurement.
For the back, crochet two overlapping cream panels in hdc or granny stitch.
Overlap them by approximately 10–15 cm to create an envelope closure.
Join the front and back around all four edges with cream sc.
Estimating Yarn Requirements
Because dimensional petals use considerably more yarn than flat granny squares, calculate yarn from a finished motif instead of relying on blanket area alone.
Make one complete flower and weigh it separately by color if possible.
For example, if one finished motif weighs 70 g and the bedspread requires 80 large motifs:
70 × 80 = 5,600 g
That number would represent the main motifs only. Connector flowers, joining yarn and the border must still be added.
For a more useful estimate, weigh each color used in the master motif before and after crocheting. Multiply those amounts by the planned motif count, then add approximately 10 percent for joining, swatching and variation.
Making a Smaller Throw
A sofa throw does not require the full bedspread layout.
Start with approximately 5–6 main motifs across.
Continue until the length reaches roughly 120–160 cm, depending on the intended use.
Add connector flowers and finish with the same cream border.
Using fewer motifs preserves the same floral scale seen in the bedspread.
Color Variations
- Rose Garden: dusty rose petals, sage outer layer and cream centers.
- Blue Garden: cornflower blue petals, dusty green and ivory.
- Autumn Floral: burnt orange petals, olive outer petals and oatmeal centers.
- Neutral: taupe petals, beige outer petals and warm ivory centers.
- Pastel: blush petals, pale mint outer petals and white centers.
Assembly
- Crochet one complete ivory, lavender and sage master flower and block it to determine the finished diameter.
- Make the remaining large motifs with identical stitch counts and yarn tension.
- Block all large flowers to the same measurement before beginning the bedspread layout.
- Arrange the motifs on a flat surface and confirm the final width and length.
- Join neighboring green outer petals at consistent points using cream yarn.
- Crochet the required small cream connector flowers for the spaces between large motifs.
- Attach each connector without pulling the surrounding flowers inward.
- Work a cream foundation round around the complete outer perimeter.
- Add the openwork and scalloped border, adjusting only at corners when necessary.
- Weave in all yarn tails, wash according to the yarn label and block the completed bedspread flat.
The completed piece should remain flat across the joining areas while the lavender petals rise above the sage and cream background.
7 Technical Tips
- Cupped flower centers: ten lavender petals require enough room around the ivory foundation. If the center begins forming a bowl, increase the foundation chain spaces slightly rather than stretching the finished motif during blocking.
- Uneven petal length: count every chain in each lavender petal. A difference of one chain becomes obvious when ten petals are arranged around the same center.
- Green layer curling: check the motif after completing three sage petals. If their outer edges turn upward, increase the hook size by 0.5 mm or loosen the outer stitches.
- Visible joining distortion: connect neighboring motifs at identical petal positions. Random attachment points make the rows wander even when every individual flower is the same size.
- Connector flowers pulling inward: pin all four surrounding motifs before sewing a cream connector. Its finished diameter should match the natural opening rather than forcing the opening to match the connector.
- Excessive blanket weight: weigh the first five finished motifs. Multiply that weight by the planned motif count before making the complete set so the final bedspread weight is known early.
- Loose yarn tails: dimensional petals experience movement during use. Weave each tail through at least 6–8 cm of neighboring stitches, reverse direction once, then trim.
Care and Final Blocking
Support the entire bedspread when moving it after washing. Do not lift a wet floral blanket from one corner because the weight can stretch the joining points.
Lay the piece flat.
Square the overall perimeter first, then arrange the outer green petals and cream scallops.
Do not flatten the lavender petals completely. Shape them individually so the raised floral texture remains visible after drying.
For storage, fold the blanket loosely and change the fold positions periodically so the same dimensional flowers are not compressed every time.
Conclusion
This purple flower granny square crochet bedspread is built around three separate structural levels: an ivory center, raised lavender petals and a broad sage-green layer that carries the joining points. Make one complete 18–21 cm master motif before committing yarn to the full blanket, then use its blocked measurement and weight to calculate the required quantity. Cream connector flowers can be added after the large motifs are positioned, making the final dimensions easier to control. Save the pattern to Pinterest and share completed versions on Instagram with #PurpleFlowerCrochetBedspread. For your version, would you keep all ten lavender petals the same shade or alternate light and dark purple around each flower?








