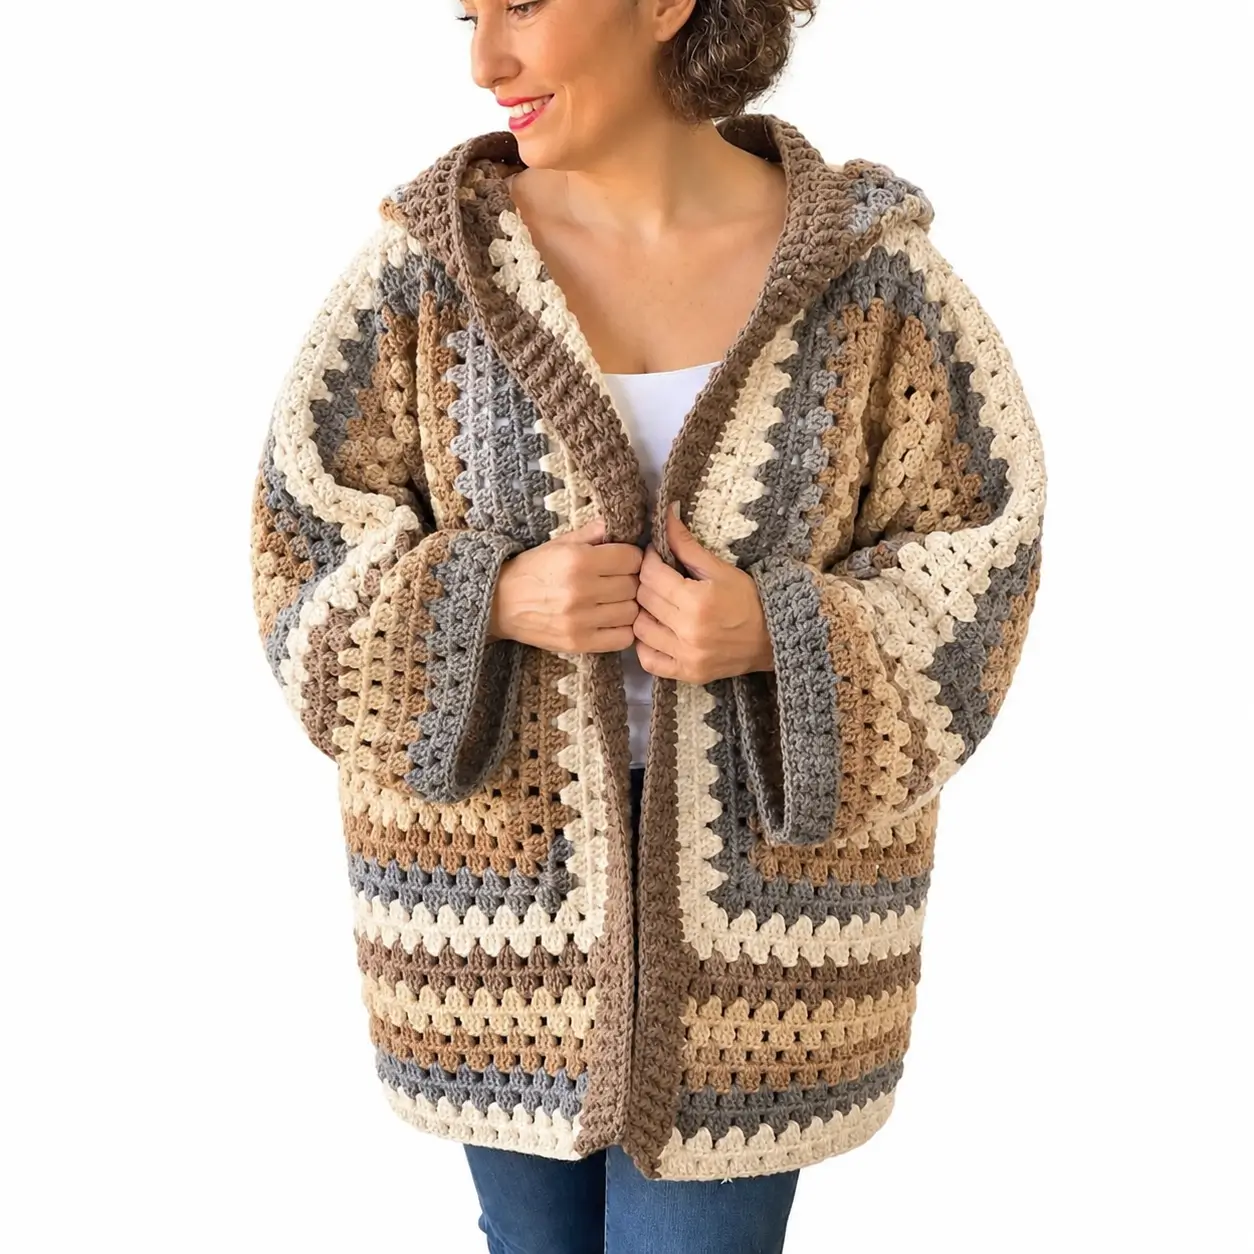
A hood changes the balance of an oversized crochet cardigan: too much weight at the neckline pulls the entire garment backward. This photo-inspired granny stitch crochet hooded cardigan uses cream, taupe, camel and gray stripes, relaxed drop shoulders, roomy sleeves and a wide contrasting front band. The construction is based on simple rectangular panels, making the finished measurements easier to adjust before the sleeves and hood are attached.
The Design: What Makes This Hooded Cardigan Different
The cardigan combines the familiar three-double-crochet granny cluster with the proportions of an oversized jacket. Horizontal color bands run continuously across the body, while the sleeves repeat the same neutral palette at a larger visual scale. This keeps the garment cohesive even though several colors are used.
The shoulder line sits below the natural shoulder, creating the loose silhouette visible in the photo. A substantial taupe front band continues around the hood opening, adding structure where open granny stitches would otherwise stretch. The sleeves are intentionally wide through the upper arm and narrow only slightly toward the cuff.
A common construction problem is making the hood too narrow. It should have enough depth to fold naturally behind the neck when it is not being worn.
Project Information at a Glance
| Skill Level | Construction | Fit | Suggested Hook | Best For |
|---|---|---|---|---|
| Intermediate | Seamed rectangular panels | Oversized / relaxed | 5.0–6.0 mm | Layering cardigan, casual jacket |
Materials and Tools
Yarn
- Cream — worsted or aran weight #4 — main light stripe
- Camel — worsted or aran weight #4 — warm neutral stripe
- Taupe — worsted or aran weight #4 — stripes, hood and front edging
- Medium Gray — worsted or aran weight #4 — contrast stripe
For an adult oversized cardigan, approximately 1,500–2,300 g of yarn may be required depending on size, yarn construction, hood depth, sleeve length and overall garment length. Treat this as a planning range. Weighing a large gauge swatch gives a more useful estimate for a customized garment.
Tools
- 5.0–6.0 mm crochet hook, adjusted after swatching
- Locking stitch markers
- Large yarn needle
- Scissors
- Flexible measuring tape
- Blocking mats or a large flat surface
Abbreviations
- ch — chain
- sc — single crochet
- hdc — half double crochet
- dc — double crochet
- sl st — slip stitch
- sp — space
- st/sts — stitch/stitches
- RS — right side
- WS — wrong side
Granny Cluster Used Throughout
The main fabric is based on a standard granny cluster:
Granny cluster: 3 dc worked into the same chain space.
Clusters are separated by ch 1 unless a different spacing is required at an edge.
On the following row, work each new 3-dc cluster into the ch-1 space between the clusters below.
This produces the small repeating openings visible throughout the body and sleeves.
Make a Gauge Swatch First
Work a swatch at least 20 × 20 cm using the granny stitch and the yarn intended for the cardigan.
Measure the swatch after it has rested or after washing it according to the yarn instructions.
Record:
- Number of granny clusters per 10 cm
- Number of rows per 10 cm
- Weight of the finished swatch
- Change in dimensions after washing
The garment should have drape. If the swatch stands stiffly when held from one corner, test a larger hook.
Choosing the Finished Size
This cardigan is intended to have substantial positive ease.
Measure the fullest part of the bust while wearing the type of clothing that will normally sit underneath the cardigan.
Add approximately 20–35 cm for a relaxed oversized fit.
For example, a 100 cm body measurement plus 25 cm of positive ease gives a target garment circumference of approximately 125 cm.
Divide that measurement between the back and two front panels.
Suggested Finished Garment Circumference
| Body Measurement | Suggested Finished Circumference |
|---|---|
| 80–90 cm | 105–120 cm |
| 90–100 cm | 115–130 cm |
| 100–110 cm | 125–140 cm |
| 110–120 cm | 135–150 cm |
| 120–130 cm | 145–160 cm |
These are construction targets rather than fixed commercial sizes. Use actual body and swatch measurements for the final calculation.
Color Stripe Sequence
The photographed cardigan uses irregular neutral stripes rather than a strict two-color repeat. A practical sequence is:
- Cream — 2 rows
- Camel — 2 rows
- Taupe — 2 rows
- Cream — 2 rows
- Gray — 2 rows
- Camel — 2 rows
- Cream — 2 rows
- Taupe — 2 rows
Repeat or rearrange the sequence as required. Keep the same general sequence across the back and fronts so the stripes align at the side seams.
Back Panel
Calculate the back width from the required finished circumference.
For an oversized cardigan, the back usually represents slightly less than half of the complete circumference because the front edging adds additional width.
Foundation
Chain to the required back width using the repeat needed for your granny-stitch method.
The foundation should measure the planned width without stretching.
Row 1
Establish 3-dc clusters evenly across the foundation, separating each cluster with ch 1.
Turn.
Row 2
Work a 3-dc cluster into every ch-1 space across.
Ch 1 between clusters.
Maintain a clean edge stitch at both sides.
Following Rows
Repeat Row 2 while following the selected stripe sequence.
Continue until the back reaches the desired length from shoulder to hem.
A photo-inspired oversized length will usually fall around the upper thigh, although the exact measurement should be selected for the wearer.
Fasten off.
Left Front Panel
The left front is approximately half the back width, minus the space that will later be added by the wide front band.
Work the same granny-cluster fabric and color sequence used for the back.
Continue without waist shaping for the relaxed rectangular silhouette.
Finish at the same total length as the back.
Fasten off.
Right Front Panel
Make the second front panel to match the first.
Check both panels every 10–15 rows by placing them together. Their width, row count and stripe positions should match.
Fasten off when the right front reaches the same length as the left front and back.
Joining the Shoulders
Lay the back panel flat with the two front panels positioned over it.
Align the outside shoulder edges.
Leave the central back section open for the neckline.
Join each shoulder using mattress stitch, slip stitches or single crochet.
A flexible seam is preferable because the hood will later add weight to this area.
Side Seams and Armholes
Place a marker at each side to define the bottom of the armhole.
For an oversized cardigan, measure the upper arm circumference and add approximately 8–15 cm of ease.
Use half of that circumference as the approximate vertical armhole depth when the garment is lying flat.
Seam from the hem upward to the marker.
Repeat on the opposite side.
Try the body on before beginning the sleeves. The armhole should be roomy without extending so low that the sleeve pulls the body upward.
Oversized Sleeve — Make 2
The sleeves in the image are intentionally broad and slightly ballooned. They should not be constructed like narrow fitted sleeves.
Upper Sleeve
Begin with enough stitches to match the complete armhole circumference.
Work in granny stitch using the same neutral stripe palette.
Maintain the wider upper-arm measurement for the first portion of the sleeve.
Sleeve Shaping
Reduce gradually rather than making abrupt decreases.
One practical method is to remove one granny-cluster space from each side after several rows, then work a number of rows without decreases before repeating.
Continue until the sleeve reaches the required wrist circumference.
Sleeve Length
Measure from the dropped shoulder seam to the wrist.
The image shows a long sleeve that reaches close to the hand, so add approximately 2–4 cm if a slightly extended cuff is preferred.
Finish both sleeves at identical row counts.
Gray Cuff
Switch to gray for a defined cuff similar to the photo.
Work several rows of hdc or sc around the sleeve opening.
For more structure, work the final rows through the back loop only.
A cuff depth of approximately 5–8 cm gives enough visual weight to balance the oversized sleeve.
Fasten off.
Attach the Sleeves
With the garment body flat, center the top of each sleeve on the shoulder seam.
Pin or mark the sleeve evenly around the armhole before sewing.
Attach with mattress stitch or a loose slip-stitch seam.
Avoid stretching the armhole while sewing.
Repeat for the second sleeve.
Constructing the Hood
The hood is a major feature of this cardigan and should be measured from the neckline rather than made from an arbitrary stitch count.
Hood Foundation
Join taupe yarn at one front neckline edge.
Work evenly around the neckline to the opposite front edge.
Use sc or hdc for the first foundation row.
Hood Body
Begin working granny clusters into the foundation.
Continue upward until the hood reaches approximately 32–38 cm from the neckline, depending on the wearer and desired hood depth.
Check the hood by folding the fabric upward around the head.
It should reach comfortably over the crown without pulling the front panels upward.
Back Hood Seam
Fold the hood with RS together.
Align the upper edges.
Join across the top using mattress stitch or slip stitches.
Turn the hood to the RS.
For a less pointed crown, round the upper rear corners slightly during the final rows instead of making a completely rectangular hood.
Wide Front and Hood Band
The taupe edging is one of the strongest visual elements in the photographed garment.
Join taupe yarn at the lower corner of one front panel.
Work evenly up the first front edge, around the hood opening and down the opposite front.
Band Row 1
Work sc evenly around the entire opening.
Do not overcrowd the stitches along vertical row ends.
Band Row 2
Work hdc across.
Band Rows 3–6
Continue in hdc, sc or BLO hdc until the band measures approximately 5–8 cm wide.
The wider band adds enough weight to stabilize the open granny-stitch fronts.
Bottom Hem
The photo shows a relatively compact hem rather than a deep ribbed waistband.
Join cream, taupe or the final stripe color along the bottom edge.
Work one round or row of sc.
Add one or two rows of hdc if additional stability is required.
The finished hem should lie flat without pulling the front corners inward.
Optional Pockets
Large patch pockets can be added without changing the main cardigan construction.
Make two rectangles in granny stitch measuring approximately 18–22 cm wide and 20–24 cm tall.
Finish the upper pocket edge with two or three rows of taupe hdc.
Pin both pockets at identical distances from the front edges and hem.
Sew around the sides and bottom, leaving the upper edge open.
Adjusting the Cardigan Length
The rectangular construction makes length modification simple.
| Style | Approximate Shoulder-to-Hem Target |
|---|---|
| Hip Length | 60–70 cm |
| Long Hip | 70–80 cm |
| Upper Thigh | 80–90 cm |
| Long Cardigan | 90–105 cm |
Measure on the intended wearer because the same garment length sits differently according to torso height.
Calculating Yarn More Accurately
Make a granny-stitch swatch measuring approximately 30 × 30 cm using all planned colors.
Weigh it after finishing.
Suppose the sample weighs 70 g.
The sample area is:
30 × 30 = 900 cm²
Estimate the combined surface area of the back, fronts, sleeves and hood. Divide that area by 900, then multiply by 70 g.
Add approximately 10–15 percent for seams, front bands, cuffs, swatching and normal variation.
This method also makes it possible to estimate how much of each color is required from the proportion of stripes in the swatch.
Alternative Color Palettes
- Autumn: cream, rust, mustard, olive and chocolate.
- Coastal: ivory, pale blue, denim, navy and sand.
- Woodland: oatmeal, sage, forest green, camel and brown.
- Soft Neutral: ivory, beige, mushroom, taupe and light gray.
- Rose Neutral: cream, dusty rose, mauve, beige and burgundy.
Assembly
- Make and measure a granny-stitch gauge swatch before calculating panel widths.
- Crochet the back panel to the selected finished width and length.
- Make two matching front panels while keeping their stripe sequence aligned with the back.
- Join the shoulder seams and leave the calculated center neckline open.
- Seam the sides while leaving armholes based on the wearer’s upper-arm measurement.
- Crochet two oversized sleeves, shape them gradually toward the wrists and finish the cuffs.
- Attach each sleeve evenly around its armhole without stretching the body fabric.
- Crochet the hood directly from the neckline and close its upper seam.
- Work the wide taupe band continuously up one front, around the hood and down the second front.
- Finish the hem, weave in every yarn tail and check the cardigan measurements before washing or blocking.
The completed cardigan should hang with a relaxed open front, dropped shoulders, roomy sleeves and enough hood depth to rest behind the neckline without pulling the garment backward.
7 Technical Tips
- Shoulder stretching: the hood places extra weight on the neckline. Reinforce each shoulder seam with a second pass of yarn if it lengthens by more than about 1 cm when the cardigan is hung briefly.
- Misaligned stripes: count rows rather than matching colors visually while making the fronts. A difference of only one granny row becomes obvious after the side seams are joined.
- Tight armholes: measure the upper arm and add 8–15 cm of ease before closing the side seams. An oversized body does not compensate for an undersized armhole.
- Pointed hood: a simple rectangular hood can form a sharp rear corner. Add slight shaping near the upper corners or seam the crown with a gentle curve if a rounder profile is preferred.
- Wavy front band: too many stitches along the vertical fronts create rippling. Stop after approximately 20 cm of edging and check that the band lies flat before continuing.
- Heavy sleeves: weigh one completed sleeve before making the second. If it feels excessively heavy, shorten the sleeve or reduce the cuff depth rather than tightening the stitches.
- Loose yarn tails: color changes create many ends in striped granny fabric. Weave each tail through at least 6–8 cm of neighboring stitches and reverse direction once before trimming.
Blocking and Garment Care
Wash or steam the finished cardigan only according to the yarn manufacturer’s fiber instructions. Support the garment fully when wet because an oversized granny-stitch cardigan can become substantially heavier after absorbing water.
Lay it flat and arrange the back first. Align the front panels, straighten the side seams and position both sleeves to identical measurements.
Shape the hood last. Do not stretch it vertically, since additional hood length can pull the neckline backward during wear.
Allow the cardigan to dry completely while lying flat.
Conclusion
The granny stitch crochet hooded cardigan combines simple cluster fabric with garment measurements that control the oversized silhouette. Begin with the back panel, use its finished dimensions to calculate matching fronts, then confirm the armhole measurement before making the wide sleeves. The hood and continuous taupe front band are added after the main body is assembled, which makes their depth easier to control. Your next step is to make a 20 × 20 cm granny-stitch swatch in the four neutral colors and record its washed gauge. Share the finished version on Pinterest or Instagram with #GrannyHoodedCardigan. Would you keep the cream, camel, gray and taupe palette, or replace the gray stripes with olive green?








