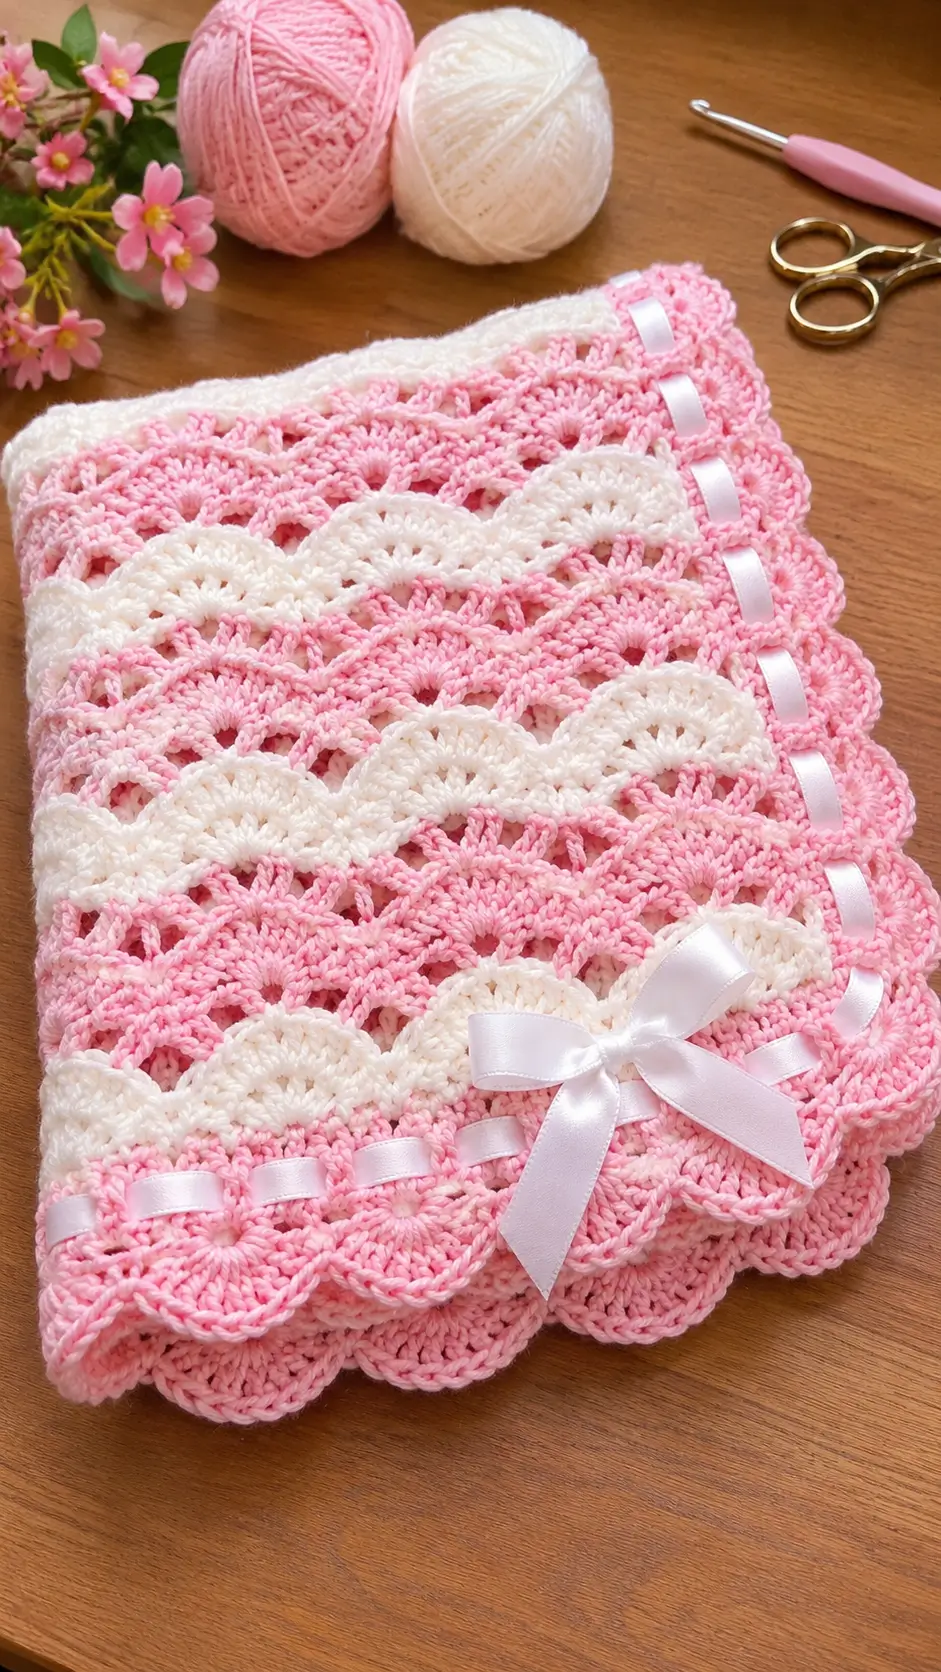
The white shell rows cut across the pink lace like overlapping fans, which is the defining construction detail of this blanket. This pink and white crochet baby blanket pattern combines alternating shell bands, open lace sections, a deep scalloped border, and woven satin ribbon. Worked in soft DK yarn with a 4 mm hook, the design can be adjusted for a stroller blanket, crib blanket, or larger decorative throw.
The Design: Pink Lace, White Shells and Ribbon
This blanket uses three elements rather than relying on one repeating stitch. Pink openwork rows form most of the fabric, white fan-shaped shells interrupt the pink sections at regular intervals, and a wide pink scalloped border frames the finished rectangle.
The white bands need careful spacing. Each fan must sit directly above the corresponding repeat below it; otherwise the waves gradually shift sideways. The ribbon channel is also structural. It is placed inside the outer border rather than at the very edge, leaving enough crochet beyond the ribbon to support the large scallops.
A common mistake with a shell stitch crochet blanket is adding too many stitches inside each fan. That produces a ruffled fabric instead of the controlled waves visible here.
Project Information at a Glance
| Skill Level | Construction | Target Size | Hook | Best For |
|---|---|---|---|---|
| Intermediate | Rows + worked border | Approx. 75 × 95 cm | 4.0 mm | Baby blanket, stroller blanket, decorative throw |
Materials and Tools
Yarn
- Soft Pink — DK #3 yarn — approximately 450–550 g
- Warm White — DK #3 yarn — approximately 180–250 g
For a baby blanket, choose a washable yarn with a smooth construction. Cotton, cotton-acrylic, or a soft washable acrylic can all produce clear shell definition.
Additional Materials
- 4.0 mm crochet hook
- Yarn needle
- Scissors
- Stitch markers
- Measuring tape
- White satin ribbon — approximately 10–15 mm wide
- Blocking mats and rust-resistant pins
Abbreviations
- ch — chain
- sc — single crochet
- hdc — half double crochet
- dc — double crochet
- tr — treble crochet
- sl st — slip stitch
- sp — space
- st/sts — stitch/stitches
- RS — right side
- WS — wrong side
Finished Sizes
| Blanket | Approximate Size |
|---|---|
| Small Stroller | 60 × 75 cm |
| Baby Blanket | 75 × 95 cm |
| Crib Blanket | 90 × 110 cm |
| Small Throw | 110 × 140 cm |
These measurements are project targets rather than fixed dimensions. The final measurement depends on yarn, hook size, stitch tension, and the number of pattern repeats.
Gauge Swatch
Before making the foundation chain, crochet a swatch containing at least three complete lace repeats.
Measure the width only after the swatch has been lightly blocked. Use that measurement to calculate the number of repeats needed for your chosen blanket width.
The repeat is more important than a fixed stitches-per-centimeter gauge because shell stitches spread differently between yarn types.
Pattern Repeat
The blanket body is built around a simple open fan repeat. Use a foundation chain that is a multiple of 8 plus 3 chains.
For a wider or narrower blanket, add or remove complete groups of eight chains.
Foundation
With pink yarn, chain the required multiple of 8 plus 3.
Do not make the foundation chain tight. A tight starting edge will remain shorter than the shell rows and can cause the lower edge to curve upward.
Pink Foundation Rows
Row 1
Dc in the 4th ch from hook. Dc in each chain across. Turn.
Row 2
Ch 3, dc in next stitch, *ch 2, skip 2 stitches, dc in next 2 stitches*. Repeat across, adjusting the final repeat if required to finish symmetrically. Turn.
Row 3
Ch 3. Work dc into each dc and 2 dc into each ch-2 space across. Turn.
This creates a stable base before the decorative fan rows begin.
Pink Openwork Fan Section
Row 4
Ch 1, sc in first stitch.
*Skip 3 stitches, work 7 dc in next stitch, skip 3 stitches, sc in next stitch.*
Repeat across. Turn.
Row 5
Ch 5.
*Sc in the center dc of the next 7-dc shell, ch 5.*
Repeat across, ending with an appropriate edge stitch. Turn.
Row 6
Sl st into the first ch-5 space.
Ch 3, work 3 dc in the same space.
*Ch 2, 4 dc in next ch-5 space.*
Repeat across. Turn.
Row 7
Ch 1, sc in first stitch.
*Ch 4, sc into next ch-2 space.*
Repeat across.
This row creates the open arches visible between the denser fan sections.
White Shell Band
Change to white yarn at the beginning of the next row.
White Row 1
Sl st into the first ch-4 space.
Ch 3, work 6 dc into the same space.
Sc into the next ch-4 space.
*7 dc in next ch-4 space, sc in next ch-4 space.*
Repeat across.
White Row 2
Ch 3.
Work dc across each shell while placing a small ch-1 opening near the center of every fan:
3 dc, ch 1, 3 dc across each designated shell section.
Use sc between neighboring fans to maintain their separation.
White Row 3
Work sc or hdc evenly across the upper edge of the white fans.
This final row stabilizes the wave before returning to pink.
Return to Pink
Join pink yarn.
Pink Transition Row
Ch 1, sc across the white band, distributing the stitches evenly.
Do not add a stitch into every visual opening automatically. The goal is to restore the original repeat count used before the white band.
Next Openwork Row
*Ch 4, skip the appropriate number of stitches, sc in next stitch.*
Repeat across, positioning each arch above the corresponding fan below.
Fan Row
Work 7 dc into alternate ch-4 spaces and sc into the spaces between them.
The next set of pink shells should sit between the shell peaks from the preceding decorative band. This offset creates the layered wave effect.
Repeating the Blanket Body
Continue alternating the following sections:
- Pink shell row.
- Pink open chain row.
- Pink cluster or dc row.
- Pink transition row.
- White shell band.
- White stabilizing row.
- Pink openwork transition.
Repeat until the blanket body reaches approximately 8–12 cm less than the desired final length. The remaining measurement is reserved for the border.
Keeping the Shell Bands Aligned
Lay the blanket flat after every two major color bands.
Check three positions: left edge, center, and right edge. A shell peak in one section should remain vertically related to the repeat underneath it.
If the center begins shifting while both edges remain straight, the error usually occurred in an open chain row. Count the arches before proceeding.
Preparing the Border
Finish the body with a pink stabilizing row.
Do not fasten off if pink is already attached.
Border Round 1
Ch 1 and work sc evenly around the complete rectangle.
At each corner work:
(sc, ch 2, sc)
into the corner space.
Along row ends, distribute the sc stitches according to the actual row height. The side edge should lie flat without pulling or rippling.
Border Round 2
Work hdc in each stitch around.
At each corner work:
(2 hdc, ch 2, 2 hdc).
Ribbon Eyelet Round
The satin ribbon passes through a dedicated openwork round inside the scalloped border.
Ribbon Round: Ch 3, *dc in next 2 stitches, ch 2, skip 2 stitches.* Repeat around.
At the corners, maintain enough extra space to allow the ribbon to turn without folding sharply.
Check that the openings are slightly wider than the ribbon before completing the entire round.
Pink Scalloped Border
The border in the reference design is substantially deeper than a basic shell edging.
Border Round 4
Work sc around, placing 2 sc into each ch-2 ribbon opening.
Border Round 5
*Skip 2 stitches, 7 dc in next stitch, skip 2 stitches, sc in next stitch.*
Repeat around.
Adjust the spacing near each corner so a complete shell is centered at the corner whenever possible.
Border Round 6
Sl st to the first shell.
Work one sc in the first dc, then:
*ch 2, sc in next dc*
across the shell.
Work sl st or sc in the valley between shells.
Repeat around.
Optional Larger Scallops
For a deeper border, replace the 7-dc shells with 9-dc shells.
On the following round, work:
sc, hdc, dc, 3 dc in center stitch, dc, hdc, sc
across each shell.
This produces a fuller rounded edge similar to the pronounced pink scallops in the photographed blanket.
Adding the White Satin Ribbon
Cut the ribbon only after measuring the completed blanket perimeter.
Starting near a lower corner, weave the ribbon alternately over and under the eyelet spaces.
Do not pull it tight. The crochet should remain completely flat while the ribbon is in place.
Continue around the perimeter and bring both ribbon ends together near the chosen bow position.
Making the Decorative Bow
Allow enough ribbon for two loops and two tails.
Tie a conventional bow, then adjust both loops until they are equal.
The tails can be cut diagonally or in an inverted V shape to reduce fraying.
If the blanket will be used by a baby rather than only as a decorative photo prop, removable ribbon is the safer practical choice. Loose decorative elements should not be left where an infant can pull or mouth them.
Alternative Crochet Bow
A crocheted bow can replace the satin ribbon decoration.
Bow Rectangle
With white yarn, ch 25.
Row 1: Hdc in second chain from hook and across.
Rows 2–7: Ch 1, turn, hdc across.
Fasten off.
Bow Center
Ch 8.
Sc in second chain from hook and across.
Work 4–6 rows.
Wrap the small strip around the center of the larger rectangle and sew securely on the wrong side.
Adjusting the Pattern for Different Sizes
Make the starting chain longer or shorter in complete eight-chain repeats.
After completing the first decorative section, measure the actual width.
If one repeat measures approximately 5 cm and an additional 20 cm of width is required, add four repeats to the starting chain.
Length is easier to modify. Continue complete pink-and-white pattern sections until the body reaches the required measurement.
Yarn Quantity Calculation
Because shell stitch consumes more yarn than plain double crochet, a swatch-based calculation is more reliable than estimating from surface area alone.
Make a sample measuring approximately 20 × 20 cm using the complete color sequence.
Weigh it.
For example, if a 400 cm² swatch weighs 22 g and the intended blanket body is 75 × 95 cm:
75 × 95 = 7,125 cm²
7,125 ÷ 400 = 17.81
17.81 × 22 g = approximately 392 g
Add yarn for the deep border plus approximately 10% for swatching and finishing. Actual consumption varies considerably with fiber and stitch tension.
Color Variations
Classic Baby Pink
- Blush pink
- Warm white
- White ribbon
Lavender Version
- Soft lavender
- Ivory
- Lavender satin ribbon
Sage Version
- Pale sage
- Cream
- Ivory ribbon
Blue Version
- Powder blue
- White
- White or pale blue ribbon
Assembly and Finishing
- Complete the pink foundation and establish the full stitch repeat.
- Work the first pink lace section and count every open arch before changing color.
- Add the white shell band, keeping each fan centered over its designated repeat.
- Continue alternating pink openwork and white fan sections to the required length.
- Finish the blanket body with a stabilizing pink row.
- Work an even sc round around all four sides and form identical corner spaces.
- Add the ribbon eyelet round without allowing the border to contract.
- Complete the pink scalloped edging and correct any crowded corner shells.
- Weave in yarn ends, block the blanket, then thread the satin ribbon after the crochet is dry.
- Tie the bow at the selected corner and trim or secure the ribbon ends as appropriate for the intended use.
The completed blanket should have a flat rectangular body, clearly separated white shell bands, an even pink scalloped perimeter, and a ribbon channel that does not distort the edge.
7 Technical Tips
- Shells begin drifting sideways: an arch has probably been added or missed in the preceding openwork row. Count every repeat before beginning the next white band rather than correcting the displacement inside the shell row.
- The lower edge curves upward: the foundation chain was worked more tightly than the body. Use a hook 0.5 mm larger for the foundation chain if your starting edge consistently contracts.
- White fans ruffle: too many tall stitches are being placed into each fan. Reduce a 9-dc shell to 7 dc before changing the spacing of the entire repeat.
- Side edges flare: too many border stitches were placed into the row ends. Start with approximately two border stitches for each dc-height row and one for each sc-height row, then adjust according to the actual fabric.
- The satin ribbon puckers the blanket: it has been threaded under tension. Leave enough ribbon that the finished crochet retains exactly the same perimeter measurement before and after the ribbon is inserted.
- Corner scallops overlap: the corner contains too many border stitches. Mark all four corners before the shell round and distribute the neighboring repeats so one shell can occupy each corner cleanly.
- The lace looks uneven after finishing: block the blanket to measured dimensions and pin the outer shell peaks individually. Compare both diagonals before drying; a large difference indicates the rectangle has been stretched out of square.
Care and Blocking
Wash according to the yarn manufacturer’s instructions. Remove detachable satin ribbon before laundering when practical.
After washing, lay the blanket flat and reshape the shell bands by hand. Measure the width at the top, center, and bottom so all three measurements match.
Pin the scalloped border lightly if necessary. Allow the blanket to dry completely before replacing the ribbon.
Conclusion
This pink and white crochet baby blanket pattern combines open pink lace, contrasting white shell bands, a decorative ribbon channel, and a deep scalloped border in one coordinated construction. Start by making a three-repeat swatch so the shell width and foundation-chain calculation can be checked before the full blanket is worked. The same repeat can then be expanded for a crib blanket or reduced for a stroller size. Save the finished version to Pinterest or share your color combination on Instagram with #PinkShellCrochetBlanket. Would you keep the white satin ribbon shown here, or replace it with a crocheted cord for an all-yarn finish?









