Introduction
Circular wooden handles change how a crochet handbag carries weight: the upper edge must support the contents without stretching around the rings. This blue and cream crochet handbag pattern uses cotton yarn, dense stitches, color-block panels, and reinforced handle attachments to create a structured accessory approximately 32 cm wide. Designed for intermediate crocheters, the project provides a practical everyday bag with a washable textile body and replaceable hardware.
The Design: What Makes This Handbag Different
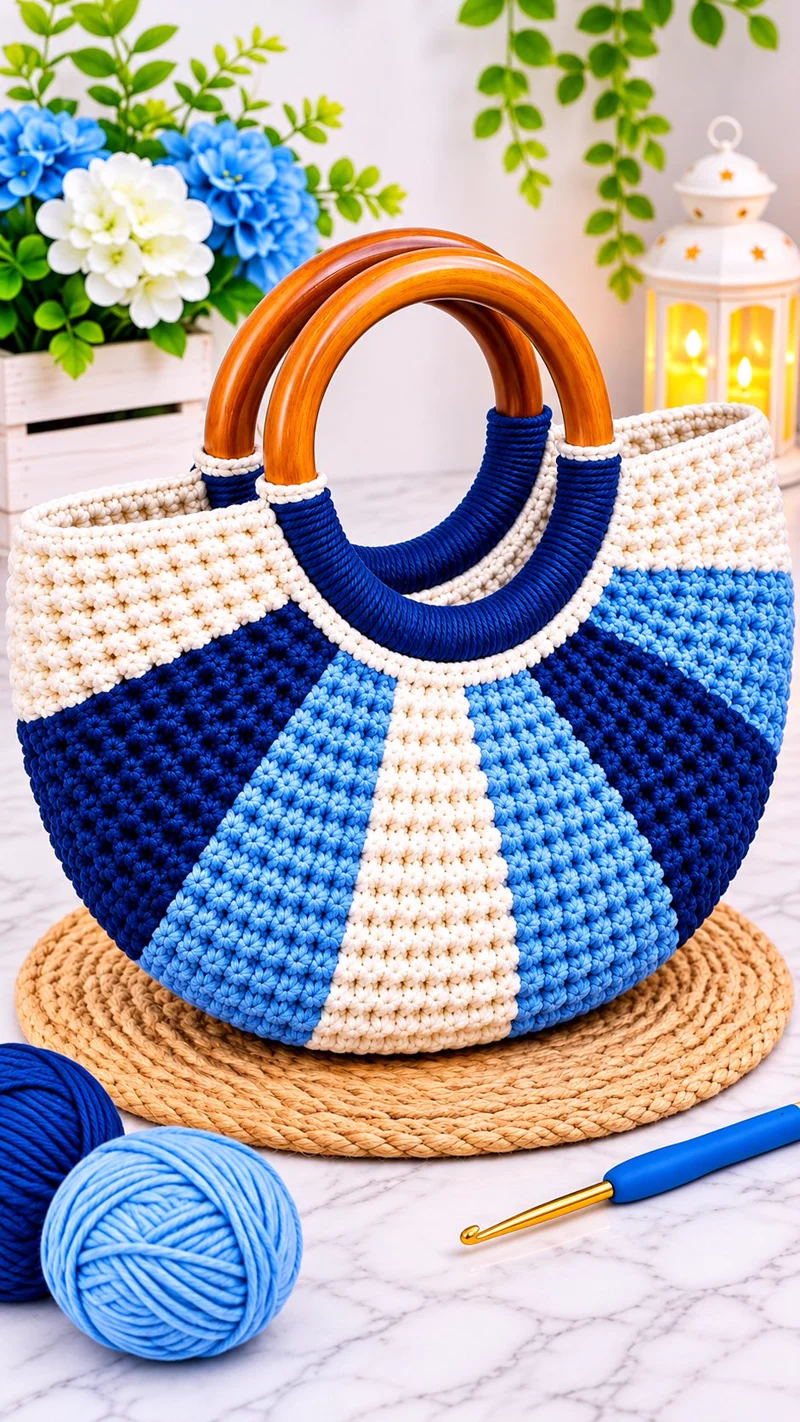
The photographed handbag combines three structural elements: a rounded lower body, geometric blue-and-cream color placement, and polished circular handles. Each contributes to the finished shape.
First, dense crochet fabric limits the stretching commonly found in openwork bags. The reconstructed design uses single crochet with a textured surface rather than large decorative gaps. This makes the bag more suitable for carrying small personal items.
Second, the alternating blue panels create a radial effect. The original photograph shows wedges rising toward the handle opening, while this tutorial interprets that appearance using controlled color changes across two panels.
Third, wooden handles require a reinforced upper attachment. A common mistake in a crochet bag with wooden handles is attaching each ring to only a few stitches. The resulting tension can distort the opening.
This color block crochet bag uses wider attachment zones and an optional lining to distribute that load.
Project Info at a Glance
| Detail | Specification |
|---|---|
| Skill Level | Intermediate |
| Estimated Time | 10–14 hours |
| Target Finished Size | 32 × 25 × 10 cm |
| Hook Size | 4.5 mm |
| Yarn | Worsted-weight cotton |
| Construction | Two panels and a continuous gusset |
| Handles | Two wooden rings |
| Best For | Everyday accessories and handmade gifts |
These dimensions and times are design targets, not independently verified measurements of the photographed bag. A gauge swatch is required before construction.
Materials and Tools
Yarn
Use a smooth, tightly twisted cotton yarn. Cotton produces a more stable fabric than highly elastic wool, particularly around the top opening.
- Cream cotton yarn — 150 g: Main upper sections, center accents, and edging.
- Navy cotton yarn — 100 g: Darker lower color blocks.
- Royal blue cotton yarn — 100 g: Intermediate color blocks and handle reinforcement.
- Light blue cotton yarn — 100 g: Brighter geometric sections.
A suitable starting option is a worsted-weight cotton such as DROPS Paris or another yarn that produces the required gauge. These quantities include an allowance for swatching and assembly; actual usage varies with yarn density and stitch tension.
Tools
- 4.5 mm crochet hook
- Two wooden circular handles, approximately 13–15 cm in outside diameter
- Tapestry needle with a large eye
- Locking stitch markers, at least six
- Sharp scissors
- Measuring tape
- Matching sewing thread
- Cotton fabric lining, approximately 45 × 70 cm
- Sewing needle or sewing machine
- Optional magnetic snap for closure
Wooden handles should have smooth, sealed surfaces. Rough edges can abrade cotton yarn during repeated use.
Gauge
For this reconstruction, work toward approximately 15 single crochet stitches and 16 rows per 10 cm after light blocking.
A 48-stitch panel at this gauge measures approximately 32 cm wide. Thirty-eight rows produce approximately 24 cm of fabric height before edging.
Make a swatch at least 12 × 12 cm. Measure the central 10 cm without stretching the fabric. If the stitches are too wide, reduce the hook size by 0.5 mm. If the fabric is unusually stiff and narrow, test a slightly larger hook.
Crochet Abbreviations
| Abbreviation | Meaning |
|---|---|
| ch | Chain |
| sc | Single crochet |
| hdc | Half double crochet |
| sl st | Slip stitch |
| st / sts | Stitch / stitches |
| RS | Right side |
| WS | Wrong side |
| BLO | Back loop only |
| FO | Fasten off |
| MR | Magic ring |
| inc | Two stitches in one stitch |
| dec | Single crochet two stitches together |
An invisible decrease works through the front loops of two adjacent stitches and produces a less noticeable reduction than a standard decrease.
Pattern — Step by Step
Construction note: The photographed bag appears to use more complex curved shaping than can be recovered from a single image. This original reconstruction uses flat color-block panels, a separate gusset, and shaped handle attachments. It creates a related design rather than an exact stitch-for-stitch duplicate.
Work the main panels in turned rows. The side gusset is also worked in rows. The handle attachment sections are added after assembly.
Part 1: Front Handbag Panel (Make 1)
Yarn: Cream, navy, royal blue, and light blue.
The front panel contains 48 stitches per row.
Foundation: Ch 49.
R1: Sc in second ch from hook and each remaining ch (48).
R2: Ch 1, turn, sc across (48).
R3: Ch 1, turn, sc across (48).
R4: Ch 1, turn, sc across (48).
R5: Ch 1, turn, sc across (48).
R6: Ch 1, turn, sc across (48).
R7: Ch 1, turn, sc across (48).
R8: Ch 1, turn, sc across (48).
R9: Ch 1, turn, sc across (48).
R10: Ch 1, turn, sc across (48).
R11: Ch 1, turn, sc across (48).
R12: Ch 1, turn, sc across (48).
R13: Ch 1, turn, sc across (48).
R14: Ch 1, turn, sc across (48).
R15: Ch 1, turn, sc across (48).
R16: Ch 1, turn, sc across (48).
R17: Ch 1, turn, sc across (48).
R18: Ch 1, turn, sc across (48).
R19: Ch 1, turn, sc across (48).
R20: Ch 1, turn, sc across (48).
R21: Ch 1, turn, sc across (48).
R22: Ch 1, turn, sc across (48).
R23: Ch 1, turn, sc across (48).
R24: Ch 1, turn, sc across (48).
R25: Ch 1, turn, sc across (48).
R26: Ch 1, turn, sc across (48).
R27: Ch 1, turn, sc across (48).
R28: Ch 1, turn, sc across (48).
R29: Ch 1, turn, sc across (48).
R30: Ch 1, turn, sc across (48).
R31: Ch 1, turn, sc across (48).
R32: Ch 1, turn, sc across (48).
R33: Ch 1, turn, sc across (48).
R34: Ch 1, turn, sc across (48).
R35: Ch 1, turn, sc across (48).
R36: Ch 1, turn, sc across (48).
R37: Ch 1, turn, sc across (48).
R38: Ch 1, turn, sc across (48).
Follow the color placement instructions below. Each row retains exactly 48 stitches regardless of color changes.
Fasten off. Leave a 25 cm tail for assembly.
Part 2: Geometric Color Placement
The image uses dark and light blue segments separated by cream. For the reconstructed panel, divide the 48 stitches into four color sections.
| Rows | Navy | Royal Blue | Light Blue | Cream | Total |
|---|---|---|---|---|---|
| 1–8 | 16 | 8 | 16 | 8 | 48 |
| 9–16 | 12 | 12 | 12 | 12 | 48 |
| 17–24 | 8 | 12 | 8 | 20 | 48 |
| 25–30 | 4 | 8 | 4 | 32 | 48 |
| 31–38 | 0 | 0 | 0 | 48 | 48 |
Arrange the colors in contiguous bands from left to right: navy, light blue, cream, and royal blue. Use the stitch quantities in the table for each row group.
When the next stitch requires a different color, complete the final yarn-over of the previous stitch with the new yarn. This produces a cleaner transition than changing yarn after the stitch is complete.
Carry inactive yarn only across short distances of two or three stitches. For longer sections, use separate yarn bobbins to avoid long floats inside the handbag.
This chart creates stepped color blocks rather than the photograph’s precise curved wedges.
Part 3: Back Handbag Panel (Make 1)
Yarn: Same four colors.
Foundation: Ch 49.
R1: Sc in second ch from hook and across (48).
R2–R38: Ch 1, turn, sc across (48 stitches in every row).
Follow the same color chart as the front panel. To mirror the appearance, reverse the order of the color sections on the back.
Fasten off. Leave a 25 cm sewing tail.
Measure both panels before proceeding. They must have matching widths and heights. If one panel is longer, compare row gauge rather than pulling the shorter fabric into shape.
Part 4: Side and Bottom Gusset (Make 1)
Yarn: Navy blue.
The gusset provides approximately 10 cm of bag depth.
Foundation: Ch 16.
R1: Sc in second ch from hook and across (15).
R2: Ch 1, turn, sc across (15).
R3–R90: Repeat R2 (15 stitches in every row).
At the target gauge, 15 stitches produce approximately 10 cm of width, while 90 rows produce approximately 56 cm of length.
Measure the two side edges and bottom edge of one panel. The target combined seam length is approximately 80 cm (24 + 32 + 24 cm), so 90 rows will usually be insufficient at the stated gauge.
R91–R128: Ch 1, turn, sc across (15 stitches per row).
Continue or shorten the gusset as needed until its length matches the actual three-edge perimeter of the panel.
Fasten off. Leave a 35 cm sewing tail.
Part 5: Upper Cream Edging (Make 2)
Yarn: Cream.
Work the upper edge of each panel before joining the body to the handles.
R1: Attach cream yarn at the top corner and sc across the 48 top-edge stitches (48).
R2: Ch 1, turn, sc across (48).
R3: Ch 1, turn, sc across (48).
R4: Ch 1, turn, sc across (48).
Fasten off. Leave a 20 cm tail.
This four-row edging adds approximately 2.5 cm of height at the stated gauge and reinforces the upper edge. It also creates a cream transition between the colored body and the wooden rings.
Part 6: Wooden Handle Attachment Tabs (Make 4)
Yarn: Royal blue.
Each tab wraps around part of a wooden handle and connects it to the bag opening.
Foundation: Ch 13.
R1: Sc in second ch from hook and across (12).
R2: Ch 1, turn, sc across (12).
R3: Ch 1, turn, sc across (12).
R4: Ch 1, turn, sc across (12).
R5: Ch 1, turn, sc across (12).
R6: Ch 1, turn, sc across (12).
R7: Ch 1, turn, sc across (12).
R8: Ch 1, turn, sc across (12).
R9: Ch 1, turn, sc across (12).
R10: Ch 1, turn, sc across (12).
R11: Ch 1, turn, sc across (12).
R12: Ch 1, turn, sc across (12).
Fasten off. Leave a 40 cm sewing tail.
Fold each tab around the lower arc of its wooden ring. The two ends should overlap sufficiently to create a secure sewn attachment.
Position two tabs on each panel, approximately 6 cm inward from the side edges. Confirm that both handles hang at the same height before stitching.
The tabs are structural components. Use repeated stitching through the tab and the reinforced cream edge, not only through surface loops.
Part 7: Optional Textured Surface Detail
Yarn: Matching panel colors.
The photograph contains pronounced raised stitches. The reconstruction can imitate part of that effect with a surface slip-stitch texture.
Insert the hook through the fabric from front to back at a selected point. Pull a matching yarn loop through, then work surface slip stitches along the desired line.
Keep each surface stitch loose enough that the panel remains flat. Tight surface crochet can shorten the panel and pull the color sections inward.
For a more pronounced texture, make a separate swatch using alternating single crochet and bobble stitches. That approach changes yarn consumption and gauge, so do not substitute it into the measured panel instructions without recalculating the dimensions.
Part 8: Optional Fabric Lining
Material: Cotton fabric.
A lining protects the crochet from small objects and reduces distortion when the bag is loaded.
Cut two fabric rectangles approximately 34 × 28 cm and one gusset strip approximately 12 × 84 cm. These are cutting estimates that include seam allowances; refine them against the assembled crochet shell.
Sew the gusset around the sides and bottom of one rectangle, then attach the second rectangle. Press the upper seam allowance inward.
Insert the lining with the wrong sides facing. Hand-sew it to the inside upper edge using small, evenly spaced stitches.
Avoid sewing through the wooden handles or creating a rigid seam directly across the attachment tabs.
Assembly — 10 Steps
- Block the panels. Lay the front and back panels flat and adjust them to matching dimensions without overstretching the cotton.
- Position the gusset. Place the gusset along the left side, bottom, and right side of the front panel, with the edges aligned.
- Join the first panel. Use mattress stitch or evenly spaced slip stitches to attach the gusset. Check the alignment at both bottom corners.
- Attach the back panel. Join the second panel to the remaining gusset edge, matching the top corners and lower center.
- Inspect the body. Turn the bag right side out and confirm that the base sits evenly without twisting.
- Inspect the front. Check the color transitions and hide any exposed yarn floats.
- Attach the handles. Wrap two royal-blue tabs around each wooden ring and sew their ends securely to the upper cream band.
- Reinforce the attachment zones. Add extra stitches across the width of each tab, distributing tension over several crochet stitches.
- Install the lining. Insert the prepared fabric lining, then stitch it around the interior upper edge. Add an optional magnetic closure to the lining before final attachment.
- Finish the seams. Weave yarn ends through multiple stitch directions, trim excess yarn, and test the bag with a light load before regular use.
The completed reconstruction consists of two color-block panels, one gusset, two wooden handles, four attachment tabs, and optional lining.
7 Technical Tips for a Better Crochet Handbag
- Prevent incorrect stitch counts. Place markers at both ends of every 48-stitch panel row. An accidental increase at a turning edge can make the panel flare.
- Avoid a twisted gusset. Mark the center of the bottom edge and the center of the gusset before sewing. These points should meet during assembly.
- Control color-change gaps. Change yarn during the final yarn-over of the preceding stitch. Switching after completion can leave a visible contrasting loop.
- Prevent handle attachment failure. Each attachment tab should span approximately 8 cm at the target gauge. Use multiple rows of reinforcement stitching.
- Check cotton tension. A gauge difference of two stitches per 10 cm can noticeably change the width of a 48-stitch panel. Measure the swatch before beginning the bag.
- Pin before permanent sewing. Secure the handles temporarily and compare their position with a measuring tape. Uneven placement causes the bag to hang at an angle.
- Hide yarn tails securely. Weave each loose tail at least 5 cm through the reverse side, change direction, and then trim it. A single short pass can work loose during use.
Care and Maintenance
Cotton handbags should be cleaned according to the yarn manufacturer’s instructions. Because this design includes wooden hardware, avoid soaking the entire bag unless the handle manufacturer confirms that water exposure is acceptable.
Spot-clean marks using a damp cloth and mild detergent. Keep the wooden rings dry, then lay the bag flat to air-dry away from direct heat.
Store the bag with its body supported. Hanging a loaded crochet handbag by its handles for extended periods can gradually stretch the attachment zones.
If the cotton fabric becomes distorted, reshape it gently while damp. Do not force the upper edge wider than the wooden handles allow.
Frequently Asked Questions
What yarn is best for a crochet handbag with wooden handles?
Cotton and cotton-blend yarns are common choices because they produce a relatively firm fabric. For a structured handbag, use a tight gauge and consider adding a fabric lining. Very stretchy yarn can allow the bottom to sag under load.
Can acrylic yarn replace cotton?
Yes, but the finished fabric may behave differently. Acrylic often has more elasticity and may produce a softer body. Make a gauge swatch, test the fabric under light tension, and consider a lining or stabilizer if the panels stretch.
How do I keep a crochet handbag from losing its shape?
Use dense stitches, a firm base, and reinforced seams. A properly fitted lining can reduce stretching, while an optional removable base insert can help distribute the weight of the contents.
Can I change the wooden handles?
Yes. Select replacement handles with sufficient space for the attachment tabs and a smooth surface that will not damage the yarn. Changing the ring diameter may require adjusting the tab positions and the width of the bag opening.
Is this the exact pattern shown in the photograph?
No. The image does not reveal the hidden seams, original yarn specifications, or row-by-row construction. This tutorial is an original interpretation using a flat-panel method. Its color placement and overall proportions are inspired by the photograph, but the precise curved wedge construction has not been reproduced.
Conclusion
This blue and cream crochet handbag pattern provides a measured starting point for constructing a color-block accessory with circular wooden handles. The design combines dense cotton fabric, a separate gusset, reinforced attachment tabs, and an optional lining. Before making the full bag, crochet a gauge swatch and compare the resulting dimensions with the project specifications. Photograph the completed front, side, and handle attachments to document any adjustments. Share the finished project on Pinterest or Instagram with #BlueCreamCrochetHandbag, including the yarn weight and hook size used. Which arrangement of navy, royal blue, light blue, and cream produces the most balanced geometric front panel?









