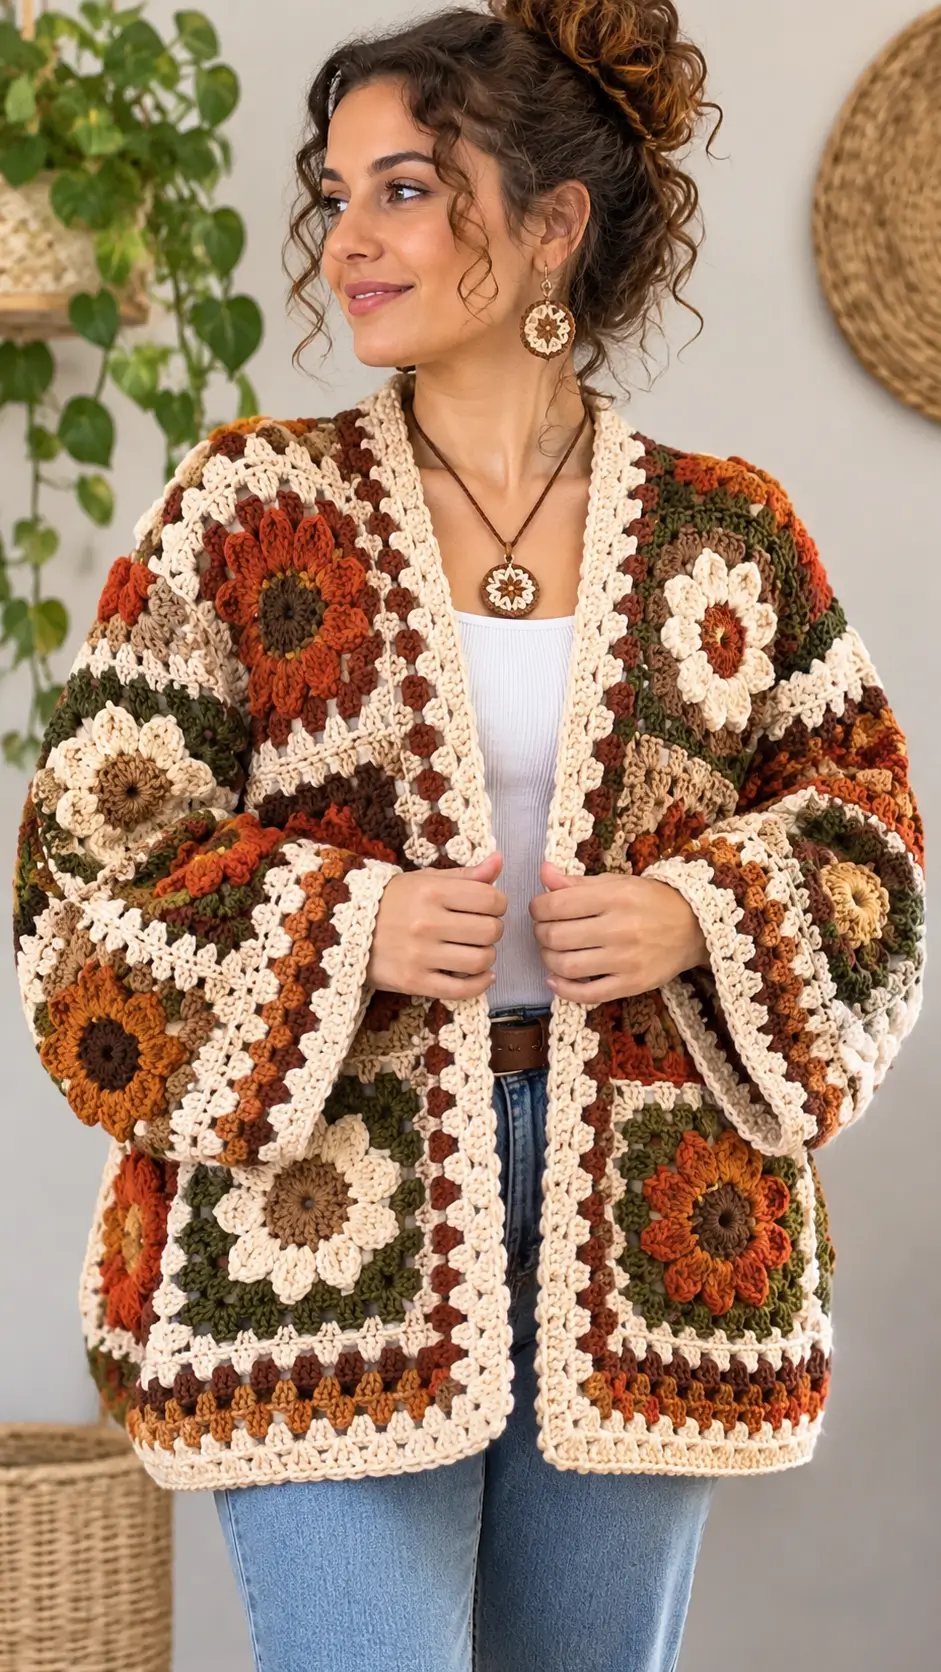
Burnt-orange flowers turn this cardigan into a patchwork of autumn color rather than a conventional striped garment. This autumn flower granny square crochet cardigan combines dimensional floral motifs with cream, olive, rust, taupe, and brown rounds. The relaxed open-front construction uses joined squares, wide sleeves, and a structured cream border. A medium-weight yarn keeps the floral texture visible while allowing the finished cardigan to drape comfortably.
The Design: What Makes This Floral Cardigan Different
The cardigan is built from individual flower granny squares instead of one continuous fabric. Each motif begins with a compact center, develops into a raised eight-petal flower, and then changes into a traditional square through background rounds. Alternating flower colors prevents the finished garment from looking like a repeated grid.
The second structural decision is the oversized silhouette. Wide sleeves and generous body panels give the square motifs enough room to remain flat instead of stretching across the shoulders. A cream front band stabilizes the open edges.
The main construction failure is joining motifs before blocking them. Even a 1 cm difference between squares multiplies across a full cardigan panel and can produce uneven hems or twisted sleeves.
Project Information at a Glance
| Skill Level | Construction | Motif Size | Hook | Fit |
|---|---|---|---|---|
| Intermediate | Joined floral granny squares | Approx. 16–18 cm | 5.0 mm | Relaxed / oversized |
Materials and Tools
Yarn
- Warm Cream — worsted weight #4 — main edging and joining color
- Burnt Orange — worsted weight #4 — flower petals and accent rounds
- Olive Green — worsted weight #4 — backgrounds and accent rounds
- Dark Brown — worsted weight #4 — flower centers
- Caramel Brown — worsted weight #4 — flowers and background
- Taupe — worsted weight #4 — neutral flower variation
- Rust — worsted weight #4 — secondary accent
For an adult oversized cardigan, total yarn consumption can vary substantially with garment dimensions. Make and weigh one completed square before purchasing the final quantity.
Tools
- 5.0 mm crochet hook
- Yarn needle
- Scissors
- Stitch markers
- Measuring tape
- Blocking mats
- Rust-resistant blocking pins
Abbreviations
- MR — magic ring
- ch — chain
- sc — single crochet
- hdc — half double crochet
- dc — double crochet
- tr — treble crochet
- sl st — slip stitch
- sp — space
- st/sts — stitch/stitches
- BLO — back loop only
Cardigan Construction
The garment is assembled from four main sections: back panel, two front panels, and two wide sleeves. The floral squares are completed and blocked individually before assembly.
Do not select a fixed number of motifs until one finished square has been washed and blocked. The blocked measurement controls every garment dimension.
3D Autumn Flower Granny Square
The photographed cardigan mixes orange, cream, caramel, and neutral flowers. Use the same structural motif while changing the flower and background colors.
Flower Center
Round 1: With dark brown or caramel yarn, make an MR. Ch 1 and work 8 sc into the ring. Join with sl st. (8)
Round 2: Ch 1. Work 2 sc in each stitch around. Join. (16)
Round 3: Ch 1. *Sc in next stitch, 2 sc in next stitch.* Repeat around. Join. (24)
Fasten off if changing color.
Petal Foundation
Join the flower color in any stitch.
Round 4: *Ch 5, skip 2 stitches, sl st in next stitch.* Repeat around to create eight petal loops.
Check the loop count before continuing. The flower requires eight evenly distributed petals.
Raised Petals
Round 5: Into each ch-5 loop work:
(sc, hdc, 3 dc, hdc, sc)
Repeat in all eight loops.
Fasten off.
Second Petal Layer
For a deeper flower similar to the raised motifs in the image, join yarn behind Round 4.
Round 6: *Ch 7, anchor with sl st behind the space between the next two petals.* Repeat eight times.
Round 7: Into each ch-7 loop work:
(sc, hdc, 2 dc, 3 tr, 2 dc, hdc, sc)
Repeat around.
The outer petals should extend beyond the first layer without folding completely over it.
Converting the Flower into a Square
The flower has eight sections, while the cardigan needs four structural corners. Use every second space behind the petals as a corner position.
Background Round 1
Join olive, cream, taupe, or another background color behind the flower.
Place a marker in four spaces positioned approximately 90 degrees apart.
In each marked corner space work:
(2 dc, ch 2, 2 dc)
Across each side, work groups of 3 dc into the available spaces behind the petals, separated by ch 1 where needed.
Repeat around and join.
Background Round 2
Sl st to the nearest corner.
In each corner work:
(3 dc, ch 2, 3 dc)
Work 3 dc into each ch-1 space along the sides.
Join with sl st.
Contrast Round
Change to a contrasting autumn color.
Work standard granny groups along each side:
3 dc in each space, ch 1 between groups.
At every corner work:
(3 dc, ch 2, 3 dc)
Cream Structural Round
Change to cream.
Repeat one granny-square round, maintaining the four marked corners.
The cream round visually separates neighboring motifs and gives the joining seam a consistent color.
Final Square Round
Work one final round in olive, rust, brown, cream, or another color from the palette.
Use hdc rather than dc if the square is already close to the target measurement.
Finish with a light sc round if additional edge stability is required.
Target Motif Size
Block every finished square to the same dimensions. A practical target for this cardigan is approximately 16–18 cm square.
Measure:
- Top edge
- Bottom edge
- Left edge
- Right edge
- Both diagonals
The two diagonals should differ by no more than approximately 5 mm after blocking.
Flower Color Variations
Burnt Orange Flower
Use dark brown for the center, burnt orange for both petal layers, olive for the first background, and cream for the structural rounds.
Cream Flower
Use caramel for the center, cream for the petals, olive for the background, and rust or brown for the accent round.
Caramel Flower
Combine dark brown center stitches with caramel petals, taupe background, and cream framing.
Rust Flower
Use a brown center, rust petals, olive background, and alternating cream and caramel outer rounds.
Planning the Cardigan Size
Measure the wearer’s bust circumference and add approximately 15–25 cm of positive ease for the relaxed fit shown in the image.
Example:
Bust measurement: 100 cm
Desired positive ease: 20 cm
Target garment circumference: 120 cm
If one blocked square measures 17 cm:
120 ÷ 17 = approximately 7 motif widths
This calculation is only a starting point. Because the cardigan remains open at the front, distribute the total width between the back and two front panels according to the desired front opening.
Back Panel
Lay blocked squares on a flat surface before joining.
A relaxed adult back may begin with approximately three to four motifs across, depending on motif size and wearer measurements.
Continue the grid upward until the panel reaches the required shoulder height.
Alternate flower colors rather than placing all orange flowers in one vertical line.
Front Panels
Construct two mirrored rectangular panels.
Each front should generally be narrower than half of the back because the cardigan is designed to remain open.
Lay the front panels beside the back before joining the shoulders. Confirm that both fronts contain the same number of square rows.
Shoulder Joining
Place the front and back panels with the correct sides facing.
Join the shoulder sections using cream yarn.
A slip-stitch seam produces a visible raised line. A mattress-style sewn seam creates a flatter connection.
Leave the center open for the neckline.
Side Seams and Armholes
Join each side upward from the hem.
Stop when the remaining opening is large enough for the upper arm plus approximately 8–12 cm of ease.
Measure both armholes before fastening off. They must contain the same number of motif edges or equivalent stitch spaces.
Wide Crochet Sleeves
The sleeves in this design are deliberately roomy. They can be assembled from floral squares or from a mixture of flower motifs and conventional granny sections.
Measure the upper arm before choosing the number of motifs around the sleeve.
For example, if a blocked square measures 17 cm, two squares provide only about 34 cm before seaming. Three square widths provide about 51 cm. Select the layout from the actual arm measurement rather than from a fixed motif count.
Sleeve Assembly
Arrange the required motifs into a rectangle.
Join the vertical edges to form a tube.
Attach one end of the tube evenly around the armhole.
Keep the seam positioned under the arm.
Alternative Granny Stitch Sleeve Sections
To reduce the weight of the sleeves, work some sections directly in granny stitch rather than filling the entire sleeve with dimensional flowers.
Attach yarn around the armhole and work:
*3 dc in next space, ch 1, skip to next space.*
Repeat around.
Change among cream, rust, olive, caramel, and brown every one or two rounds.
Decrease gradually toward the wrist if a narrower cuff is preferred.
Wide Sleeve Cuffs
The reference cardigan has a broad finished sleeve edge rather than a tight ribbed cuff.
With cream yarn, work one sc round around the wrist opening.
Continue with 3–5 rounds of hdc.
For additional structure, finish with one BLO sc round.
Block both cuffs to the same circumference.
Open Front Band
The cream front band is one of the main structural elements of the cardigan.
Join cream yarn at one lower front corner.
Work evenly upward along the first front, around the back neckline, and down the second front.
Band Row 1
Work sc evenly around the entire opening.
Band Row 2
Ch 2 and work hdc in each stitch.
Band Row 3
Work sc BLO around the opening.
Band Rows 4–6
Alternate hdc and sc rows until the band measures approximately 3–5 cm.
Do not increase around the back neck unless the band begins pulling inward.
Lower Hem
Join cream yarn at one lower corner.
Work one sc row across the bottom.
Follow with two or three hdc rows.
For a slightly firmer finish, work the final row in BLO sc.
The finished hem should remain level when the cardigan is hanging vertically.
Joining the Granny Squares
A cream joining yarn works well because the motif edges already contain cream sections.
Slip-Stitch Join
Place two blocked squares with wrong sides together.
Insert the hook through corresponding outer loops and work a relaxed sl st seam.
Do not tighten the slip stitches. A rigid join can shorten the seams and cause the garment panels to buckle.
Flat Sewn Join
Thread cream yarn onto a yarn needle.
Match corresponding stitches and sew through the outer loops.
This method produces less surface bulk and works particularly well around the shoulder area.
Motif Placement
Spread all completed squares on the floor or a large table before assembly.
A balanced arrangement can follow these rules:
- Do not place two identical flower colors directly beside each other when avoidable.
- Distribute dark brown centers throughout the garment.
- Keep cream flowers separated by darker motifs.
- Use olive backgrounds in several different areas rather than one block.
- Place visually strong burnt-orange flowers near the shoulders and lower fronts.
Estimating Yarn
The most reliable method is to weigh one completed and blocked square.
For example, if one motif weighs 60 g and the cardigan requires 32 motifs:
60 g × 32 = 1,920 g
Add the yarn required for sleeves, seams, front band, cuffs, and hem, then include approximately 10% for swatching and finishing.
Dimensional flowers consume considerably more yarn than flat granny-square centers, so a cardigan of this type can become heavy. A lighter worsted yarn or DK yarn can be used when lower garment weight is a priority.
Making a Lighter Version
Use DK #3 yarn with approximately a 4.0–4.5 mm hook.
The motifs will become smaller, so recalculate the number of squares from the blocked measurement.
Another option is to use dimensional flowers only on the front panels and upper sleeves while making the back from flat granny squares in the same autumn palette.
Making a Longer Cardigan
Add one complete row of motifs before constructing the lower hem.
If one blocked square measures 17 cm, one extra motif row adds approximately 17 cm before edging.
Check garment weight before adding two or more extra rows. Heavy cotton yarn can stretch vertically after repeated wear.
Optional Pockets
Make two additional floral granny squares.
Block them to exactly the same dimensions.
Work 1–2 extra cream rows along the upper edge of each pocket.
Pin the pockets to the lower front panels approximately 5–8 cm above the hem.
Sew three sides securely while leaving the upper edge open.
Assembly
- Crochet all flower motifs and complete every square to the same round count.
- Wash or damp-block the motifs to one consistent measurement before planning the garment.
- Arrange and join the squares for the back panel, keeping the color distribution balanced.
- Construct two mirrored front panels and join them to the back across the shoulders.
- Join the side seams while leaving equal openings for both sleeves.
- Construct the sleeve panels, seam them into tubes, and attach them evenly around the armholes.
- Finish both sleeve openings with matching cream cuffs.
- Work the continuous cream band around both front edges and the back neckline.
- Add the lower hem, weave in every yarn tail, and reinforce the flower centers where necessary.
- Block the assembled cardigan to its final measurements and allow it to dry flat before wearing.
The completed cardigan should hang with level front edges, equal sleeve lengths, flat joining seams, and raised flowers that remain clear of the structural seams.
7 Technical Tips
- Squares differ by more than 1 cm: do not force them together during joining. Reblock the oversized motifs or remake those that cannot reach the target measurement without distortion.
- Flowers collapse into the background: the outer petals were attached too tightly. Leave enough space behind each petal so the second layer can sit approximately 1–2 cm above the square.
- Shoulder seams become bulky: four layers of raised flower fabric are meeting in the same area. Position the motifs so large petals do not sit directly over the shoulder joining line.
- Front bands wave: too many stitches were placed along the motif edges. Remove approximately one stitch every few centimeters until the band lies flat without pulling the fronts inward.
- Sleeves feel restrictive: measure the upper arm before joining the sleeve tube. Include approximately 8–12 cm of ease for the oversized silhouette instead of relying only on the number of squares.
- The cardigan stretches vertically: dimensional motifs and worsted yarn have produced excessive weight. Allow the assembled body to hang for several hours before finalizing sleeve and hem lengths.
- Joining seams pucker: slip stitches have been pulled tighter than the square edges. Use a hook 0.5 mm larger for the joining process if maintaining relaxed seam tension is difficult.
Care and Blocking
Follow the washing instructions specified for the selected yarn. A large floral cardigan is best supported during washing rather than lifted while saturated with water.
Press excess water out without twisting. Lay the garment flat and reshape the front edges, hem, sleeves, and flower petals.
Measure both sleeves from shoulder to cuff. Check the two front edges from shoulder to hem before the cardigan dries.
Store the finished cardigan folded rather than on a narrow hanger. The weight of dimensional granny squares can stretch the shoulders during long-term hanging.
Conclusion
This autumn flower granny square crochet cardigan uses dimensional flowers, traditional granny construction, and a cream structural border to turn an autumn palette into a wearable patchwork garment. Begin with one complete flower square, block it, and record its exact width and weight before calculating the body layout. That single measurement determines the number of motifs, sleeve circumference, cardigan length, and approximate yarn requirement. After completing your version, share the finished color arrangement on Pinterest or Instagram with #AutumnFlowerGrannyCardigan. For the main flowers, would you use more burnt orange like the photographed cardigan, or make cream flowers the dominant motif?









