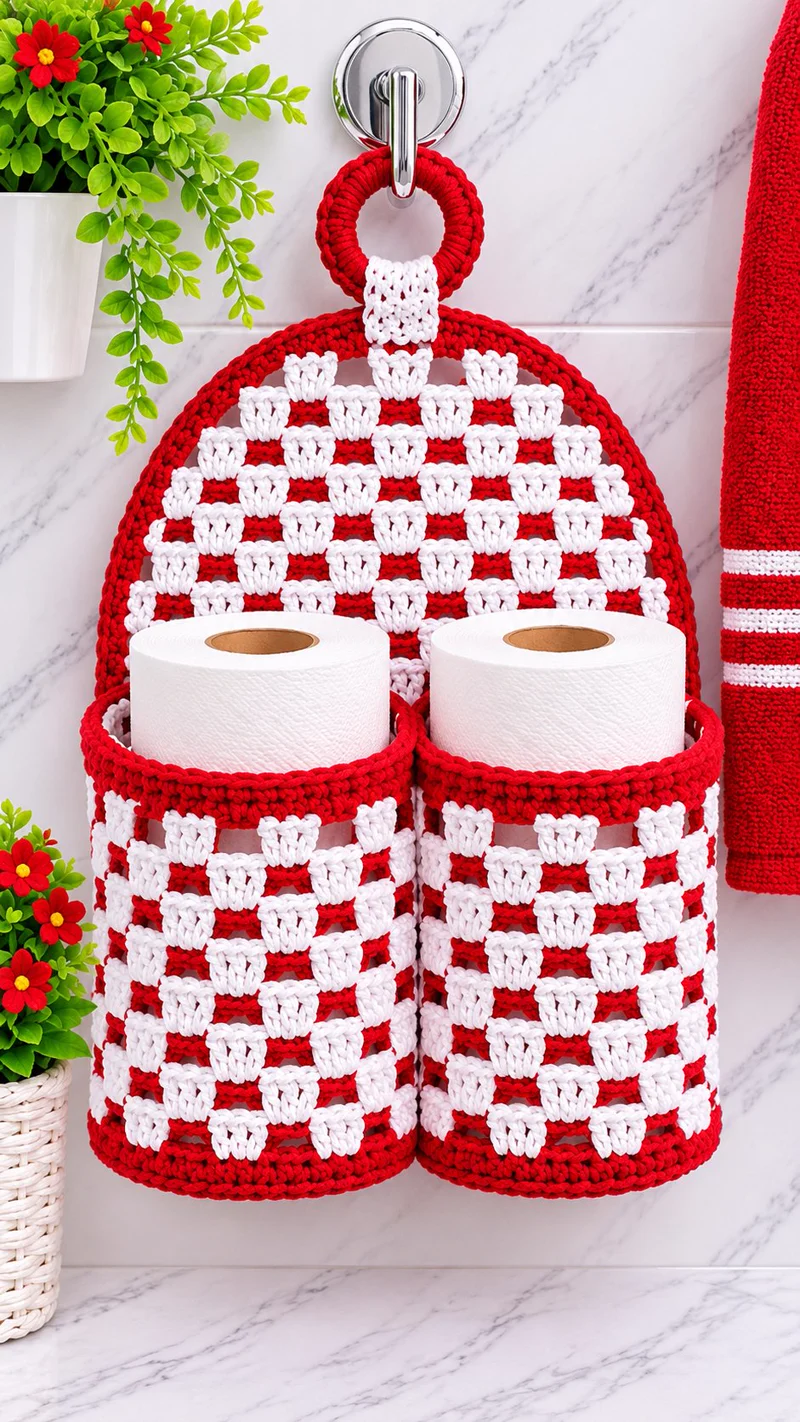
Two toilet paper rolls need separate cylindrical supports if they are to hang side by side without collapsing inward. This crochet toilet paper roll holder pattern uses red cotton yarn, white cluster stitches, a shaped backing panel, and a reinforced hanging ring to create compact bathroom storage. Designed for intermediate crocheters, the organizer targets approximately 40 cm in height and keeps two spare rolls accessible without taking up shelf space.
The Design: What Makes This Double Holder Different
The defining feature of this hanging crochet toilet paper organizer is its paired basket construction. Each roll sits inside a separate cylinder, so removing one does not disturb the other. Both compartments attach to a common backing panel, which spreads the load toward the central hanging loop.
Red single crochet rounds create horizontal structure, while white three-double-crochet clusters produce an open checkerboard appearance. The clusters are offset between pattern repeats to prevent long vertical openings.
Unlike a standard crochet bathroom storage basket, this design must support its contents while hanging vertically. A reinforced upper rim limits stretching, and a firm circular base helps maintain the basket diameter.
One frequent mistake is making the compartments too narrow. Measure the actual toilet paper rolls before committing to the basket circumference. The backing should also remain flat under load.
Project Information
| Detail | Specification |
|---|---|
| Skill Level | Intermediate |
| Estimated Time | 8–12 hours |
| Target Height | Approximately 40 cm |
| Target Basket Diameter | 12–13 cm |
| Crochet Hook | 4.0 mm |
| Yarn Weight | Medium-weight cotton, category 4 |
| Construction | Joined rounds, flat rows, sewn assembly |
| Best For | Bathroom wall storage |
Pattern note: This is an original, photo-inspired design rather than an exact reconstruction of the photographed item. Measurements and yarn quantities are working estimates. The pattern has not yet been physically tested.
Materials and Tools
Yarn
Use smooth cotton yarn with limited stretch. The design has clearly defined stitch edges, making tightly twisted cotton a practical choice.
- Red cotton yarn: Worsted weight, approximately 200–250 g. Suggested brand: Lily Sugar’n Cream.
- White cotton yarn: Worsted weight, approximately 80–120 g. Suggested brand: Lily Sugar’n Cream.
- Additional red yarn: Reserve approximately 15 g from the red allocation for seams, edging, and wrapping the hanging ring.
These are purchasing estimates rather than measured consumption. Actual yarn requirements depend on gauge, basket dimensions, and the number of cluster repeats.
Tools
- 4.0 mm crochet hook
- Yarn needle with a blunt tip
- Stitch markers, at least four
- Scissors
- Measuring tape
- Plastic or metal ring, approximately 5–6 cm in diameter
- Plastic canvas, optional for reinforcement
- Two toilet paper rolls for checking the fit
- Secure wall hook suitable for the loaded organizer
Crochet Abbreviations
| Abbreviation | Meaning |
|---|---|
| MR | Magic ring |
| ch | Chain |
| sc | Single crochet |
| dc | Double crochet |
| hdc | Half double crochet |
| inc | Two single crochets in one stitch |
| dec | Single crochet decrease |
| sl st | Slip stitch |
| st(s) | Stitch(es) |
| BLO | Back loop only |
| RS | Right side |
| WS | Wrong side |
| FO | Fasten off |
An invisible decrease is made by inserting the hook through the front loops of the next two stitches, then completing one single crochet through both.
Cluster stitch: Three double crochet stitches worked into one stitch or chain space, as directed.
Gauge target: Approximately 16 single crochets and 18 rows over 10 cm using a 4.0 mm hook. Make a gauge swatch and check the dimensions before starting.
Free Crochet Toilet Paper Roll Holder Pattern – Step by Step
The organizer consists of two circular basket bases, two patterned cylindrical walls, a flat backing panel, a hanging tab, and a covered ring.
The basket walls use joined rounds rather than a continuous spiral so that the white cluster rows remain level. The circular bases use continuous rounds.
Part 1: Crochet Basket Bases (Make 2)
Yarn: Red
Construction: Continuous rounds
Each basket begins with a flat circular base. The proposed 60-stitch circumference is intended for standard toilet paper rolls, but the diameter must be checked against the rolls you plan to store.
R1: 6 sc in MR (6)
R2: Inc ×6 (12)
R3: (1 sc, inc) ×6 (18)
R4: (2 sc, inc) ×6 (24)
R5: (3 sc, inc) ×6 (30)
R6: (4 sc, inc) ×6 (36)
R7: (5 sc, inc) ×6 (42)
R8: (6 sc, inc) ×6 (48)
R9: (7 sc, inc) ×6 (54)
R10: (8 sc, inc) ×6 (60)
R11: Sc in each stitch around, BLO (60)
The final round creates a turning edge between the base and the vertical basket wall.
Place a stitch marker at the beginning of each round. Check the base against the underside of a toilet paper roll before continuing.
Do not fasten off. Continue directly into the basket wall.
Part 2: Red and White Basket Walls (Make 2)
Yarn: Red and white
Construction: Joined rounds
This section creates the alternating horizontal red lines and white open clusters visible in the photographed design.
The circumference contains ten six-stitch pattern repeats.
Foundation Rounds
R12: With red, sc in every stitch, join with sl st (60).
R13: Ch 1, sc in each stitch, join (60).
First White Cluster Row
R14: Join white. Ch 3 (counts as first dc), 2 dc in the same stitch, ch 3, skip 5 stitches. Repeat the sequence of 3 dc in the next stitch, ch 3, skip 5 stitches around, accounting for the starting cluster. Join to the top of the beginning ch 3. (30 dc + 30 chains)
The ten groups of three double crochets are separated by ten chain-3 spaces.
Red Stabilizing Rows
R15: Join red. Ch 1, sc in each dc and work 3 sc in each ch-3 space. Join (60).
R16: Ch 1, sc in each stitch around, join (60).
Second White Cluster Row
R17: Join white. Slip stitch into the third stitch of the round, ch 3, 2 dc in the same stitch, ch 3, skip 5 stitches. Repeat around with the same six-position spacing. Join. (30 dc + 30 chains)
The starting position shifts the white clusters relative to the previous cluster row.
R18: Join red. Work 1 sc in every dc and 3 sc in every ch-3 space. Join (60).
R19: Ch 1, sc around, join (60).
Repeat the Cluster Sequence
R20: Repeat R14 (60 stitch/chain units).
R21: Repeat R15 (60).
R22: Repeat R16 (60).
R23: Repeat R17 (60 stitch/chain units).
R24: Repeat R18 (60).
R25: Repeat R19 (60).
R26: Repeat R14 (60 stitch/chain units).
R27: Repeat R15 (60).
R28: Repeat R16 (60).
R29: Repeat R17 (60 stitch/chain units).
R30: Repeat R18 (60).
R31: Repeat R19 (60).
Reinforced Upper Rim
R32: With red, sc around (60).
R33: Sc around (60).
R34: Reverse sc around for a firm decorative edge (60).
Fasten off and weave in the ends.
Check the height after R31. Add another complete three-round cluster sequence if the basket does not reach the upper edge of your toilet paper roll. The number of repeats may differ from the photographed item.
Part 3: Shaped Crochet Back Panel (Make 1)
Yarn: Red and white
Construction: Flat rows with a shaped upper section
The backing supports both baskets and transfers their weight to the central hanging tab.
The photographed panel has a rounded top. This written version uses a tapered upper section with edging to soften the outline rather than reproducing the exact semicircle.
Lower Rectangular Section
With red, ch 61.
Row 1: Sc in the second chain from the hook and each chain across, ch 1, turn (60).
Rows 2–4: Sc across, ch 1, turn (60).
Row 5: Join white. Sc across, ch 1, turn (60).
Rows 6–7: Red sc across, ch 1, turn (60).
Row 8: White sc across, ch 1, turn (60).
Rows 9–10: Red sc across, ch 1, turn (60).
Rows 11–20: Repeat the color arrangement of Rows 5–10 as needed, maintaining 60 stitches per row.
Upper Shaping
Change to red.
Row 21: Dec, sc 56, dec, ch 1, turn (58).
Row 22: Dec, sc 54, dec, ch 1, turn (56).
Row 23: Dec, sc 52, dec, ch 1, turn (54).
Row 24: Dec, sc 50, dec, ch 1, turn (52).
Row 25: Dec, sc 48, dec, ch 1, turn (50).
Row 26: Dec, sc 46, dec, ch 1, turn (48).
Row 27: Dec, sc 44, dec, ch 1, turn (46).
Row 28: Dec, sc 42, dec, ch 1, turn (44).
Row 29: Dec, sc 40, dec, ch 1, turn (42).
Row 30: Dec, sc 38, dec, ch 1, turn (40).
Row 31: Dec, sc 36, dec, ch 1, turn (38).
Row 32: Dec, sc 34, dec, ch 1, turn (36).
Row 33: Dec, sc 32, dec, ch 1, turn (34).
Row 34: Dec, sc 30, dec, ch 1, turn (32).
Row 35: Dec, sc 28, dec, ch 1, turn (30).
Row 36: Dec, sc 26, dec, ch 1, turn (28).
Row 37: Dec, sc 24, dec, ch 1, turn (26).
Row 38: Dec, sc 22, dec, ch 1, turn (24).
Row 39: Dec, sc 20, dec, ch 1, turn (22).
Row 40: Dec, sc 18, dec, ch 1, turn (20).
Row 41: Dec, sc 16, dec, ch 1, turn (18).
Row 42: Dec, sc 14, dec, ch 1, turn (16).
Row 43: Dec, sc 12, dec, ch 1, turn (14).
Row 44: Dec, sc 10, dec, ch 1, turn (12).
Row 45: Dec, sc 8, dec, ch 1, turn (10).
Row 46: Dec, sc 6, dec, ch 1, turn (8).
Row 47: Dec, sc 4, dec, ch 1, turn (6).
Fasten off, leaving a 25 cm tail.
Outer Edging
Join red yarn at the bottom right corner.
Work one round of evenly spaced single crochet around the entire panel. At the lower corners, place 3 sc into the corner stitch to prevent pulling.
Work a second edging round using single crochet, adding stitches at the curved or angled sections as necessary to keep the panel flat.
Block the panel before assembly. A plastic-canvas insert can be cut to fit inside a doubled backing if extra support is required.
Part 4: White Hanging Tab (Make 1)
Yarn: White
Construction: Flat rows
Ch 9.
Row 1: Sc in the second chain from the hook and across (8).
Rows 2–14: Ch 1, turn, sc across (8).
Fasten off, leaving a 30 cm sewing tail.
Fold the strip around the hanging ring and overlap the ends behind the upper center of the backing.
The finished tab should hold the ring upright without allowing it to rotate freely.
Part 5: Crochet-Covered Hanging Ring (Make 1)
Yarn: Red
Construction: Single crochet worked around a rigid ring
Use a 5–6 cm metal or plastic ring.
Attach red yarn with a slip knot.
R1: Work approximately 45–55 sc around the ring, pushing the stitches together until the ring is fully covered.
Join with sl st.
Fasten off, leaving a 20 cm tail.
The stitch count depends on ring thickness and diameter. Cover the ring completely without overlapping stitches or leaving large exposed sections.
Part 6: Basket Reinforcement (Make 2)
Yarn: Red
Construction: Surface stitching and sewn reinforcement
The upper rims must resist stretching when both baskets contain full rolls.
Work an additional line of surface slip stitches immediately below each basket rim.
If the baskets appear too flexible, add a second row of surface slip stitches approximately 1 cm below the first.
For extra base support, cut two circles of washable plastic canvas slightly smaller than the crocheted bases. Secure them inside the baskets using small stitches through the crochet fabric.
Do not use cardboard inserts in a bathroom because moisture can cause distortion.
How to Assemble the Crochet Toilet Paper Holder
- Prepare the backing. Lay the panel right side up on a flat surface. Check that the lower edge is straight and the upper section is centered.
- Position the baskets. Place both cylinders side by side on the lower section of the backing, keeping their upper rims level.
- Check the spacing. Insert one toilet paper roll into each basket. Adjust the spacing until the baskets touch lightly without forcing their walls inward.
- Mark the attachment points. Use stitch markers to identify the side and rear contact areas of each cylinder. Keep the front openings unobstructed.
- Sew the first basket. Attach the rear portion of the left cylinder to the backing using red yarn and firm whip stitches.
- Attach the second basket. Repeat for the right cylinder, checking that both bases sit at the same height.
- Secure the basket sides. Add short reinforcement seams where the two baskets meet and where their upper edges touch the backing. Avoid sewing through the roll openings.
- Attach the hanging tab. Fold the white tab through the covered ring, then sew both tab ends securely to the upper center of the backing.
- Reinforce the hanging point. Work several additional passes of stitching through the tab and backing. Test the assembly by gradually adding the two rolls while supporting the organizer from below.
- Finish the organizer. Weave all yarn tails through at least 5 cm of surrounding stitches, trim loose ends, and mount the holder on a secure wall hook away from direct water spray.
The completed organizer has two separate roll compartments supported by a shared hanging panel.
7 Technical Tips for a Better Crochet Toilet Paper Holder
- Prevent stitch-count drift. Place a marker at the first stitch of each circular round and recount after every increase round. A 60-stitch basket base should contain exactly ten six-stitch pattern repeats.
- Check the basket diameter. Measure the largest toilet paper roll you plan to store before making both bases. Allow approximately 0.5–1 cm of clearance so the roll can be removed without pulling the basket out of shape.
- Control the white cluster spacing. Each cluster row uses ten groups of three double crochets separated by chain-3 spaces. An extra chain can create an uneven opening and distort the following red row.
- Avoid excessive stretching. Cotton fabric may lengthen when the organizer is loaded, particularly around the hanging tab. Reinforce the tab with several sewing passes and test it with both rolls before mounting.
- Keep the backing flat. Pin the shaped panel to a flat surface before attaching the baskets. A difference of more than 1 cm between the left and right attachment heights can make the organizer hang unevenly.
- Check the rim tension. A loose upper rim can flare outward and allow the toilet paper roll to tilt. If the rim stretches visibly, work another firm round of single crochet with a slightly smaller hook.
- Secure the yarn tails. Weave each finishing tail through at least 5 cm of dense crochet fabric, reversing direction once. Short unsecured tails can loosen around the basket seams after repeated loading.
How to Adjust the Pattern for Different Toilet Paper Roll Sizes
Toilet paper rolls vary in diameter and height. Some standard rolls fit a basket approximately 12 cm wide, while larger rolls may require 14 cm or more.
For a wider basket, add another increase round to the base before beginning the walls. Each additional six-increase round adds six stitches to the circumference, which can be incorporated into one additional cluster repeat.
For a taller basket, repeat the white cluster and red stabilizing sequence before finishing the upper rim.
When changing the basket diameter, adjust the width of the backing accordingly. Both compartments must fit without overlapping excessively or extending beyond the supported portion of the panel.
The hanging tab should remain centered over the combined weight of the two filled baskets.
Frequently Asked Questions
Can beginners make this crochet toilet paper holder?
A crocheter who already understands single crochet, double crochet, increases, decreases, and working in rounds can follow the main construction. The most demanding sections are the white cluster spacing, shaped backing, and basket assembly.
What yarn works best for a hanging toilet paper organizer?
Medium-weight cotton is a practical option because it produces defined stitches and can be worked firmly. Cotton blends can also be used, but highly elastic yarn may cause the hanging baskets to stretch.
How much yarn is needed?
For this original design, plan approximately 200–250 g of red cotton and 80–120 g of white cotton. These quantities are estimates rather than measured results from a completed sample.
Can the organizer hold jumbo toilet paper rolls?
Possibly, but the basket circumference must be increased. Measure the roll diameter and height, then adjust the circular bases and cylindrical walls before assembling the organizer.
How should the finished holder be washed?
Follow the care instructions for the selected yarn. If removable plastic-canvas inserts are used, take them out before washing. Reshape the organizer while damp and dry it flat to reduce stretching.
Can I use different colors?
Yes. The construction does not depend on red and white yarn. High-contrast color combinations make the cluster arrangement easier to see, while matching colors create a subtler texture.
Final Thoughts
This crochet toilet paper roll holder pattern combines two cylindrical baskets, a shaped backing panel, contrasting cluster stitches, and a reinforced hanging ring. Its modular construction allows the basket diameter and height to be adjusted for different toilet paper brands.
Before making a second organizer, record the actual finished measurements, yarn consumption, and any changes required for your preferred rolls. These details will make future versions more consistent.
Share a photograph of the completed organizer on Pinterest or Instagram using #DoubleCrochetToiletPaperHolder, and include the yarn weight and hook size used.
Would a rounded semicircular backing or a narrower rectangular backing provide better support for your bathroom wall arrangement?









