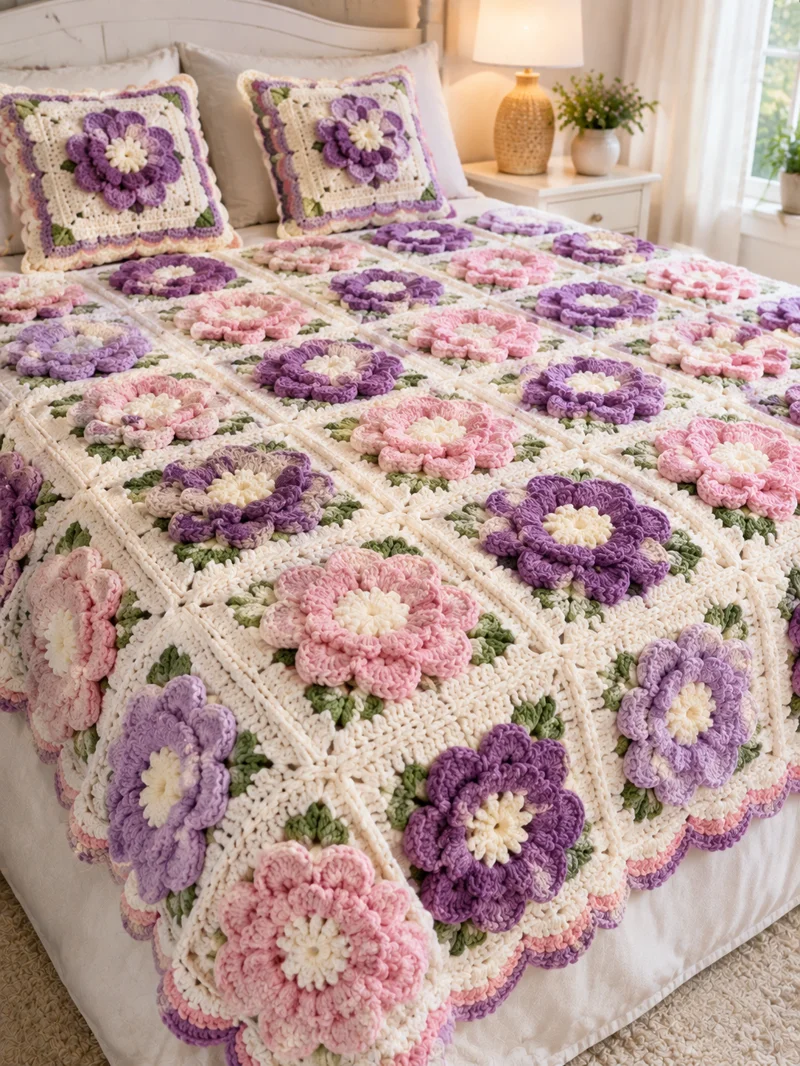
Raised flower petals change the thickness of a crochet bedspread at every motif center. This 3D flower granny square crochet blanket pattern uses ivory squares, pink and purple layered flowers, green leaf accents, and a scalloped edge. Designed for intermediate crocheters using worsted yarn and a 5 mm hook, the proposed 160 × 200 cm blanket uses 80 squares. Its modular construction allows individual sections to be replaced or resized without remaking the entire cover.
The Design: What Makes This Floral Bedspread Different
Three structural decisions define this floral bedspread.
First, the flowers are made separately from the square backgrounds. This allows the petals to remain raised instead of being compressed into flat rounds. You can also control flower placement before attaching each appliqué.
Second, ivory square backgrounds separate the pink and purple motifs. Green leaf details create a visual transition between the flowers and the cream-colored fabric. A raised flower granny square benefits from this separation because the dimensional petals already introduce substantial texture.
Third, the squares are assembled into a regular grid. A consistent blocked measurement prevents the finished crochet flower bedspread from developing uneven edges.
One common mistake is adding large flowers before blocking the square backgrounds. Complete and measure the backgrounds first, then attach the dimensional elements.
Project Info at a Glance
| Detail | Specification |
|---|---|
| Skill Level | Intermediate |
| Estimated Time | 65–100 hours |
| Finished Size | Approximately 160 × 200 cm plus border |
| Crochet Hook | 5 mm |
| Yarn Weight | Worsted / Category 4 |
| Construction | Raised flowers on joined granny squares |
| Number of Squares | 80 |
| Main Stitches | sc, hdc, dc, tr, ch, sl st |
| Best For | Bedspreads, throws, decorative cushions |
Measurements and working time are planning estimates. Make and measure a sample before purchasing yarn for the complete blanket.
Materials and Tools
Yarn
Choose yarns of the same weight and similar fiber composition to reduce differences in tension, washing behavior, and finished dimensions.
- Ivory / cream: Approximately 1,800–2,400 g of worsted-weight yarn.
- Blush pink: Approximately 400–600 g.
- Lavender: Approximately 250–400 g.
- Deep purple: Approximately 250–400 g.
- Sage green: Approximately 150–250 g.
- Pale yellow or ivory for flower centers: Approximately 100–150 g.
These amounts are provisional purchasing allowances, not measured yarn consumption. Weigh one completed motif and calculate the actual quantities before buying the full supply.
Suitable yarn ranges include Stylecraft Special Aran, Paintbox Yarns Simply Aran, and comparable washable worsted-weight yarns.
Tools
- 5 mm crochet hook for the main squares.
- 4.5 mm crochet hook for firmer flower centers, if needed.
- Tapestry needle for sewing and weaving ends.
- Locking stitch markers for identifying corners and joins.
- Scissors and measuring tape.
- Blocking mats and rust-resistant pins.
- Digital kitchen scale for measuring yarn consumption.
- Two pillow inserts for the optional matching cushions.
Crochet Abbreviations
All instructions use US crochet terminology.
| Abbreviation | Meaning |
|---|---|
| MR | Magic ring |
| ch | Chain |
| sc | Single crochet |
| hdc | Half double crochet |
| dc | Double crochet |
| tr | Treble crochet |
| sl st | Slip stitch |
| st / sts | Stitch / stitches |
| sp | Space |
| inc | Increase |
| dec | Decrease |
| BLO | Back loop only |
| FLO | Front loop only |
| rep | Repeat |
| RS / WS | Right side / Wrong side |
An invisible decrease is made through the front loops of two adjacent stitches, although decreases are not required for the main blanket construction.
3D Flower Granny Square Crochet Pattern – Step by Step
This blanket is constructed from separate ivory granny squares decorated with raised floral appliqués. The squares are joined into a rectangular panel and finished with a scalloped border.
Pattern note: This is an original, image-inspired design rather than a reproduction of the photographed maker’s instructions. The complete motif and final gauge should be tested before making all 80 squares.
Part 1: Ivory Granny Square Background (Make 80)
Yarn: Ivory
Hook: 5 mm
The square background provides a stable foundation for the raised flower. Each corner contains two groups of three double crochets separated by two chains.
A beginning ch 3 counts as the first dc. Join each round with a slip stitch to the top of the beginning chain.
Round 1: Make MR. Ch 3, 2 dc, ch 2. Work (3 dc, ch 2) three more times into the ring. Join. (12 dc, four corner ch-2 spaces)
Round 2: Sl st to the first corner space. Work (ch 3, 2 dc, ch 2, 3 dc) in that corner. Ch 1. Work (3 dc, ch 2, 3 dc) in each remaining corner, placing ch 1 between corners. Join. (24 dc, four corner spaces, four side ch-1 spaces)
Round 3: Sl st to a corner. Work (3 dc, ch 2, 3 dc) in that corner. Ch 1, 3 dc in the next side space, ch 1. Repeat the corner and side sequence around. Join. (36 dc, four corner spaces, eight side ch-1 spaces)
Round 4: Work the same corner groups. Place one 3-dc cluster in each side ch-1 space, with ch 1 between adjacent groups. Join. (48 dc, four corner spaces, 12 side ch-1 spaces)
Round 5: Repeat the established granny-square pattern. (60 dc, four corner spaces, 16 side ch-1 spaces)
Round 6: Repeat. (72 dc, four corner spaces, 20 side ch-1 spaces)
Round 7: Repeat. (84 dc, four corner spaces, 24 side ch-1 spaces)
Round 8: Repeat. (96 dc, four corner spaces, 28 side ch-1 spaces)
Fasten off and weave in the ends.
Block the square and measure its width. If it is smaller than the desired 20 cm, add complete granny rounds. If it is larger, remove rounds or adjust the hook size.
Part 2: Raised Flower Centers (Make 80)
Yarn: Pale ivory or yellow.
The center forms the foundation for the layered flower petals.
R1: 6 sc in MR. Join. (6)
R2: Inc in every stitch. Join. (12)
R3: (Sc, inc) six times. Join. (18)
R4: (2 sc, inc) six times. Join. (24)
R5: Ch 1, sc in each stitch. Join. (24)
Fasten off, leaving a 20 cm sewing tail.
Use a smaller hook if the center appears too loose. Do not add stuffing, since the layered petals provide the raised texture.
Part 3: Inner Flower Petals (Make 80 Sets)
Yarn: Blush pink, lavender, or deep purple.
Each flower contains six inner petals worked around its 24-stitch center.
Petal repeat: Sl st in the first stitch of a four-stitch group. Ch 2, hdc in the next stitch, 2 dc in the following stitch, hdc in the fourth stitch. Ch 2, sl st back into the fourth stitch.
Repeat across all six groups to form six petals.
Fasten off and secure the yarn on the wrong side.
The inner petals should remain slightly narrower than the outer layer. This difference in diameter helps the flower maintain its dimensional appearance.
Part 4: Outer Flower Petals (Make 80 Sets)
Yarn: Pink, lavender, or deep purple.
Attach the yarn behind the inner petals, at the base of the first petal.
Foundation round: Ch 5, sl st behind the next petal base. Repeat around until six ch-5 loops are formed.
Petal round: Work (sc, hdc, 3 dc, tr, 3 dc, hdc, sc) into each ch-5 loop. Repeat for all six loops.
Fasten off and leave a 25 cm sewing tail.
Optional Second Outer Petal Layer
For a fuller flower, attach a contrasting shade behind the first outer layer.
Make six ch-6 foundation loops around the back of the flower.
Work (sc, hdc, 4 dc, tr, 4 dc, hdc, sc) into each loop.
Repeat for all six petals, then fasten off.
This additional layer creates a fuller profile, particularly when light lavender and deep purple are combined within the same flower.
Part 5: Green Leaf Accents (Make 160)
Yarn: Sage green.
Each flower receives two leaves positioned beneath opposite sides of the petals.
R1: Ch 8. Starting in the second chain from the hook, work sl st, sc, hdc, dc, dc, hdc, sc. (7 stitches)
Rotate the work and crochet into the unused loops along the opposite side of the foundation chain.
R2: Work sc, hdc, dc, dc, hdc, sc, sl st. (7 stitches)
Fasten off, leaving a 15 cm tail.
For a more pointed leaf, add ch 2 at the turning end before working the opposite side.
Position each leaf so that its tip extends beyond the flower petals but remains within the ivory square.
Part 6: Attach the Flowers to the Granny Squares
Place a blocked ivory square on a flat surface with the right side facing upward.
Position the completed flower in the center. Check that its petals extend evenly toward all four corners.
Thread the long sewing tail through a tapestry needle. Sew through the flower’s central foundation and the background square.
Do not sew down the outer petal edges. Their free edges create the raised floral appearance.
Attach two sage-green leaves beneath opposite sides of the flower. Sew along the center of each leaf while leaving the edges free.
Repeat for all 80 squares.
Part 7: Arrange the Flower Colors
For the proposed 8 × 10 layout, prepare:
- 40 pink flower squares.
- 20 lavender flower squares.
- 20 deep purple flower squares.
Arrange the squares on a clean floor or large table before joining.
Alternate the pink and purple motifs across the rows. Use lavender squares to break up repeated dark-purple clusters.
Photograph the layout before moving the squares. The photograph will serve as a placement reference during assembly.
Part 8: Join the Granny Squares
Yarn: Ivory.
A flat slip-stitch join produces a defined grid. A mattress stitch can be used instead when a less visible seam is preferred.
For the slip-stitch method, place two squares with wrong sides together and align the corresponding edge stitches and chain spaces.
Insert the hook through matching edge loops, yarn over, and pull through all loops to form a slip stitch.
Continue along the edge, matching every granny cluster and chain space.
Join the squares into eight horizontal rows of ten squares. Then connect the rows using the same method.
Check the intersections where four corners meet. The squares should remain flat without twisting or gathering.
If each blocked square measures 20 cm, the central panel will measure approximately 160 × 200 cm before the border.
Part 9: Scalloped Crochet Blanket Border
Yarn: Ivory, blush pink, and deep purple.
The border uses a foundation round, a transition round, and a decorative shell edging.
Border Round 1 – Ivory: Join yarn at a corner. Work sc evenly around the blanket, placing 3 sc in each corner. Adjust stitch spacing to keep the border flat. Join with sl st.
Border Round 2 – Blush Pink: Ch 1, sc in every stitch around. Work 3 sc in the center corner stitch. Join.
Border Round 3 – Purple Scallops: Repeat *skip 2 stitches, 5 dc in next stitch, skip 2 stitches, sc in next stitch* along each side.
Adjust the spacing near corners so a scallop or corner fan sits neatly at each corner.
Border Round 4 – Optional Ivory Detail: Work loose slip stitches around the outer edge of each scallop to create a contrasting outline.
Fasten off and weave in all yarn tails.
The scallop repeat uses six foundation stitches. Test the repeat on one side before working around the full blanket.
Part 10: Matching Crochet Flower Pillow Covers (Make 2)
Matching pillow covers repeat the floral colors and layered flower construction of the bedspread.
For a 40 × 40 cm pillow insert, make four 20 cm granny squares for each pillow front.
Arrange the squares in a two-by-two layout and join them using the same method as the blanket.
Attach one raised flower to each square. Alternatively, use a single larger flower centered on the front panel.
For the back panel, crochet a solid rectangle using double crochet rows. Make a foundation chain to the required width, then work rows until the panel reaches the desired height.
Place the front and back together with wrong sides facing. Join three sides using single crochet.
Insert the pillow and close the remaining side with buttons or a sewn seam.
Finish with a narrow scalloped border.
A removable envelope or button closure is recommended when the pillow cover will need regular washing.
How to Assemble the Crochet Flower Bedspread
- Prepare the backgrounds. Crochet 80 ivory granny squares using consistent yarn tension. Measure the first five squares before continuing.
- Block the squares. Follow the yarn manufacturer’s blocking instructions and allow the pieces to dry completely.
- Make the flower centers. Crochet 80 ivory or pale-yellow centers and secure the starting ends.
- Build the petals. Add six inner petals and six outer petals to each center. Add a second outer layer if desired.
- Create the leaves. Crochet 160 sage-green leaves and arrange two beneath each flower.
- Attach the flowers. Sew the flower bases to the centers of the ivory squares, leaving the outer petals free.
- Plan the layout. Arrange the squares in eight rows of ten, distributing pink, lavender, and purple motifs.
- Join the squares. Connect the squares into rows, then join the rows into one rectangular panel.
- Work the border. Add the ivory foundation, pink transition round, and purple scalloped edging.
- Finish the project. Weave in all yarn tails, inspect the seams, block the blanket as needed, and complete the matching pillow covers.
The completed bedspread consists of a joined floral panel with dimensional flowers, green accents, and a multicolored scalloped border.
7 Technical Tips for Better Crochet Results
- Control square dimensions. A 5 mm variation across ten squares can produce a cumulative width difference of 5 cm. Measure and block each square to the same target dimension.
- Prevent loose flower centers. Visible gaps can appear when the center is worked too loosely. Try a 4.5 mm hook for a firmer foundation.
- Keep the petals raised. Sewing through the outer petal edges flattens the flower. Attach each appliqué through its central foundation instead.
- Avoid distorted seams. Tight slip stitches can shorten the joining edge and pull squares inward. Compare the joined length with the original square edges after every two squares.
- Secure color-change tails. Loose purple or pink ends can become visible against ivory stitches. Weave each tail through at least 5 cm of matching-color stitches and reverse direction.
- Prevent border rippling. Too many stitches in the foundation round cause the scalloped border to flare outward. Lay the blanket flat after the first border round and correct excess stitches.
- Maintain consistent petal tension. Different yarn brands can change flower diameter by several millimeters. Make one pink and one purple sample before producing all the motifs.
How to Customize the Blanket Size
The number of squares determines the central panel dimensions. Once the first square has been blocked, multiply its finished width by the number of columns and its height by the number of rows.
| Blanket Type | Square Layout | Approximate Size |
|---|---|---|
| Baby Blanket | 4 × 5 | 80 × 100 cm |
| Small Throw | 6 × 7 | 120 × 140 cm |
| Large Throw | 7 × 9 | 140 × 180 cm |
| Decorative Bedspread | 8 × 10 | 160 × 200 cm |
| Larger Bedspread | 10 × 11 | 200 × 220 cm |
These measurements assume a blocked square size of 20 cm and exclude the additional width of the outer border.
For a bedspread that hangs over the mattress sides, measure the mattress width and add twice the desired side drop. Apply the same calculation to the foot of the bed.
How Much Yarn Do You Need?
Raised flower blankets often consume more yarn than flat granny square blankets because the petals create multiple layers of crochet fabric.
The most reliable method is to make and weigh a complete sample square.
Weigh the ivory background, flower, leaves, and decorative details separately. Record the yarn consumption for each color.
Multiply the measured quantities by the number of squares, then add yarn for joining and the border. Include approximately 10–15% extra for adjustments and waste.
For example, if one finished square uses 35 g of yarn, 80 squares require approximately 2,800 g before joining and edging. This is an example calculation rather than a measured requirement for this pattern.
Purchase matching dye lots where possible. Small differences in ivory shades may become visible across a large joined panel.
Washing and Caring for Your Crochet Flower Blanket
Check the care instructions for every yarn used in the blanket. Different fibers may require different washing temperatures and drying methods.
For washable acrylic or cotton-blend yarn, a gentle machine cycle may be suitable if permitted by the manufacturer. Use a laundry bag for delicate pillow covers.
Avoid high dryer temperatures. Raised petals can lose their shape under excessive heat or aggressive agitation.
Dry the bedspread flat when practical, arranging the flower petals and border while the fabric is damp.
Do not hang a saturated heavy blanket from one narrow edge. The weight of wet yarn may stretch the joining seams.
Inspect the flower attachments periodically and reinforce loose sewing stitches before washing again.
Frequently Asked Questions
Is this crochet flower blanket suitable for beginners?
The basic granny square uses familiar stitches, but the raised flower layers, appliqué attachment, joining, and border require additional control.
Intermediate crocheters should be comfortable working in rounds, changing colors, and following stitch repeats. Beginners can practice the background squares before attempting the complete floral construction.
Can I use chunky yarn instead of worsted yarn?
Yes, but the squares and flowers will become larger and heavier. Choose a hook appropriate for the yarn and make a complete sample before calculating the blanket dimensions.
Chunky yarn also increases seam thickness. A flatter joining technique may be preferable for a bedspread.
Can I make the blanket without the green leaves?
Yes. The flowers can be attached directly to the ivory squares.
However, the green accents help separate the petals from the background and add contrast to the pastel color palette.
Should I crochet all the flowers before making the squares?
Either order is possible, but completing the background squares first is practical when exact blanket dimensions matter.
After blocking the squares, compare the flower diameter with the available space. Adjust the outer petal layer before making all 80 flowers.
How can I make the crochet flowers look fuller?
Add the optional second outer petal layer. Stagger the petals so the lower layer remains visible between the upper petals.
Leave the petal tips unattached to maintain the three-dimensional effect.
Can I make matching crochet pillow covers?
Yes. Use four granny squares to form a pillow front approximately 40 × 40 cm, depending on the blocked square gauge.
Attach raised flowers, add a solid crochet back, and finish with a narrow scalloped border. A removable closure makes the pillow cover easier to wash.
How do I prevent the granny squares from curling?
Curling may result from tight tension, uneven stitch heights, or inconsistent increases at the corners.
Check the stitch counts, use a consistent hook size, and block the squares before joining. If a square continues to curl, adjust the tension or hook size and make another sample.
Can I sell finished blankets made from this pattern?
Finished handmade blankets may generally be sold, subject to applicable laws and any restrictions associated with materials or other patterns used.
When adapting another designer’s written instructions, check their terms before reproducing or distributing the pattern itself.
Conclusion
The completed floral bedspread combines repeating ivory squares, raised flower appliqués, green leaf accents, and a multicolored scalloped border. Its modular construction makes it possible to adjust the blanket dimensions while keeping the same decorative design.
Before producing all 80 motifs, crochet one complete sample and record its blocked dimensions, yarn consumption, and flower diameter. Use those measurements to finalize the material quantities and bedspread layout.
Save this 3D flower granny square crochet blanket pattern to Pinterest, and share photographs of the finished project on Instagram using #3DFlowerGrannySquareBlanket.
For this particular design, would you alternate pink and purple flowers evenly, or concentrate the darker purple flowers around the outer edge?








