Introduction
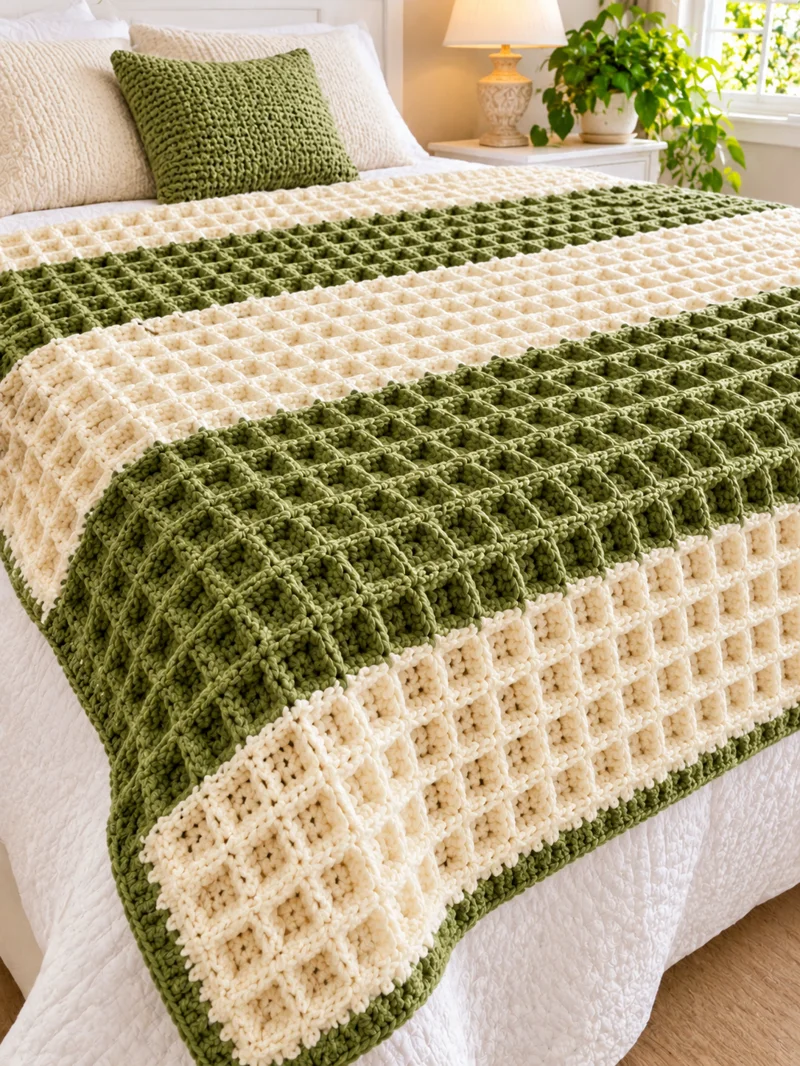
The alternating olive-green and cream bands give this waffle blanket five distinct horizontal sections, while raised post stitches form the square-grid surface. This chunky waffle stitch crochet blanket pattern uses bulky yarn, a 6.5 mm hook, and a planned 120 × 150 cm finished size. Suitable for intermediate crocheters, the construction uses repeatable rows and a simple border. Its color layout makes it practical for coordinating a bed throw with neutral bedding.
The Design: What Makes This Blanket Different
The main structural feature is the combination of a raised waffle grid and broad color bands. Rather than changing yarn every few rows, this two-color crochet blanket uses longer sections to keep the surface visually organized.
The second decision concerns stitch depth. Front-post double crochet stitches sit forward of the surrounding fabric, creating raised vertical columns. Alternating their placement on successive rows produces recessed squares. This technique gives a textured crochet blanket more thickness than a plain double crochet fabric.
Third, a narrow olive-green border frames the cream sections without competing with the central pattern. It also provides a more consistent outer edge.
A common mistake is allowing the front-post columns to shift sideways after a color change. You must preserve the established stitch sequence. The next row should follow the previous row’s stitch positions, not restart the pattern at a different point.
Project Info at a Glance
| Skill Level | Intermediate |
|---|---|
| Estimated Time | 25–40 hours |
| Target Finished Size | 120 × 150 cm |
| Suggested Hook | 6.5 mm |
| Yarn Weight | Bulky, category 5 |
| Construction | Flat, turned rows |
| Best For | Bed throws, sofa blankets, textured home décor |
Measurements, time, and quantities are planning estimates. The pattern requires physical testing to confirm the final measurements.
Materials and Tools
Yarn
Choose a bulky category 5 yarn with consistent thickness. The photographed blanket has a thick, rounded yarn appearance, but its exact fiber composition cannot be identified visually.
- Olive green bulky yarn: approximately 1,200–1,500 g for the green sections and border.
- Warm cream bulky yarn: approximately 900–1,200 g for the cream sections.
- Recommended fiber: acrylic, washable wool blend, or a comparable bulky blanket yarn.
Buy yarn according to meterage as well as weight. Two skeins weighing 100 g can contain very different lengths depending on fiber, construction, and thickness. Purchase enough yarn from the same dye lot to maintain consistent color across the blanket.
Tools
- 6.5 mm crochet hook, adjusted after gauge testing.
- Stitch markers, at least four.
- Tapestry needle with a large eye.
- Sharp scissors for cutting yarn.
- Flexible measuring tape for width and length checks.
- Blocking mats, optional for final shaping.
- Digital kitchen scale, useful for estimating yarn consumption.
Abbreviations
| Abbreviation | Meaning |
|---|---|
| ch | Chain |
| sc | Single crochet |
| dc | Double crochet |
| FPdc | Front-post double crochet |
| sl st | Slip stitch |
| st(s) | Stitch(es) |
| RS | Right side |
| WS | Wrong side |
| rep | Repeat |
| sp | Space |
Understanding the Waffle Stitch
The waffle stitch relies on a combination of ordinary double crochet stitches and raised post stitches. A front-post double crochet is worked around the vertical post of a stitch from the previous row, rather than into the two loops at the top.
To make one FPdc, yarn over and insert the hook from front to back and then front again around the designated stitch post. Yarn over, pull up a loop, and complete the double crochet normally.
The result sits in front of the surrounding stitches.
In this pattern, Row 2 establishes the first set of raised posts. Row 3 places the raised stitches in a different arrangement. Repeating these two rows creates the recessed squares.
Keep the same stitch count on every row. Post stitches replace regular double crochets; they are not added as extra stitches.
Gauge and Blanket Sizing
A gauge swatch is necessary because bulky yarn varies substantially between manufacturers.
For the planned blanket, use a provisional working gauge of approximately 10 stitches and 8 rows per 10 cm, measured in the waffle pattern after resting the fabric. This is a calculation target, not a verified sample measurement.
How to Make a Gauge Swatch
- Chain 20.
- Work the foundation and waffle pattern instructions below to create 18 stitches per row.
- Continue for at least 14 rows.
- Lay the swatch flat without stretching.
- Measure the central 10 cm in both directions.
- Count the stitches and rows within that area.
- Change hook size if necessary and repeat the test.
If the sample has more stitches per 10 cm than the target, the finished blanket will be narrower. Fewer stitches mean a wider result.
For a custom width, calculate the required stitch count from the measured gauge. Round that count to a multiple of three, then add two chains for the foundation.
Pattern – Step by Step
Construction Notes
This blanket is worked flat in turned rows, not in a continuous spiral. US crochet terminology is used throughout.
The beginning chain 2 on subsequent rows does not count as a stitch. The sample instructions use 120 stitches per row. Every main-fabric row must retain exactly 120 stitches.
The planned stripe sequence contains 120 total rows, divided into five sections. With the provisional gauge of eight rows per 10 cm, this gives a fabric length of approximately 150 cm before border effects.
Foundation Chain
Yarn: olive green.
Chain 122.
Row 1 (RS): Dc in the third chain from the hook and in every remaining chain. Turn. (120 sts)
Count all 120 double crochet stitches before continuing. The foundation row establishes the width and gives the front-post stitches a complete row of posts to work around.
Waffle Stitch Row A
Row 2 (WS): Ch 2. Dc in the first stitch. *FPdc around the next stitch, dc in each of the next 2 stitches.* Repeat from * 39 times. FPdc around the next stitch, dc in the last stitch. Turn. (120 sts)
This row produces a repeated arrangement of raised posts separated by two ordinary double crochet stitches. The first and final stitches remain regular double crochets to form a consistent edge.
Waffle Stitch Row B
Row 3 (RS): Ch 2. Dc in the first stitch. *Dc in the next stitch, FPdc around each of the next 2 stitches.* Repeat from * 39 times. Dc in the next stitch, FPdc around the next stitch. Turn. (120 sts)
Row 3 places the front-post stitches in pairs, creating the horizontal structure of the waffle texture. The final stitch is a post stitch, so check the edge tension carefully.
Rows 4 onward: Repeat Rows 2 and 3 alternately, maintaining 120 stitches per row.
The waffle grid becomes clearer after several rows. Check that the raised columns and horizontal bars form regular rectangles rather than diagonal lines.
Section 1 – Olive Green
Yarn: olive green.
Work Rows 1–20 in olive green, using the foundation row followed by the alternating waffle sequence. The first green section contains 20 rows total.
After Row 20, prepare to join cream yarn. Because Row 20 follows Row A, the next row must follow Row B. Do not restart at Row 2 simply because the yarn color changes.
Section 2 – Warm Cream
Yarn: warm cream.
Join the cream yarn while completing the final yarn-over of the last stitch in Row 20.
Rows 21–50: Continue the established waffle sequence for 30 rows. (120 sts per row)
Row 21 follows Row B. Row 22 follows Row A. Continue alternating.
The cream band should contain the same number of stitches as the green section. Measure its width after ten rows to check for changes in tension.
At the end of Row 50, change back to olive green.
Section 3 – Olive Green
Yarn: olive green.
Rows 51–70: Continue the waffle sequence for 20 rows. (120 sts per row)
This green band is shorter than the neighboring cream sections. Check the fabric on a flat surface after Row 60. The side edges should remain parallel, and the raised grid should line up with the previous sections.
Complete Row 70 and change to cream.
Section 4 – Warm Cream
Yarn: warm cream.
Rows 71–100: Continue the waffle sequence for 30 rows. (120 sts per row)
The second cream band matches the first cream band in row count. For a balanced stripe arrangement, keep both cream sections at the same tension. Differences in stitch height can make one band visibly longer.
Change to olive green after Row 100.
Section 5 – Olive Green
Yarn: olive green.
Rows 101–120: Continue the waffle sequence for 20 rows. (120 sts per row)
The final green section completes the five-band arrangement. At the end of Row 120, count the stitches and measure the length. If your row gauge differs from the target, adjust the number of rows before beginning the border.
| Section | Color | Rows |
|---|---|---|
| 1 | Olive green | 20 |
| 2 | Cream | 30 |
| 3 | Olive green | 20 |
| 4 | Cream | 30 |
| 5 | Olive green | 20 |
| Total | 120 | |
Crochet Border
Yarn: olive green.
The border is worked in joined rounds around the completed rectangular blanket.
Border Round 1: With the right side facing, work sc evenly around all four edges. Along the top and bottom, work approximately one sc per stitch. Along the row ends, begin with roughly two sc for every three rows, adjusting the spacing so the border lies flat. Work 3 sc in each corner. Join with a sl st.
Border Round 2: Ch 1. Work sc in every stitch around, placing 3 sc in the center stitch of each corner group. Join with a sl st.
Fasten off, leaving a 15 cm tail for weaving. The border is deliberately narrow. A wider edge would change the proportions of the green and cream sections and add weight to the finished throw.
How to Change Colors Without Distorting the Waffle Grid
Color changes should occur at the end of a completed row. Work the last stitch until two loops remain on the hook. Drop the old yarn, yarn over with the new color, and pull through both loops.
Turn the work and continue with the next scheduled waffle row. This places the new color at the row boundary without adding an extra stitch.
Leave a tail of approximately 15–20 cm. Weave the tail into the same-colored section after the blanket is complete.
Avoid carrying the unused yarn across a full cream section. A dark green strand may show through the recessed squares, especially when the fabric stretches.
The same issue occurs when loose tails are woven across the face of the waffle texture. Work through the backs of several stitches instead.
How Much Yarn Does a Waffle Stitch Blanket Need?
Waffle crochet typically consumes more yarn than a flat double crochet fabric of comparable dimensions. The front-post stitches use additional yarn to travel around the existing posts, and the resulting fabric is thicker.
For this design, a preliminary purchasing allowance is 2,100–2,700 g of bulky yarn in total. That estimate must be checked against the chosen yarn’s meterage and a weighed swatch.
The green sections account for half of the planned rows, with additional green yarn required for the border. The cream sections account for the other half.
A more dependable estimate comes from weighing a swatch.
Suppose a 20 × 20 cm swatch weighs 35 g. The planned blanket area is 120 × 150 cm, or 18,000 square centimeters.
Divide 18,000 by 400 to get 45 swatch-sized areas. Multiply 45 by 35 g to obtain 1,575 g for the main fabric. Add a separate allowance for the border and approximately 10% for yarn ends, sampling, and variation.
This example illustrates the calculation method; 35 g is hypothetical.
Assembly and Finishing
- Lay the blanket flat with the right side facing upward.
- Check that all five stripe sections are present and correctly ordered.
- Count the stitches across the final row.
- Inspect the first and last stitches of each row for accidental increases.
- Check the raised waffle grid for misplaced front-post stitches.
- Secure each color-change tail on the wrong side.
- Weave the tails through several neighboring stitches without pulling the fabric tight.
- Check that the border corners lie flat.
- Wash or block the blanket according to the selected yarn label.
- Allow the fabric to dry fully before measuring the final dimensions.
The blanket is complete when all yarn ends are secured and the finished fabric has been measured.
7 Technical Tips for a Better Waffle Stitch Blanket
- Prevent lost edge stitches. Place a marker in the first and last stitch of each row; the stitch count should remain at 120 throughout the main fabric.
- Avoid uneven foundation tension. If the foundation edge pulls inward by more than approximately 2 cm compared with the main fabric, remake it with a larger hook.
- Correct misplaced front-post stitches. A raised post worked around the wrong stitch can interrupt the grid, so inspect every 6–10 rows before continuing.
- Control color-change bulk. Leave approximately 15–20 cm tails and weave them into matching color sections rather than tying large knots at the edge.
- Check thick-yarn tension. If a 10 cm gauge sample differs by more than one stitch from your target, change hook size or recalculate the foundation width.
- Pin the border corners before finishing. A corner that curls upward often needs more evenly spaced edge stitches, while a wavy edge generally contains too many.
- Secure the final yarn tails. Weave each tail through at least 8–10 cm of neighboring stitches, reverse direction, and trim only after checking that the tail remains secure.
Common Crochet Blanket Problems and Fixes
Why Is the Waffle Texture Not Forming Squares?
The front-post stitch positions may have shifted. Check the last correct row and compare the stitch sequence with Rows 2 and 3. Each new row must use the correct alternating arrangement.
Why Are the Sides of the Blanket Getting Narrower?
The most likely cause is a missing stitch at the beginning or end of a row. Count all 120 stitches and mark the edge positions. If several rows are already affected, correcting the mistake early prevents a visibly tapered blanket.
Why Is the Border Rippling?
Too many stitches may have been worked along the side edges. Remove the border and reduce the number of stitches placed into the row ends. Keep the corners at three single crochet stitches each.
Can the Blanket Be Made With Worsted Yarn?
Yes, but the foundation count, hook size, yarn quantity, and row count will need recalculation. Worsted-weight waffle blankets commonly use smaller hooks than bulky-yarn versions, depending on the desired gauge.
Can I Make the Blanket Wider?
Yes. Add stitches in groups of three, then add the two foundation chains required by this pattern. For example, 150 working stitches require a foundation chain of 152. This preserves the waffle repeat while increasing the width.
Conclusion
The olive-green and cream stripe arrangement gives this blanket a defined structure, while alternating front-post stitches create the raised waffle grid. Before making the full project, crochet and measure a gauge swatch, then calculate yarn requirements using the actual fabric weight. The chunky waffle stitch crochet blanket pattern can be adjusted by changing the foundation width in multiples of three and modifying the number of rows.
Save the finished blanket to a Pinterest crochet board, or share a photograph of the completed project on Instagram using #OliveGreenWaffleBlanket.
For your version, would you keep the five broad green-and-cream sections or change their widths to suit a larger bed?








