Introduction
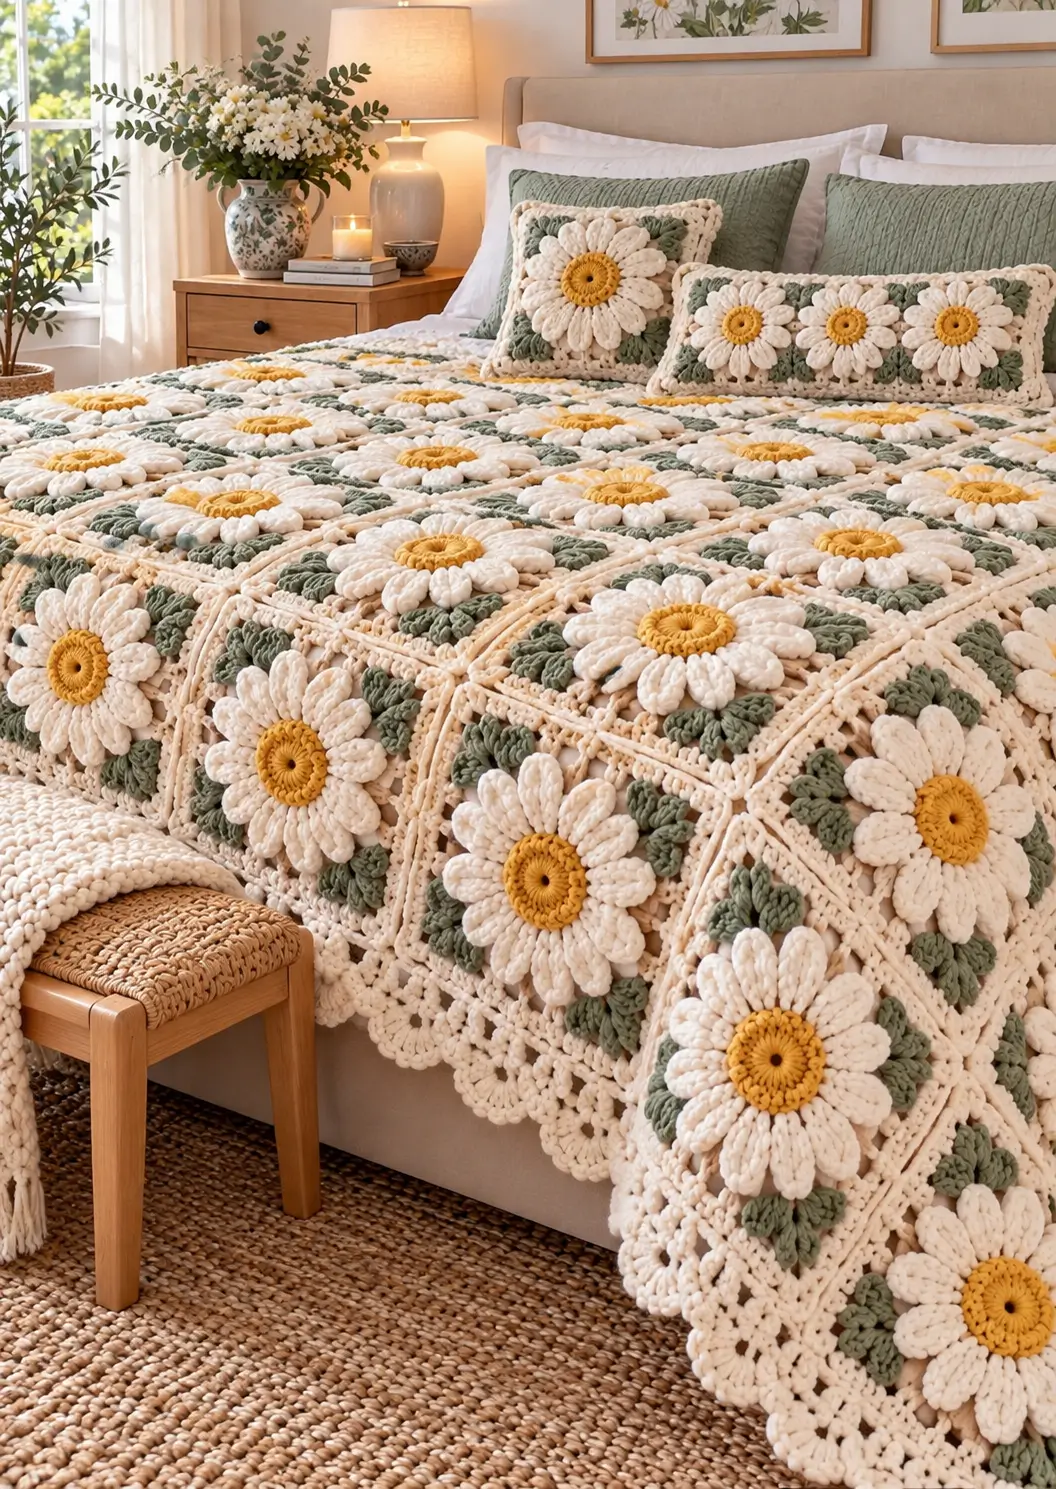
A daisy loses its proportions when the yellow center becomes wider than the combined bases of its raised white petals. This 3D daisy granny square crochet bedspread uses mustard centers, dimensional ivory petals, sage leaves and cream structural squares. Work it in medium-weight yarn with a 5.0 mm hook. The modular intermediate construction suits a full bedspread because individual squares can be blocked and measured before joining.
The Design: What Makes This Daisy Bedspread Different
The flower sits above the structural square rather than carrying the joining load itself. That distinction matters. A dense mustard center supports the raised ivory petals, four sage leaf groups fill the corners, and a cream square surrounds the entire composition. The joins therefore remain flat even though the daisies project strongly from the surface. Comparable 3D daisy squares use petals laid over the square for a raised effect, and a documented Aran-weight example measures 11 × 11 cm with a 5.0 mm hook. Another current daisy blanket pattern uses worsted yarn and the same 5.0 mm hook. For the larger bedspread proportions visible here, additional cream framing rounds bring the target block to approximately 20–22 cm.
Project Info at a Glance
| Skill Level | Construction | Target Square | Hook | Best For |
|---|---|---|---|---|
| Intermediate | Raised daisy over structural granny square | 20–22 cm | 5.0 mm | Bedspreads, throws and matching pillows |
Materials and Tools
Yarn
- Mustard yellow — medium/worsted #4 — flower centers
- Warm ivory — medium/worsted #4 — petals and main square
- Sage green — medium/worsted #4 — leaves
- Optional cream — medium/worsted #4 — joining and outer border
Use yarns with similar meterage per 100 g. Published 3D daisy-square patterns commonly use medium or Aran yarn with a 5.0 mm hook, while DK versions may use a 3.5 mm hook. The heavier option better matches the pronounced texture and large motifs visible in this bedspread.
Tools
- 5.0 mm crochet hook
- Medium/worsted #4 yarn
- Yarn needle
- Scissors
- Locking stitch markers
- Tape measure
- Blocking mats and pins
- Digital kitchen scale
Abbreviations
- MR — magic ring
- ch — chain
- sl st — slip stitch
- sc — single crochet
- hdc — half double crochet
- dc — double crochet
- tr — treble crochet
- sp — space
- st/sts — stitch/stitches
- FO — fasten off
Pattern — 3D Daisy Granny Square
This is an original photo-inspired construction. The daisy, leaf placement and cream frame reproduce the general structure visible in the reference without transcribing a published pattern.
Mustard Daisy Center
With mustard yarn, make a MR.
Round 1: Ch 2, work 12 dc into MR. Join. (12)
Round 2: Ch 1, work 2 sc in each stitch around. Join. (24)
FO mustard.
The second round provides enough attachment points for twelve individual petals.
Ivory Petal Foundation
Join ivory to any stitch of Round 2.
Each petal uses two center stitches.
Petal 1: Ch 10.
Beginning in the second chain from the hook, work:
sc, hdc, dc, 3 tr, dc, hdc, sc.
Sl st into the next stitch of the mustard center.
Sl st into the following stitch to position the hook for the next petal.
Remaining Daisy Petals
Repeat the petal sequence around the center until there are 12 ivory petals.
Keep each starting chain at exactly ten chains.
After Petal 12, join at the base and FO.
Arrange the petals evenly around the mustard center before continuing.
Thickening the Petals
The petals in the reference are heavily textured rather than thin flat spokes.
Join ivory at the base of the first petal.
Work sc evenly up the first side.
At the tip work:
(sc, ch 2, sc).
Work sc down the opposite side.
Sl st at the base.
Repeat around all twelve petals.
FO.
Optional Extra-Raised Petals
For stronger three-dimensional relief, add one surface-slip-stitch line inside each petal.
Begin approximately 5 mm above the petal base.
Follow the petal toward its tip, stopping just before the ch-2 point.
Keep the slip stitches relaxed.
A tight surface line makes the petal curl excessively and can distort the flower center.
Sage Leaf — Make 4
With sage green, ch 8.
Beginning in the second chain from hook work:
sc, hdc, dc, 2 tr, dc, 3 sc in final chain.
Rotate to work along the unused side of the foundation chain.
Work:
dc, 2 tr, dc, hdc, sc.
Sl st at the base.
FO leaving approximately 20 cm for attachment.
Make four identical leaves.
Optional Double Leaf Cluster
The reference has substantial sage texture around the flower. For a fuller square, make 8 leaves instead of four.
Arrange them as two leaves at every corner.
Overlap each pair by approximately 10–15 mm.
Do not sew the outer halves down yet.
Cream Structural Square
The structural square is worked separately so the raised flower does not carry seam tension.
With cream, make a MR.
Round 1
Ch 3.
Work:
(3 dc, ch 3) ×4
into the ring.
Join.
You have four 3-dc groups and four corner spaces.
Round 2
Sl st into the first corner.
Work:
(3 dc, ch 2, 3 dc)
in each corner.
Ch 1 between corners.
Join.
Round 3
Sl st to the next corner.
In the corner work:
(3 dc, ch 2, 3 dc).
Ch 1.
Work 3 dc in the next side space.
Ch 1.
Repeat around.
Round 4
Continue the classic granny-square expansion.
Work:
(3 dc, ch 2, 3 dc)
in every corner.
Work 3 dc into each ch-1 side space with ch 1 between groups.
Round 5
Repeat Round 4.
Lay the flower over the square.
The ivory petals should remain inside the square perimeter, while the sage leaves can extend toward the four corners.
Solid Cream Framing Round
Work one round of hdc around the square.
Place one hdc in each dc and one hdc in each ch-1 space.
At each corner work:
(2 hdc, ch 2, 2 hdc).
This round creates a stronger joining edge than an entirely open granny structure.
Second Cream Frame
Ch 2.
Hdc in each stitch.
At every corner work:
(2 hdc, ch 2, 2 hdc).
FO.
Block the square before attaching the flower.
Target Square Size
Block the structural square to approximately 20–22 cm.
A documented 3D daisy granny square in Aran yarn with a 5.0 mm hook measures 11 × 11 cm, while other worsted daisy blanket designs also use a 5.0 mm hook. The larger target here comes from adding extra framing rounds to match the oversized bedspread motifs visible in the reference.
Attaching the Sage Leaves
Place one leaf diagonally toward each corner.
The pointed end should stop approximately 1.5–2 cm inside the outer cream edge.
Sew the lower half of each leaf to the square.
Leave the upper half slightly raised.
If using two leaves per corner, angle them apart to form a shallow V.
Attaching the Daisy
Center the flower over the structural square.
Pin the mustard center first.
Check the distance from the flower center to all four square edges.
Sew around the outer edge of the mustard center using matching yarn.
Add a small anchoring stitch near the base of every second petal.
Do not sew the full length of the petals to the background.
The free outer sections create the raised texture.
Checking the Finished Motif
Place the completed square on a flat surface.
The cream joining edge must touch the table on all four sides.
The daisy may project upward, but it must not pull the square corners inward.
If the cream edge lifts, one or more flower attachment stitches are too tight.
Master Square Measurements
Measure the first completed square in four directions:
- Top edge
- Bottom edge
- Left edge
- Right edge
Keep the difference below approximately 5 mm.
Then measure both diagonals.
Record these figures and use the square as the master for every subsequent motif.
Planning the Bedspread Grid
Assuming a blocked square of approximately 21 cm, the following layouts provide useful starting points:
| Grid | Squares | Approx. Motif Area |
|---|---|---|
| 5 × 6 | 30 | 105 × 126 cm |
| 6 × 8 | 48 | 126 × 168 cm |
| 8 × 10 | 80 | 168 × 210 cm |
| 9 × 11 | 99 | 189 × 231 cm |
| 10 × 12 | 120 | 210 × 252 cm |
The final border adds extra width and length. Measure the mattress and desired side drop before selecting the grid.
Yarn Estimation
Current daisy-square patterns demonstrate why a sample-based calculation is useful. One 11 cm Aran 3D daisy square uses approximately 18 m of yarn, while a 36 × 36 inch worsted daisy blanket lists approximately 1,801 yards. A larger textured square like this project will require more yarn per motif.
Make one complete square and weigh it.
Suppose the finished square weighs 65 g.
For an 80-square bedspread:
65 g × 80 = 5,200 g
Add the joining and outer-border yarn separately.
Then add approximately 10% for samples, gauge variation and repairs.
The 65 g figure is a calculation example rather than a fixed requirement.
Estimating Each Color
Weigh the yarn balls before and after completing the master square.
For example, if one square uses:
- 6 g mustard
- 24 g ivory petals
- 12 g sage
- 23 g cream background
For 80 squares the calculation becomes:
Mustard: 480 g
Ivory petals: 1,920 g
Sage: 960 g
Cream background: 1,840 g
Add joining and border yarn afterward.
Arranging the Squares
Place all blocked squares on a floor before joining.
Rotate each square so the leaf clusters point in the same diagonal directions.
Check the mustard centers from several meters away.
The centers should form straight horizontal and vertical lines.
A square rotated ninety degrees may not affect the flower itself, but asymmetrical leaf placement will reveal the error.
Flat Cream Join
Use cream for the seams.
Place two squares with right sides upward.
Insert the hook through corresponding edge loops.
Work loose slip stitches from one corner to the next.
Open the joined squares after every 5–6 cm.
The seam should remain flat rather than forming a ridge.
Alternative Mattress-Stitch Join
For a less visible seam, place two squares side by side and use a yarn needle.
Pass the cream yarn through corresponding edge loops.
Pull the seam closed only until the edges meet.
Do not cinch it.
This method leaves the dimensional daisies as the dominant surface feature.
Joining the Full Bedspread
Join the squares into horizontal rows first.
Lay every finished row back into its planned position.
Check the flower centers and sage leaves.
Join the rows vertically only after the complete arrangement has been verified.
This sequence reduces the chance of sewing one motif into the wrong orientation.
Matching Daisy Pillow — Square Version
The square cushion in the reference uses one enlarged central daisy.
Make one standard square but continue the cream background for additional rounds until the front matches the pillow insert.
For a 45 × 45 cm pillow, add enough hdc or granny rounds to approach 45 cm after blocking.
Keep the daisy centered.
Rectangular Daisy Pillow
The rectangular cushion repeats three flowers horizontally.
Make three smaller daisy squares.
Join them side by side with cream.
Add cream border rounds around the resulting rectangle until it matches the pillow insert.
Use identical mustard, ivory and sage yarns so the pillows remain visually connected to the bedspread.
Simple Pillow Back
With sage or cream, chain to the required width.
Row 1: Hdc in the third chain from hook and across.
Row 2: Ch 2, turn, hdc across.
Repeat until the panel matches the floral front.
Block the front and back separately before joining.
Joining the Pillow
Place the wrong sides together.
Using cream, sc through both layers along three sides.
Insert the pillow form.
Close the fourth side or add buttons for a removable cover.
Keep the raised flower clear of the seam while working.
Bedspread Border — Cream Foundation
Join cream at one corner of the assembled blanket.
Work sc evenly around the complete perimeter.
At each corner work:
(2 sc, ch 2, 2 sc).
Count the stitches on opposite edges.
They should be equal or differ only where the joining structure requires a small adjustment.
Openwork Border Round
Ch 1.
Sc in the first stitch.
Work:
ch 3, skip 2 sts, sc in next st.
Repeat around.
At each corner work a larger ch-5 space.
Second Openwork Round
Sl st into the first ch-3 space.
Work:
ch 4, sc in next ch-3 space.
Repeat around.
Use the ch-5 corner spaces as structural turning points.
Scalloped Outer Border
Into the first selected chain space work:
(sc, hdc, 5 dc, hdc, sc).
Repeat in each chain space around the blanket.
At the corners, work a slightly larger shell:
(sc, hdc, 7 dc, hdc, sc).
FO and weave in the final tail.
Optional Heavier Border
The reference has a substantial lower edge. For more weight, add one solid hdc round before the openwork border.
Keep the corner formula:
(2 hdc, ch 2, 2 hdc).
Stop adding solid rounds if the border begins to flare.
Keeping the Raised Daisies Practical
Maximum relief is not the goal on a functional bedspread.
The petal tips should rise approximately 1–2 cm above the cream square when relaxed.
If they stand much higher, they can fold irregularly during use and washing.
Attach the inner third of each petal if additional stability is required while leaving the outer section free.
Making a Flatter Version
Skip the petal reinforcement round.
Sew each petal at its base and midpoint.
Use only four sage leaves per square.
The flower will retain visible dimension but the overall blanket will be lighter and easier to fold.
Making a More Textured Version
Add the reinforcement round to every petal.
Use eight leaves per square.
Add one surface-slip-stitch line around the mustard center.
Keep the cream joining edges unchanged so the extra texture remains confined to the interior of each block.
Assembly
- Crochet one mustard center and twelve ivory petals, then add the reinforcement edging before measuring the completed daisy.
- Make four or eight sage leaves and arrange them diagonally beneath the flower without extending into the future seam area.
- Crochet one cream structural square, add its solid framing rounds and block it to approximately 20–22 cm.
- Center the daisy and sage leaves on the blocked square, sewing the center securely while leaving the outer petal sections raised.
- Use the completed motif as the master square and produce the remaining blocks to the same edge and diagonal measurements.
- Block every square before joining, keeping the dimensional petals free from the blocking pins wherever possible.
- Arrange the squares into the required bed-size grid and check that mustard centers form straight rows before beginning the seams.
- Join horizontal rows first with cream, then connect the completed rows vertically using the same relaxed seam.
- Work the cream structural and openwork border around the assembled bedspread, finishing with evenly distributed scallops.
- Make the matching pillow fronts, weave every yarn tail through dense stitches and complete a final light blocking of the joined fabric.
The completed bedspread should show an even cream grid supporting repeated raised daisies, with mustard centers aligned in rows and sage leaves remaining inside the joining boundaries.
7 Technical Tips
- Keep all twelve petal foundation chains at exactly ten chains. A one-chain difference can make a petal several millimeters longer after reinforcement and disrupt the circular flower outline.
- Leave at least 1.5 cm between the sage leaf tips and the square edge. Leaves that enter the joining zone create thick seams when two completed blocks meet.
- Check the flower center before sewing every second petal base. A center shifted more than about 5 mm becomes obvious once the squares form straight rows across the bed.
- Keep opposite square edges within 5 mm of the master block. Repeating a small sizing error across ten motifs can distort the complete bedspread by several centimeters.
- Limit petal relief to approximately 1–2 cm. Excessively raised petals fold over neighboring flowers and make the finished surface difficult to block evenly.
- Keep joining slip stitches loose enough for both squares to remain flat. A seam that contracts even 5 mm can create a visible channel between two rows of daisies.
- Weave structural tails through at least 5 cm of dense crochet. Avoid hiding center or joining tails through open border chains, where repeated washing can expose them.
Color Balance
The photographed palette depends on three clearly separated roles. Mustard is restricted to the flower centers. Ivory creates the largest high-relief area through the petals. Sage fills the space between flower and square, while cream acts as the structural background.
Do not increase the amount of mustard significantly. A wider yellow center changes the flower from a daisy-like proportion toward a sunflower-like proportion.
For a softer variation, replace mustard with muted ochre. For a cooler version, replace sage with dusty eucalyptus while keeping the ivory background unchanged.
Care and Final Blocking
Follow the yarn manufacturer’s washing instructions.
Support the entire bedspread when wet rather than lifting it from one corner.
Lay it flat and straighten the cream seam grid first.
Check the overall width at the top, middle and bottom.
Then reshape the border scallops.
Arrange the daisy petals by hand rather than pinning every raised petal flat. Their dimensional profile should remain visible after drying.
Store the bedspread loosely folded and avoid placing a permanent fold directly through the raised flower centers.
Conclusion
The flat cream square is what makes the dimensional flower practical in this 3D daisy granny square crochet bedspread. Crochet one complete 20–22 cm master block before calculating the bed size, and keep every sage leaf and raised petal away from the joining edge. Weigh that finished sample by color before purchasing the full yarn quantity. Then test four joined squares to check seam tension and flower spacing before producing the complete grid. Save the finished arrangement to Pinterest or share it on Instagram with #3DDaisyGrannyBedspread. For this specific daisy design, would you keep the mustard centers or change them to soft brown for a more neutral flower?









