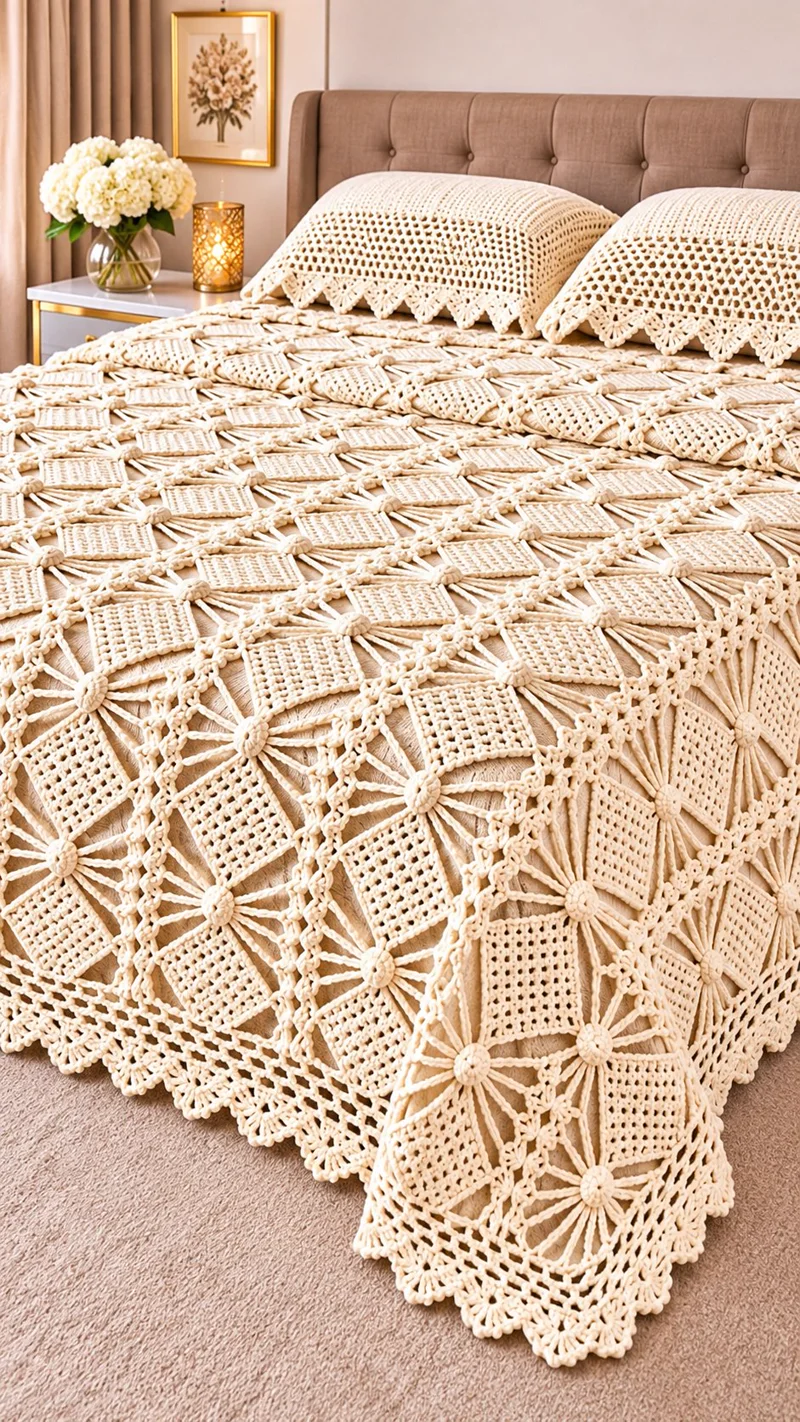
A diamond-shaped crochet lattice needs controlled corner spacing to keep its starburst intersections from collapsing. This crochet diamond star bedspread pattern uses ivory cotton yarn, modular openwork squares, and a decorative scalloped border to create a proposed 225 × 240 cm coverlet. Designed for intermediate to advanced crocheters, the project uses a 4 mm hook and repeated motifs. Its modular construction allows individual sections to be repaired or replaced without dismantling the entire bedspread.
The Design: What Makes This Diamond Star Bedspread Different
Three structural features define this bedspread: a geometric square foundation, open chain-space connections, and a raised center that creates the appearance of radiating stars.
First, each square maintains four equal sides. This matters because uneven corner increases can pull a diamond crochet blanket out of alignment, particularly after washing.
Second, the openwork sections reduce fabric density while allowing the underlying bedding to remain visible. The third feature is a central decorative knot, which adds relief without requiring thick yarn throughout the motif.
A common mistake in a starburst crochet motif is working the connecting chains too tightly. The resulting fabric contracts between its anchor points and loses the intended geometric shape. Use consistent chain tension and measure each blocked unit before assembly.
This original adaptation recreates the visual character of the reference photograph rather than its exact stitch architecture.
Project Info at a Glance
| Specification | Project Details |
|---|---|
| Skill Level | Intermediate to Advanced |
| Estimated Time | 70–110 hours |
| Finished Size | Approximately 225 × 240 cm |
| Crochet Hook | 4.0 mm |
| Yarn Weight | DK Cotton |
| Construction | Joined Square Motifs |
| Motif Target | 15 × 15 cm |
| Main Motifs | 210 |
| Best For | Decorative Queen-Size Coverlet |
Measurements, time, and yarn requirements are estimates. This photo-inspired pattern has not been physically tested.
Materials and Tools
Yarn
Choose yarn with a defined twist and limited surface fuzz. Clear stitch definition is particularly important when the design combines open mesh, raised details, and lace edging.
- Warm ivory DK cotton yarn – approximately 2,400–3,200 g total. A smooth cotton such as DROPS Muskat is a possible option, subject to gauge.
- Matching ivory yarn – reserve approximately 200–300 g from the total quantity for joining and edging.
- Optional contrasting cotton – 25–50 g. Use only for a sample or decorative accent; the reference design is monochromatic.
The estimate is a purchasing allowance, not a measured consumption figure. Work and weigh a finished motif before buying the full quantity.
Tools
- 4.0 mm crochet hook, or size needed for gauge.
- Tapestry needle with a blunt tip.
- Locking stitch markers for corners and motif identification.
- Sharp scissors for trimming ends.
- Measuring tape marked in centimeters.
- Blocking mats and rust-resistant pins for squaring motifs.
- Digital kitchen scale for estimating yarn use.
Crochet Abbreviations
This pattern uses US crochet terminology.
| Abbreviation | Meaning |
|---|---|
| MR | Magic Ring |
| ch | Chain |
| sc | Single Crochet |
| hdc | Half Double Crochet |
| dc | Double Crochet |
| tr | Treble Crochet |
| sl st | Slip Stitch |
| st / sts | Stitch / Stitches |
| sp | Space |
| inc | Increase |
| dec | Decrease |
| RS / WS | Right Side / Wrong Side |
| rep | Repeat |
| FO | Fasten Off |
A beginning ch-3 counts as one dc only when explicitly stated. The decrease abbreviation is included for reference but is not required in the principal motifs.
Crochet Diamond Star Bedspread Pattern – Step by Step
The bedspread is assembled from square lace motifs with a central decorative detail, then finished with a perimeter border.
Unlike amigurumi, this project uses joined rounds and turned rows. The conventional six-stitch magic-ring increase sequence is not appropriate for every flat lace motif.
Part 1: Openwork Diamond Square (Make 210)
Yarn: Warm ivory DK cotton.
This square is the main repeat unit. Each motif is crocheted in rounds from the center outward. The four corners provide consistent alignment for later joining.
Round 1: Make a MR. Ch 3 (counts as dc), work 2 dc, ch 2. Work (3 dc, ch 2) three more times into the ring. Join with sl st to top of beginning ch-3.
Count: 12 dc and four ch-2 corner spaces.
Round 2: Sl st into the next corner space. Ch 3, 2 dc, ch 2, 3 dc in the same corner. Ch 1. Work (3 dc, ch 2, 3 dc) in each remaining corner, with ch 1 between corners. Join.
Count: 24 dc, four ch-2 corners, and four ch-1 side spaces.
Round 3: Sl st into the first corner. Work (3 dc, ch 2, 3 dc) in that corner. Ch 1, 3 dc in the next side ch-1 space, ch 1. Repeat the same corner treatment and side sequence around. Join.
Count: 36 dc, four corner spaces, and eight ch-1 side spaces.
Round 4: Work (3 dc, ch 2, 3 dc) into each corner. Along each side, work ch 1, 3 dc into each existing side ch-1 space, and ch 1 between groups. Join.
Count: 48 dc, four corner spaces, and 12 ch-1 side spaces.
Round 5: Repeat the established granny-square expansion: one corner cluster pair per corner and one 3-dc cluster in each side ch-1 space, separated by ch 1. Join.
Count: 60 dc, four corner spaces, and 16 ch-1 side spaces.
Round 6: Repeat Round 5 using the new side spaces.
Count: 72 dc, four corner spaces, and 20 ch-1 side spaces.
Round 7: Repeat the same expansion.
Count: 84 dc, four corner spaces, and 24 ch-1 side spaces.
Round 8: Repeat the established expansion once more.
Count: 96 dc, four corner spaces, and 28 ch-1 side spaces.
Fasten off, leaving a 20 cm tail for seaming.
Pattern note: This is a standard expanding granny-square lace unit, used here as a geometric substitute. It does not reproduce the photograph’s exact square-and-spoke motif.
Part 2: Raised Central Medallion (Make 210)
Yarn: Warm ivory.
The small raised medallion adds texture at the center of each square. It also provides a visual anchor for the surrounding openwork.
Round 1: Work 6 sc in MR. Join with sl st. (6 sc)
Round 2: Work 2 sc in each stitch around. Join. (12 sc)
Round 3: Work 1 sc in each stitch around. Join. (12 sc)
Fasten off with a 15 cm sewing tail.
Place the medallion over the center ring of the square, right side facing upward. Sew through the back loops of the medallion and the center stitches of the square. Keep the center slightly raised rather than flattening it completely.
Repeat for every square, or reserve the raised centers for alternating motifs if a less textured surface is preferred.
Part 3: Optional Radiating Starburst Overlay
Yarn: Warm ivory.
The reference design shows long radiating strands between raised nodes. A simplified decorative overlay can suggest this effect, although it will not duplicate the original lace geometry.
Work this section after the square motifs are assembled.
- Mark the center and the four corner spaces.
- Attach yarn at the central medallion with a sl st.
- Make a loose chain long enough to reach the upper-right corner without pulling the square inward.
- Slip stitch into the corner space, then fasten off.
- Repeat from the center to the other three corners.
- Secure the chain ends on the wrong side.
Measure each chain against the actual blocked square rather than using one fixed stitch count. The diagonal distance changes with yarn, tension, and blocking.
The overlays should lie flat against the background mesh. If the corner of a square curls toward its center, remove the strand and remake it with additional chains.
For a bedspread intended for frequent laundering, omit the overlays or tack each chain at intermediate points. Long unsecured strands can catch on jewelry, buttons, or bedding hardware.
Part 4: Joining the Crochet Squares
Arrange the squares into 14 columns and 15 rows.
Before seaming, block the motifs to a consistent size. Place adjacent squares with right sides facing and align corresponding corner spaces.
Use a tapestry needle and matching yarn to sew through the outer loops of corresponding stitches. Alternatively, use slip stitches through both layers for a firmer seam.
Join the squares into 15 horizontal strips first. Each strip contains 14 motifs.
Next, join the strips along their long edges. Match every corner intersection and check that the seams remain perpendicular. A diagonal distortion at one intersection can become more noticeable across the entire bedspread.
A join-as-you-go method is another option for crocheters who prefer connecting motifs during their final rounds. It requires modifying the final round and should be sampled before use.
Part 5: Foundation Border
Yarn: Warm ivory.
Work the border after all squares are connected.
Round 1: Attach yarn at a corner. Work sc evenly around the perimeter, placing 3 sc into each outer corner. Join with sl st.
The exact stitch count depends on the joined edge. Record the total and distribute any necessary adjustments evenly along the sides.
Round 2: Ch 3 (counts as dc). Work dc in each sc around, with (2 dc, ch 2, 2 dc) in each corner’s center stitch or designated corner space. Join.
Round 3: Ch 1, sc in the first stitch. Repeat (ch 3, skip 2 sts, sc in next st) along each side, adjusting the last repeat before the corner. At each corner, work (sc, ch 5, sc) into the corner space.
This creates an open mesh transition between the solid foundation and the decorative outer edge.
Part 6: Scalloped Lace Edging
Yarn: Warm ivory.
The reference design uses a wide openwork border with small scallops. The following edging provides a simpler interpretation.
Round 4: Work 5 dc into the first ch-3 space, then sc into the next ch-3 space. Repeat alternating shells and anchor stitches along each side. At corners, work 7 dc into the ch-5 space.
Round 5: Attach yarn at the beginning of a shell. Work sc in the first dc, then repeat (ch 3, sc in next dc) across the five dc of each shell. Work sl st into the anchor sc between shells. At the seven-dc corner shell, follow the same sequence across all seven stitches.
Fasten off and weave in the final end.
Because the perimeter stitch count is determined by the finished panel, the shell distribution must be checked on a sample. Avoid forcing an incomplete repeat into a corner.
Assembly Instructions
- Make the first square. Complete all eight rounds and record its dimensions before blocking.
- Check gauge. Block the sample and measure both diagonals as well as its sides.
- Weigh the sample. Calculate the approximate yarn requirement for 210 squares and add an allowance for joins, medallions, and edging.
- Crochet the remaining squares. Group them into batches of ten to simplify counting and inspection.
- Add the raised medallions. Center each decorative piece and sew it securely.
- Block every square. Pin to matching dimensions and allow it to dry fully before removal.
- Arrange the layout. Position 14 motifs across and 15 down, keeping the right sides facing upward.
- Join the squares. Sew horizontal strips, then connect the strips into one rectangular panel.
- Complete the decorative work. Add optional radiating overlays, foundation border, and scalloped edging.
- Finish and inspect. Weave in loose ends, check corner alignment, and complete a final light blocking.
The finished bedspread consists of 210 joined square motifs with raised centers and a continuous lace border.
7 Technical Tips for a Better Crochet Bedspread
- Prevent corner drift. Place a locking marker in every ch-2 corner space during the first sample. If the square develops five corners or one side has an extra cluster, correct the round before continuing.
- Control motif size. Aim for a blocked square of 15 × 15 cm only if your yarn and hook can produce that dimension without stretching the fabric excessively. A 5 mm difference per motif can create a 7 cm width difference across 14 columns.
- Avoid rigid seams. Do not pull joining yarn tighter than the outer edges of the motifs. A seam that contracts by 1 cm across each square can produce significant puckering in a large panel.
- Check raised centers. Position the medallion directly over the square’s center ring before sewing. Off-center placement becomes visible when the repeated motifs are viewed across the bed.
- Prevent chain snagging. Keep optional starburst overlay chains close to the mesh surface. If a finger can easily pass beneath a long strand, consider adding a discreet anchoring stitch.
- Balance the border corners. Work additional stitches into each corner to prevent the outer edging from pulling diagonally. Excessive corner increases, however, cause waves rather than a flat scallop.
- Secure yarn tails. Weave each tail through several centimeters of neighboring stitches, then reverse direction at least once. Cotton yarn can loosen at cut ends when a large bedspread is repeatedly washed or folded.
How to Adjust the Bedspread Size
The modular layout allows changes without redesigning the individual squares.
Assuming each blocked square measures 15 cm and the border extends approximately 7.5 cm on every side, the following are useful planning layouts.
| Size Option | Motif Layout | Total Motifs | Estimated Size |
|---|---|---|---|
| Small Throw | 8 × 10 | 80 | 135 × 165 cm |
| Large Throw | 10 × 12 | 120 | 165 × 195 cm |
| Double Coverlet | 12 × 14 | 168 | 195 × 225 cm |
| Queen Coverlet | 14 × 15 | 210 | 225 × 240 cm |
| Large Bedspread | 16 × 17 | 272 | 255 × 270 cm |
These dimensions assume that joining does not appreciably change the motif pitch. Measure the assembled sample before deciding on the final layout.
For a bedspread that drapes over the mattress sides, measure the mattress width, add twice the desired side drop, and then divide by the blocked motif width. Round up to the next whole motif.
How Much Yarn Does a Crochet Bedspread Need?
Yarn consumption is determined by the weight of one complete motif, the number of motifs, and the additional yarn required for assembly and edging.
For example, if one finished square including its medallion weighs 11 g:
- 210 squares × 11 g = 2,310 g
- Joining and edging allowance at 15% = approximately 347 g
- Total estimate = approximately 2,657 g
This is an illustrative calculation, not a measured result for the pattern.
The most reliable approach is to complete one square, weigh it on a digital scale, and multiply by the planned quantity. Add a separate allowance for the border. For large projects, purchasing yarn from the same dye lot helps prevent visible shade differences.
A thicker yarn may produce a larger motif with fewer rounds, but the fabric will also become heavier. Fine cotton creates a more delicate lace surface and generally requires more stitches to cover the same area.
Washing and Blocking Instructions
Cotton crochet can change dimensions after its first wash. Test the yarn and stitch sample before laundering the entire bedspread.
Use the care instructions supplied with the selected yarn. When handwashing is appropriate, support the wet fabric rather than lifting it by one edge. The weight of water can stretch openwork sections.
Remove excess moisture by pressing the fabric between towels. Avoid twisting or wringing the lace.
Spread the bedspread on a clean, flat surface. Align the long edges, check the corners, and allow the fabric to dry completely.
For storage, fold the bedspread loosely. Avoid hanging a heavy cotton coverlet for long periods, as gravity can lengthen the open chain spaces.
Conclusion
The crochet diamond star bedspread pattern combines repeatable geometric squares, raised center details, and a scalloped lace edge in a modular coverlet design. Its construction makes sizing adjustments possible without altering every individual motif. Before beginning the full project, crochet and block one square, confirm the finished dimensions, and calculate yarn requirements from its actual weight. Treat the instructions as a photo-inspired design draft until a complete sample has been tested.
Save the pattern to Pinterest for future reference, or share your finished crochet work on Instagram using #DiamondStarBedspread.
Which feature would you emphasize in your version: the raised starburst centers or the open diamond lattice?









