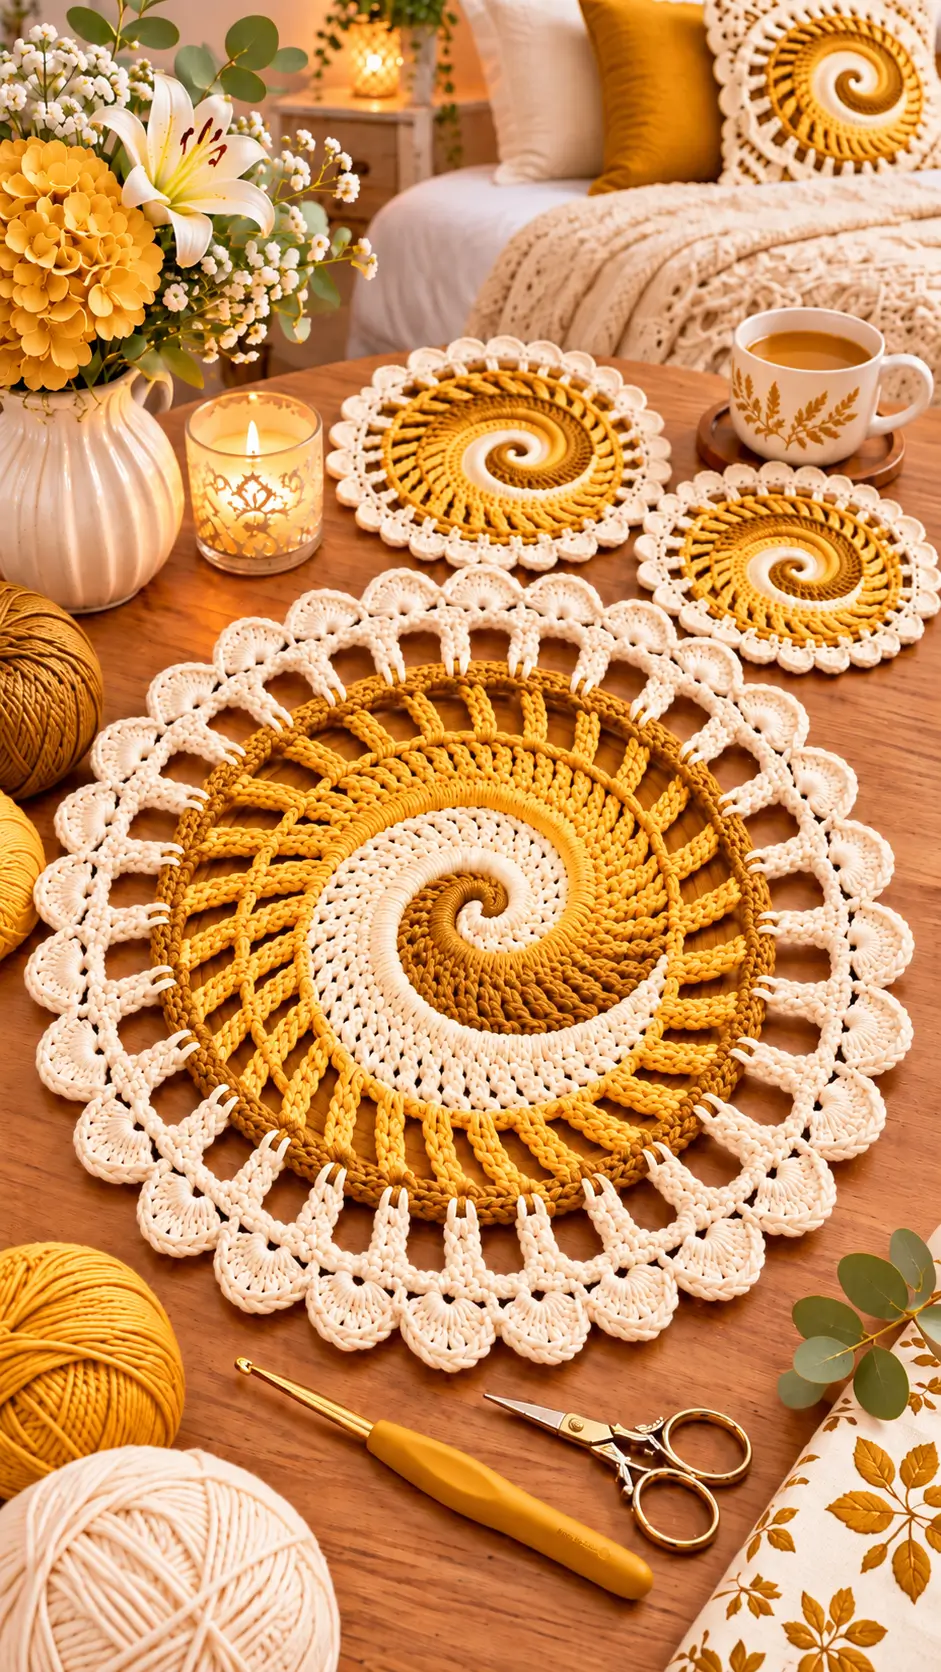
The center of this crochet mandala appears to rotate before the lace border even begins. This spiral crochet placemat pattern uses mustard gold, warm caramel, and cream to create a three-color pinwheel center, an open spoke section, and a wide scalloped outer edge. The construction can be worked as a large table mat or reduced into matching coasters for a coordinated autumn table set.
The Design: What Makes This Spiral Mandala Different
The main feature is the rotating three-color center. Instead of building a standard circular motif from identical rounds, three color sections advance around the center to produce a visible spiral. The next section changes construction completely: elongated chain-and-stitch spokes open the fabric and reduce the visual weight of the dense center.
A cream lace border finishes the motif. Large open arches separate the colored center from the outer shells, while repeated fan-shaped scallops create the flower-like perimeter visible in the reference design.
The most common problem with this type of project is excessive increasing. A circular crochet piece needs controlled expansion; too many stitches create waves, while too few cause the mat to cup.
Project Information at a Glance
| Skill Level | Construction | Finished Size | Hook | Best For |
|---|---|---|---|---|
| Intermediate | Spiral center + open spokes + lace border | Approx. 38–45 cm | 3.5–4.0 mm | Placemat, centerpiece, table mat |
Materials and Tools
Yarn
- Mustard Yellow — DK #3 cotton — approximately 70–100 g
- Caramel Brown — DK #3 cotton — approximately 50–80 g
- Warm Cream — DK #3 cotton — approximately 80–120 g
Cotton is particularly suitable for a table mat because it gives the lace border enough definition while allowing the finished piece to be blocked accurately.
Tools
- 3.5–4.0 mm crochet hook
- Yarn needle
- Scissors
- Stitch markers
- Measuring tape
- Blocking mat and pins
Abbreviations
- MR — magic ring
- ch — chain
- sc — single crochet
- hdc — half double crochet
- dc — double crochet
- tr — treble crochet
- sl st — slip stitch
- sp — space
- st/sts — stitch/stitches
Gauge and Finished Measurements
Exact stitch gauge is less important than producing a flat circular fabric. Make a small test circle before committing to the full project.
A useful target for DK cotton and a 3.5–4.0 mm hook is approximately 18–21 stitches per 10 cm, depending on the stitch section.
| Version | Target Diameter |
|---|---|
| Coaster | 12–15 cm |
| Small Table Mat | 25–30 cm |
| Placemat | 38–45 cm |
| Large Centerpiece | 50–60 cm |
Pattern Construction
The piece is worked from the center outward. The spiral section is followed by a stabilizing round, an open spoke section, a cream arch round, and finally the scalloped lace border.
Place a stitch marker at the beginning of each major section. During the spiral, additional markers between the three color segments make it easier to maintain equal expansion.
Three-Color Spiral Center
The visual spiral is created by introducing three working colors into the same central ring and allowing each color section to grow independently.
Starting the Center
With mustard yarn, make an MR.
Section 1: Ch 2, work 4 hdc into the ring. Remove the hook and secure the working loop with a stitch marker.
Join cream yarn into the same ring.
Section 2: Ch 2, work 4 hdc into the ring. Secure the loop.
Join caramel yarn into the same ring.
Section 3: Ch 2, work 4 hdc into the ring.
Pull the magic ring closed.
Do not join the three sections together with a conventional round closure. Each color remains active so the sections can advance around the circle.
Growing the Spiral
Return to mustard.
Work across the cream stitches ahead of the mustard section, increasing gradually:
Pass 1: 2 hdc in each of the next 4 stitches.
Secure mustard and pick up cream.
Work the same increase sequence across the caramel stitches.
Secure cream and pick up caramel.
Work the corresponding increases across the mustard section.
The three colors now begin to chase one another around the center.
Next Expansion
For each color in turn, work:
*1 hdc in next stitch, 2 hdc in next stitch.*
Repeat across that color’s working section.
On the next pass, work:
*1 hdc in next 2 stitches, 2 hdc in next stitch.*
Continue increasing according to the same circular principle as the spiral expands.
Each new expansion places one additional plain stitch between increases.
Changing Stitch Height for a Stronger Spiral
The center can remain entirely in hdc, but changing stitch height makes the rotation more pronounced.
After several hdc passes, work the outer portion of each color segment using dc.
Begin each color segment with shorter stitches:
1 sc, 1 hdc, then dc across the main section.
At the end of the segment, taper with:
1 hdc, 1 sc, 1 sl st.
This transition produces a smoother spiral termination than stopping every color at full dc height.
Finishing the Spiral Center
Continue until the center measures approximately 18–22 cm for a full-size placemat.
Taper the mustard section first, then cream, then caramel.
Fasten off each color only after its outer edge blends smoothly into the circular perimeter.
The completed center should lie flat before the openwork section is added.
Stabilizing Round
Join caramel yarn at any point on the outer edge.
Round 1: Ch 1, sc evenly around. Join with sl st.
Do not automatically place one sc into every visible stitch if the spiral edge has irregular spacing. Distribute the stitches evenly around the circumference.
Round 2: Ch 2, hdc around, adding increases only where required to maintain a flat circle.
Fasten off.
Open Crochet Spoke Section
The next section creates the long open spaces visible between the spiral center and outer lace.
Join mustard yarn.
Round 1: Ch 1, sc in the same stitch, *ch 7, skip approximately 4–5 stitches, sc in next stitch.* Repeat around.
Adjust the skipped stitches slightly if necessary so the final number of arches is evenly distributed.
Building the Spokes
Round 2: Sl st into the first ch-7 space. Ch 3, work 5 dc into the same space, ch 4, work 6 dc into the next ch-7 space.
Continue around, maintaining identical groups.
For a more open appearance, substitute each dense dc group with:
2 dc, ch 3, 2 dc.
This produces lighter spokes and larger negative spaces.
Long Radiating Spokes
To reproduce the elongated visual movement in the reference piece, extend each spoke through an additional round.
Round 3: Work sc at the top of the first stitch group, ch 8, sc at the top of the next group.
Repeat around.
Round 4: Work approximately 9–11 sc around each ch-8 arch.
Keep the stitches loose enough that the arch does not contract.
The resulting structure should form an open circular lattice around the colored spiral.
Caramel Structural Ring
Join caramel yarn.
Work one round of sc around the outer edge of the spoke section.
Where a spoke meets the perimeter, work through the appropriate attachment point rather than only around the chain. This makes the finished mat more resistant to distortion.
Work a second round of hdc if a stronger colored ring is required.
Check the work on a flat surface before continuing.
Cream Lace Transition
Join cream yarn.
Round 1: *Sc in next structural point, ch 8.* Repeat around.
The number of arches should correspond with the planned number of outer scallops.
Round 2: Sl st into the first arch. Work:
sc, ch 3, 3 dc, ch 3, sc
into each arch.
This establishes the base of the pointed cream elements between the inner circle and outer shells.
Pointed Lace Connectors
For a longer lace connector, work the following into each designated arch:
sc, hdc, dc, 2 tr, ch 3, 2 tr, dc, hdc, sc.
The ch-3 section creates the tip.
Repeat around the motif.
Keep every connector the same height. Variations of even one or two chains can make the finished perimeter look irregular after blocking.
Outer Scalloped Border
The wide cream shell border is the final major structural feature.
Join cream yarn at the base between two pointed connectors.
Shell: Work 9 dc into the designated outer space.
Sc into the next connecting point.
Repeat around.
For a larger placemat, use 11 dc per shell instead of 9.
Each shell should spread into a semicircle without overlapping the neighboring shell.
Decorative Shell Definition
Work one additional edging round around the scallops.
Edging: Sc in the first dc, *ch 2, sc in next dc.* Repeat across each shell.
Alternatively, use one sc in every stitch with a small picot at the center of each scallop.
For the picot:
Ch 3, sl st into the first chain.
Continue to the next stitch.
This creates a sharper lace edge without significantly increasing the diameter.
Matching Spiral Crochet Coasters
The smaller pieces shown with the table mat can be made from the same spiral construction.
Begin with the three-color spiral center.
Stop increasing when the center reaches approximately 8–10 cm.
Taper all three colors.
Work one stabilizing sc round.
Add a short cream lace transition followed by a scalloped border.
A finished diameter of approximately 12–15 cm works well for mugs and small serving pieces.
Simple Coaster Border
For a less elaborate coaster, omit the long spoke section.
After completing the spiral:
Round 1: Cream sc around.
Round 2: *Ch 4, skip 2 stitches, sc in next stitch.* Repeat around.
Round 3: Work 5 dc into each ch-4 space and sc into each connecting sc.
Fasten off and block.
Making a Complete Table Set
The same construction can produce several coordinated pieces.
| Piece | Suggested Diameter |
|---|---|
| Mug Coaster | 12–15 cm |
| Small Trivet | 20–25 cm |
| Placemat | 38–45 cm |
| Centerpiece | 50–60 cm |
Changing the number of center expansion rounds is usually cleaner than attempting to enlarge the lace border alone.
Color Placement
The mustard, cream, and caramel combination gives the spiral clear separation while keeping the overall palette limited.
Use the darkest color on one spiral arm and structural ring. The lightest color works effectively in both the spiral and outer lace because it connects the center visually to the border.
A useful distribution is approximately:
- 45% mustard yellow
- 35% cream
- 20% caramel brown
Alternative Color Combinations
Autumn
- Mustard
- Rust
- Ivory
Botanical
- Sage green
- Olive
- Warm cream
Coastal
- Deep navy
- Dusty blue
- Ivory
Neutral
- Caramel
- Oatmeal
- Natural white
Blocking the Mandala
Blocking is a structural step for this project because the large open arches and scallops need equal spacing.
Wet or damp-block according to the yarn label.
Place the center on the blocking surface and measure the diameter in several directions.
Pin opposite points first: top and bottom, then left and right.
Continue pinning opposite sections rather than moving consecutively around the circle.
Pull every scallop to approximately the same depth.
Allow the piece to dry completely before removing the pins.
Assembly and Finishing
- Complete the three-color spiral center and check that it lies flat.
- Taper each color gradually before fastening off.
- Add the stabilizing rounds around the spiral.
- Work the mustard open spokes with identical spacing around the circle.
- Add the caramel structural ring and correct any minor waviness before proceeding.
- Work the cream arches and pointed lace connectors.
- Add the large outer scallops, keeping their stitch counts identical.
- Finish the scallops with sc, picots, or a fine chain edging.
- Weave every yarn tail through several stitch directions on the wrong side.
- Block the finished mat to a symmetrical circle and allow it to dry completely.
The finished piece combines a rotating three-color center, open radiating spokes, structural rings, and a wide cream scalloped perimeter.
7 Technical Tips
- The center starts forming a bowl: the spiral does not contain enough increases. Add an increase to each color section at evenly spaced positions during the next pass.
- The center becomes wavy: too many increases have accumulated. Work one expansion pass with fewer increases before adding another full increase sequence.
- The spiral boundaries look stepped: ending a color at full stitch height creates an abrupt stop. Taper from dc to hdc, then sc and sl st before fastening off.
- The spoke section twists: inconsistent chain lengths are usually responsible. Keep every ch-7 or ch-8 arch at the same relaxed tension rather than tightening the last chains.
- The outer edge ruffles: the scallops are receiving too many stitches. Reduce a 11-dc shell to 9 dc, or increase the distance between shell attachment points.
- The finished circle becomes oval: measure two perpendicular diameters while blocking. Keep the difference below approximately 5 mm on coasters and 10 mm on a large placemat.
- The lace points curl after drying: pin each point individually during blocking. A point that dries folded inward usually retains that distortion after the pins are removed.
Care
Use the washing method recommended for the chosen yarn. Cotton table pieces can usually be reshaped while damp, which helps restore the scalloped border after laundering.
Dry the piece flat. Avoid hanging a wet mandala because the weight of the cotton can pull the open spoke section out of shape.
If the mat is intended for hot cookware, select a suitable heat-resistant natural fiber and avoid relying on decorative openwork as protective insulation.
Conclusion
This spiral crochet placemat pattern separates the project into manageable structural stages: a rotating three-color center, stabilizing rounds, open spokes, cream connectors, and a scalloped lace perimeter. Begin with the spiral and confirm that it remains flat before adding the decorative outer rounds. The same center can then be stopped earlier to make matching coasters or extended for a larger table centerpiece. Save the finished table set to Pinterest or share your color version on Instagram with #AutumnSpiralCrochet. For your version, would you keep the mustard, caramel, and cream palette or replace the caramel section with olive green?









