Introduction
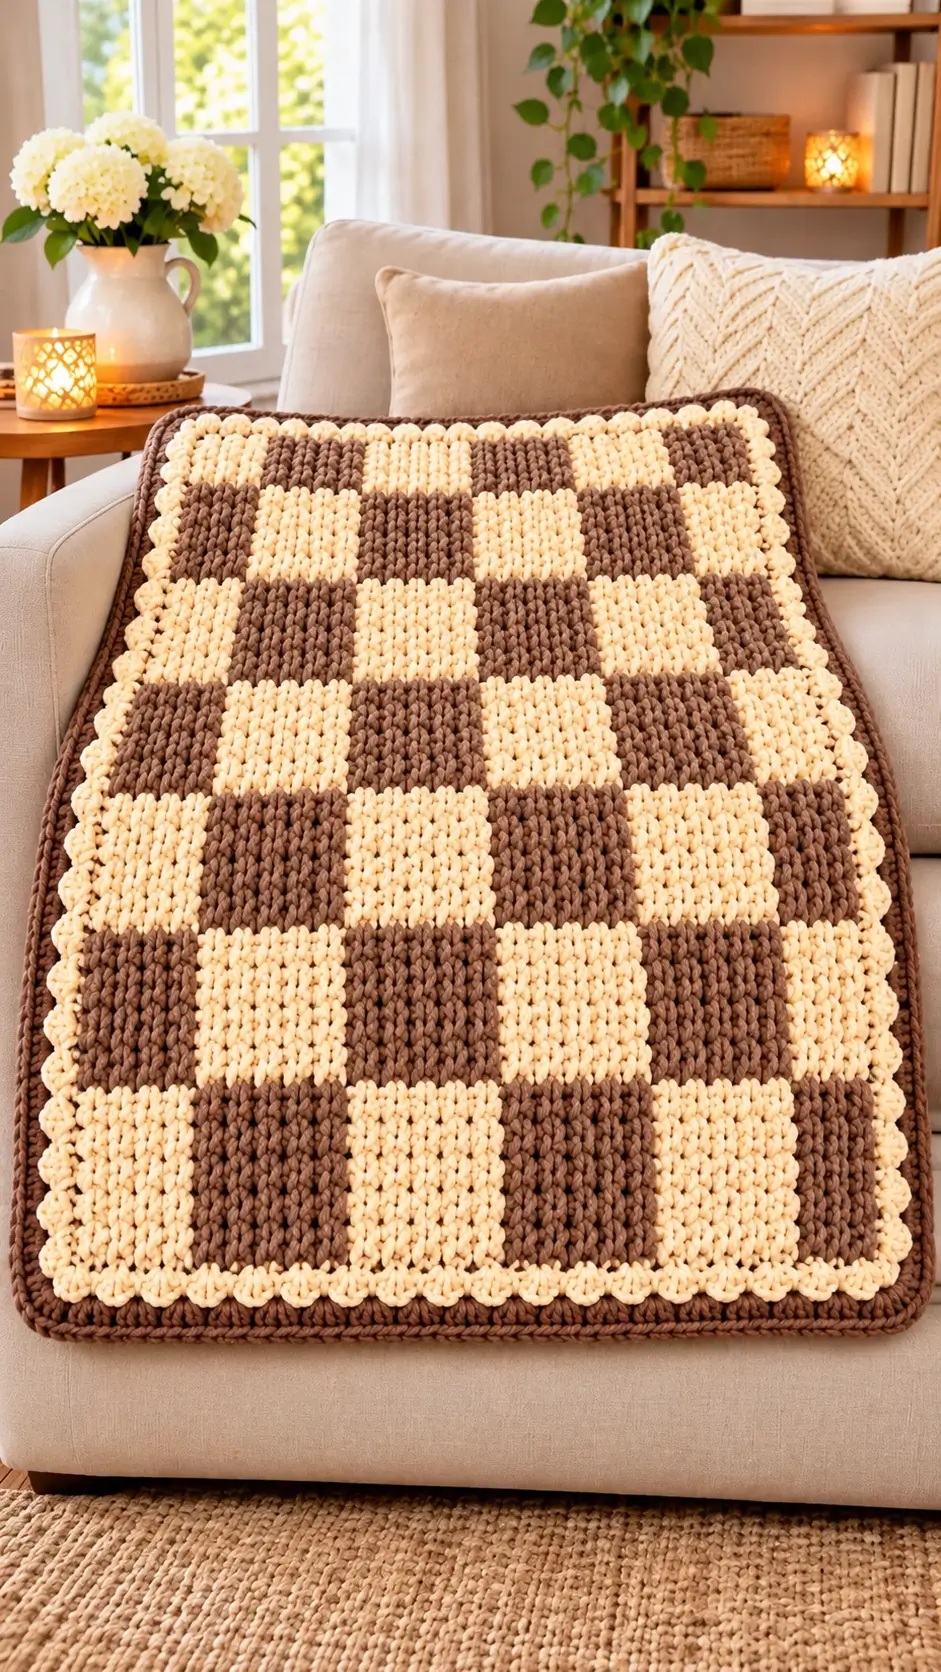
A checkerboard blanket fails visually when one square grows even a few stitches wider than its neighbor. This chunky checkerboard crochet blanket pattern uses alternating warm cream and chocolate-brown blocks, a compact textured stitch, a cream decorative inner edging, and a substantial brown outer border. The photo-inspired construction is designed as a practical sofa throw using chunky yarn and a large hook, with the color changes worked directly into the fabric rather than sewing dozens of separate squares.
The Design: What Makes This Checkerboard Blanket Different
The blanket is built around large, clearly defined color blocks rather than traditional granny squares. Cream and brown rectangles alternate both horizontally and vertically to create the classic checkerboard arrangement. Working the blocks as continuous rows reduces joining work and produces a flatter finished surface.
The second structural feature is the double border. A narrow cream decorative edge separates the checkerboard from a heavier brown frame, preventing the dark border from visually merging with the brown squares. The chunky stitch texture also matters. Each block needs enough density to hide carried yarn and maintain crisp vertical color boundaries. The most common problem is tightening the yarn during a color change, which pulls the neighboring squares inward and creates visible waves along the block divisions.
Project Info at a Glance
| Skill Level | Construction | Suggested Size | Hook | Best For |
|---|---|---|---|---|
| Intermediate | Continuous checkerboard rows | Approx. 105 × 135 cm | 8.0 mm | Sofa throw, lap blanket, bedroom accent |
Materials and Tools
Yarn
- Warm cream — chunky/bulky weight #5 — approximately 900–1100 g
- Chocolate brown — chunky/bulky weight #5 — approximately 900–1100 g
The yarn quantities are project estimates. Actual consumption changes with blanket dimensions, yarn construction, hook size, stitch tension, and the number of border rounds.
A smooth chunky acrylic, wool-acrylic blend, or soft washable bulky yarn works well. Select cream and brown yarns from the same product line whenever possible so both colors produce matching gauge.
Tools
- 8.0 mm crochet hook
- Yarn needle with a large eye
- Scissors
- Locking stitch markers
- Measuring tape
- Blocking mats if required
Abbreviations
- ch — chain
- sc — single crochet
- hdc — half double crochet
- dc — double crochet
- sl st — slip stitch
- BLO — back loop only
- st/sts — stitch/stitches
- RS — right side
- WS — wrong side
Finished Size
The sample construction is planned as a medium sofa throw measuring approximately 105 × 135 cm after the border is added.
The checkerboard can be resized easily because its dimensions are determined by the number and size of blocks.
| Blanket Type | Approximate Finished Size |
|---|---|
| Baby blanket | 70 × 90 cm |
| Lap blanket | 90 × 115 cm |
| Sofa throw | 105 × 135 cm |
| Large throw | 125 × 155 cm |
| Bed-end blanket | 150 × 180 cm |
Gauge and Block Planning
Make a square swatch before calculating the foundation chain. The critical measurement is not simply stitches per 10 cm; each complete checkerboard block needs to finish at approximately the same width and height.
A useful target for chunky yarn is a block measuring approximately 14–16 cm square.
For example, if 12 hdc stitches measure 15 cm, work each color block over 12 stitches. Continue the same color for enough rows to produce a 15 cm height.
Do not assume that 12 stitches automatically require 12 rows. Crochet stitches are rarely perfectly square. Measure the swatch.
Checkerboard Layout
The photo-inspired arrangement uses alternating cream and brown squares. A practical throw can use seven blocks across and nine blocks vertically.
For Row Section A:
Cream – Brown – Cream – Brown – Cream – Brown – Cream
For Row Section B:
Brown – Cream – Brown – Cream – Brown – Cream – Brown
Alternate Sections A and B until the required blanket length is reached.
Foundation Chain
First determine the stitch count of one block from your gauge swatch.
If one block requires 12 stitches and the blanket has seven blocks across:
12 × 7 = 84 stitches
For a hdc foundation worked into a standard chain, chain 86 so the extra chains can provide the turning height according to your preferred method.
Place a stitch marker every 12 stitches after completing the first row. These markers identify the color boundaries.
Main Checkerboard Pattern
Row 1
With cream, hdc across the first block section.
Before completing the final hdc of the cream block, stop with the last loops still on the hook.
Join brown and pull the brown yarn through the remaining loops to finish the stitch.
Work hdc across the second block.
Change back to cream in the final stitch.
Continue alternating colors across the row.
Turn.
Row 2
Ch 2. The turning chain does not count as a stitch unless your personal method requires it.
Work hdc in each stitch, maintaining exactly the same color divisions established in Row 1.
Turn.
Following Rows of Section A
Repeat Row 2 until the height of the color blocks equals their width.
For example, if each block measures 15 cm wide, continue until the section measures approximately 15 cm high.
Finish the final row of Section A.
Second Checkerboard Section
The colors now reverse.
Where Section A begins with cream, Section B begins with brown.
First Row of Section B
Join brown at the first edge.
Work hdc across the first marked block.
Change to cream.
Continue alternating:
Brown – Cream – Brown – Cream – Brown – Cream – Brown.
Turn.
Remaining Rows
Continue without changing the vertical block boundaries.
Stop when Section B matches the height of Section A.
Continue the Checkerboard
Repeat the two sections:
Section A: Cream first.
Section B: Brown first.
Continue until the blanket reaches the planned length.
Count the rows in every section rather than relying only on visual measurement. Equal row counts help keep all horizontal block divisions aligned.
How to Make Clean Color Changes
Work the final stitch of the old color until two loops remain on the hook.
Drop the old color.
Yarn over with the new color and pull it through both loops.
The new color is now ready for the next stitch.
This places the actual color transition at the top of the preceding stitch and produces a cleaner vertical division.
Managing the Yarn
A seven-block row can become difficult if every color section uses a separate full skein. Smaller working balls or bobbins are easier to manage.
Prepare several cream and brown yarn portions before starting.
Each block can have its own working yarn. This avoids carrying a contrasting strand behind a large section where it could show through the chunky stitches.
Turn the work in alternating directions when changing rows to reduce yarn tangling.
Alternative Method: Separate Crochet Squares
The same visual design can also be made from individual squares.
Make equal numbers of cream and brown squares, each approximately 14–16 cm.
For a 7 × 9 layout, make 63 squares.
Because the checkerboard begins and ends with different colors on alternating rows, one color will be used for approximately half the squares and the second color for the remainder.
Arrange them on a flat surface before joining.
This method uses more finishing work but makes it easier to maintain perfectly defined blocks.
Simple Individual Square
Chain enough stitches to reach the target block width.
Row 1: Hdc across. Turn.
Row 2: Ch 2, hdc across. Turn.
Repeat Row 2 until the height equals the width.
Fasten off.
Block every square to the same dimensions before joining.
Joining Separate Squares
If you choose the modular method, arrange all squares in the full checkerboard pattern first.
Join adjacent squares with mattress stitch for a nearly invisible seam, or use slip-stitch crochet for a slightly raised structural line.
Join complete horizontal rows first.
Then connect the rows vertically.
Measure after every two joined rows to catch any accumulated distortion early.
Preparing the Blanket Edge
After the checkerboard body is complete, work one stabilizing round in cream.
Join cream at any corner.
Round 1: Sc evenly around the entire blanket.
At each corner work:
(sc, ch 2, sc)
When working along row ends, distribute the stitches evenly rather than forcing one sc into every visible gap.
The blanket should lie flat after this round.
Cream Decorative Inner Border
The photo shows a narrow light-colored decorative line between the checkerboard body and the dark outer frame.
Round 2
Ch 1.
Sc around.
Work (sc, ch 2, sc) into each corner space.
Round 3 — Small Shell Edge
Repeat around:
*sl st in next st, skip 1 st, 4 dc in next st, skip 1 st.*
Adjust the spacing slightly before each corner if necessary.
The shells should form a compact cream ruffle without causing the blanket to wave.
Chocolate-Brown Outer Frame
The dark border provides visual weight and protects the decorative cream edging.
Brown Foundation Round
Join chocolate brown behind the cream shell round so the brown stitches form a clean outer frame.
Work sc evenly around.
At each corner work:
(2 sc, ch 2, 2 sc)
Second Brown Round
Work hdc in each stitch around.
At each corner work:
(2 hdc, ch 2, 2 hdc)
Final Brown Round
Work one round of sc or reverse sc around the outer edge.
Fasten off and weave the tail through at least 8–10 cm of dense border stitches.
Optional Raised Brown Border
For an even heavier frame, add one BLO hdc round before the final edging.
Working through the back loop creates a visible ridge that separates the border rounds.
Do not add this round if the blanket already feels heavy around the perimeter.
Adjusting the Blanket Width
Resize the blanket by changing the number of blocks rather than changing individual block dimensions.
If one block is 15 cm:
| Blocks Across | Body Width Before Border |
|---|---|
| 5 | Approx. 75 cm |
| 6 | Approx. 90 cm |
| 7 | Approx. 105 cm |
| 8 | Approx. 120 cm |
| 10 | Approx. 150 cm |
Add the border measurement to determine the final width.
Adjusting the Blanket Length
Add or remove complete horizontal checkerboard sections.
If each section is 15 cm high, nine sections produce approximately 135 cm before the final border.
For a longer bed throw, use eleven or twelve sections.
Always finish with a complete square section rather than stopping halfway through a color block.
Yarn Calculation Method
Chunky yarn consumption varies substantially between brands, so weighing a test block gives a more useful estimate than relying on a fixed yardage figure.
Make one complete cream block and one brown block using the planned stitch count and number of rows.
Weigh them.
If one 15 × 15 cm block uses 28 g and the blanket contains 63 block areas:
28 × 63 = 1764 g
Add the border allowance.
Adding approximately 10% gives:
1764 × 1.10 = approximately 1940 g
This example demonstrates the calculation method rather than a fixed yarn requirement.
Color Variations
Black and Cream
Use warm ivory with charcoal or black for a stronger graphic checkerboard.
Sage and Ivory
Replace chocolate brown with muted sage green while retaining the cream squares.
Terracotta and Beige
Combine burnt terracotta with oatmeal for a warmer version.
Blue and White
Use denim blue with soft white for a cooler two-color blanket.
Three-Color Checkerboard
A third neutral can be introduced into selected squares, but keep the block dimensions unchanged. The classic two-color alternation gives the clearest checkerboard effect.
Assembly
- Make and wash a gauge swatch in both cream and chocolate brown.
- Calculate the stitch width and row height required for one square block.
- Work the foundation and mark every block boundary with locking stitch markers.
- Complete the first checkerboard section with cream as the first color.
- Reverse the colors for the next section and continue alternating sections to the planned length.
- Check every horizontal division and correct any stitch-count error before continuing.
- Work the cream stabilizing rounds around the completed checkerboard body.
- Add the small cream decorative shells while keeping the edge flat.
- Work the chocolate-brown outer frame and finish with a firm final round.
- Weave in all tails, measure opposite sides, and lightly block the blanket to square the corners.
7 Technical Tips
- Failure mode: color boundaries drifting sideways. Place a stitch marker at every block division and confirm the stitch count before each color change.
- Failure mode: rectangular rather than square blocks. Measure the first block after several rows and stop the section when its height matches its width; do not assume stitches and rows have equal gauge.
- Failure mode: visible contrasting yarn behind the fabric. Use separate bobbins for large color sections instead of carrying brown behind cream or cream behind brown.
- Failure mode: puckering at color changes. Leave approximately 1–2 cm of relaxed yarn behind the first stitch after changing colors before adjusting the working tension.
- Failure mode: wavy cream shell border. Reduce the number of shells if the perimeter begins expanding; tightening every shell only makes the edge harder and less flexible.
- Failure mode: rounded blanket corners. Mark all four corner spaces during the first border round and work every later corner into those same structural positions.
- Failure mode: loose woven ends in chunky yarn. Weave each tail through at least 8–10 cm of dense stitches, reverse direction once, and trim only after the blanket has been handled and stretched lightly.
Blocking and Finishing
Lay the completed blanket on a large flat surface.
Measure the top and bottom edges first, followed by both side edges. Opposite measurements should be as close as possible.
Adjust the corners until the checkerboard blocks appear square.
Use the blocking method appropriate for the yarn fiber. Acrylic generally needs only gentle shaping or carefully controlled steam, while natural fibers can often be wet blocked according to their care instructions.
Do not stretch the cream blocks farther than the brown blocks. Both colors must finish at the same dimensions.
Care
Follow the washing instructions printed on the selected yarn label. A large chunky blanket becomes considerably heavier when wet, so support the entire fabric when transferring it from washing to drying.
Dry flat when possible. Reshape the four corners and straighten the checkerboard divisions while the blanket is damp.
Before folding for storage, confirm that the dense brown outer border is completely dry.
Conclusion
The defining feature of this chunky checkerboard crochet blanket pattern is accurate block geometry. Start with a measured swatch, calculate one square before establishing the full foundation, and use markers at every color boundary. Once the checkerboard body is complete, the cream decorative edging and chocolate-brown outer frame provide the same layered finish seen in the photo-inspired design. Your next step is to crochet one cream and one brown test block and compare their dimensions before buying the full yarn quantity. Share a finished version on Pinterest or Instagram with #ChunkyCheckerboardBlanket. Would you keep the cream-and-chocolate palette or replace the brown squares with sage green?








