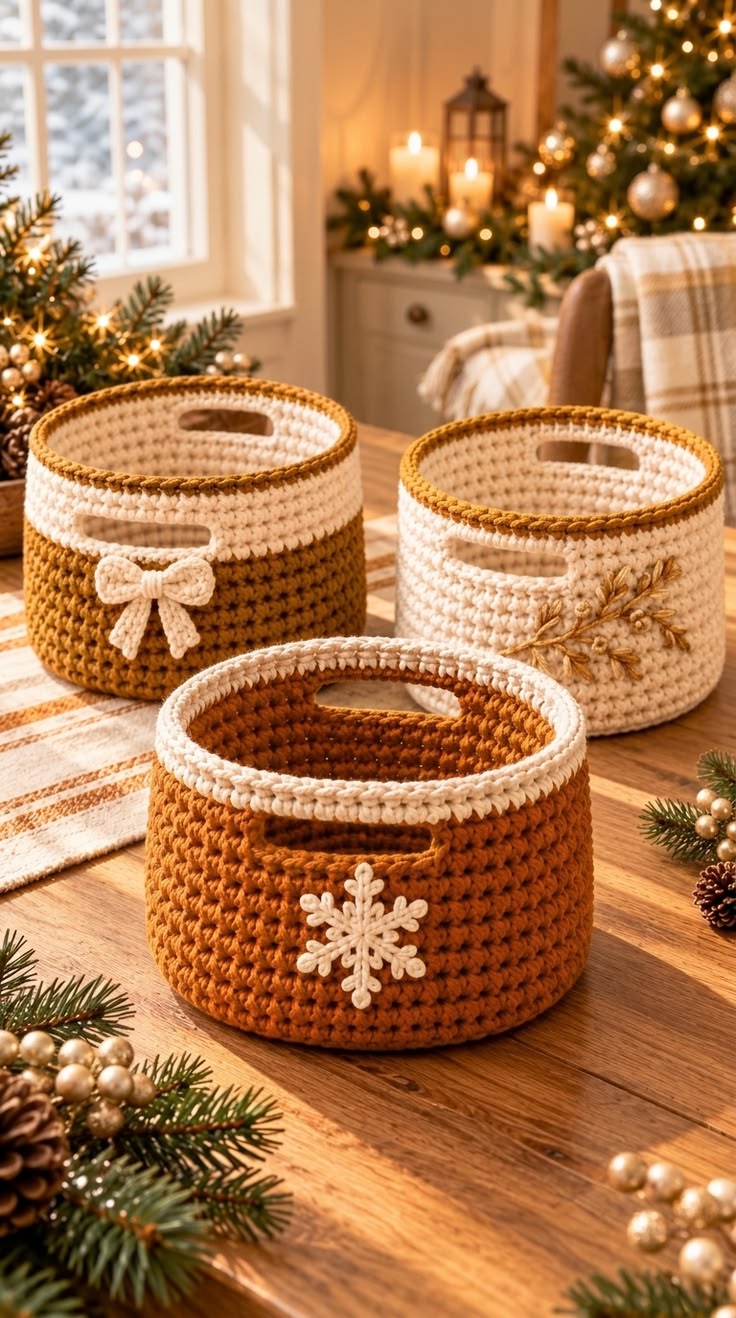
Cut-out handles change the construction of a crochet basket because the upper wall must stay firm after several stitches are replaced by open space. This Christmas crochet storage basket pattern uses a dense round base, structured sides, integrated handles, and simple seasonal appliqués. The photo-inspired set combines warm cream, caramel brown, and small decorative details to create three coordinated baskets for yarn, towels, gifts, ornaments, or household storage.
The Design
The baskets in the reference image use the same basic cylindrical construction but vary the color placement and front decoration. One basket combines a caramel lower section with a cream upper section and a small cream bow. A second is primarily cream with a caramel rim and botanical embroidery. The third uses caramel for most of the body, a narrow cream rim, and a cream snowflake appliqué.
The most important structural choice is the dense fabric. Storage baskets should not be worked at the same loose gauge as a blanket. A relatively small hook and firm yarn produce walls that resist collapsing. The base is worked as a flat circle, followed by one back-loop round that creates a defined fold between the floor and wall. The handles are formed directly in the upper rounds rather than sewn on separately.
Project Information
| Skill Level | Advanced Beginner |
|---|---|
| Construction | Bottom-up, worked in the round |
| Suggested Yarn | Super Bulky #6 cotton blend or firm cotton cord |
| Hook | 8 mm |
| Large Basket Target | Approximately 23 cm diameter × 18 cm high |
| Medium Basket Target | Approximately 20 cm diameter × 16 cm high |
| Small Basket Target | Approximately 18 cm diameter × 14 cm high |
| Method | Continuous spiral unless stated otherwise |
Materials and Tools
Yarn
- Warm Cream — Super Bulky #6 cotton or cotton-blend yarn.
- Caramel Brown — Super Bulky #6 cotton or cotton-blend yarn.
- Gold/Brown — small amount for optional botanical embroidery.
- Green — optional small amount for alternative holiday embroidery.
For a three-basket set, yarn consumption depends heavily on the finished dimensions and density. Weighing the first completed basket is the most accurate way to calculate yarn for additional pieces.
Tools
- 8 mm crochet hook
- Large locking stitch marker
- Yarn needle
- Scissors
- Measuring tape
- Optional removable markers for handle placement
Abbreviations
- MR — magic ring
- ch — chain
- sc — single crochet
- inc — 2 sc in the same stitch
- sl st — slip stitch
- st/sts — stitch/stitches
- BLO — back loop only
- FLO — front loop only
Gauge and Basket Structure
Work a small swatch before beginning the complete set. The fabric should feel substantially firmer than fabric intended for clothing or blankets. If the swatch folds easily under its own weight, reduce the hook size or select a firmer yarn.
The pattern below uses a 42-stitch base for the small basket. Continuing the standard six-increase sequence to 48 or 54 stitches creates progressively larger versions.
Small Round Basket Base
Use caramel for the snowflake basket or cream for the botanical basket.
R1: 6 sc in MR. (6)
R2: inc in every st around. (12)
R3: [sc 1, inc] ×6. (18)
R4: [sc 2, inc] ×6. (24)
R5: [sc 3, inc] ×6. (30)
R6: [sc 4, inc] ×6. (36)
R7: [sc 5, inc] ×6. (42)
Place the base on a flat surface. It should lie flat without forming a bowl or developing pronounced waves.
Turning Round
R8: sc BLO in every stitch around. (42)
This round creates the lower fold and allows the side wall to rise more sharply from the base.
Basket Walls
R9–R17: sc in every st around. (42)
Move the stitch marker after every round. Do not increase during the wall section. Increasing here will flare the basket outward.
For a taller basket, add two to four plain rounds before forming the handles.
Integrated Handle Openings
The two handles must sit directly opposite each other. Count the complete round and place removable markers before crocheting this section.
R18: sc 8, ch 6, skip 6 sts, sc 15, ch 6, skip 6 sts, sc 7. (42 positions)
R19: sc in every sc and work 6 sc around each ch-6 handle section. (42)
R20: sc around. (42)
For stronger handles, work one additional round. Keep the stitches over the handle openings firm but do not pull them so tightly that the rim contracts.
Caramel Snowflake Basket
The front basket in the image uses caramel for the main body and cream around the upper edge. Work the base and most wall rounds in caramel.
Change to cream approximately two rounds before the handle round. Complete the handle reinforcement and upper rim in cream.
Simple Crochet Snowflake Appliqué
Use cream yarn and a smaller hook if necessary so the decoration remains compact.
R1: Make an MR. Work 12 sc into the ring. Join with sl st. (12)
R2: Repeat six times: ch 5, sl st in second ch from hook, sc in next ch, ch 3, sl st in first of those 3 ch, sc in next foundation ch, ch 3, sl st in first ch, sc in final foundation ch, sl st into the next 2 sts of the center.
Fasten off with a long sewing tail. Pin the snowflake to the front of the basket and sew around the center and several branch points. Avoid pulling the appliqué tightly enough to distort the wall.
Two-Tone Bow Basket
For the basket at the back left, begin with caramel and continue until approximately half the target wall height has been completed.
Change to cream at the same position around the basket. Work the remaining wall and handle rounds in cream. A narrow caramel finishing round can be added at the upper rim to repeat the lower color.
Crochet Bow
With cream yarn, ch 13.
Row 1: sc in second ch from hook and across. (12)
Rows 2–6: ch 1, turn, sc across. (12)
Fasten off and weave in the ends. Pinch the rectangle tightly through its center.
Bow Center
Ch 6.
Row 1: sc in second ch from hook and across. (5)
Rows 2–8: ch 1, turn, sc across. (5)
Wrap this narrow strip around the pinched center of the bow. Sew the ends together behind the bow.
Bow Tails — Make 2
Ch 6.
Row 1: sc in second ch from hook and across. (5)
Rows 2–8: ch 1, turn, sc across. (5)
Fasten off. Sew both tails behind the bow at a slight angle. Attach the completed decoration beneath one handle opening as shown in the photo-inspired design.
Cream Botanical Basket
Work the complete basket in cream. Change to caramel only for the final one or two rounds at the rim.
The botanical detail can be embroidered after the basket has been completed. Mark the intended branch lightly with removable yarn or pins before stitching.
Embroidered Branch
Thread the yarn needle with caramel yarn. Create a gently curved stem approximately 9–12 cm long using backstitch or chain stitch.
Add pairs of small leaves along the stem. Each leaf can be formed with three or four long stitches that meet at a pointed tip.
Keep all embroidery knots and yarn tails on the inside of the basket. Do not pull the stitches excessively; tight embroidery can create dents in the wall.
Making the Medium Basket
For a wider basket, continue the base after R7.
R8: [sc 6, inc] ×6. (48)
Work the next round BLO without increasing. Continue the sides with 48 stitches.
For the handles, divide the round symmetrically. A practical starting point is a 6–8 stitch opening for each handle, with equal wall sections between the two openings.
Because yarn thickness changes the physical width of those stitches, measure the handle opening before completing the round. A comfortable opening for this style is approximately 8–10 cm.
Making the Large Basket
Continue one more increase round:
R9: [sc 7, inc] ×6. (54)
Work the following round BLO in all 54 stitches. Continue without increases until the wall reaches the required height.
A large basket needs particularly firm tension. If the wall begins collapsing, switching to a smaller hook usually produces a better result than adding more decorative stitches.
Alternative Yarn Construction
Super bulky cotton provides a firm surface and clearly defined stitches. Cotton cord or T-shirt yarn can also be used for baskets that need more structure.
If only worsted yarn is available, multiple strands can be held together. Make a gauge sample first because two strands of worsted yarn do not automatically reproduce the diameter or stiffness of a specific super bulky yarn.
Color Placement
The three baskets work as a set because the same two main colors appear in different proportions.
| Basket | Main Color | Secondary Color | Decoration |
|---|---|---|---|
| Snowflake | Caramel | Cream | Cream snowflake |
| Bow | Caramel lower half | Cream upper half | Cream bow |
| Botanical | Cream | Caramel rim | Caramel branch |
Changing the Basket Size
The circular base controls the width. Each standard increase round adds six stitches.
- 36 stitches — compact basket.
- 42 stitches — small storage basket.
- 48 stitches — medium basket.
- 54 stitches — larger basket.
These stitch totals describe construction rather than guaranteed finished measurements. Yarn diameter, hook size, and individual tension determine the actual dimensions.
How to Keep the Base Flat
A flat base is essential. If the outer edge forms waves, the increases are too generous for the current gauge. If the base curls upward before the turning round, the fabric needs additional width.
Minor differences can sometimes be corrected by redistributing increases in the next round. Severe rippling should be corrected before the wall begins because the defect becomes harder to remove later.
How to Keep the Walls Upright
The BLO turning round creates a visible hinge between the base and side. After that point, every wall round should contain the same number of stitches.
Use a hook that creates compact stitches with very little space between them. Dense single crochet is particularly suitable because the short stitch height limits vertical stretch.
Place the empty basket on a table after every three or four wall rounds. If it collapses immediately, adjust the gauge before investing additional yarn.
Reinforcing the Handles
Handle openings receive more stress than any other part of the basket. The chain used to cross each opening should be worked slightly loosely so it does not pull the upper edge inward.
On the following round, work directly around or into the chains according to the desired appearance. A second plain round distributes the load across the surrounding stitches.
For baskets intended to carry heavier objects, add another round of slip stitches around each handle opening.
Optional Firm Base Insert
A removable insert can be added when the basket will hold heavier supplies. Cut plastic canvas to a circle slightly smaller than the crocheted base.
Place it inside after the basket is complete. A removable insert is preferable when the basket may need washing.
Finishing the Rim
A clean rim makes the basket appear more structured. After the final sc round, work one slip stitch into the next stitch, cut the yarn, and pull the tail through.
For a more pronounced decorative edge, reverse single crochet can be substituted for the last plain round. Test it on the smallest basket first because an excessively tight edging can pull the rim inward.
Assembly
- Complete the circular base and confirm that it lies flat.
- Work the BLO turning round to establish the lower edge.
- Crochet the straight wall to the required height.
- Add any planned color changes at the same position in the round.
- Mark the two handle openings directly opposite each other.
- Form the handles and reinforce them with at least one additional round.
- Finish the upper rim and weave all structural yarn tails into the inside wall.
- Crochet the snowflake, bow, or other appliqué separately.
- Pin the decoration in position and sew through several secure points.
- Shape the basket by hand and check that the base, walls, rim, and handles remain symmetrical.
The completed basket should stand independently with both handle openings aligned across the diameter.
7 Technical Tips for Better Crochet Baskets
- Prevent a wavy base: inspect the base after every increase round. More than approximately 1 cm of visible rippling at the outer edge should be corrected before starting the walls.
- Mark every round: continuous single crochet makes the beginning of a round difficult to identify. Move a locking marker into the first stitch every time a new round begins.
- Check handle symmetry: fold the empty basket in half before making the handle chains. The two marked openings should meet when the side walls are aligned.
- Control handle stretch: keep each handle opening around 8–10 cm for a basket of this scale. Openings that are much wider place additional strain on the upper wall.
- Maintain firm tension: a basket wall that collapses under its own weight indicates fabric that is too loose. Reduce the hook by approximately 0.5–1 mm and test again.
- Pin appliqués first: use at least four temporary attachment points around a snowflake or bow before sewing. This prevents the decoration from rotating or pulling the basket wall off center.
- Hide yarn tails securely: weave each structural tail through at least 5–7 cm of dense stitches on the inside. Handles and color-change areas need particularly secure finishing because they receive repeated movement.
Christmas Gift Basket Variation
These baskets can also function as reusable gift containers. Make the basket first, then fill it with rolled towels, yarn, wrapped gifts, ornaments, or craft supplies.
A removable ribbon can replace the crocheted bow when a less permanent seasonal detail is preferred. The basket remains useful after the holiday decoration is removed.
Neutral Version for Year-Round Storage
The same construction works without Christmas appliqués. Replace caramel with taupe, gray, sage, terracotta, or charcoal and omit the snowflake. A plain two-tone basket can be used for bathroom towels, nursery supplies, yarn storage, toys, or shelf organization.
For a minimalist version, work the entire basket in cream and add only a contrasting upper rim. This retains the construction of the photo-inspired design without seasonal decoration.
Care and Shaping
Follow the washing instructions specified for the chosen yarn. Cotton baskets may change shape when wet, so reshape the base and walls before drying.
Do not hang a wet basket from its handles. The additional water weight can stretch the openings. Dry the basket supported on a flat surface with the base circular and the wall positioned vertically.
Conclusion
The most useful test for a Christmas crochet storage basket is structural rather than decorative: place it empty on a flat surface and check whether the rim stays open without assistance. Once that foundation is correct, the cream and caramel color blocks, snowflake, bow, and botanical branch can be changed without altering the basket construction. Make the smallest 42-stitch version first, measure its finished diameter, and use that gauge to plan the medium and large baskets. Share the completed three-basket set on Pinterest or Instagram with #ChristmasCrochetStorageBaskets. Which front detail would you use on the largest basket: the snowflake, bow, or embroidered branch?








