Introduction
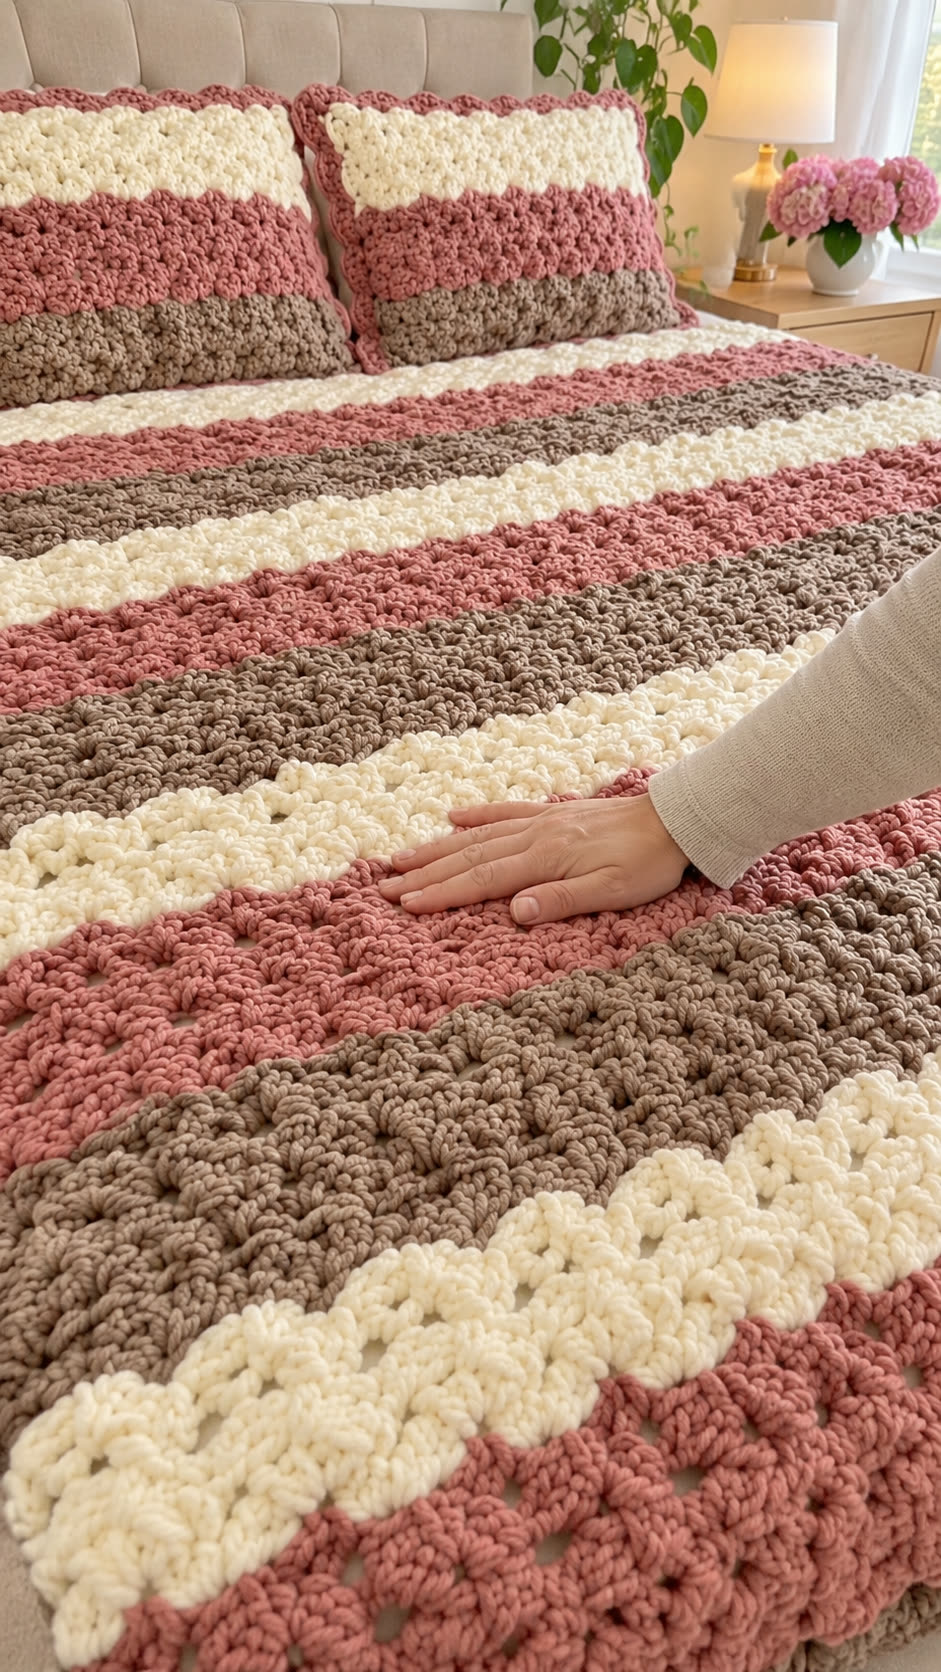
Dusty rose stripes separate the thick ivory and taupe sections of this chunky crochet blanket, while raised clusters create a densely textured surface across the bed. This chunky crochet striped blanket pattern uses three colors, plush yarn and repeated stitch groups to approximate the design shown in the photograph. Intended for intermediate crocheters, the project can be sized as a throw or bedspread, with coordinating pillow covers made from the same stitch pattern.
The Design: What Makes This Striped Crochet Blanket Different
The photographed blanket combines three muted colors with a heavy, dimensional crochet texture. Its stripes run horizontally across the bed, alternating between dusty rose, warm ivory and medium taupe.
Unlike a flat striped blanket, the fabric contains repeated raised stitch groups that produce small ridges and rounded clusters. These stitches make the color transitions more pronounced.
Thlle ivory stripes are especially noticeable because the pale yarn highlights the shadows between individual stitch groups. The dusty rose and taupe sections provide contrast without introducing additional motifs or decorative appliqués.
Another defining feature is the consistent stripe width. Each color occupies a substantial horizontal band, rather than appearing as a narrow accent line.
The matching pillows repeat the same colors and textured construction, creating a coordinated bedding set.
For this type of chunky crochet bedspread, maintaining consistent stitch height and row width is essential. Uneven tension can cause the stripes to slope or the blanket edges to narrow.
Project Information at a Glance
| Detail | Description |
|---|---|
| Project type | Textured striped crochet blanket |
| Skill level | Intermediate |
| Construction | Flat rows with color changes |
| Main colors | Dusty rose, ivory, taupe |
| Suggested yarn | Super bulky category 6 |
| Suggested hook | 9–10 mm |
| Main stitches | Chain, single crochet, double crochet, puff stitch |
| Texture | Raised clustered stitches |
| Border | Minimal textured edge |
| Finished dimensions | Adjustable |
| Matching accessories | Two striped crochet pillows |
| Working direction | Back-and-forth rows |
The yarn category and hook sizes are suggested starting points. They cannot be confirmed from the image. Finished dimensions depend on the foundation chain, gauge and number of rows.
Materials and Tools
Yarn
Choose a plush yarn that produces rounded, clearly visible stitches.
The photograph shows three main shades.
- Dusty rose: Super bulky yarn, category 6, muted pink with a slightly earthy undertone.
- Warm ivory: Super bulky yarn, category 6, soft cream rather than bright white.
- Taupe: Super bulky yarn, category 6, medium warm brown-gray.
Use the same yarn brand and weight for all three colors.
A soft chenille-style yarn or a thick, rounded acrylic blend can approximate the appearance, although different fibers will produce different stitch definition and fabric weight.
Estimating Yarn Quantity
The exact yarn requirement cannot be determined from the photograph.
A reliable estimate requires making a sample swatch, weighing it and calculating the approximate yarn consumption for the intended blanket area.
For example, if a 20 × 20 cm sample weighs 65 g, a 150 × 200 cm blanket would require approximately:
(150 × 200) ÷ (20 × 20) × 65 = 4875 g
This is only an illustrative calculation, not a measured yarn requirement for the pictured blanket.
Allow additional yarn for swatching, color changes and finishing.
Tools
- Crochet hook: 9 mm or 10 mm as a starting point.
- Tapestry needle: Large-eye needle suitable for bulky yarn.
- Stitch markers: To mark the first and last stitch of each row.
- Scissors: For cutting yarn at color changes.
- Measuring tape: For checking blanket width and stripe depth.
- Digital kitchen scale: Optional, for estimating yarn usage.
Crochet Abbreviations — US Terms
| Abbreviation | Meaning |
|---|---|
| ch | Chain |
| sc | Single crochet |
| dc | Double crochet |
| sl st | Slip stitch |
| st | Stitch |
| sp | Space |
| yo | Yarn over |
| rep | Repeat |
| FO | Fasten off |
Special Stitch: Puff Stitch
For this reconstruction, use a puff stitch made with three elongated yarn-over loops.
Yarn over, insert the hook into the indicated stitch, yarn over and pull up a long loop.
Repeat this sequence twice more in the same stitch.
Yarn over and pull through all seven loops on the hook.
Chain one to secure the puff.
The securing chain is part of the puff stitch and does not count as an additional stitch.
Pattern — Step by Step
The blanket is worked in rows from one long edge toward the opposite edge.
Each stripe is created by changing yarn colors after a specified number of rows.
The original stitch repeat is not identifiable from the image. The following pattern uses alternating puff stitches and double crochet to approximate the thick, clustered surface.
Step 1: Make a Gauge Swatch
Before beginning the full blanket, work a sample approximately 20 × 20 cm.
Use the same yarn and hook intended for the finished project.
Foundation: Chain 22.
Row 1: Sc in the second chain from the hook and in each chain across. Turn. (21 sc)
Row 2: Ch 2 (does not count as a stitch). Dc in the first stitch. Work the following sequence 10 times: puff stitch in the next stitch, dc in the next stitch. Turn. (21 stitches)
Row 3: Ch 1, sc in each stitch across. Turn. (21 sc)
Row 4: Repeat Row 2.
Row 5: Repeat Row 3.
Continue alternating Rows 2 and 3 until the sample reaches approximately 20 cm in height.
Measure the width and height after allowing the swatch to rest flat.
If the fabric feels too stiff, try a larger hook.
If the stitch groups appear loose and lack definition, try a smaller hook.
Step 2: Calculate the Foundation Chain
The blanket width depends on the number of stitches in the foundation row.
This stitch pattern requires an odd number of working stitches.
For a sample blanket, use 121 working stitches.
Chain 122.
This gives 121 single crochet stitches in the first row.
The actual width must be checked against the gauge swatch because super bulky yarn varies significantly between brands.
Step 3: Work the First Taupe Stripe
Yarn: Taupe
Row 1: Sc in the second chain from the hook and in each chain across. Turn. (121)
Row 2: Ch 2, dc in the first stitch. Repeat the following sequence 60 times: puff stitch in the next stitch, dc in the next stitch. Turn. (121)
Row 3: Ch 1, sc in each stitch across. Turn. (121)
Row 4: Repeat Row 2. (121)
Row 5: Repeat Row 3. (121)
Row 6: Repeat Row 2. (121)
Row 7: Repeat Row 3. (121)
Row 8: Repeat Row 2. (121)
Row 9: Repeat Row 3. (121)
Row 10: Repeat Row 2. (121)
Row 11: Repeat Row 3. (121)
Row 12: Repeat Row 2. (121)
This produces the first textured taupe band.
Do not fasten off until the final stitch is ready for the next color.
Step 4: Change to Dusty Rose
At the end of the final taupe row, work the last yarn-over of the final stitch using dusty rose yarn.
This creates a cleaner transition between colors.
Leave a yarn tail approximately 15 cm long.
Yarn: Dusty rose
Row 13: Ch 1, sc in each stitch across. Turn. (121)
Row 14: Ch 2, dc in the first stitch. Repeat the puff-and-dc sequence 60 times. Turn. (121)
Row 15: Ch 1, sc in each stitch across. Turn. (121)
Rows 16–24: Continue alternating puff-stitch rows and single crochet rows, ending with a puff-stitch row. (121 stitches per row)
The dusty rose stripe should have approximately the same depth as the taupe section.
If the stitch height differs between colors, measure the stripe depth rather than relying only on row count.
Step 5: Add the Ivory Stripe
Yarn: Warm ivory
Change color at the end of the previous row.
Row 25: Ch 1, sc in each stitch across. Turn. (121)
Row 26: Ch 2, dc in the first stitch. Repeat the puff-and-dc sequence 60 times. Turn. (121)
Row 27: Ch 1, sc in each stitch across. Turn. (121)
Rows 28–36: Continue alternating puff-stitch rows and single crochet rows, ending with a puff-stitch row. (121 stitches per row)
The ivory section provides the lightest stripe in the blanket.
Keep the same hook size and tension used for the other colors.
Step 6: Repeat the Stripe Sequence
The photograph shows repeating bands of taupe, dusty rose and ivory.
For this reconstruction, continue the following 12-row color sequence:
| Stripe | Color | Rows |
|---|---|---|
| 1 | Taupe | 1–12 |
| 2 | Dusty rose | 13–24 |
| 3 | Ivory | 25–36 |
| 4 | Taupe | 37–48 |
| 5 | Dusty rose | 49–60 |
| 6 | Ivory | 61–72 |
| 7 | Taupe | 73–84 |
| 8 | Dusty rose | 85–96 |
| 9 | Ivory | 97–108 |
| 10 | Taupe | 109–120 |
| 11 | Dusty rose | 121–132 |
| 12 | Ivory | 133–144 |
This is a suggested repeat for constructing a blanket with the same general visual rhythm.
The photographed blanket may contain a different number of rows per stripe.
Continue until the desired blanket length is reached.
Step 7: Finish the Final Row
After completing the last stripe, work one final row of single crochet in the same color.
This creates a stable edge for finishing.
Fasten off and leave a yarn tail approximately 15 cm long.
Weave the tail through the reverse side of the fabric.
Avoid pulling the tail too tightly because this may distort the final row.
Creating the Raised Cluster Texture
The thick texture is the most important feature of the photographed blanket.
The surface consists of repeated rounded stitch groups separated by small recessed areas.
In the reconstructed pattern, puff stitches provide the raised elements, while double crochet stitches create spacing between them.
Single crochet rows stabilize the fabric and prevent the puff stitches from stretching excessively.
Puff Stitch Height
Pull each elongated loop to approximately the height of a double crochet stitch.
Inconsistent loop height can cause uneven ridges.
Stitch Placement
Work puff stitches into the indicated stitches rather than into the spaces between them.
This keeps the stitch columns aligned.
Tension
Bulky yarn requires controlled tension.
Pulling the working yarn too tightly can compress the puff stitches and make the blanket rigid.
Keep the loops relaxed enough to form rounded clusters.
How to Keep the Stripes Straight
Horizontal stripe blankets reveal tension problems quickly.
Even a small difference in stitch count can become noticeable after several color changes.
Place a stitch marker in the first and last stitch of each row.
Count the stitches regularly.
For the sample pattern, every row should contain 121 working stitches.
The turning chains do not count as stitches.
At each color change, check the blanket width.
If one stripe is noticeably narrower, examine the edge stitches before continuing.
Making the Matching Crochet Pillows
The photograph includes two rectangular pillows with the same three colors.
Each pillow has an ivory upper section, a dusty rose middle section and a taupe lower section, with a dusty rose border.
The pillows are worked using the same textured stitch pattern as the blanket.
Pillow Front Panel
Choose a pillow insert and make a gauge swatch before calculating the foundation chain.
The front panel should be slightly smaller than the insert if a full, structured pillow is desired.
Work the panel in three horizontal sections:
- Taupe lower section: Approximately one-third of the panel height.
- Dusty rose middle section: Approximately one-third of the panel height.
- Ivory upper section: Approximately one-third of the panel height.
Use the same alternating puff-stitch and single crochet rows as the blanket.
Pillow Back Panel
A plain single crochet backing can reduce bulk.
Work the back panel to match the front panel dimensions.
Alternatively, make two overlapping back panels to create an envelope-style opening.
Pillow Assembly
Place the front and back panels with the wrong sides facing.
Join the edges using dusty rose yarn.
Work single crochet stitches evenly around the perimeter, placing three single crochet stitches at each corner.
Leave an opening if using a removable insert.
The photographed pillows have a textured pink edging, which can be approximated by adding a second round of small clusters or puff stitches.
The exact original pillow border is not identifiable from the photograph.
Blanket Size and Customization
The same stitch pattern can be used for several blanket sizes.
The following measurements are common planning targets, not measurements taken from the image.
| Blanket Type | Approximate Target Size |
|---|---|
| Small throw | 100 × 130 cm |
| Sofa throw | 130 × 160 cm |
| Large throw | 150 × 180 cm |
| Double-bed cover | 180 × 220 cm |
| Large bedspread | 220 × 240 cm |
To adjust the width, begin with an odd number of working stitches.
Chain one more than the desired number of stitches for the foundation row.
To adjust the length, add or remove complete stripe repeats.
For a balanced appearance, keep the dusty rose, ivory and taupe sections approximately equal in depth.
7 Technical Tips for Better Results
- Check the stitch count at every color change. A missing edge stitch can cause the blanket to narrow gradually. For the sample pattern, maintain 121 stitches in each row.
- Control puff stitch height. Pull the elongated loops to a consistent height. Short loops produce compressed clusters, while excessively long loops can snag.
- Measure stripe depth. Different colors may work up at slightly different tensions. Compare the completed stripe heights before beginning the next color.
- Avoid tight foundation chains. A tight starting chain can make the bottom edge narrower than the rest of the blanket. Use a hook 1 mm larger for the foundation chain if necessary.
- Weave yarn tails securely. Bulky yarn can work loose if the ends are only passed through a few stitches. Weave each tail through several stitch paths on the reverse side.
- Check the fabric weight. Puff stitches use more yarn than flat single crochet. Weigh a finished sample to estimate the final blanket weight before purchasing all the yarn.
- Keep the side edges consistent. Turning chains should not be counted as stitches in this pattern. Mark the first and last working stitch to prevent accidental increases.
Washing and Care Instructions
The photographed blanket appears thick and substantial.
A large blanket made with super bulky yarn may become heavy when wet.
Follow the yarn manufacturer’s care instructions.
If the selected yarn is machine washable, use a gentle cycle appropriate for the finished blanket’s size and weight.
Avoid overcrowding the washing machine.
Support the blanket when lifting it while wet.
Lay flat to dry whenever possible.
Do not hang the blanket from one edge while saturated because the weight may stretch the stitch groups.
After drying, reshape the corners and smooth the stripe edges.
Common Problems and Solutions
| Problem | Possible Cause | Correction |
|---|---|---|
| Blanket edges narrow | Missed edge stitches | Count every row and mark the edges |
| Puff stitches look uneven | Inconsistent loop height | Pull loops to the same height |
| Stripes have different widths | Tension changes between colors | Check gauge at each transition |
| Fabric feels stiff | Hook too small | Try a larger hook |
| Large gaps between clusters | Loops too loose | Reduce loop height slightly |
| Color changes look uneven | Yarn changed after completing the final stitch | Change color during the final yarn-over |
| Blanket becomes too heavy | Dense stitches and thick yarn | Test the weight of a larger sample |
Frequently Asked Questions
What stitch is used in this chunky striped crochet blanket?
The reconstruction uses alternating puff stitches and double crochet stitches, separated by single crochet rows. The exact stitch used in the photograph cannot be confirmed from the image alone.
Is this blanket suitable for beginners?
The pattern is best suited to crocheters familiar with basic stitches and color changes. Beginners can practice the puff stitch on a smaller swatch before beginning the blanket.
What yarn should I use?
A soft super bulky yarn is a reasonable starting choice. Choose dusty rose, warm ivory and taupe shades to reproduce the photographed color palette.
How much yarn do I need?
The quantity depends on the blanket dimensions, gauge and yarn brand. Make and weigh a sample swatch to calculate an estimate.
Can I make the blanket with fewer stripes?
Yes. Repeat the three-color sequence fewer times for a smaller throw.
Can I use a different stitch?
Yes, although changing the stitch will affect the surface texture. The photographed blanket has a dense raised appearance, so a flat stitch will produce a noticeably different result.
Do the matching pillows use the same stitch?
They appear to have a similar raised texture. The exact stitch construction is not visible, but the blanket’s reconstructed stitch pattern can be adapted for pillow covers.
Does this blanket need a border?
The image shows a textured outer edge rather than a prominent contrasting border. A simple single crochet finishing row is sufficient for the reconstruction.
Conclusion
This chunky crochet striped blanket pattern recreates the main visual elements of the photographed bedspread: broad horizontal stripes, dusty rose and taupe sections, warm ivory accents, and a dense raised texture. The coordinating pillows repeat the same colors, making them a practical extension of the project.
Begin with a gauge swatch to establish stitch width, stripe depth and yarn consumption. Once the sample matches the desired texture, calculate the foundation chain and work the blanket in repeating color bands.
Save the project to Pinterest or share your finished blanket on Instagram using #ChunkyStripedCrochetBlanket.
Would you keep the ivory stripes the same width as the dusty rose and taupe sections, or make the cream bands narrower to match the visual balance of the photographed bedspread?








