Introduction
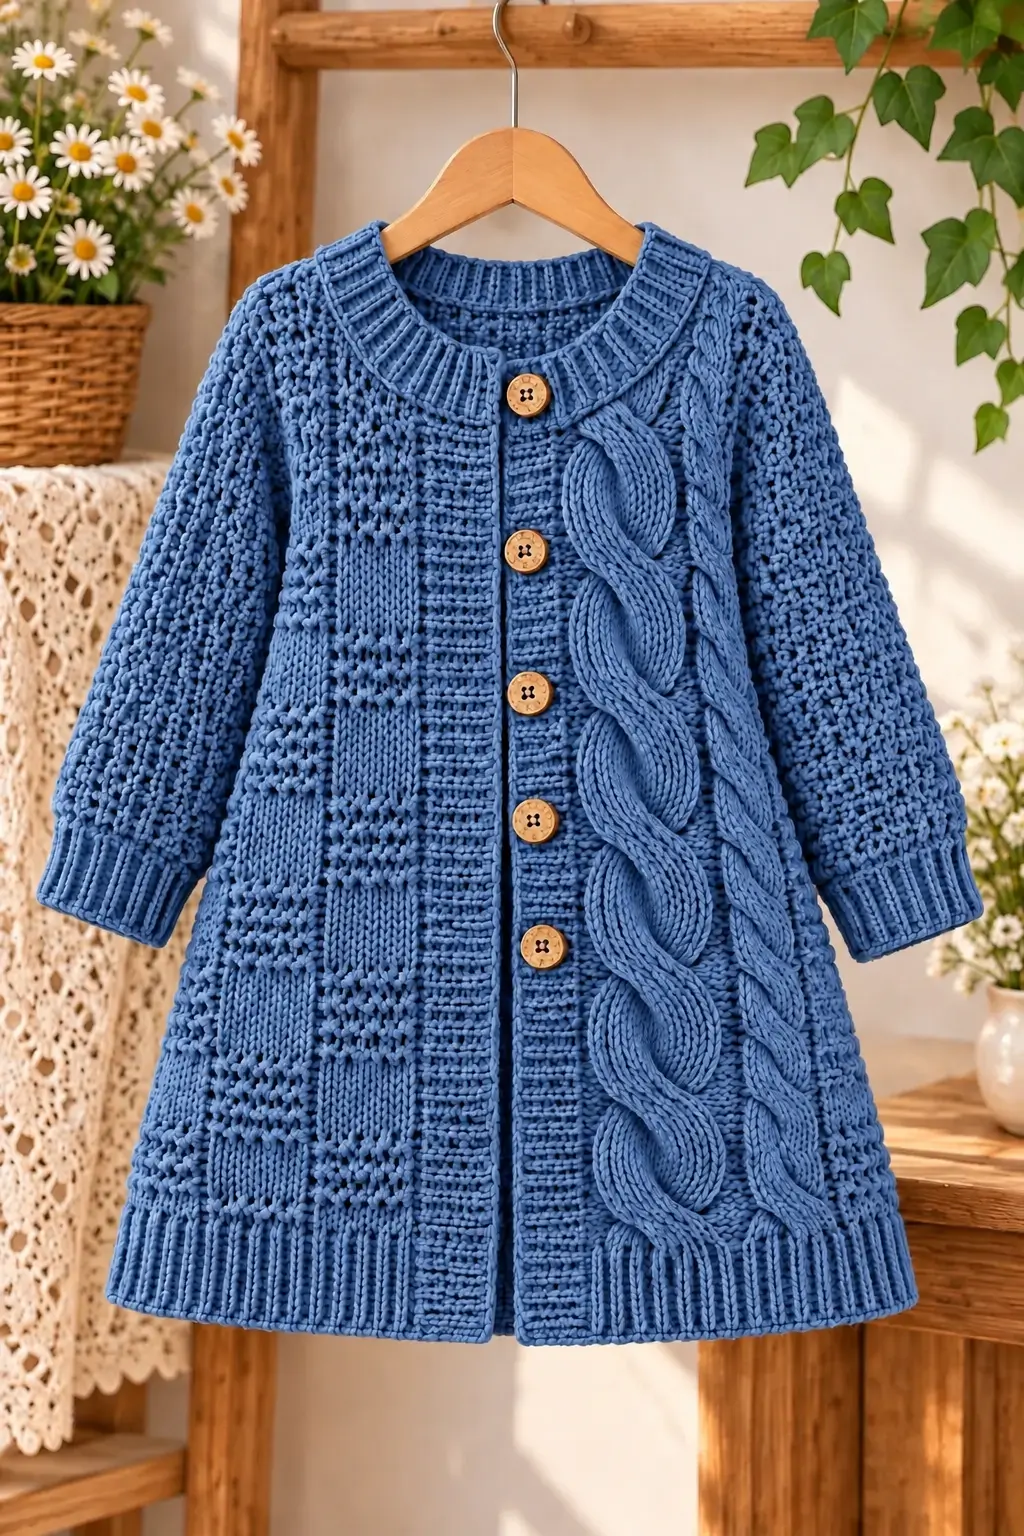
An oversized ten-stitch cable makes one front of this dusty-blue coat visually heavier than its textured opposite panel. This blue cable knit cardigan pattern translates that contrast into a flat-knitted, five-button child’s coat. Use bulky yarn, 6 mm needles, a cable needle, and wooden buttons. The draft targets a 58 cm length and approximately 81 cm finished chest at the stated gauge. Seamed construction suits an intermediate knitter and permits fitting adjustments before sleeve attachment.
The Design: What Makes This Cardigan Different
The main motif uses ten knit stitches bordered by purl grooves. Grooves separate the cable from its background without appliqué. A six-stitch rope offsets its visual weight, while seed-stitch sections fill the flatter areas. This arrangement reproduces the reference image’s asymmetric emphasis rather than copying a standard mirrored-front cardigan.
A slightly flared hem gives a long knitted cardigan coat additional room over clothing; four single-stitch reductions on each front and four total on the back taper the panels toward the chest. Separate shoulder and side seams support the bulky fabric, and the sleeves can be checked against the armhole openings before sewing.
A frequent mistake with a chunky cable cardigan knitting pattern is treating stockinette gauge as the finished width of every textured panel. Cables draw stitches inward. Wash and measure the cable swatch before relying on the nominal circumference.
Project Info at a Glance
| Skill Level | Working Time | Finished Size | Main Needles | Best For |
|---|---|---|---|---|
| Intermediate | Approximately 18–25 hours, planning estimate | 81 cm chest, 90 cm hem, 58 cm length; one proposed child-size version | 6 mm | A long, loose-fitting buttoned layer |
Sizing note: This is an untested, photo-inspired draft, not the pictured garment’s identified commercial pattern. Chest and hem figures come from stitch-count calculations at 14 stitches per 10 cm, less a six-stitch overlap. Textured sections may finish narrower. Child sizes 4 and 6 have standard body chests of 58.5 and 63.5 cm, respectively, so the design includes substantial planned ease. Measure the intended wearer or a comparable coat, and test the pattern before use.
Materials and Tools
Yarn
- Dusty or cornflower blue bulky yarn — 700 g purchase allowance (seven 100 g balls) — suggested yarn: Stylecraft Special Chunky in Cornish Blue, Denim, or another similar blue. Each ball contains 144 m; seven balls provide 1,008 m. This quantity is a project-planning allowance, not measured consumption from a completed sample.
- Accent yarn — none — the image has no separately knitted contrast-color pieces.
Stylecraft lists 14 stitches and 20 rows to 10 cm on 6 mm needles. Its specifications cover yarn properties and label tension, not this original garment’s final measurements. Yarn manufacturer.
Tools
- 6 mm knitting needles for the main pieces, or another size that produces gauge.
- 5.5 mm knitting needles for ribbed hems, cuffs, and neckline.
- Cable needle for six- and ten-stitch crosses.
- Five wooden buttons, approximately 18 mm, subject to a buttonhole swatch.
- Tapestry needle, tape measure, stitch markers, locking pins, and blocking supplies.
- Waste yarn or stitch holders for the shoulder sections.
Gauge and Measurements
Work a stockinette sample at least 15 cm square and measure the middle 10 cm after washing and drying flat. Target 14 stitches × 20 rows = 10 × 10 cm. Make a second sample with a C10F cable and purl gutters. Compare its width against the stockinette sample; compensate before casting on if the narrower cable sample changes the intended fit.
At the target gauge, the body calculations are: upper chest (56 + 32 + 32 − 6) ÷ 1.4 ≈ 81 cm and hem (60 + 36 + 36 − 6) ÷ 1.4 = 90 cm. The subtraction represents a six-stitch overlap between the two button bands. Body height is 116 rows ÷ 2 = 58 cm. Each sleeve is about 64 rows ÷ 2 = 32 cm from cuff to top edge.
Knitting Abbreviations
CO: cast on. BO: bind off. K: knit. P: purl. St(s): stitch(es). RS: right side. WS: wrong side. K2tog: knit two together. SSK: slip, slip, knit; one left-leaning decrease. M1R / M1L: make one right / left. CN: cable needle. Rep: repeat. C6F: hold three stitches on CN in front, K3, then K3 from CN. C6B: hold three behind, K3, then K3 from CN. C10F: hold five in front, K5, then K5 from CN.
Seed stitch: across its assigned section, alternate knit and purl stitches; on each following row, knit the stitches presenting as purls and purl the stitches presenting as knits. Garter band: knit its six stitches on every row. Work all pieces flat, turning after every row. There are no crochet magic rings, safety eyes, or stuffing in this garment.
Pattern — Step by Step
Construction overview: Knit the back, right front, left front, and two sleeves from the hem upward. Rows 1–12 form the bottom ribbing. Unless an instruction says otherwise, odd rows are RS and even rows are WS. The numbering is local to each piece. Treat stitch counts below as live stitches after the named row; a temporary buttonhole gap is restored on the next row.
Back Panel (Make 1)
Yarn: blue. Stitch arithmetic: original design; yarn gauge: Stylecraft.
CO 60 sts using 5.5 mm needles.
- R1–R12 (60 sts): Work K2, P2 rib, maintaining the columns on WS rows.
- R13–R40 (60 sts): Change to 6 mm needles. RS: K2, seed stitch across 14 sts, K28, seed stitch across 14 sts, K2. WS: K2, seed 14, P28, seed 14, K2.
- R41 (58 sts): K2, SSK, work the established middle pattern to the last four stitches, K2tog, K2. Each seed section now contains 13 stitches.
- R42–R64 (58 sts): Continue with K2 edges, two 13-stitch seed sections, and 28 center stockinette stitches.
- R65 (56 sts): Repeat the two edge decreases from R41. Each seed section now contains 12 stitches.
- R66–R112 (56 sts): Work the two 12-stitch seed sections around 28 center stockinette stitches with K2 edges.
- R113 (56 sts before neck BO): Separate the outer 20 stitches at each side; BO the center 16 stitches for the back neckline. 20 live stitches remain on each shoulder.
- R114–R115 (20 sts per shoulder): Work each shoulder separately in its established fabric.
- R116 (20 sts per shoulder): BO each shoulder loosely.
Do not stretch the center-neck bind-off when blocking. The upper 32 rows on both sides of the back will later form part of the armhole opening.
Right Front and Buttonhole Band (Make 1)
Yarn: blue. The right front is the wearer’s right side; its inner six-stitch garter band comes FIRST on RS rows.
CO 36 sts using 5.5 mm needles.
- R1–R12 (36 sts): Keep the first six stitches in garter stitch. Work K2, P2 rib across the other 30 stitches, with WS stitches worked as they present.
- R13–R40 (36 sts): Change to 6 mm needles. On RS rows work K6 band, P2, K6 cable column, P2, seed 14, K6 outer margin. On WS rows, reverse the section order, purl the six cable stitches, knit the garter band, and maintain seed texture.
- R41 (35 sts): At the outer edge, work to the last three stitches, K2tog, K1. Outer margin becomes five stitches.
- R42–R64 (35 sts): Maintain all motifs with a five-stitch outer margin.
- R65 (34 sts): Repeat the outer-edge decrease; margin becomes four. Work the third buttonhole in the inner band on this same row.
- R66–R80 (34 sts): Continue the established pattern.
- R81 (33 sts): Repeat the outer-edge decrease; margin becomes three.
- R82–R96 (33 sts): Continue the established pattern.
- R97 (32 sts): Repeat the outer-edge decrease; margin becomes two.
- R98–R99 (32 sts): Continue the pattern without another decrease.
- R100 (32 sts): Work a WS row; then stop the cable and seed motifs for the shoulder shaping.
- R101 (25 sts): On the RS, BO the first seven stitches at the neckline edge. Knit the remaining stitches.
- R102–R111 (25 → 20 sts): Knit on RS and purl on WS; decrease one stitch at the neckline edge on R103, R105, R107, R109, and R111.
- R112–R115 (20 sts): Work stockinette without shaping.
- R116 (20 sts): BO the shoulder.
Six-stitch cable schedule: On RS rows 21, 29, 37, 45, 53, 61, 69, 77, 85, and 93, replace the K6 cable column with C6B. All other RS rows knit the six cable stitches normally; WS rows purl them.
Five buttonholes: Center two-stitch horizontal buttonholes in the six-stitch garter band on R37, R51, R65, R79, and R93. On each named RS row, knit two band stitches, bind off the next two stitches in the buttonhole position, and complete the row. The live count temporarily drops by two; on the following WS row, cable-cast-on two replacement stitches across the gap, restoring the stated row count. Practice the two-row method and check the selected button diameter first. Two-row buttonhole tutorial.
Left Front and Large Cable (Make 1)
Yarn: blue. The center-front garter band comes LAST on RS rows.
CO 36 sts using 5.5 mm needles.
- R1–R12 (36 sts): Work K2, P2 rib over the outer 30 stitches; knit the final six band stitches on every row.
- R13–R40 (36 sts): Change to 6 mm needles. RS: K6 outer margin, P2, K6 narrow cable, P2, K10 wide cable, P4, K6 garter band. On WS rows, reverse the order, purl both cable columns, and knit all stitches belonging to the band and purl gutters as appropriate.
- R41 (35 sts): K1, SSK at the outer edge, then work the established pattern. Outer margin becomes five stitches.
- R42–R64 (35 sts): Continue both cables with a five-stitch outer margin.
- R65 (34 sts): Repeat the outer-edge decrease; margin becomes four. The left-front band has no buttonholes.
- R66–R80 (34 sts): Maintain the cable pattern.
- R81 (33 sts): Repeat the outer-edge decrease; margin becomes three.
- R82–R96 (33 sts): Work without additional shaping.
- R97 (32 sts): Repeat the outer-edge decrease; margin becomes two.
- R98–R99 (32 sts): Complete the last two pattern rows; stop the cables afterward.
- R100 (25 sts): On the WS, BO seven stitches at the inner neckline edge; purl across the remainder.
- R101–R110 (25 → 20 sts): Continue stockinette and decrease one stitch at the neckline edge on R102, R104, R106, R108, and R110.
- R111–R115 (20 sts): Work stockinette without shaping.
- R116 (20 sts): BO the shoulder.
Narrow cable: Replace its K6 with C6F on RS rows 21, 29, 37, 45, 53, 61, 69, 77, 85, and 93.
Wide cable: Replace its K10 with C10F on RS rows 25, 37, 49, 61, 73, 85, and 97. Work ordinary knit stitches across the ten-stitch column on every other RS row and purl the column on WS rows. Both cable widths remain unchanged by the outer-edge taper.
Long Textured Sleeves (Make 2)
Yarn: blue. The increases add two stitches per named row.
CO 28 sts using 5.5 mm needles.
- R1–R12 (28 sts): Work K2, P2 rib.
- R13–R16 (28 sts): Switch to 6 mm needles. RS: K1 edge, seed 10, K6 center cable, seed 10, K1 edge. WS: K1, seed 10, P6, seed 10, K1.
- R17 (30 sts): Make one increase just inside each K1 edge. Each seed section now contains 11 stitches.
- R18–R22 (30 sts): Continue the centered cable and seed texture.
- R23 (32 sts): Increase once at each edge; seed sections become 12 stitches each.
- R24–R28 (32 sts): Work in pattern.
- R29 (34 sts): Increase twice in total; seed sections become 13 stitches each.
- R30–R34 (34 sts): Work in pattern.
- R35 (36 sts): Increase twice; seed sections become 14 stitches each.
- R36–R40 (36 sts): Work in pattern.
- R41 (38 sts): Increase twice; seed sections become 15 stitches each.
- R42–R46 (38 sts): Work in pattern.
- R47 (40 sts): Increase twice; seed sections become 16 stitches each.
- R48–R52 (40 sts): Work in pattern.
- R53 (42 sts): Increase twice; seed sections become 17 stitches each.
- R54–R58 (42 sts): Work in pattern.
- R59 (44 sts): Make the final pair of increases; seed sections become 18 stitches each.
- R60–R63 (44 sts): Work in pattern.
- R64 (44 sts): BO all stitches at the upper sleeve edge.
Cross the six-stitch center cable as C6B on R21, R37, and R53. The sleeve shape is a widening rectangle with no separate cap; it belongs in a drop-shoulder armhole. Keep both sleeves the same length and mark the center of each upper edge before sewing.
Ribbed Neckband (Make 1 After Shoulder Seams)
Yarn: blue. Gauge and pick-up distribution are provisional until the neckline is measured.
With 5.5 mm needles and RS facing, pick up 16 sts along the first shaped front edge, 16 across the back neckline, and 16 along the second front edge (48 sts total).
- R1–R8 (48 sts): Work K1, P1 rib, maintaining the columns on alternating rows.
- R9: BO all 48 stitches in rib, using a loose edge.
If the front neckline puckers or flares, change the pick-up distribution based on the actual blocked neckline rather than forcing 48 stitches into unsuitable spacing. This raised band represents the rounded collar visible in the image.
Cable Placement and Row-Count Checks
Shaping sequences contain the critical arithmetic. The back is 60 → 58 → 56, with 16 neckline stitches removed and 20 stitches left for each shoulder. Each front is 36 → 35 → 34 → 33 → 32, then loses seven neckline stitches and five neckline decreases, leaving 20 shoulder stitches. The sleeves move through 28, 30, 32, 34, 36, 38, 40, 42, and 44 stitches. Cable crosses rearrange existing stitches and must never change the count.
At the proposed row gauge, the last 32 rows of each body side measure approximately 16 cm. Together, the front and back armhole edges provide around 32 cm of opening. The sleeve’s top edge is approximately 44 ÷ 1.4 = 31.4 cm before seam adjustments, which is close to that opening. Cable contraction could change both measurements, so compare the blocked pieces before sewing.
Assembly — 10 Steps
- Block the five knitted pieces to measured dimensions without stretching their cables; let them dry flat.
- Sew the shoulder seams, matching the 20-stitch shoulders of each front with the corresponding 20-stitch back shoulder.
- Mark the armholes on both sides, 32 rows down from the shoulder line on the front and back panels.
- Find each sleeve midpoint by folding its 44-stitch top edge in half and placing a locking marker.
- Pin each sleeve midpoint to its shoulder seam, then distribute half of the upper sleeve edge along each 32-row body-side opening.
- Sew the sleeves into the openings using mattress stitch, checking for puckers before closing the lower sections.
- Sew the side seams and sleeve undersides, starting from matched underarm points and leaving the front bands free.
- Pick up and knit the 48-stitch neckband as specified, then bind it off and flatten its edge with light blocking.
- Attach five wooden buttons to the left band directly opposite the right-front buttonholes at rows 37, 51, 65, 79, and 93.
- Weave in yarn tails, reinforce the button stitching, and measure the finished coat across the chest, hem, length, and both sleeves.
The result is a seamed cardigan coat with five functional button closures and an intentionally asymmetric front cable layout.
Seven Technical Tips
- Stitch markers: Mark both sides of the ten-stitch cable on the left front before R13. Losing one purl-gutter stitch moves the crossing off center and distorts every following cable repeat.
- Cable tension: A C10F cross holds five bulky stitches in front, creating concentrated tension. If that row shrinks by more than 1 cm compared with adjacent rows, loosen the working yarn and recheck the swatch.
- Buttonhole sizing: An 18 mm wooden button may not fit a single-stitch eyelet made in bulky yarn. Work a two-stitch horizontal test hole and pass the actual button through it before knitting R37.
- Shaping counts: Place a marker at every front decrease row: 41, 65, 81, and 97. Missing R81 leaves 33 rather than 32 live stitches at the neck-shaping stage.
- Sleeve increases: Both sleeves must reach 44 stitches by R59. An omitted increase creates a 42-stitch sleeve that will be narrower than the calculated 32 cm armhole opening.
- Pinning and seaming: Match the center of the sleeve top to the shoulder seam and compare the two 16 cm armhole halves. An uncentered sleeve can twist the visible cable toward the back of the arm.
- Tail weaving and washing: Weave each cut yarn end through at least 5 cm of the reverse-side fabric before trimming. Test washing a swatch first, because aggressive stretching can flatten the seed texture and lengthen the heavy hem.
Fit Adjustments and Troubleshooting
If the coat is too narrow: Check the washed cable panel rather than increasing needle size blindly. The published 14-stitch gauge is stockinette; dense cables can reduce actual width. A new cast-on distribution is required when the gap is substantial, because adding stitches only to the button bands will make the garment close unevenly.
If the coat is too long: Remove rows from the straight body sections, but move each front’s shaping and buttonhole positions in a coordinated way. The five buttonholes are spaced 14 rows apart, or about 7 cm at the target row gauge. A shorter hem without revised buttonhole spacing can leave the lowest closure visibly too high.
If the cables lean in the opposite direction: Check whether the held stitches sat in front or behind the work. C6F and C10F create left-crossing motifs; C6B creates a right-crossing cable. Mirror the directions only if altering the front composition deliberately.
If the neckline curls: Confirm that all six front-band stitches were knitted on RS and WS rows. A stockinette band curls more readily than a garter one. Also check that the picked-up neck stitches are spaced evenly through the rounded shaping sections.
If the sleeves bunch at the shoulder: Compare the 44-stitch upper sleeve width with the two marked 16 cm body edges. Reblock the pieces to their natural dimensions, then repin. A drop-shoulder sleeve does not require decreases around a curved sleeve cap.
If a button band pulls open: Check both the six-stitch overlap and the location of each button relative to its hole. Move the button sewing point slightly inward when needed; tightening the band itself can distort the front cable.
Conclusion
Compare the blocked front panels before attaching the five buttons: the larger cable should sit beside the center band without pulling it toward the side seam. Record the final chest, hem, body length, and sleeve measurements, then update the draft if the cable swatch alters its calculated proportions. For a repeatable version, knit a full sample and request a separate test knit before labeling the instructions tested. Share a finished photograph on Pinterest and Instagram with #BlueCableCardiganCoat, together with the yarn, needle size, and measured gauge. The blue cable knit cardigan pattern can then be refined against actual fabric measurements. Did the ten-stitch front cable pull the button band inward after washing?









