Introduction
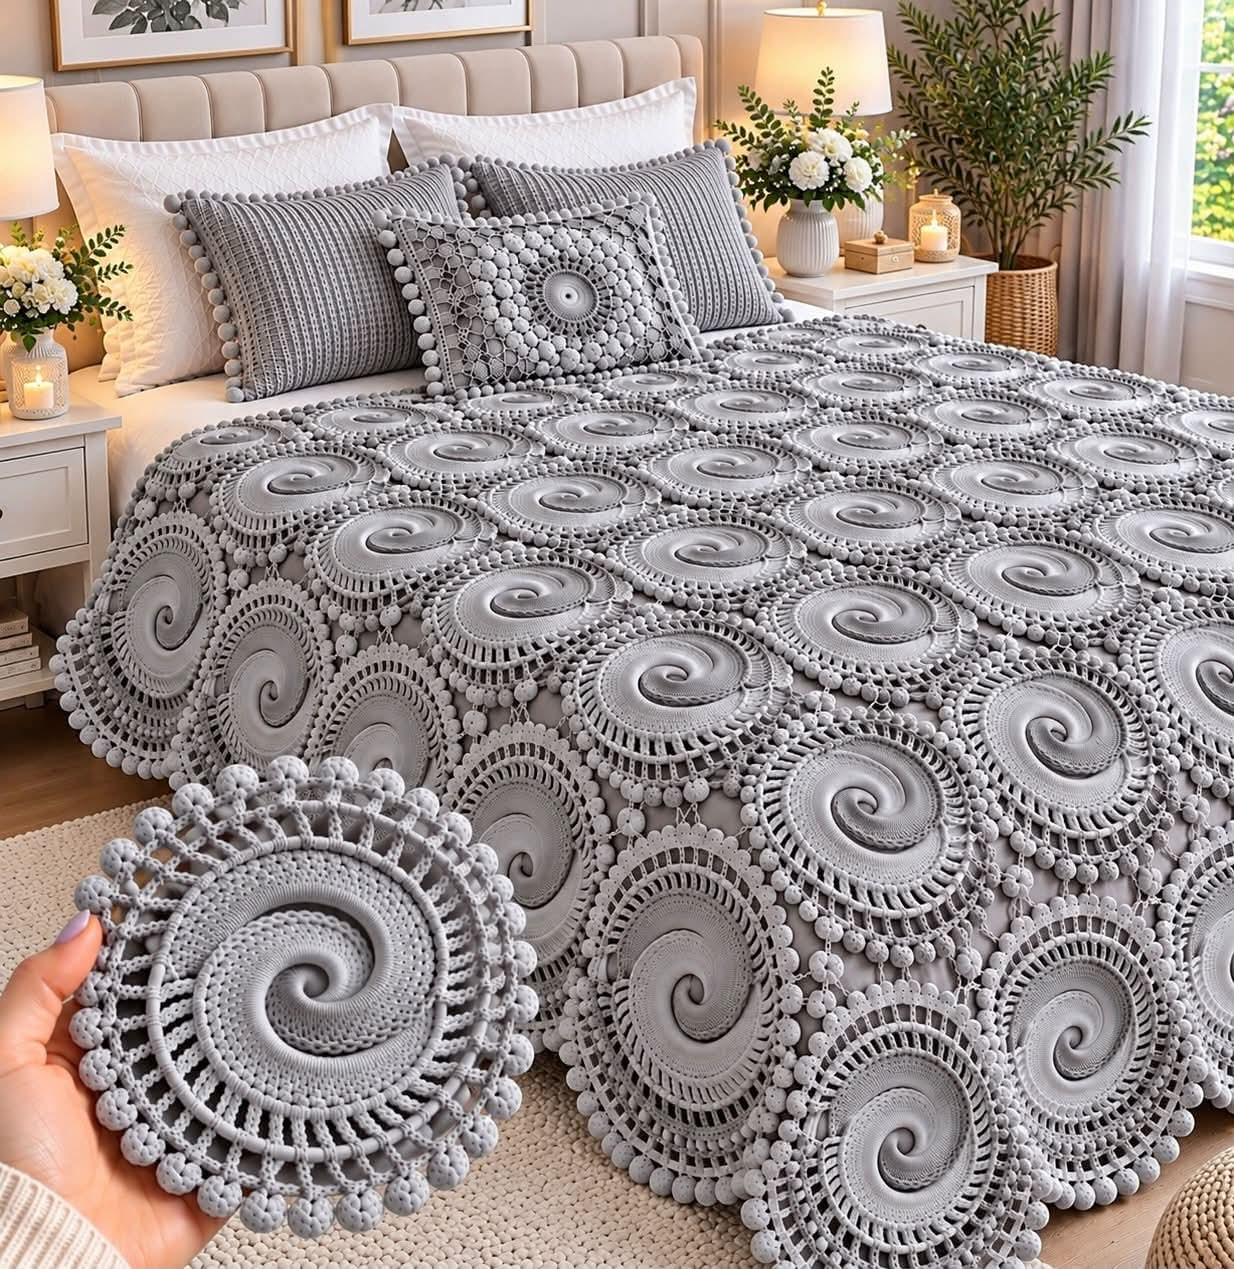
A spiral that closes its central curl too early becomes a plain circle, while one expanded too aggressively develops a ruffle before the lace even begins. This spiral crochet motif blanket pattern builds a sculptural gray medallion from a raised spiral center, dense circular field, radial openwork, and rounded outer edging. Use DK yarn with a 3.5–4 mm hook for an intermediate modular blanket, bedspread, runner, or pillow panel.
The Design: What Makes This Spiral Medallion Different
The motif uses texture instead of color changes to expose the rotation. A raised inner ridge follows the curl from the center outward, allowing a single pale-gray yarn to produce a visible spiral. The dense center then changes abruptly into tall radial openings, which reduce weight and establish attachment points for the outer lace. A rounded bobble-style perimeter finishes the crochet spiral medallion and supplies repeated joining positions.
The construction also solves a practical problem found in large circular motifs: excess fabric. You need enough increases to keep the dense center flat, but the openwork ring must expand independently once the stitch structure changes. A common mistake in a round crochet motif is continuing the same increase rate through both sections. That usually produces either a cupped center or a rippled lace perimeter.
Project Information at a Glance
| Skill Level | Time | Target Size | Hook | Best For |
|---|---|---|---|---|
| Intermediate | 2–3 hours per large motif | 18–20 cm photo-inspired target | 3.5–4 mm | Blankets, bedspreads, pillows and runners |
Published spiral motifs vary substantially with yarn and hook choice. Verified examples include approximately 7.6 cm in crochet thread, 10 cm in medium yarn, and a 12 cm DK spiral square. The 18–20 cm measurement used here is therefore a target for this expanded lace version, not a claimed measurement for the photographed piece.
Materials and Tools
Yarn
- Pearl-gray DK yarn — smooth plied yarn with clear stitch definition
Do not calculate a bedspread from an assumed grams-per-motif figure. Crochet one complete medallion, block it, weigh it on a digital scale, then multiply its weight by the final motif count. Add 15–20 percent for joins, fillers, border rounds, gauge variation and swatching.
Tools
- 3.5–4 mm crochet hook
- Tapestry needle
- Scissors
- Locking stitch markers
- Flexible measuring tape
- Digital kitchen scale
- Blocking mats
- Rustproof pins
Abbreviations
- MR — magic ring
- ch — chain
- sc — single crochet
- hdc — half double crochet
- dc — double crochet
- tr — treble crochet
- sl st — slip stitch
- sp — space
- st/sts — stitch/stitches
- BLO — back loop only
- FPsc — front-post single crochet
- bobble — grouped partial double crochets closed together
When a decrease is required during shaping, work it through the front loops only so the reduction remains less visible on the right side.
Spiral Crochet Motif Pattern — Step by Step
This is an original photo-inspired construction rather than a transcription of the photographed bedspread. Work one complete sample before committing yarn to a full blanket.
Central Spiral Foundation
Yarn: pearl gray.
Ch 14.
Join with a sl st to form a ring.
Round 1: Work 14 sc evenly around the ring. (14)
Do not close the central opening by pulling the foundation excessively tight.
Spiral Section 1
Ch 1.
Work:
1 sc, 2 hdc, 3 dc, 4 tr, 3 dc, 1 hdc
around the foundation.
The changing stitch heights begin the curved movement rather than forming a level conventional round.
Place a marker in the active loop.
Spiral Section 2
Continue around the outside edge of the first curved section.
Work 2 dc into every second stitch along the broadest outside curve.
Work one stitch per stitch along the tighter inside curve.
Finish with hdc and sc as the spiral approaches the center-facing edge.
Lay the work flat.
The curl should already be visible without forcing the fabric into position.
Spiral Section 3
Continue with dc along the outside arc.
Increase approximately every third stitch along the outermost portion.
Change to hdc as the row approaches the inner curve.
Finish the final section with sc.
Do not place increases on the tightest inner edge.
Spiral Section 4
Repeat the same shaping principle.
Use dc on the broad outside curve.
Add one increase approximately every fourth stitch where additional circumference is required.
Use hdc and sc toward the inside of the curl.
Stop and check flatness after the complete pass.
Spiral Section 5
Continue until the dense spiral measures approximately 9–10 cm across.
Increase only where the outer edge begins pulling upward.
Finish the section with hdc followed by sc and sl st so the raised spiral ridge tapers rather than ending abruptly.
Raised Spiral Ridge
The image has a pronounced cord-like ridge defining the spiral. Surface crochet provides a practical way to reproduce that relief in one color.
Join gray yarn close to the center opening.
Work surface slip stitches along the curved boundary created by the spiral sections.
Follow the line outward toward the perimeter of the dense disc.
Keep every surface stitch slightly looser than the fabric underneath.
Fasten off at the outer end.
For stronger relief, work a second line of surface slip stitches directly beside the first.
Dense Transition Round
The spiral now needs a stable circular perimeter before the lace begins.
Join yarn at the outer edge.
Ch 1.
Work sc evenly around the complete circumference.
Distribute increases only where needed to keep the disc flat.
Before joining, count the stitches.
Adjust the final few stitches so the total is divisible by 24.
Join with a sl st.
Mark every 1/24 section. These markers control the radial openwork.
First Radial Openwork Round
Ch 5.
Work one tr in the same base position.
Ch 2.
Skip the calculated number of stitches required to reach the next marker.
At the marker work:
tr, ch 2
Repeat around until 24 evenly distributed tall spokes have been formed.
Join at the top of the beginning chain.
There should be 24 radial openings.
Second Openwork Round
Sl st into the first ch-2 space.
Ch 1.
Work sc into the space.
Ch 5.
Sc into the next ch-2 space.
Repeat around.
You should have 24 ch-5 arches.
Join with a sl st.
Third Lace Round
Sl st into the first arch.
Work:
(sc, ch 3, dc, ch 3, sc)
into the arch.
Repeat in every ch-5 arch around.
Join.
At this stage the motif should still lie flat without being pinned.
Rounded Bobble Edge
The photographed medallions use a strongly dimensional outer border. A small bobble at every lace repeat reproduces the rounded rhythm without requiring separate pieces.
Join yarn at the center of the first lace repeat.
Ch 2.
Work a 5-dc bobble:
Yarn over, insert hook into the same space, yarn over and pull up a loop, yarn over and pull through two loops. Repeat until five partial dc stitches are on the hook, then yarn over and pull through all remaining loops.
Ch 1 to close the bobble.
Ch 3.
Sl st into the next lace junction.
Ch 3.
Make another bobble in the next designated center space.
Continue around.
Keep the bobbles equally spaced.
Join and fasten off.
Alternative Puff-Ball Border
If a softer rounded perimeter is preferred, replace each bobble with a puff stitch.
Yarn over and draw up a loop three times in the same space.
Yarn over and pull through the accumulated loops.
Ch 1 to secure.
Use the same border method for every medallion in one blanket. Mixing bobbles and puffs changes both diameter and joining distance.
Blocking the Master Motif
Block the first medallion before making the remaining pieces.
Dampen it according to the yarn manufacturer’s care directions.
Place it on a blocking mat.
Pin opposite points first.
Measure across the center.
Rotate the ruler 90 degrees and measure again.
Target approximately 18–20 cm for this expanded version.
The two diameter measurements should differ by no more than 5 mm.
Pin the remaining lace arches without pulling individual bobbles away from the circular perimeter.
Allow the motif to dry fully.
Making Matching Motifs
Use the first blocked piece as the master rather than depending exclusively on row counts.
After every new motif is completed, place it over the master.
Check the dense spiral diameter first.
Then compare the radial ring.
Finally compare the bobble perimeter.
If the centers match but the outer edges do not, the problem is normally in the chain spaces rather than the spiral itself.
Joining Two Spiral Medallions
The bedspread shown in the image keeps visible negative space between its circular motifs. A lace join is therefore more appropriate than a continuous solid seam.
Place two blocked motifs side by side.
Identify three corresponding bobble spaces on each edge.
Join yarn behind the first bobble of Motif A.
Ch 3.
Sl st into the corresponding space on Motif B.
Ch 3.
Return to the next joining space on Motif A.
Continue between the marked positions.
Do not pull the motifs together until their bobbles touch. Leave a controlled lace gap between the circular edges.
Four-Motif Filler
A small opening remains where four round motifs meet. Filling it gives a bedspread more stability without removing all of the negative space.
Make an MR.
Round 1: 8 sc in MR. (8)
Round 2: (sc, ch 4) × 4, skipping one base stitch between anchors.
Round 3: Work (sc, ch 5, sc) into each ch-4 loop.
During the final round, connect each ch-5 point to one surrounding medallion.
Fasten off.
Bedspread Layout
Do not calculate a circular-motif bedspread by multiplying motif diameter alone. The lace joining spaces affect both width and length.
Make a 2 × 2 test panel first.
Block the complete panel.
Measure its finished width and height.
Use those measurements to calculate the final grid.
| Layout | Motifs | Suggested Project |
|---|---|---|
| 4 × 5 | 20 | Small decorative throw |
| 6 × 8 | 48 | Medium throw |
| 8 × 10 | 80 | Large throw |
| 10 × 12 | 120 | Bed blanket |
| 12 × 14 | 168 | Large bedspread |
These counts are planning grids rather than guaranteed mattress dimensions.
Calculating Yarn
Complete and block one medallion.
Weigh it on a digital scale.
If one motif weighs 28 g and the selected layout uses 120 motifs, the medallions require approximately 3,360 g before joining yarn, fillers and the border are included.
Add 15–20 percent to the calculated figure.
For a project this large, buy yarn from the same dye lot where possible because the entire design uses one color.
Matching Spiral Pillow
A single large medallion can form the center of a decorative pillow like the one shown with the bedspread.
Make one spiral motif using the same yarn.
After the bobble round, continue with four corner sections to convert the circle into a square.
Mark four equally spaced points.
At each corner work:
(2 dc, 2 tr, ch 3, 2 tr, 2 dc)
Use dc between corners.
On the next round, repeat the corner increase while adjusting the side stitches until the panel lies square.
Continue until the panel reaches the required cushion dimensions.
Bedspread Border
Once every motif and filler is joined, work a stabilizing border around the complete perimeter.
Border Round 1
Join gray yarn at an outer corner.
Work sc evenly around the bedspread.
Use chain stitches to bridge deep spaces between neighboring medallions.
Border Round 2
Work ch-5 arches around the perimeter.
Anchor each arch with sc.
At major corners, add one extra arch if required to prevent pulling.
Border Round 3
Into each ch-5 arch work:
(sc, hdc, 3 dc, hdc, sc)
Repeat around.
Border Round 4
Add one small bobble at the center of each shell.
Ch 2 between bobbles.
Join and fasten off.
Assembly
- Crochet one complete spiral medallion and block it as the master sample.
- Measure its dense center, complete diameter and finished weight.
- Make the required number of motifs while comparing each one with the master.
- Block all medallions to matching dimensions before joining.
- Arrange the complete motif grid on a flat surface and check the bedspread proportions.
- Connect neighboring motifs through corresponding lace spaces rather than through the raised spiral.
- Add the four-motif fillers where additional stability is required.
- Join completed rows or panels while maintaining equal gaps between circles.
- Work the stabilizing outer border after the complete bedspread lies flat.
- Weave remaining tails into dense sections and perform a light final blocking of the joins and perimeter.
The completed fabric should retain raised spiral centers, open radial lace, rounded outer texture and consistent spaces between neighboring medallions.
7 Technical Tips
- Mark the beginning of the spiral. Losing the active position by one stitch can shift the relief ridge and create a visible step in the curl.
- Measure the dense center at 90-degree angles. A difference greater than 5 mm indicates uneven increases before the lace is added.
- Correct cupping before the openwork ring. A center rising more than approximately 1 cm from a flat surface needs additional circumference rather than stronger blocking.
- Keep surface slip stitches loose. A relief ridge shorter than the fabric beneath it pulls the spiral inward and creates a bowl-shaped center.
- Count all 24 radial sections. Missing one spoke shifts every later bobble and makes motif-to-motif joining asymmetrical.
- Block before joining. Connecting an 18 cm motif directly to a 20 cm motif transfers the 2 cm difference into the lace network and produces irregular gaps.
- Weigh the blocked master motif. A difference of only 3 g multiplied across 120 medallions changes the yarn calculation by 360 g.
Fixing a Cupped Spiral
Cupping means the outside circumference is too short for the diameter of the center.
Inspect the last dense spiral section first.
Add increases gradually around the broad outside curve rather than placing several increases beside each other.
If cupping appears only after the radial ring, lengthen selected chain spaces by one chain.
Place the motif on a table again.
It should rest without pressure before the next round is worked.
Fixing a Ruffled Motif
A ruffled edge contains excess circumference.
If the dense center ripples, remove some increases from the final spiral section.
If only the lace ripples, shorten selected chain arches.
Do not remove a complete radial repeat merely to correct mild ruffling because the repeat count controls the joining positions.
Compare the corrected piece against the master motif before continuing.
Why a Single Color Works
Many spiral patterns depend on contrasting yarns to reveal rotation. This version instead uses relief.
The surface ridge catches light differently from the dense stitches beside it. The openwork then creates a second texture, while bobbles create a third.
That hierarchy is important in a monochrome blanket. Without changes in stitch height, density and relief, a pale-gray spiral can disappear visually when viewed from across a room.
Choosing Yarn
A smooth DK yarn gives the raised spiral better definition than a heavily brushed fiber. Published spiral references confirm DK as a practical weight, with documented hooks from approximately 3.5 to 5 mm.
Cotton creates crisp relief but becomes heavy when repeated across a bed-size project. Acrylic reduces total weight and provides more elasticity through the lace joins. A cotton-acrylic blend offers an intermediate structure.
Whatever fiber is selected, use the same yarn throughout the medallions and joining network. Changing yarn thickness in the filler motifs can alter the spacing between the large circles.
Conclusion
This spiral crochet motif blanket pattern uses relief rather than multiple colors to make its rotation visible: a shaped central curl establishes movement, surface crochet strengthens the ridge, and radial lace expands the circle before the bobble perimeter. Make and block one master medallion before starting a bedspread, then record its diameter and weight. Those two measurements determine motif consistency, layout dimensions and total yarn more reliably than an unblocked stitch count.
Save the layout to Pinterest or share the finished bedspread on Instagram with #SpiralCrochetMedallion. For this specific monochrome design, would you keep every bobble pearl gray or make only the outer bobble ring white for contrast?









