Introduction
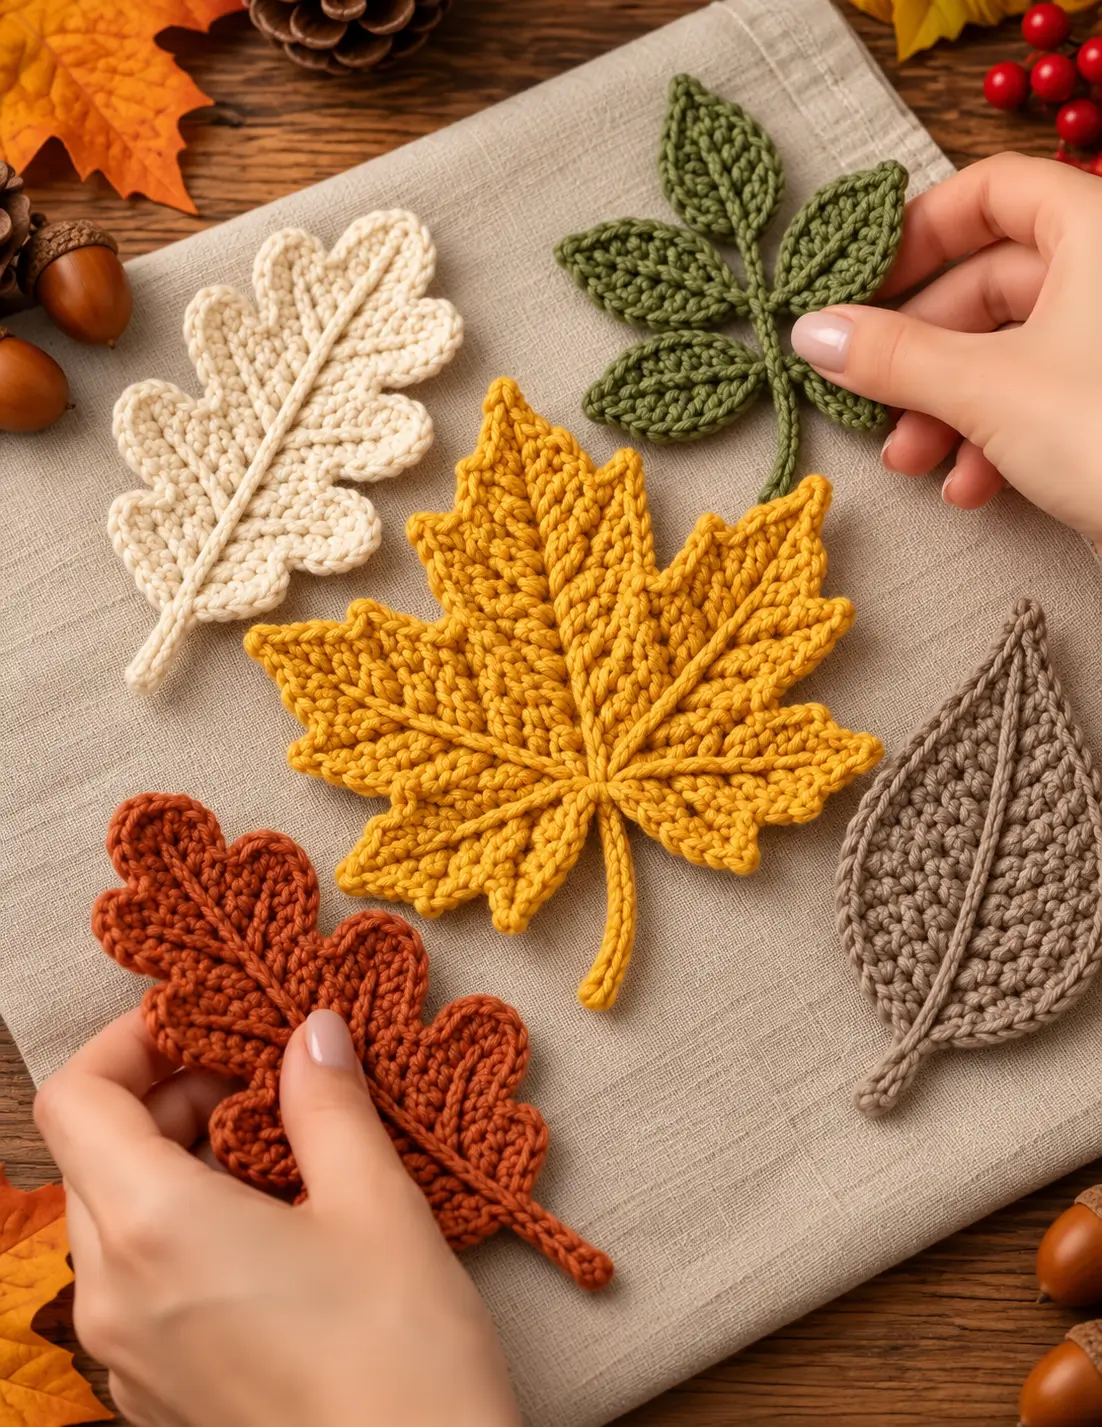
A maple leaf needs five clearly separated points, while an oak leaf depends on rounded lobes instead of sharp tips. This crochet autumn leaves pattern creates a coordinated collection inspired by the photo: a golden maple leaf, cream and rust oak leaves, a five-leaf olive branch, and a taupe pointed leaf. Use worsted cotton with a 3.5–4.0 mm hook for firm motifs suitable for autumn decorations, appliqués, garlands, table settings, and seasonal crafts.
The Design: Four Leaf Structures in One Autumn Collection
The collection works because each leaf uses a different silhouette while repeating the same raised-vein treatment. The maple leaf has five major pointed lobes with smaller teeth between them. The oak leaves use rounded side lobes and a narrow base. The taupe leaf is an elongated oval with a sharp tip, while the olive branch combines five individual pointed leaves around a slender crocheted stem.
All four designs are worked as flat motifs. Their raised center veins are added after the main leaf fabric is complete, which keeps the body flat while creating the pronounced lines visible in the reference. Cotton or a cotton-rich yarn is useful because the edges can be blocked into defined points without adding stuffing or internal support.
Project Info at a Glance
| Skill Level | Construction | Finished Size | Hook | Best For |
|---|---|---|---|---|
| Intermediate | Flat motifs with surface veins | Approximately 10–22 cm | 3.5–4.0 mm | Garlands, appliqués, table décor and wreaths |
Materials and Tools
Yarn
- Mustard yellow — worsted #4 cotton — approximately 25–35 g for one large maple leaf
- Burnt orange — worsted #4 cotton — approximately 15–25 g for one oak leaf
- Warm cream — worsted #4 cotton — approximately 15–25 g for one oak leaf
- Olive green — worsted #4 cotton — approximately 20–30 g for one five-leaf branch
- Taupe — worsted #4 cotton — approximately 10–15 g for one pointed leaf
The gram figures are project estimates. Weigh the first completed motif if you need an exact quantity for a large garland or repeated table setting.
Tools
- 3.5–4.0 mm crochet hook
- Worsted #4 cotton or cotton-blend yarn
- Yarn needle
- Scissors
- Stitch markers
- Blocking mat
- Rust-resistant pins
Abbreviations
- ch — chain
- sl st — slip stitch
- sc — single crochet
- hdc — half double crochet
- dc — double crochet
- tr — treble crochet
- st/sts — stitch/stitches
- sp — space
- FO — fasten off
Pattern — Large Golden Maple Leaf
The maple leaf is the largest motif in the collection. Its structure is built around a central spine with five principal lobes: one long center lobe, two medium upper side lobes, and two shorter lower lobes.
Central Foundation
With mustard yellow, ch 22.
Beginning in the second chain from the hook, work:
2 sc, 3 hdc, 7 dc, 4 hdc, 5 sc.
Work 3 sc in the final chain.
Rotate the work and crochet along the unused side of the foundation chain.
Work:
5 sc, 4 hdc, 7 dc, 3 hdc, 2 sc.
Join at the top.
This creates an elongated central body that will support the lobes.
Center Lobe
At the upper end of the leaf, ch 12.
Beginning in the second chain from the hook work:
sc, hdc, dc, 5 tr, dc, hdc, sc.
Sl st back into the main leaf body.
The center lobe should be the longest point of the maple leaf.
Upper Left Lobe
Move approximately 3–4 stitches down the left side.
Ch 10.
Beginning in the second chain work:
sc, hdc, dc, 3 tr, dc, hdc, sc.
Sl st into the leaf body.
Upper Right Lobe
Repeat the same construction on the opposite side:
Ch 10.
Work:
sc, hdc, dc, 3 tr, dc, hdc, sc.
Sl st into the body.
Lower Left Lobe
Move farther down the left side.
Ch 8.
Beginning in the second chain work:
sc, hdc, 3 dc, hdc, sc.
Sl st into the main body.
Lower Right Lobe
Repeat on the opposite side.
Ch 8.
Work:
sc, hdc, 3 dc, hdc, sc.
Sl st into the body.
Maple Leaf Secondary Points
The photograph shows smaller points between the five major lobes. Add these during the edging round.
Work sc around the entire leaf.
At each major lobe tip work:
(sc, ch 3, sl st into second ch from hook, sc).
Between major lobes, create smaller points with:
ch 2, sl st into second ch from hook.
Continue sc around.
This produces the serrated maple outline without making every point the same size.
Maple Leaf Stem
At the bottom center, ch 14.
Sl st back along the chain to the leaf base.
For a thicker stem, work sc back along the chain instead of slip stitches.
FO.
Raised Maple Leaf Center Vein
Join mustard yarn at the base of the stem.
Work surface slip stitches from the stem through the center of the leaf and toward the center-lobe tip.
Keep the line relaxed.
Stop approximately 5 mm before the outer point.
FO.
Maple Leaf Side Veins
Join yarn along the center vein near the base of each major lobe.
Surface slip stitch outward toward the lobe tip.
Repeat for all four side lobes.
The finished leaf should show five vein lines radiating from the lower central area.
Maple Leaf Finished Size
Block the large maple leaf to approximately 18–22 cm wide and 20–24 cm long including the stem.
Pin the center point first, followed by the two upper side points and two lower points.
Shape the smaller teeth only after the five principal lobes are symmetrical.
Pattern — Rounded Oak Leaf
Use warm cream or burnt orange.
The oak leaf differs from the maple leaf because its silhouette depends on rounded lobes rather than sharp points.
Oak Leaf Foundation
Ch 20.
Beginning in the second chain work:
3 sc, 4 hdc, 5 dc, 4 hdc, 3 sc.
Work 3 sc in the final chain.
Rotate.
Work the same sequence down the opposite side:
3 sc, 4 hdc, 5 dc, 4 hdc, 3 sc.
Join.
Oak Leaf Lobes
Work around the outer edge.
For the first small lower lobe work:
(sc, hdc, 3 dc, hdc, sc)
across the next section of the edge.
Sl st in the next stitch.
For the next lobe work:
(sc, hdc, 4 dc, hdc, sc).
Sl st in the next stitch.
For the large upper side lobe work:
(sc, hdc, 5 dc, hdc, sc).
Continue toward the top.
Oak Leaf Tip
At the upper center work:
(sc, hdc, 3 dc, ch 2, sl st into second ch from hook, 3 dc, hdc, sc).
This creates a subtle point without turning the oak leaf into a maple shape.
Second Side of Oak Leaf
Mirror the lobe sequence down the opposite side:
Large lobe → medium lobe → small lobe.
Join at the lower center.
The two sides should contain the same number of rounded lobes.
Oak Leaf Stem
Ch 12.
Sl st or sc back along the chain.
Join at the leaf base.
FO.
Raised Oak Leaf Vein
Join matching yarn at the bottom of the stem.
Surface slip stitch through the center of the leaf toward the upper tip.
Stop approximately 5 mm before the edge.
FO.
For additional detail, work two or three short side veins toward the largest lobes.
Cream Oak Leaf
Make one complete oak motif in warm cream.
Block it to approximately 11–15 cm wide and 16–20 cm long including the stem.
The rounded lobes should remain distinct after blocking.
Burnt Orange Oak Leaf
Repeat the same pattern using burnt orange.
Keep the hook size unchanged.
Place the orange and cream leaves together after blocking and compare their dimensions.
A difference greater than approximately 5 mm should be corrected before using the motifs in a symmetrical garland or table arrangement.
Pattern — Simple Pointed Taupe Leaf
This motif uses a long oval body with one sharp tip and a raised central vein.
With taupe, ch 18.
First Side
Beginning in the second chain from the hook work:
2 sc, 3 hdc, 6 dc, 3 hdc, 2 sc.
In the final chain work:
(sc, ch 2, sc).
Second Side
Rotate the work.
Working along the unused side of the foundation chain, work:
2 sc, 3 hdc, 6 dc, 3 hdc, 2 sc.
Join at the base.
Pointed Leaf Edging
Work one round of sc around the complete leaf.
At the upper tip work:
(sc, ch 2, sc).
Do not add increases along the long sides.
The edge should remain smooth rather than ruffled.
Taupe Leaf Stem
At the bottom center ch 10.
Sl st back along the chain.
FO.
Taupe Leaf Center Vein
Join yarn at the stem base.
Surface slip stitch along the original foundation chain toward the leaf tip.
Stop just before the ch-2 point.
FO.
Block to approximately 8–11 cm wide and 15–18 cm long including the stem.
Pattern — Five-Leaf Olive Branch
The green motif uses five individual pointed leaves attached to one central stem. Make the leaves separately first so their positions can be adjusted before permanent assembly.
Small Olive Leaf — Make 2
Ch 12.
Beginning in the second chain work:
2 sc, 2 hdc, 4 dc, hdc, sc.
In the final chain work:
(sc, ch 2, sc).
Rotate.
Work:
sc, hdc, 4 dc, 2 hdc, 2 sc.
Join.
FO leaving a 15 cm tail.
Medium Olive Leaf — Make 2
Ch 14.
Beginning in the second chain work:
2 sc, 3 hdc, 5 dc, hdc, sc.
At the tip work:
(sc, ch 2, sc).
Rotate and mirror the sequence down the opposite side.
FO.
Top Olive Leaf — Make 1
Ch 15.
Beginning in the second chain work:
2 sc, 3 hdc, 6 dc, hdc, sc.
At the tip work:
(sc, ch 2, sc).
Rotate and mirror the stitches down the opposite side.
FO.
Olive Branch Stem
With olive yarn, ch 28.
Beginning in the second chain from hook, sl st in every chain.
For a thicker stem, use sc instead of slip stitches.
FO leaving a long tail.
Arranging the Five Leaves
Lay the stem vertically.
Place the longest leaf at the top.
Position the two medium leaves approximately 2–3 cm below the top leaf, one on each side.
Place the two smaller leaves another 2–3 cm lower.
Angle the side leaves upward rather than horizontally.
Attaching the Olive Leaves
Use the yarn tails to sew each leaf base around the central stem.
Keep the attachment area compact.
Do not sew along the full side of the leaf.
The five leaves should remain independently shaped.
Olive Leaf Veins
Work one surface-slip-stitch line along the center of each leaf.
Begin at the stem connection and work toward the tip.
Keep all five veins at similar tension.
The completed branch should measure approximately 15–20 cm from the bottom of the stem to the top leaf.
Creating Raised Veins
Surface slip stitch is used throughout this collection because it creates a continuous raised line without requiring a second fabric layer.
Insert the hook from the front of the leaf.
Hold the working yarn behind the motif.
Pull a loop to the front.
Insert the hook into the next position and pull the new loop through the loop already on the hook.
Continue along the planned vein.
Keep each stitch approximately the same length as the underlying crochet stitches.
Alternative Embroidered Veins
If surface crochet makes the leaf curl, use a yarn needle instead.
Thread the needle with matching yarn.
Work chain stitch or a loose backstitch from the base toward the tip.
This produces a flatter vein and works particularly well on smaller leaves.
Making the Leaves Firmer
Use a hook approximately 0.5 mm smaller than you would normally select for the yarn.
The denser gauge helps the points and lobes hold their shape.
Do not compensate by pulling the yarn excessively tight.
Stitches should remain easy to enter on the edging round.
Making a Crochet Autumn Leaf Garland
Make approximately:
- 3 maple leaves
- 4 cream oak leaves
- 4 burnt-orange oak leaves
- 3 olive branches
- 4 taupe pointed leaves
With taupe or cream yarn, ch until the cord reaches the required garland length.
Attach the motifs every 10–15 cm.
Alternate large and small leaves rather than placing all maple leaves together.
Autumn Table Decoration
For a table arrangement similar to the reference, combine one large mustard maple leaf with one cream oak leaf, one orange oak leaf, one green branch and one taupe leaf.
Place the maple leaf near the center because it has the widest silhouette.
Angle the other motifs outward.
The mixed shapes create more visual separation than using five versions of the same leaf.
Using the Leaves as Coasters
The maple and oak motifs can function as decorative coasters if made from absorbent cotton.
Skip bulky surface veins underneath cups or glasses.
Instead, embroider the vein with a flatter stitch.
Block the finished coaster completely flat.
Test the motif with the intended cup before making a full set.
Using the Leaves as Appliqués
For appliqués, omit the long stems.
Leave a 30 cm yarn tail at the base of each motif.
Use that tail to attach the leaf to blankets, bags, cushions, table runners, baskets or seasonal wall hangings.
Sew around the central body while leaving selected lobe tips free for slight dimension.
Autumn Wreath Layout
Make approximately 12–18 motifs depending on wreath diameter.
Use the maple leaves as the largest focal pieces.
Place oak leaves between them.
Use the pointed taupe leaves and green branches to fill narrow gaps.
Overlap neighboring motifs by approximately 2–4 cm.
Color Variations
The reference palette uses mustard, burnt orange, cream, olive and taupe. The same patterns can be worked in additional autumn shades without changing the stitch construction.
- Burgundy — suitable for maple leaves
- Rust — suitable for oak leaves
- Forest green — suitable for compound branches
- Caramel — suitable for pointed leaves
- Golden tan — suitable for smaller maple motifs
Blocking the Maple Leaf
Place the wet or lightly dampened motif on a blocking mat.
Pin the central upper point first.
Pin the lower stem in a straight line with that point.
Next pin the two upper side lobes.
Then position the lower lobes.
Only after the five principal points are balanced should you shape the smaller serrations.
Blocking the Oak Leaves
Pin the top and bottom first.
Shape matching lobes on opposite sides.
Do not stretch the lobes into sharp points.
The cream and burnt-orange motifs should retain the rounded profile that distinguishes them from the maple leaf.
Blocking the Pointed Leaf
Pin the base, tip and widest point on both sides.
The central vein should form a straight line from stem to tip.
If one side bulges farther than the other, reposition the side pins before the motif dries.
Blocking the Olive Branch
Pin the stem first.
Position the top leaf directly above it.
Angle the two upper side leaves approximately 35–45 degrees from the stem.
Angle the lower pair slightly wider.
Keep the leaf tips separated.
Assembly
- Crochet the large mustard maple body first, then add its five major lobes, smaller edge points and stem.
- Add the raised center and side veins to the maple leaf, keeping every surface stitch loose enough for the motif to remain flat.
- Make the cream and burnt-orange oak leaves with identical stitch sequences so their finished silhouettes match.
- Crochet the taupe pointed leaf and check that the tip remains centered over the foundation chain before adding its raised vein.
- Make five individual olive leaves in three sizes and block them before attaching them to the branch stem.
- Assemble the olive branch with the longest leaf at the top and paired leaves positioned symmetrically below it.
- Block every completed motif separately, shaping sharp maple points, rounded oak lobes and smooth pointed-leaf edges according to their individual structures.
- Compare repeated motifs against the first blocked sample and correct any size difference greater than approximately 5 mm.
- Weave yarn tails through dense stitches on the wrong side, keeping them away from the raised vein lines.
- Arrange the finished collection as a garland, table display, wreath, coaster set or appliqué group after all motifs are completely dry.
The completed collection should contain clearly different leaf silhouettes connected visually by consistent yarn weight, edging and raised vein treatment.
7 Technical Tips
- Keep the maple center lobe longer than its four side lobes. If all five lobes finish at the same length, the silhouette becomes star-like rather than recognizably maple-shaped.
- Limit size variation between matching oak leaves to approximately 5 mm. Larger differences become visible when cream and orange motifs alternate in a garland.
- Keep surface slip stitches relaxed. A vein that is shorter than the underlying leaf body pulls the motif into a permanent lengthwise curl.
- Use rounded stitch groups on the oak leaves rather than picots. Sharp points along every lobe remove the structural distinction between the oak and maple designs.
- Keep the taupe leaf tip aligned with the foundation chain. A tip displaced more than a few millimeters produces an asymmetrical leaf after blocking.
- Attach olive leaves through only their lower 5–10 mm. Sewing farther up the leaf restricts movement and makes the five-leaf branch look like one solid piece.
- Weave each structural tail through at least 4–5 cm of dense crochet. Avoid running tails beneath the surface vein because the extra thickness can become visible from the front.
Yarn Estimation for a Larger Collection
The most accurate method is to weigh one finished sample of each design.
For example, suppose the completed motifs weigh:
- Large maple leaf — 30 g
- Oak leaf — 20 g
- Five-leaf branch — 25 g
- Pointed leaf — 12 g
A collection containing three maple leaves, eight oak leaves, three branches and four pointed leaves would require approximately:
Maple: 30 × 3 = 90 g
Oak: 20 × 8 = 160 g
Branches: 25 × 3 = 75 g
Pointed leaves: 12 × 4 = 48 g
Total estimated sample-based consumption would be 373 g. Add approximately 10% for gauge variation, stems and test motifs. Replace these example weights with the measurements from your own finished samples before purchasing yarn for a large project.
Care and Storage
Follow the care instructions for the selected yarn.
After washing, reshape the motifs while damp.
Do not hang large wet maple leaves from their stems because the weight can stretch the narrow base.
Store finished leaves flat whenever possible.
If they are used in a garland, roll the garland loosely around a wide cardboard tube rather than folding sharp creases through the lobes.
Conclusion
The strongest feature of this crochet autumn leaves pattern is the contrast between five different silhouettes rather than color alone. Start with the golden maple leaf and confirm its five main lobes before adding the raised veins. Then use the same yarn weight and hook for the rounded oak leaves, olive branch and pointed taupe motif so the collection remains visually consistent. Block each design according to its natural shape instead of forcing every leaf into the same outline. Save the finished collection to Pinterest or share it on Instagram with #CrochetAutumnLeaves. Which motif would you repeat most for a fall garland: the golden maple, rounded oak, or olive branch?









