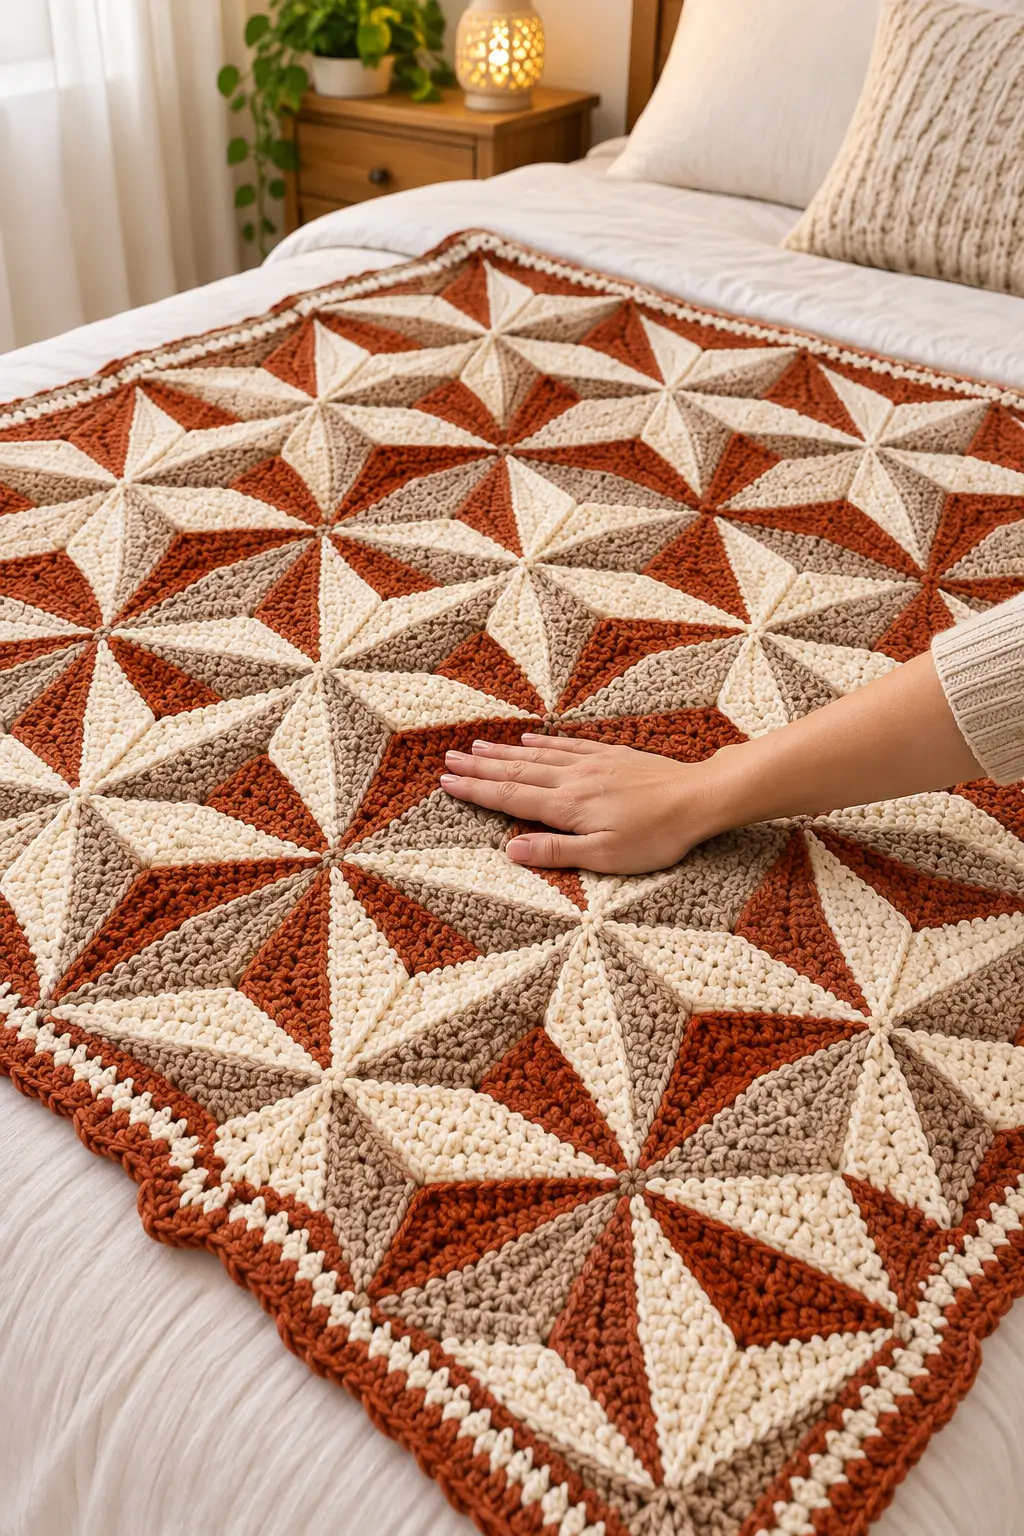
Eight narrow points must arrive at the same center without forcing the blanket into a bowl. This geometric star crochet blanket pattern uses modular triangular wedges in rust, warm cream and taupe to create repeating pinwheel stars across a rectangular throw. Worked with medium-weight yarn and a firm but flexible gauge, the construction is best suited to an intermediate crocheter who is comfortable measuring motifs and joining pieces accurately.
The Design: What Makes This Star Blanket Different
The visual effect comes from color placement rather than complicated surface decoration. Long triangular wedges point toward shared centers, while alternating cream, taupe and burnt-rust sections create the impression of overlapping eight-point stars. Each wedge needs the same finished length. Even a small difference becomes visible when eight tips meet.
The second structural decision is the join. Instead of hiding every seam, a controlled joining line helps define the geometry and prevents neighboring wedges from visually merging. Finally, the border is intentionally simpler than the center. Rust dominates the outer edge, with a narrow cream accent separating the geometric field from the final frame.
A common mistake with a crochet star motif blanket is joining unblocked wedges. Their tips may look identical on the hook but differ substantially after relaxing.
Project Information at a Glance
| Skill Level | Construction | Suggested Yarn | Hook | Target Size |
|---|---|---|---|---|
| Intermediate | Joined triangular modules | Worsted #4 | 5.0 mm after swatching | Approx. 120 × 150 cm |
Materials and Tools
Yarn
- Burnt Rust — worsted #4 — main contrast color
- Warm Cream — worsted #4 — light contrast
- Warm Taupe — worsted #4 — neutral contrast
Choose all three colors from the same yarn line when possible. Differences in fiber, twist or elasticity can change the dimensions of individual triangles even when the stitch counts match.
Tools
- 5.0 mm crochet hook or size required for gauge
- Yarn needle
- Scissors
- Locking stitch markers
- Measuring tape
- Blocking mats
- Rustproof blocking pins
Abbreviations
- ch — chain
- sc — single crochet
- hdc — half double crochet
- dc — double crochet
- sl st — slip stitch
- st/sts — stitch/stitches
- RS — right side
- WS — wrong side
Construction Overview
The blanket is treated as a geometric modular project rather than as one continuous square. Make identical tapered wedges, arrange them into rotating star groups, block them, then join the groups into the final rectangle.
The photographed design suggests repeated points rather than conventional granny-square clusters. The instructions below therefore use an original photo-inspired wedge system that can be resized without depending on one fixed blanket dimension.
Gauge and Master Wedge
Do not begin by making dozens of triangles. Complete one master wedge first.
With worsted yarn and a 5.0 mm hook, aim for a fabric that holds a crisp edge while remaining flexible enough to lie flat.
A useful target for the finished wedge is approximately:
- Length: 14–16 cm
- Width at outer edge: 9–11 cm
- Tip: narrow enough for multiple wedges to meet without a large central hole
The exact dimensions are project targets. Your blocked wedge measurement becomes the controlling measurement for the complete blanket.
Basic Long Triangle Wedge
Make wedges in cream, taupe and rust according to the chosen layout.
Ch 2.
Row 1: 2 sc in second ch from hook. (2)
Row 2: Ch 1, turn. 2 sc in first st, sc in final st. (3)
Row 3: Ch 1, turn. Sc across. (3)
Row 4: Ch 1, turn. 2 sc in first st, sc across. (4)
Row 5: Ch 1, turn. Sc across. (4)
Row 6: Ch 1, turn. 2 sc in first st, sc across. (5)
Continue in this sequence, increasing by one stitch at the beginning of every second row.
Stop when the wedge measures approximately 14–16 cm long and 9–11 cm across its widest edge.
Do not fasten off immediately. Measure the piece first and record the final row number and stitch count.
That becomes the master specification for every remaining wedge.
Creating a Sharper Star Point
If the first triangle appears too broad near its tip, begin with a longer narrow section.
Work the first three rows with two stitches before starting the regular increases.
If the triangle becomes too narrow, increase every row for the first four rows, then change to increases every second row.
Once a shape has been selected, do not alternate between shaping formulas. All wedges that meet at one star center need matching angles.
Optional Raised Center Ridge
The photographed wedges show strong directional texture running from the outer edge toward the star centers. A surface ridge can reproduce this effect.
Thread a yarn needle with matching yarn.
Beginning at the wide edge, work a line of surface chain or neat running stitches along the visual center of the wedge.
Stop approximately 5 mm before the pointed tip.
Alternatively, work the central stitch of selected rows through the back loop only during construction. This creates a subtler line without adding a separate surface detail.
Color Planning
The blanket works because the colors rotate instead of forming isolated blocks.
Use approximately:
- 35–40% warm cream
- 30–35% burnt rust
- 25–30% taupe
These percentages describe the visual balance rather than required yarn quantities.
A simple eight-wedge star can follow this sequence:
Cream → Rust → Cream → Taupe → Cream → Rust → Cream → Taupe.
For a stronger pinwheel effect, rotate the sequence in the neighboring star rather than positioning identical colors directly beside one another.
Building the First Eight-Point Star
Block eight completed wedges before joining.
Place their narrow tips together on a flat surface.
Arrange the wide edges outward to form a complete radial unit.
Pin the tips temporarily.
Check that the unit lies flat.
If the outer circumference forms waves, the combined wedge angles are too wide. If the unit forms a shallow bowl, the angles are too narrow.
Correct the master wedge before making the full blanket.
Joining the Wedges
Place two neighboring wedges with right sides facing.
Using matching yarn, slip stitch through corresponding edge stitches from the outer edge toward the center.
Stop before tightening the final center point.
Add the remaining wedges in the planned color order.
When all eight pieces are connected, bring the center tips together with several small stitches.
Do not pull the center into a hard knot. It should remain flat.
Alternative Flat Seam
If a raised seam is not desired, use mattress stitch from the wrong side.
Insert the needle under corresponding edge loops without catching the entire thickness of each stitch.
Tighten after every 4–5 cm rather than after every stitch.
This keeps the seam flexible and reduces puckering.
From Stars to a Rectangular Blanket
A repeating star field does not have to be constructed as isolated circles. Neighboring motifs can share visual boundaries, producing the interlocking pattern seen in the photograph.
Before permanent assembly, arrange all completed star sections on a bed or clean floor.
Rotate alternating units by 45 degrees where required.
Distribute cream wedges so they form diagonal pathways through the blanket. Place rust and taupe between those lighter pathways.
Photograph the arrangement before moving any pieces.
Suggested Blanket Layouts
| Finished Use | Approximate Target Size |
|---|---|
| Baby / stroller blanket | 75 × 95 cm |
| Lap blanket | 90 × 120 cm |
| Sofa throw | 120 × 150 cm |
| Large throw | 140 × 180 cm |
| Bed-end blanket | 160 × 200 cm |
Calculate the actual number of motifs only after blocking the first complete star section. Joining seams can alter the usable width, so multiplying the raw triangle width is not accurate enough.
Keeping the Star Centers Flat
The center is the most sensitive point in the construction.
Eight thick wedge tips stacked into one seam create unnecessary bulk. Instead, stop each side seam a few millimeters before the point.
Arrange the eight tips like spokes.
Using a yarn needle, pass through one inner loop from each wedge.
Make a second pass if necessary.
Secure the yarn without pulling the loops into a tight bundle.
The center opening should be tiny but still flexible.
Joining Complete Sections
Once individual sections have been blocked, place them right sides together.
Use rust, cream or a neutral joining color depending on the edge being joined.
Slip stitch corresponding edge stitches together.
Check the seam every 10–15 cm.
If one section begins extending beyond its neighbor, stop. Do not force the remaining stitches to match.
Recount the edges and correct the mismatch before continuing.
Squaring the Outer Edges
A radial star arrangement can leave triangular gaps along the outside of the blanket. Fill these areas with half-wedges or matching corner pieces.
Half-Wedge Filler
Start with the same pointed foundation as the full wedge.
Increase on only one edge every second row.
Keep the opposite edge straight.
Continue until its length matches the neighboring full wedge.
Block the filler against the actual blanket edge before attaching it.
Corner Filler Pieces
Each corner should finish at approximately 90 degrees.
Make a small triangular filler in rust or cream.
Begin at the corner point and increase at both outer edges until the piece fills the remaining space.
Pin it in position before fastening off.
The correct stitch count is determined by the blocked opening rather than by an arbitrary fixed number.
First Border Round
Use burnt rust.
Join yarn at one corner.
Round 1: Sc evenly around the entire blanket.
At each corner work:
(sc, ch 2, sc) in the corner space.
Join with sl st.
Count the stitches on opposite sides.
The top and bottom counts should match each other. Both side counts should also match.
Cream Accent Border
Change to warm cream.
Round 2: Ch 1, sc in each st around. Work (sc, ch 2, sc) in each corner.
Join with sl st.
Round 3: Ch 2, hdc in each st around. Work (2 hdc, ch 2, 2 hdc) in each corner.
Join and fasten off.
This narrow light band separates the complex center from the darker outer frame.
Rust Outer Border
Rejoin burnt rust.
Round 4: Sc around with (sc, ch 2, sc) at each corner.
Round 5: Hdc around with (2 hdc, ch 2, 2 hdc) at each corner.
Round 6: Sc around.
Stop here for a plain geometric edge.
Optional Small Scalloped Edge
For a slightly more decorative finish, add one restrained scallop round.
*Skip 1 st, 5 dc in next st, skip 1 st, sl st in next st.*
Repeat around, adjusting the spacing slightly near each corner if required.
The scallops should remain relatively small. Large shells compete visually with the angular star pattern.
Yarn Quantity Calculation
Because yarn brands differ considerably in density, calculate quantity from a completed motif rather than relying on a universal gram estimate.
Make and block one complete representative star section.
Weigh it.
Multiply that weight by the number of equivalent sections planned for the blanket.
Add the measured weight of filler pieces if they represent a significant portion of the design.
Finally add approximately 10–15% for seams, the border, swatching and color distribution.
For color-specific quantities, weigh the yarn balls before and after completing the master section. Record the amount consumed from each color separately.
Making a Smaller Version
Do not simply remove random triangles from the outside.
Reduce the number of complete star repeats while maintaining the same geometric sequence.
Then rebuild the edge with the appropriate half-wedges and corner fillers.
This preserves the visual rhythm.
Making a Larger Bedspread
For a bedspread, first determine the desired top dimensions and drop.
Make enough complete units to cover the mattress top.
Additional star rows can then extend down the sides.
A separate border should be added only after the full bedspread dimensions are confirmed.
Large modular blankets become heavy. Join sections progressively instead of storing every completed piece until the end.
Texture Variations
The basic wedges can be worked entirely in sc for a compact appearance.
Use hdc for a softer, slightly faster version.
For stronger directional ridges, alternate one row of standard hdc with one row worked in the back loop only.
Avoid highly open lace stitches inside the wedges. The sharp color geometry is clearer when the individual triangles have similar visual density.
Assembly
- Make one master triangle, block it and record its final length, widest measurement, row count and final stitch count.
- Crochet all required cream, rust and taupe wedges to exactly the same master measurements.
- Block the wedges in batches, keeping their pointed tips aligned and rejecting any piece that differs noticeably in length.
- Arrange eight wedges at a time in the planned rotating color sequence and check each star for flatness before joining.
- Join neighboring wedge edges from the outside toward the center, leaving the final few millimeters of each point free.
- Secure each star center through one inner loop from every wedge so the meeting point remains flat rather than forming a thick knot.
- Lay the completed sections in the full blanket arrangement and rotate neighboring units until the cream, taupe and rust diagonals are balanced.
- Join the sections systematically from the center outward, checking corresponding edge lengths after every completed seam.
- Add half-wedges and corner fillers where necessary to create four straight sides, then block the entire geometric field before adding the border.
- Work the rust foundation border, cream accent rounds and final rust frame, weave in every yarn tail and complete one final flat blocking.
The completed blanket should form a flat rectangular field of repeating star and pinwheel shapes with crisp color boundaries and four stable outer edges.
7 Technical Tips
- Star centers form bumps: too much yarn is concentrated at the meeting point. Stop the wedge seams approximately 3–5 mm before the tips and connect only the inner loops at the center.
- Complete stars form bowls: the combined wedge angles are too narrow. Correct the master triangle before producing more motifs rather than attempting to flatten the problem with aggressive blocking.
- Star edges ripple: the wedges are too wide or the joining tension is loose. Pin one complete eight-wedge unit and check its circumference before continuing production.
- Rust triangles finish larger than cream triangles: the yarns have different gauge despite having the same weight classification. Adjust hook size for the affected color until blocked measurements differ by no more than approximately 3 mm.
- Diagonal lines break between motifs: neighboring star units have been rotated incorrectly. Photograph the complete floor layout before joining and use the image as the assembly map.
- The blanket border waves: too many stitches were picked up along the modular edges. Lay the work flat after the first border round and correct the pickup rate before adding additional rounds.
- The finished blanket becomes skewed: individual seams were joined without comparing edge lengths. Mark every quarter of both edges before seaming so corresponding markers meet at the same position.
Blocking
Block the blanket twice during construction.
The first blocking occurs before the major sections are joined. The second happens after the border is complete.
For final blocking, measure both diagonals of the blanket. They should be close to equal.
Pin the four corners first, then the centers of each side.
Add additional pins between those reference points.
Do not stretch the star centers individually. Shape the blanket as one connected geometric surface.
Care
Wash according to the fiber manufacturer’s directions. Support the blanket fully when wet because modular seams carry substantially more weight after washing.
Dry flat whenever the yarn requires it. Fold the blanket loosely for storage instead of compressing the raised seams for extended periods.
Conclusion
The strength of this geometric star crochet blanket pattern comes from repetition, accurate blocking and disciplined color placement. Begin with one rust, cream and taupe test star and correct its geometry before committing yarn to the full throw. Once that master unit lies flat, duplicate its measurements, arrange the motifs before joining and finish the rectangle with a restrained contrasting border. The same construction can be scaled for a lap blanket, sofa throw or bedspread without changing the basic wedge system. Share the completed version on Pinterest or Instagram with #RustStarCrochetBlanket. Would you keep the taupe sections neutral, or replace them with olive green for a stronger autumn palette?