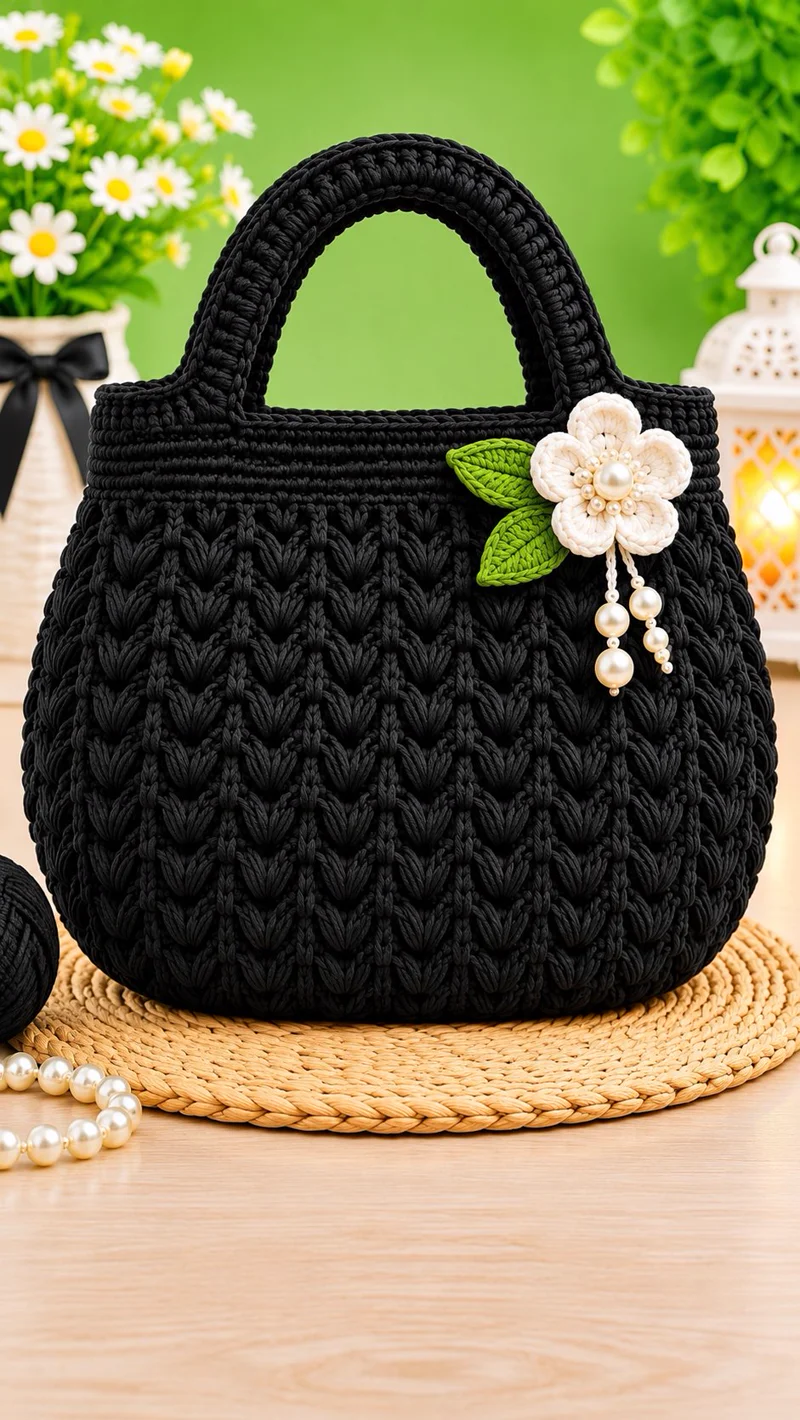
The raised green stitches on this handbag form repeating leaf-shaped columns, while a white five-petal flower marks the front handle attachment. This green crochet handbag pattern combines a structured oval base, a textured body, two reinforced handles, and decorative pearl accents. The proposed finished size is approximately 32 cm wide, 27 cm high, and 10 cm deep, excluding handles. It is an intermediate-level project using cotton cord and a 4 mm crochet hook.
The Design: What Makes This Green Crochet Handbag Different
The defining feature of this handbag is the dense vertical texture. Rather than covering the surface with separate motifs, the body uses repeating puff-stitch clusters arranged in columns. Raised stitches create a botanical appearance while the underlying single-crochet fabric supports the weight of the bag.
An oval foundation gives the handbag a broad base without sharp corners. The rounded sides are worked upward from that foundation, producing a continuous shell with fewer seams. A firm upper band controls the opening and provides a stable location for the handles.
The white crochet flower and green leaves are made separately and sewn onto the front. Pearl beads add decorative detail but are not structural components. A common construction mistake is using loose tension around the base, which causes the bag to sag after the handles are attached. This textured crochet tote bag therefore uses a smaller hook than many standard cotton-yarn projects.
Project Information at a Glance
| Detail | Specification |
|---|---|
| Skill level | Intermediate |
| Estimated working time | 12–18 hours |
| Finished size | Approximately 32 × 27 × 10 cm |
| Hook | 4 mm, adjusted for gauge |
| Construction | Oval base, continuous body, separate handles |
| Best for | Everyday handbag, handmade accessory, gift project |
Measurements, quantities, and working time are design estimates for this original adaptation. They are not measurements verified from the photograph. Make a gauge swatch before committing to the full bag.
Materials and Tools
Yarn
- Emerald green cotton cord, approximately 3 mm thick — 450–550 g: main bag, handles, and leaves.
- Ivory or white cotton yarn, DK weight — 20–30 g: decorative flower.
- Light green cotton yarn — 10 g, optional: leaf detailing.
- White cotton thread — small amount: pearl strands and decorative finishing.
Choose a firm, low-stretch cord with enough body to maintain the bag’s shape. A smooth braided cotton cord is easier to control in raised stitch patterns than velvet or highly elastic yarn. Cotton macramé cord may also work, although the hook size and final measurements will change.
Tools
- 4 mm crochet hook for the main fabric.
- 3 mm crochet hook for the flower and leaves, adjusted to yarn thickness.
- Stitch markers for the oval ends and round beginnings.
- Tapestry needle for assembly.
- Scissors and measuring tape.
- Optional plastic canvas for a removable base insert.
- Optional cotton lining fabric and matching sewing thread.
- Pearl-style beads for the flower center and hanging accents.
Do not substitute heavy glass beads for lightweight acrylic pearls without reinforcing the flower attachment. The embellishment is intended for adult accessories, not children’s toys.
Crochet Abbreviations
- ch: chain
- sc: single crochet
- hdc: half double crochet
- dc: double crochet
- tr: treble crochet
- sl st: slip stitch
- st: stitch
- inc: two single crochets in one stitch
- dec: single crochet decrease
- BLO: back loop only
- FLO: front loop only
- YO: yarn over
- puff: puff stitch cluster
- MR: magic ring
An invisible decrease is made by catching the front loops of two consecutive stitches and completing them together as one single crochet.
Green Crochet Handbag Pattern — Step by Step
Use US crochet terminology throughout. The oval foundation and main body are worked in continuous rounds unless otherwise stated. Place a marker at the first stitch of every round. Stitch counts appear in parentheses.
Step 1: Crochet the Oval Base
Yarn: emerald green cotton cord. Hook: 4 mm.
Begin with a foundation chain of 31 stitches. The oval is worked around both sides of the chain, with increases concentrated at its rounded ends.
- R1: Ch 31. Starting in the second chain from the hook, work 2 sc, sc in next 28 chains, 4 sc in the final chain. Continue along the opposite side of the foundation chain, sc in next 28 chains, then work 2 sc in the first foundation position. (64)
- R2: Inc in each of next 2 sts, sc in next 28 sts, inc in each of next 4 sts, sc in next 28 sts, inc in each of last 2 sts. (72)
- R3: (Sc 1, inc) twice, sc 28, (sc 1, inc) four times, sc 28, (sc 1, inc) twice. (80)
- R4: (Sc 2, inc) twice, sc 28, (sc 2, inc) four times, sc 28, (sc 2, inc) twice. (88)
- R5: (Sc 3, inc) twice, sc 28, (sc 3, inc) four times, sc 28, (sc 3, inc) twice. (96)
- R6: Sc in each stitch around. (96)
- R7: Working in BLO, sc in each stitch around. (96)
- R8: Sc in each stitch around. (96)
The base should lie flat with smoothly curved ends. If it curls upward before Round 7, inspect the increase placement and check that the cord is not being pulled excessively tight. Round 7 creates a fold line that separates the bottom from the side walls.
Measure the base at this stage. Its final dimensions depend on the cord diameter and stitch gauge. A removable plastic-canvas insert can be cut to the finished oval after the crochet is complete.
Step 2: Build the Lower Bag Body
Yarn: emerald green. Work through both loops unless specified.
- R9: Sc in each stitch around. (96)
- R10: Sc in each stitch around. (96)
- R11: Sc in each stitch around. (96)
- R12: Sc in each stitch around. (96)
These four rounds form a firm foundation for the decorative body. Keep the work upright and check that the side walls are not widening. The stitch count remains unchanged.
Step 3: Work the Raised Puff-Stitch Texture
The photograph shows tightly packed vertical leaf-like motifs. The following repeat creates a related raised texture, but it is not an exact reconstruction of the photographed stitch chart.
Puff stitch: YO, insert the hook into the indicated stitch and pull up a loop. Repeat the yarn-over and pull-up action three more times in the same stitch. YO and draw through all loops, then ch 1 to secure the cluster. The securing chain is part of the puff and is not counted as an additional stitch.
Textured round: Repeat [puff in next stitch, sc in next stitch] around. Each repeat uses two base stitches and produces two working positions for the following round.
- R13: Repeat [puff, sc] 48 times. (96)
- R14: Sc in each stitch around. (96)
- R15: Repeat [sc, puff] 48 times. (96)
- R16: Sc in each stitch around. (96)
- R17: Repeat [puff, sc] 48 times. (96)
- R18: Sc in each stitch around. (96)
- R19: Repeat [sc, puff] 48 times. (96)
- R20: Sc in each stitch around. (96)
- R21: Repeat [puff, sc] 48 times. (96)
- R22: Sc in each stitch around. (96)
- R23: Repeat [sc, puff] 48 times. (96)
- R24: Sc in each stitch around. (96)
- R25: Repeat [puff, sc] 48 times. (96)
- R26: Sc in each stitch around. (96)
- R27: Repeat [sc, puff] 48 times. (96)
- R28: Sc in each stitch around. (96)
- R29: Repeat [puff, sc] 48 times. (96)
- R30: Sc in each stitch around. (96)
- R31: Repeat [sc, puff] 48 times. (96)
- R32: Sc in each stitch around. (96)
Keep the puff clusters similar in height. Inconsistent loop length creates irregular raised sections, particularly near the rounded sides of the handbag. Work the plain rounds firmly enough to support the decorative clusters without compressing them.
After Round 32, check the height of the bag against the target dimensions. Add or remove complete two-round texture repeats if the yarn gauge differs from the sample estimate.
Step 4: Crochet the Reinforced Upper Band
The upper band is intentionally flatter than the textured body. This creates a stable transition between the raised surface and the handles.
- R33: Sc in each stitch around. (96)
- R34: Sc in each stitch around. (96)
- R35: Sc in each stitch around. (96)
- R36: Sc in each stitch around. (96)
- R37: Sc in each stitch around. (96)
- R38: Sc in each stitch around. (96)
- R39: Sc in each stitch around. (96)
- R40: Sc in each stitch around. (96)
- R41: Sl st loosely in each stitch around. (96)
Fasten off and weave in the yarn end. The final slip-stitch round creates a defined edge. Avoid tightening it enough to reduce the opening circumference.
Step 5: Crochet the Rounded Handles (Make 2)
Yarn: emerald green cotton cord.
Each handle is a dense crocheted strip folded lengthwise and sewn into a rounded shape. A cotton rope or fabric tape core can be added to limit stretching.
- Row 1: Ch 7, sc in second chain from hook and across. (6)
- Rows 2–54: Ch 1, turn, sc in each stitch. (6)
Continue until the strip measures approximately 34–38 cm, depending on the desired handle arch. The row count is a starting estimate; length is the controlling measurement.
Fold the strip lengthwise around a suitable reinforcing core, if used, and close the long edges with small whip stitches. Leave approximately 3 cm at each end for attachment. Repeat for the second handle.
Position the handles symmetrically on the front and back panels. Reinforce the attachment areas with additional stitches through the upper band. The handle ends should be anchored across several stitches rather than secured at a single point.
Step 6: Make the White Five-Petal Flower
Yarn: white cotton. Hook: 3 mm.
The flower is a separate appliqué. Five rounded petals surround a compact center, and pearl beads cover the central join.
- R1: Work 6 sc in MR. Join with sl st. (6)
- R2: Inc in each stitch around. Join with sl st. (12)
- R3: Work 10 sc evenly around, then sl st in the next stitch. (10 sc plus 1 sl st)
Petal construction: Join yarn at the flower center. Repeat the following sequence five times: ch 5, work 2 dc, 3 tr, 2 dc, and 1 sc into the same chain space, then sl st into the next attachment position. Space the five attachment positions evenly around the center.
Because the petals are worked as decorative groups, their stitch totals are separate from the center-round counts. Adjust the petal fullness by adding one treble crochet to each group if the yarn is thin.
Fasten off with a 20 cm sewing tail. Sew a pearl bead at the center and arrange smaller beads around it. Secure every bead individually with strong thread.
Step 7: Crochet the Green Leaves (Make 2)
Yarn: emerald green or light green cotton.
- Row 1: Ch 11. Starting in the second chain from the hook, work sc, hdc, dc in next 5 chains, hdc, sc, then 3 sc in the final chain. Continue along the opposite side of the foundation chain with sc, hdc, dc in next 5 positions, hdc, sc. Join with sl st.
- Row 2: Work one sc in each available stitch around the leaf edge, placing 3 sc at the pointed end. Join with sl st.
Fasten off, leaving a 20 cm sewing tail. Shape each leaf into a slightly pointed oval. Optional surface slip stitches can be added along the center to create a raised vein.
Position the leaves behind the flower so that one points upward and the other downward. Sew along the central vein rather than attaching the entire outer edge; this preserves the layered appearance.
Step 8: Add the Pearl Hanging Decoration
The photographed bag has several pearl strands hanging below the flower. These can be reproduced with short crochet chains and lightweight beads.
- Strand 1: Ch 12 and fasten off.
- Strand 2: Ch 16 and fasten off.
- Strand 3: Ch 20 and fasten off.
Thread one or more beads onto each strand using a needle. Knot and stitch the ends securely. Attach the strands behind the lower flower petals, staggering their lengths to create a cascading arrangement.
Check that the beads cannot slip over the end knots. For an accessory intended to carry heavy items, use strong sewing thread inside the decorative chains.
Assembly Instructions
- Shape the base. Place the handbag on a flat surface and smooth the oval foundation into an even outline.
- Check the body. Confirm that the textured rounds rise evenly and that the upper opening has not narrowed.
- Prepare the handles. Fold, reinforce, and close both crocheted handle strips.
- Mark the attachment points. Fold the bag flat to locate the center of each panel. Place matching markers at equal distances from the centers.
- Attach the front handle. Sew both ends securely through the upper band, distributing the stitches across the attachment area.
- Attach the back handle. Repeat the same positioning and reinforcement on the opposite panel.
- Position the flower. Pin the white appliqué near the upper right side of the front panel, matching the reference arrangement.
- Add the leaves and pearls. Sew the leaves beneath the flower, then attach the decorative pearl strands.
- Install optional reinforcement. Insert a removable base stiffener and sew a cotton lining inside the handbag if desired.
- Finish the project. Weave in all remaining yarn tails, inspect the handle seams, and test the bag with a light load before regular use.
The completed handbag has an oval base, raised green body, two rounded handles, and a white floral embellishment.
7 Technical Tips for a Better Crochet Handbag
- Mark the oval ends. Use two contrasting stitch markers at the curved sections so increases do not drift into the straight sides. Incorrect increase placement produces a twisted or asymmetrical base.
- Control base tension. Work a 10 cm swatch before beginning the foundation and choose a hook that produces a firm fabric. Loose stitches can cause the base to stretch when items are placed inside.
- Maintain consistent puff height. Pull every puff loop to approximately the same height before closing the cluster. Uneven loops create gaps and irregular raised columns.
- Check the stitch count. The proposed bag body remains at 96 working positions throughout the textured section. An accidental extra securing chain can gradually increase the circumference.
- Reinforce handle attachments. Sew each handle end through several stitches of the upper band instead of one narrow point. Concentrated stress can tear the attachment area during use.
- Pin decorations before sewing. Position the flower and both leaves while the bag is standing upright. Attaching them with the bag flattened can produce an off-center arrangement.
- Secure every yarn tail. Weave each structural tail through at least 5 cm of dense crochet fabric and reverse direction where possible. Short unsecured tails can loosen after repeated handling.
How to Adjust the Handbag Size
The easiest way to change the width is to modify the oval foundation chain. Adding chains increases the length of both straight sections while preserving the curved-end construction. However, the resulting stitch count must remain compatible with the two-stitch puff repeat.
For a smaller handbag, reduce the foundation chain and work fewer textured rounds. For a taller tote, add complete pairs of puff and single-crochet rounds. Changing only one decorative round can interrupt the alternating texture.
A thicker cord will increase the overall dimensions even if the stitch counts remain unchanged. Test the cord with a sample of at least four textured rounds before making a larger version.
The handle drop should also match the intended use. Short rounded handles suit hand carrying, while longer handles require additional reinforcement to resist stretching.
How to Line the Crochet Bag
A lining prevents small objects from passing through the textured crochet fabric and helps protect the inner surface from abrasion. Cotton canvas is a practical choice because it has relatively little stretch.
Measure the inside circumference, height, and base after the crochet shell is finished. Cut the lining pieces with appropriate seam allowances. Sew the fabric into a matching bag shape, turn the top edge inward, and attach it just below the reinforced upper band.
A pocket can be added before the lining is inserted. Keep the pocket stitching separate from the outer decorative surface so the attachment threads do not show between the puff clusters.
For a removable base insert, cut plastic canvas slightly smaller than the interior oval and cover its edges with fabric. Avoid exposed sharp corners that could catch the lining.
Common Crochet Handbag Problems and Fixes
Why does the base curl?
Curling usually indicates that the stitch gauge is too tight, the increases are insufficient for the yarn, or the increases are incorrectly positioned. Recheck the curved ends before adding the body rounds.
Why does the bag stretch when carried?
Cotton crochet fabric can lengthen under load, particularly around handles. A firm upper band, reinforced attachment seams, and a fabric lining help distribute the weight.
Why are the puff stitches uneven?
Inconsistent yarn-over tension changes the size of each cluster. Keep the loop height uniform and avoid tightening the closing yarn-over more than necessary.
Can acrylic yarn replace cotton cord?
Yes, but the resulting handbag may be softer and more elastic. Use a dense gauge, consider a lining, and test the handles before carrying heavy objects.
Can the flower be removed?
The flower is a separate appliqué and can be omitted or attached with a removable fastening. If using a removable pin, protect the crochet fabric from sharp metal edges.
Conclusion
This green crochet handbag pattern uses an oval foundation, repeated puff-stitch texture, a reinforced opening, and separate rounded handles to create a structured accessory. The white five-petal flower, green leaves, and hanging pearls provide the distinctive decoration visible in the reference photograph. Before using the finished bag, check the handle seams and test its shape with a light load. Photograph the completed project from the front and side to document the texture and proportions. Share the result on Pinterest or Instagram using #GreenFloralCrochetHandbag.