Crochet Teapot Towel Holder Pattern with Floral Decorations
Introduction
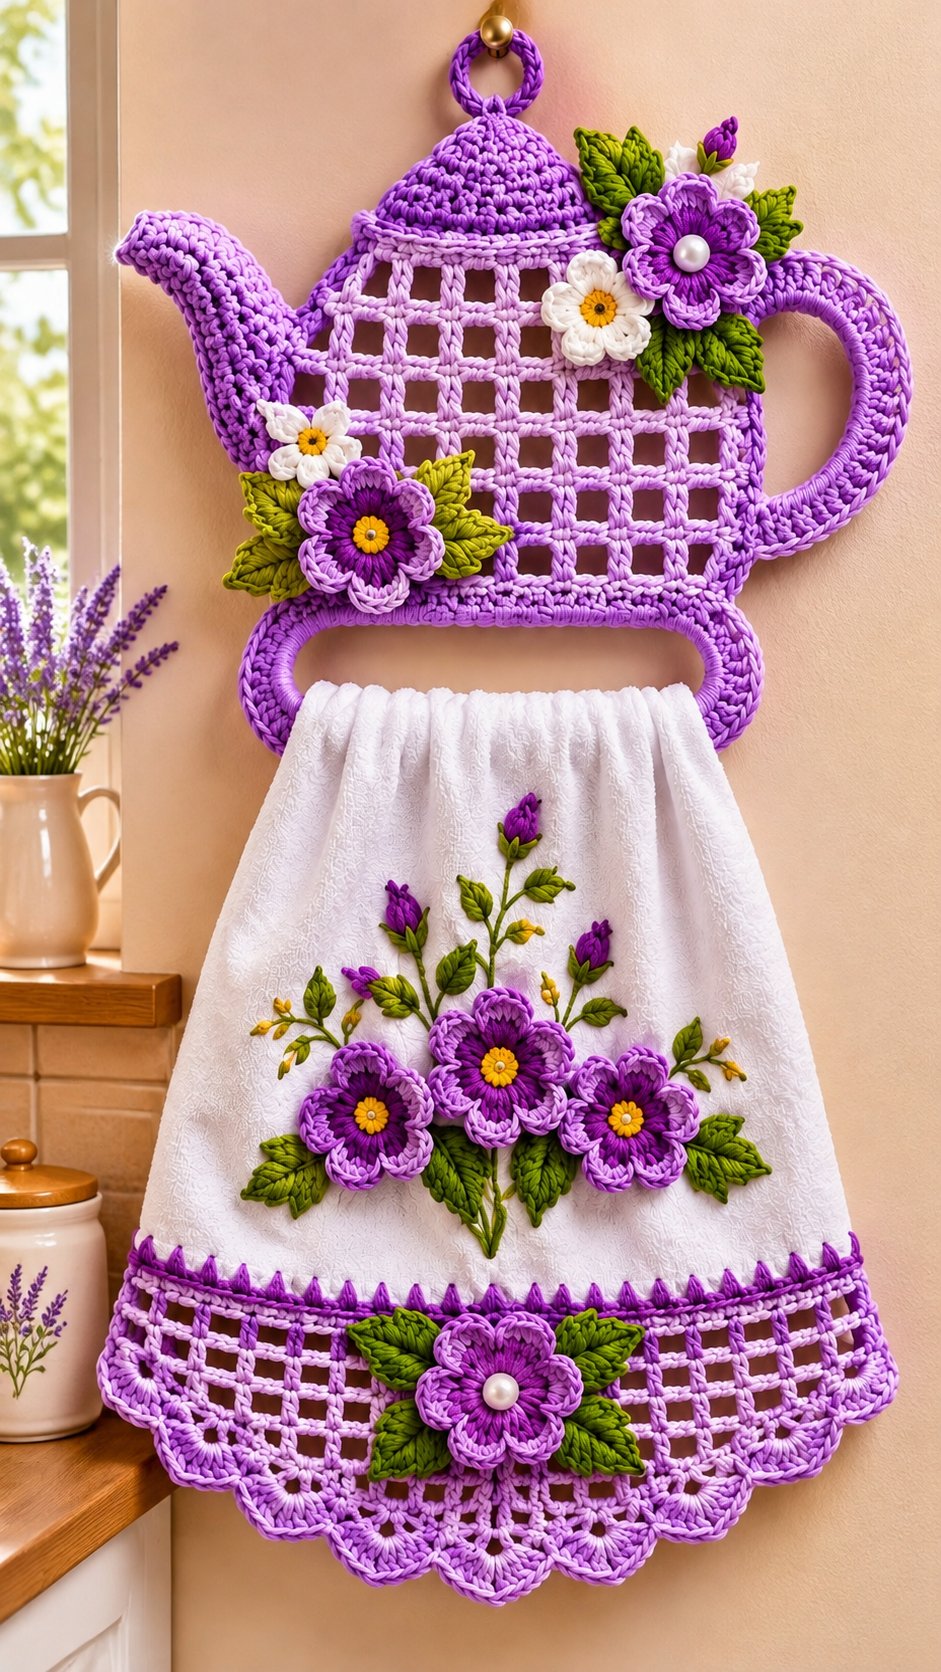
A teapot-shaped towel holder needs three recognizable features: a projecting spout, a rounded lid and a handle that remains open beneath the body. This crochet teapot towel holder pattern recreates those features with cotton yarn, open lattice stitches and layered floral appliqués. The proposed finished holder measures approximately 30–35 cm across and requires intermediate crochet skills. Its separate towel ring also allows the fabric towel to be removed for washing. This pattern is an original interpretation of the photographed design and has not been tested on a physical sample — please crochet one motif first and adjust the stitch counts to your yarn and gauge.
The Design: What Makes This Teapot Different
The teapot body uses an open lattice instead of a solid crocheted panel. This reduces yarn consumption and creates the square openings visible in the reference image. A separately crocheted lid covers the upper edge, giving the structure a recognizable teapot profile without requiring stuffing.
The spout and handle are constructed independently. The spout receives a tapered shape, while the handle forms a reinforced oval that attaches at two points. This prevents the side components from pulling the mesh panel out of shape. Layered crochet flowers and leaves conceal selected attachment points and establish the floral arrangement. One common mistake is making the handle too narrow; the resulting opening cannot accommodate the intended visual proportions. These details distinguish this crochet kitchen towel holder from an ordinary crochet floral towel topper.
Project Info at a Glance
| Skill Level | Time | Finished Size | Hook | Best For |
|---|---|---|---|---|
| Intermediate | 8–12 hours, estimated | 30–35 cm wide; 35–45 cm high, excluding towel | 4.5 mm | Kitchen decor and handmade gifts |
Measurements and working time are proposed project estimates, not measurements verified from the photograph.
Materials and Tools
Yarn
Use cotton yarn for the structural pieces. The following quantities are planning estimates for the reconstructed design.
- Purple cotton: worsted weight, 150–200 g, for the teapot body, spout, handle and hanging loop.
- Light lavender cotton: worsted or DK, 40–50 g, for the mesh borders and scalloped edging.
- Dark purple cotton: DK, 20–25 g, for flower centers and decorative details.
- White cotton: DK, 15–20 g, for daisies and small petals.
- Yellow cotton: DK, 5–10 g, for flower centers.
- Olive and dark green cotton: DK, 25–35 g combined, for leaves and embroidered stems.
Suggested brands include Lily Sugar’n Cream, Bernat Handicrafter Cotton and Rico Ricorumi. Match the yarn weight and gauge rather than relying on brand names.
Tools
- 4.5 mm crochet hook for the main structure
- 2.5–3 mm hook for small flowers
- Yarn needle
- Scissors
- Stitch markers
- Measuring tape
- Sewing needle and matching thread
- White cotton kitchen towel
- Optional pearl-style decorative beads
- Removable wall hook or suitable hanging hardware
Do not use decorative beads where they could detach and become accessible to small children.
Abbreviations
This pattern uses US crochet terminology.
- MR — magic ring
- sc — single crochet
- dc — double crochet
- hdc — half double crochet
- inc — 2 sc in one stitch
- dec — invisible decrease
- sl st — slip stitch
- ch — chain
- BLO — back loop only
- st/sts — stitch/stitches
- rep — repeat
- sk — skip
An invisible decrease combines two stitches through their front loops, reducing visible gaps and keeping the shaped sections neater.
Pattern — Step by Step
The main structure is worked in rows unless a section specifically says to work in rounds. The counts below belong to this reconstructed design, not a verified original pattern.
1. Main Teapot Body (Make 1)
Yarn: Purple cotton. Construction: open lattice panel.
The body is rectangular, with enough width to support the lid, handle and spout.
Foundation: Ch 46.
R1: Dc in fourth ch from hook, ch 2, sk 2 ch, dc in next ch; repeat across (14 mesh spaces).
R2: Ch 5, turn, dc in next dc, ch 2, dc in next dc; repeat across (14 mesh spaces).
R3–R12: Repeat R2, maintaining 14 mesh spaces.
R13: Ch 1, turn, sc across the row, working 2 sc around each chain space and 1 sc into each dc (46 sts).
R14: Ch 1, turn, sc across (46 sts).
R15: Ch 1, turn, sc across (46 sts).
Fasten off and leave a 35 cm sewing tail.
The open panel should remain square rather than curl inward. Block lightly before attaching the other pieces.
2. Domed Teapot Lid (Make 1)
Yarn: Purple cotton.
Work in continuous rounds.
R1: 6 sc in MR (6).
R2: Inc ×6 (12).
R3: (Sc, inc) ×6 (18).
R4: (2 sc, inc) ×6 (24).
R5: (3 sc, inc) ×6 (30).
R6: (4 sc, inc) ×6 (36).
R7: (5 sc, inc) ×6 (42).
R8: (6 sc, inc) ×6 (48).
R9–R11: Sc around (48).
R12: BLO sc around (48).
R13: Sl st around (48).
Fasten off, leaving a long sewing tail.
Shape the lid into a shallow dome with light blocking. Attach its lower edge to the upper section of the mesh panel.
3. Teapot Spout (Make 1)
Yarn: Purple cotton.
The spout is made flat and then seamed into a tapered tube.
Foundation: Ch 13.
R1: Sc in second ch from hook and across (12).
R2–R4: Ch 1, turn, sc across (12).
R5: Ch 1, turn, inc, 10 sc, inc (14).
R6–R8: Ch 1, turn, sc across (14).
R9: Ch 1, turn, dec, 10 sc, dec (12).
R10–R12: Ch 1, turn, sc across (12).
Fasten off, leaving a long sewing tail.
Fold the piece lengthwise and sew the long edges together. Curve the narrow end slightly upward before attaching the wider end to the left side of the teapot body. The spout should project outward rather than hang downward.
4. Teapot Handle (Make 1)
Yarn: Purple cotton.
Foundation: Ch 36 and join with a sl st, checking that the chain is not twisted.
R1: Ch 1, sc around (36).
R2–R4: Sc around (36).
R5: Sl st around (36).
Fasten off with a long sewing tail.
Shape the tube into an oval. Flatten the two ends and sew them to the upper-right and lower-right edges of the teapot panel. The opening should remain wide enough to read clearly as a handle.
5. Lower Towel Ring (Make 1)
Yarn: Purple cotton.
Foundation: Ch 40.
R1: Sc in second ch from hook, 38 sc, 3 sc in last ch; continue along the opposite side of the foundation chain with 38 sc, 2 sc in final space (82 sts).
R2: Sc around, placing 3 sc in each rounded end (86 sts).
R3: Sc around (86 sts).
R4: Sl st around (86 sts).
Fasten off and sew the ends together to form a closed oval.
Attach the oval below the teapot body. Leave sufficient space between the ring and the lower mesh edge for a fabric towel to pass through.
6. Hanging Loop (Make 1)
Yarn: Purple cotton.
Ch 25 and join without twisting.
R1: Sc around (25).
R2: Sc around (25).
R3: Sl st around (25).
Fasten off, leaving a sewing tail.
Attach the loop to the top center of the lid. Reinforce its base with several rows of sewing through the lid stitches.
7. Purple Layered Flowers (Make 4)
Yarn: Dark purple and light lavender cotton.
For each flower:
R1: Make 6 sc in MR and join (6).
R2: Ch 3, work 3 dc into the next stitch, ch 3, sl st into the same stitch. Repeat this petal construction around the circle, forming six petals.
R3: With lavender, join between the petals. Work ch 4, 4 dc, ch 4 and sl st in each petal space to form the outer layer.
Fasten off and weave in the ends.
Sew a yellow center into two flowers and a pearl-style center into the remaining two. Keep all decorative pieces firmly attached.
8. White Daisy Flowers (Make 2)
Yarn: White and yellow DK cotton.
R1: 6 sc in MR (6).
R2: In each stitch, work ch 4, 3 dc, ch 4 and sl st in the same stitch, creating six petals.
Fasten off.
Add a small yellow center using embroidery or a tightly crocheted circle. Sew one daisy near the spout and the other beside the upper floral cluster.
9. Green Leaves (Make 12)
Yarn: Olive and dark green cotton.
Foundation: Ch 8.
R1: Sl st in second ch, sc in next ch, hdc in next ch, dc in next 3 ch, hdc in next ch, 3 sc in final ch. Turn and work along the opposite side of the foundation chain: hdc, 3 dc, hdc, sc, sl st.
Fasten off, leaving a sewing tail.
Make a mixture of olive and dark green leaves. Position them around the large flowers, with the pointed ends directed outward. Stitch a central vein using a contrasting green strand.
10. Scalloped Lower Border (Make 1)
Yarn: Light lavender cotton.
Join yarn at the lower edge of the teapot body or around the visible fabric-towel border, depending on the version being constructed.
Work a base row of sc evenly along the edge.
For each scallop, work 5 dc into the same base stitch, sk 1 stitch, and sl st into the next stitch. Repeat to the end.
Adjust the number of skipped stitches to distribute the scallops evenly. Finish with a sl st and weave in the end.
11. Floral Towel Decoration (Make 1 Arrangement)
Yarn: Purple, white, yellow and green cotton.
The photograph includes a separate white fabric towel with three large purple flowers, smaller buds and branching leaves.
Prepare three purple flowers using the instructions above. Add yellow centers and arrange them in a horizontal cluster near the lower-middle section of the towel.
Create stems using green embroidery floss or fine cotton yarn. Add small leaves along both sides, then embroider three upward branches with purple buds.
Sew the appliqués to the fabric towel using a fine sewing needle. Avoid attaching the fabric permanently to the crochet towel ring; the towel must remain removable.
Assembly
- Teapot panel: Lay the mesh body flat and block it to a rectangular shape.
- Lid: Position the domed lid centrally and sew its lower edge to the top of the panel.
- Decorative details: Add the yellow flower centers and pearl-style decorations.
- Spout: Sew the tapered spout to the upper-left side, checking its upward curve.
- Handle: Attach the oval handle on the right, securing both ends.
- Towel ring: Position the oval below the panel and reinforce its attachment points.
- Special features: Sew the hanging loop to the lid and reinforce the connection.
- Flowers: Attach the large purple flowers and white daisies.
- Leaves and accessories: Add the green foliage, floral towel embroidery and lower scalloped border.
- Finish: Insert the removable towel through the lower ring, check all joins and trim loose yarn ends.
The completed assembly forms a decorative teapot-shaped wall holder with a removable fabric kitchen towel.
7 Technical Tips
- Stitch markers: Mark every fourth mesh space during the first three rows. Missing one chain space changes the alignment of the entire lattice.
- Stuffing firmness: This project is not stuffed. Avoid inserting fiberfill into the handle or spout because it can distort their openings.
- Invisible decrease: Use an invisible decrease when shaping the lid’s small decorative components. Visible gaps can interrupt the rounded edge.
- Flower placement: Pin the large flowers before sewing. Keep the upper cluster at least 2 cm away from the handle attachment points.
- Cotton tension: Check the 46-chain foundation against the target width before continuing. Tight cotton tension can reduce the finished panel width considerably.
- Attachment strength: Sew the handle and towel ring through several structural stitches. A single attachment row can stretch under the weight of a wet towel.
- Tail weaving: Weave each sewing tail through at least 3 cm of matching stitches. Loose ends near the mesh openings can catch on the fabric towel.
Conclusion
A teapot towel holder combines a shaped crochet panel, an open handle, a tapered spout and a functional towel ring. This reconstructed design uses cotton yarn and layered floral appliqués to reproduce the main visual features of the reference photograph. Before assembly, check the mesh width and reinforce every towel-ring attachment. Adapt the flower colors to coordinate with the fabric towel, then photograph the finished holder from the front so readers can see the lattice and curved spout. Share your project on Pinterest and Instagram using #CrochetTeapotTowelHolder. Would you place the largest purple flower beside the spout or on the handle side? Try this crochet teapot towel holder pattern.