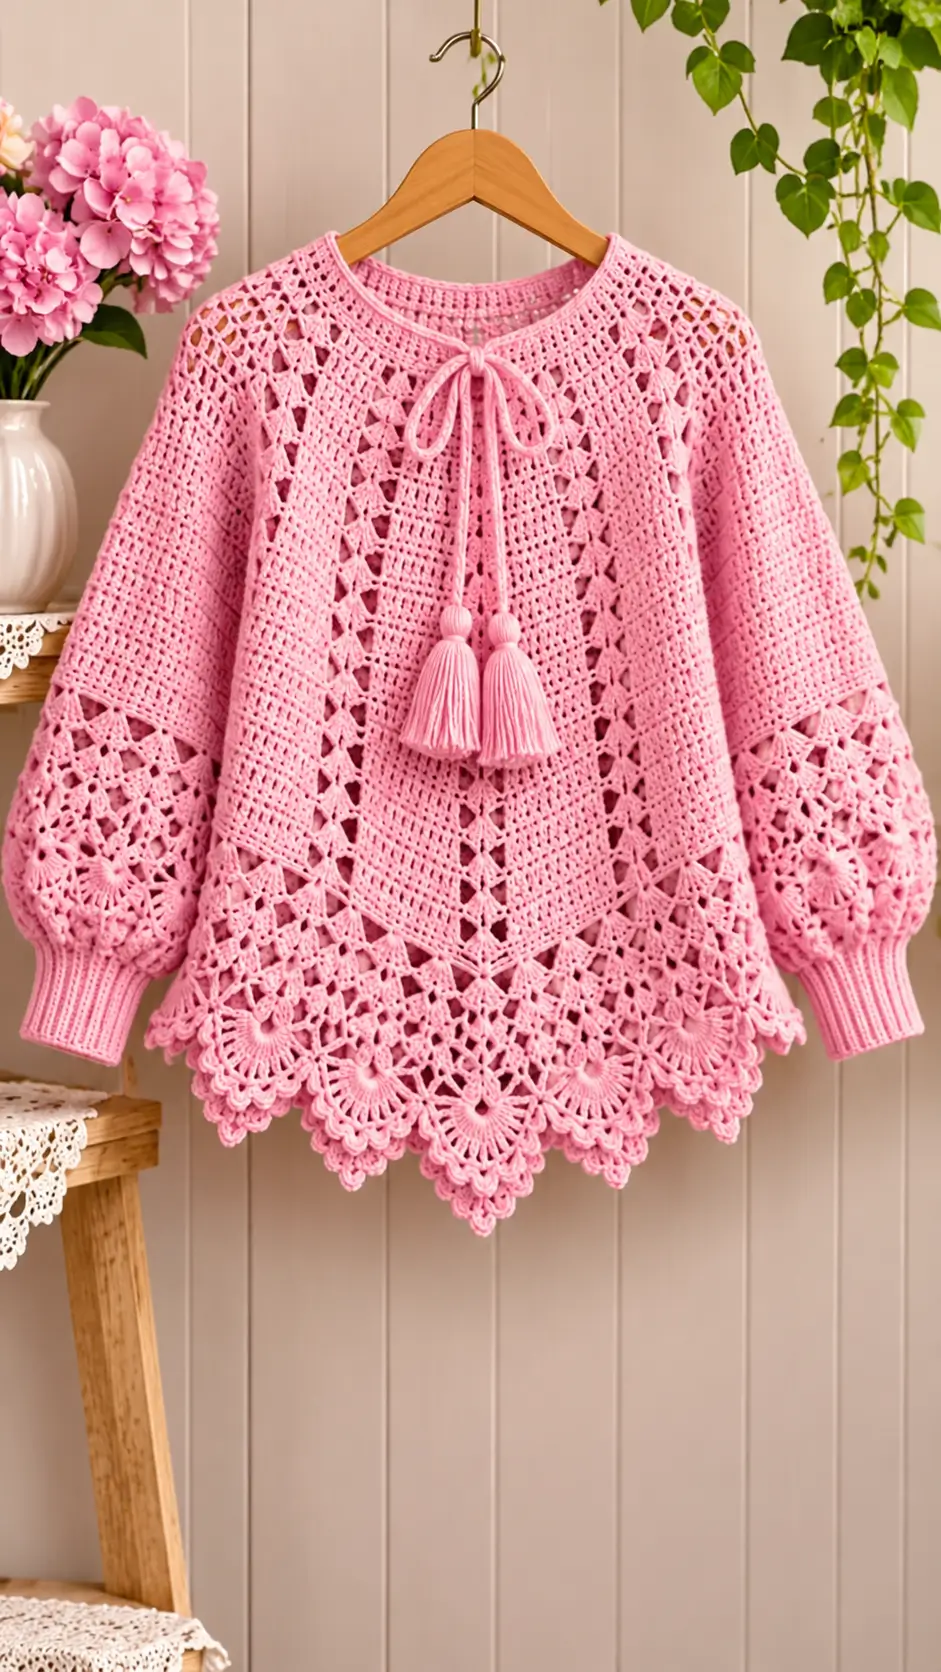
The pointed lace hem is the structural feature that controls this entire garment. This photo-inspired pink lace crochet poncho sweater combines a loose poncho-shaped body, openwork shoulder panels, long sleeves, fitted ribbed cuffs, a decorative fan-lace border and a round neckline finished with tasseled ties. The construction works best when the dense body fabric and open lace sections are planned separately, because each section stretches at a different rate.
The Design: What Makes This Pink Crochet Sweater Different
The garment is built around a wide, relaxed body rather than a fitted sweater silhouette. A solid crochet fabric forms the central front and back, while vertical lace panels reduce visual weight near the shoulders and sides. The lower edge changes again: large fan motifs expand into pointed sections, producing the dramatic scalloped hem visible in the design.
The sleeves repeat that contrast. Their upper sections remain relatively solid, then transition into open lace before narrowing into deep ribbed cuffs. A simple round neckline keeps the upper edge stable. Two crochet cords with tassels add the final decorative detail without requiring buttons or a zipper.
Project Information at a Glance
| Skill Level | Construction | Suggested Hook | Suggested Yarn | Fit |
|---|---|---|---|---|
| Intermediate to Advanced | Front, back and sleeves | 3.5–4.0 mm | DK weight #3 | Loose / oversized |
Materials and Tools
Yarn
- Rose Pink — DK weight #3 cotton, cotton blend or smooth acrylic
A smooth yarn is preferable for this design because the lower lace border contains chains, fans and narrow open spaces that need clear definition. Cotton gives the hem more structure, while a cotton-acrylic blend produces a softer drape.
Tools
- 3.5–4.0 mm crochet hook
- Yarn needle
- Scissors
- Locking stitch markers
- Flexible measuring tape
- Blocking mats
- Rust-resistant blocking pins
Abbreviations
- ch — chain
- sc — single crochet
- hdc — half double crochet
- dc — double crochet
- tr — treble crochet
- sl st — slip stitch
- sp — space
- st/sts — stitch/stitches
- BLO — back loop only
- RS — right side
- WS — wrong side
Gauge and Measurements
Make a minimum 15 × 15 cm swatch using the main body stitch. Wash and dry it in the same manner planned for the finished sweater.
Instead of forcing a universal stitch gauge, calculate the garment from the blocked swatch. Measure the number of stitches and rows across 10 cm.
The design should include substantial positive ease. For a similar relaxed silhouette, add approximately 20–35 cm to the wearer’s bust measurement.
Example:
Bust = 96 cm
Desired ease = 28 cm
Finished circumference = approximately 124 cm
Each flat body panel would therefore measure approximately 62 cm before seaming.
Main Body Stitch
The central fabric should remain lighter than a dense single-crochet panel while still providing enough structure to support the lace border.
A simple double-crochet fabric works well.
Row 1: Dc in the fourth chain from hook and in each chain across. Turn.
Row 2: Ch 3, dc in each stitch across. Turn.
Repeat Row 2 for the solid sections.
For a slightly lighter fabric, replace selected dc stitches with evenly spaced ch-1 openings.
Front Panel
Begin with a foundation chain that matches the calculated front-panel width.
Work the main body stitch until the panel reaches approximately the lower chest.
The photographed garment uses vertical openwork sections near both sides of the front. These can be introduced without changing the central body width.
Vertical Lace Panel
Reserve approximately 10–14 stitches for each lace section.
Work a repeating open mesh:
Row A: Ch 3, dc in first stitch, *ch 2, skip 2 stitches, dc in next stitch*; repeat across the lace section.
Row B: Ch 3, dc in first dc, *ch 2, dc in next dc*; repeat across.
For additional texture, alternate the mesh with a cluster row:
[2 dc, ch 2, 2 dc] in selected ch-2 spaces.
Keep the central front section in the main body stitch.
Creating the Pointed Front
The lower front appears to descend toward the center before the large lace border begins. This can be created by working progressively shorter rows at both sides.
Mark the center stitch of the front panel.
When the body reaches the planned transition point, reduce the working width gradually at each outer edge while maintaining the center section.
A practical method is to leave 3–4 stitches unworked at each outer edge every second row.
Continue until the center front extends approximately 10–15 cm below the side edges.
Do not cut the yarn after every short section if the construction allows the next row to begin from the correct position.
Back Panel
Make the back approximately the same overall width as the front.
The back can be worked with a less pronounced center point if preferred, but repeating the same lower shaping creates a balanced hem.
Continue until the back reaches the shoulder line.
Place the front and back together before making the neckline. Confirm that the side lengths match.
Round Neckline
Mark the center of the front panel.
Approximately 8–12 cm before reaching the final shoulder height, stop working the central neckline stitches.
Complete the right and left shoulder sections separately.
Decrease one stitch at the neckline edge for several rows if a softer curve is required.
The back neckline should be shallower than the front.
Join the shoulders after checking that the opening passes comfortably over the head.
Neckline Finishing
Join pink yarn at the center back neckline.
Round 1: Work sc evenly around the complete neckline. Join.
Round 2: Ch 1, sc in each stitch around. Join.
Round 3: Work hdc evenly around.
If the neckline begins to flare, decrease several stitches evenly during the second round.
If it pulls inward, remove the round and increase the pickup rate rather than stretching the finished edge.
Shoulder Lace
The open shoulder fabric can be created with a diamond mesh.
Work:
Row 1: *Ch 5, skip 3 stitches, sc in next stitch* across.
Row 2: Ch 3, *sc in next ch-5 space, ch 5* across.
Repeat these rows while keeping the outer garment edge straight.
For larger decorative diamonds, alternate ch-5 loops with ch-7 loops over several rows, then reduce back to ch-5.
Sleeves
The sleeves in the reference are loose through the upper and middle arm, then gathered into fitted cuffs.
Measure around the upper arm and add approximately 12–18 cm of ease.
Work each sleeve from the armhole downward or make a flat sleeve panel and seam it afterward.
Upper Sleeve
Begin with the main body stitch.
Maintain a relaxed width through the upper arm.
Do not decrease aggressively. The volume is part of the design.
Lower Lace Sleeve
Approximately 15–20 cm before the wrist, change to the decorative lace pattern.
Row 1: *Ch 3, skip 2 stitches, sc in next stitch* across.
Row 2: Work (3 dc, ch 2, 3 dc) into alternate chain spaces, with sc in the spaces between fans.
Row 3: Ch 4 between the tops of the fan groups, anchoring with sc.
Repeat the fan-and-mesh structure until the sleeve reaches the cuff transition.
Gathering the Sleeve for the Cuff
The cuff is considerably narrower than the lace sleeve.
Work one round of sc around the sleeve edge.
Decrease evenly during this round until the opening is only slightly larger than the wrist measurement.
For example, if the sleeve edge contains 72 usable stitch positions and the cuff needs approximately 48, reduce 24 stitches evenly around the circumference.
Do not place all decreases in one section. Uneven gathering creates visible folds.
Deep Ribbed Cuffs
Ch 13.
Row 1: Sc in second chain from hook and across. (12)
Slip stitch into the next two stitches of the sleeve foundation. Turn.
Row 2: Skip the two slip stitches, sc BLO across 12 stitches. Ch 1, turn.
Row 3: Sc BLO across. Slip stitch into the next two sleeve stitches. Turn.
Repeat Rows 2–3 around the complete wrist.
Join the first and final ribbing rows.
A cuff depth of approximately 8–10 cm produces proportions similar to the photographed sweater.
Lower Lace Border
The lower border is the most detailed section of the garment. Work it only after the front and back panels have been joined and the body dimensions have been checked.
Foundation Row
Work sc evenly around the complete lower edge.
The stitch count should be divisible by the number of large fan repeats planned for the hem.
Place markers at the center front, center back and both side seams.
Mesh Transition
Round 1: *Ch 5, skip 3 stitches, sc in next stitch* around.
Round 2: *Ch 5, sc in next ch-5 space* around.
Round 3: Alternate ch-5 and ch-7 spaces to begin increasing the depth of the lace.
Large Fan Motifs
Each lower fan is worked into a selected chain space.
In one marked space work:
3 dc, ch 2, 3 dc
On the next round, work:
2 dc in first dc, dc across the fan, (2 dc, ch 2, 2 dc) in the center space, dc across, 2 dc in final dc.
Continue increasing at the center of each fan for several rounds.
This creates the expanding shell shape visible around the lower hem.
Pointed Lace Sections
Between the fans, use chain mesh to create downward-pointing diamonds.
Start with ch-5 spaces.
Increase the central loop to ch 7, then ch 9 as the point develops.
Reduce back through ch 7 and ch 5 near the next fan.
Maintain the same number of mesh rows between every adjacent fan.
Count carefully. A single missing mesh loop can pull one section of the hem several centimeters higher than its neighbors.
Scalloped Hem Edging
Once the large fan motifs are complete, add a narrow scalloped finish.
Into each suitable outer space work:
sc, hdc, 3 dc, hdc, sc
For the point of each major fan, use:
sc, hdc, 2 dc, 3 tr, ch 2, 3 tr, 2 dc, hdc, sc
This produces a deeper center point while keeping the smaller side scallops controlled.
Crochet Neck Tie
Make two cords or one continuous cord long enough to form the bow shown at the neckline.
For each cord:
Ch approximately 55–70 cm.
Slip stitch back along the complete chain for a firmer cord.
Fasten off.
Attach the cords symmetrically at the center front neckline.
Tassels
Cut 25–35 strands of pink yarn approximately 18–20 cm long for each tassel.
Fold the strands in half around the end of the crochet cord.
Tie securely approximately 1.5–2 cm below the fold.
Wrap additional yarn around the neck several times.
Knot securely and hide the end inside the tassel.
Trim both tassels to the same finished length, approximately 8–10 cm.
Adjusting the Length
| Style | Suggested Body Length Before Lace | Lace Border |
|---|---|---|
| Short | 45–50 cm | 12–16 cm |
| Standard | 50–58 cm | 16–20 cm |
| Tunic | 58–68 cm | 18–24 cm |
These are construction targets rather than fixed garment sizes. Measure from the shoulder on the intended wearer before deciding where the lace border should begin.
Estimating Yarn
The most reliable method is to weigh a blocked swatch.
Make a 20 × 20 cm sample containing both solid and lace stitches. Weigh it accurately.
Calculate the approximate surface area of the front, back and sleeves, then compare that area with the swatch.
Add approximately 10–15 percent for the large lace border, neckline, cuffs, cords, tassels and swatching.
The openwork portions use less yarn per square centimeter than the dense body, so a sample containing both structures gives a more useful estimate than a solid dc swatch alone.
Assembly
- Make and block a large gauge swatch, then calculate the required front and back widths from the wearer’s measurements.
- Crochet the front and back panels, including the vertical lace sections and lower center shaping.
- Shape the front and back necklines, then join the shoulder seams while keeping the round neck opening symmetrical.
- Join the side seams and leave measured armholes large enough for the relaxed sleeves.
- Crochet the sleeves, transition into the lower lace sections and gather each wrist evenly.
- Add the deep ribbed cuffs and compare their finished row counts and dimensions.
- Work the large lower lace border around the assembled body, keeping every fan repeat identical.
- Finish the neckline with several stabilizing rounds and attach the crochet tie cords.
- Make two matching tassels and secure them to the ends of the neckline cords.
- Weave in all ends, wash according to the yarn label and block the sweater with every lower fan and point individually shaped.
The completed garment should have a stable round neckline, relaxed sleeves, fitted cuffs and an evenly distributed pointed lace hem.
7 Technical Tips
- Wavy lace hem: check the first foundation round before beginning the fans. Too many foundation stitches cause the entire border to flare, and later rounds increase the distortion.
- Unequal hem points: count the mesh spaces in every repeat. One additional ch-5 loop can visibly change the depth of a finished point.
- Restricted neckline: test the neck opening before adding the finishing rounds. A border that reduces the opening by more than about 2 cm may make the garment difficult to pull over the head.
- Oversized cuffs: measure the wrist before completing the gathering round. The cuff foundation should be close to the wrist measurement rather than the much larger sleeve circumference.
- Sleeve twisting: place markers at the underarm and center top before attaching each sleeve. Match these points first, then distribute the remaining fabric between them.
- Lace stretching: hang the unfinished body for several hours before deciding the final border length. Cotton and other smooth fibers can lengthen when the weight of the lace is added.
- Unequal tassels: cut both sets of strands around the same cardboard template. Trim the finished tassels together so their final lengths differ by no more than approximately 5 mm.
Blocking the Finished Sweater
Wash the garment according to the yarn manufacturer’s instructions and remove excess water without twisting.
Lay it flat on blocking mats.
Align the center front and center back.
Measure both sleeves from shoulder to cuff and correct small differences while the fabric is damp.
Pin every major lower fan at its center point. Shape the smaller scallops individually.
Do not stretch the ribbed cuffs to match the sleeve width; they are intentionally narrower.
Allow the sweater to dry completely before removing the pins.
Conclusion
This pink lace crochet poncho sweater depends on proportion more than a fixed stitch count: a loose central body, open shoulder sections, roomy sleeves, narrow ribbed cuffs and a deep pointed lace border must work together. Begin with a blocked gauge sample and calculate the body from actual measurements before committing to the decorative hem. Complete the front and back first, test the neckline and armholes, then add the lace after the basic fit has been confirmed. Save the finished design to Pinterest or share your version on Instagram with #PinkLaceCrochetPoncho. For this design, would you keep the entire sweater pink or work the lower lace fans in a contrasting cream?









