Pattern type: Floral granny square blanket
Skill level: Intermediate
Terminology: US crochet terms
Construction: Modular squares with sewn-on floral appliqués
Introduction
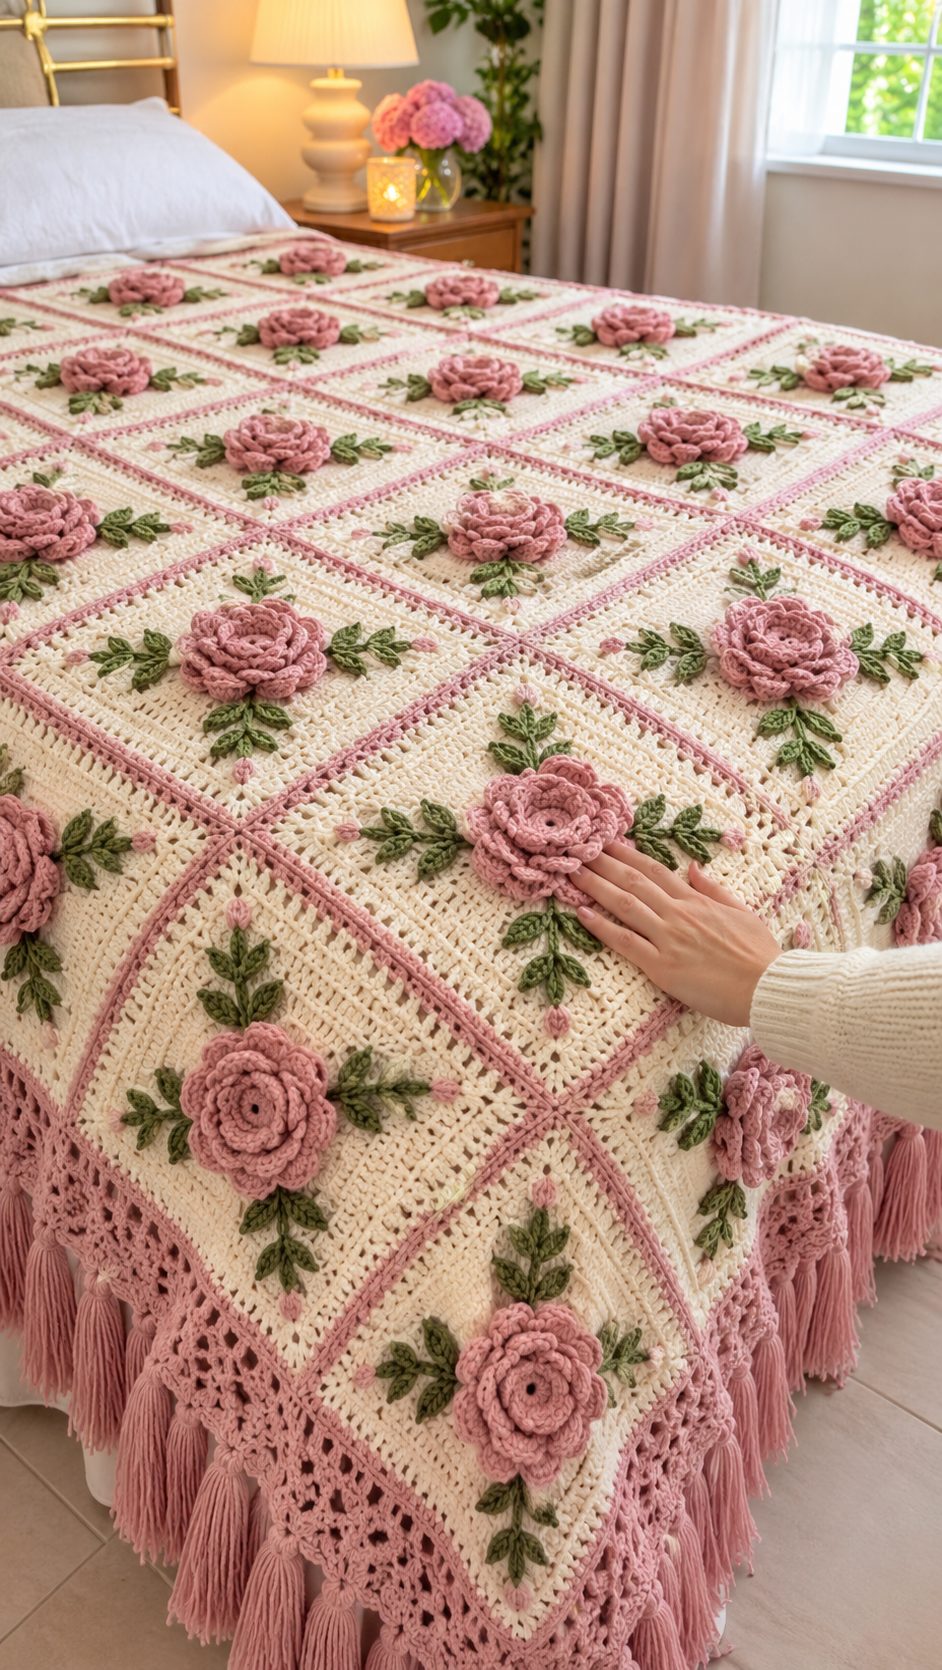
Each raised rose on this bedspread sits above a cream crochet square, with green leaves extending toward the surrounding pink border. This crochet rose granny square blanket pattern recreates that layered arrangement using separate flower appliqués, openwork squares, and decorative joining seams. Designed for intermediate crocheters, the project uses DK or light-worsted yarn and a 4 mm hook. The modular construction makes it practical to adjust the blanket for different bed sizes.
The Design: What Makes This Rose Blanket Different?
The defining feature of this vintage-inspired crochet blanket is its three-dimensional floral surface. Rather than crocheting a flat flower into the center of each square, the design uses raised spiral roses attached over a textured ivory background.
Each rose is surrounded by small green leaves and embroidered flower buds. These details give the floral granny square a botanical arrangement without requiring complicated color changes throughout the background.
Dusty-pink joining seams separate the cream squares into a visible grid. The outer edge uses an openwork crochet border with hanging tassels, creating a decorative finish suited to a bedspread.
One common mistake when making a 3D rose crochet blanket is attaching the flowers before blocking the squares. This can distort the motifs and create uneven seams. Block the square bases first, then attach the roses after the blanket panels have been joined.
Project Information at a Glance
| Feature | Details |
|---|---|
| Skill level | Intermediate |
| Estimated time | 60–90 hours, depending on size and pace |
| Sample blanket size | Approximately 150 × 200 cm before tassels |
| Target square size | Approximately 25 × 25 cm after blocking |
| Hook | 4.0 mm, adjusted for gauge |
| Yarn weight | DK / light worsted |
| Construction | 48 squares arranged in 6 columns and 8 rows |
| Best for | Decorative bedspreads and floral throws |
Measurements and time are project targets, not measurements established from the photograph. A 25 cm blocked square produces a 150 × 200 cm grid when arranged 6 × 8, excluding any extra width added by the outer border.
Materials and Tools
Yarn
Choose yarns with similar thickness and care instructions. A smooth acrylic-cotton blend or washable DK acrylic will provide clear stitch definition and support the raised petals.
- Warm ivory DK yarn: Approximately 1,600–2,000 g for the square backgrounds and cream border details.
- Dusty rose pink DK yarn: Approximately 500–700 g for the raised roses.
- Muted pink DK yarn: Approximately 350–500 g for joins, lace edging, and tassels.
- Olive green DK yarn: Approximately 200–300 g for leaves and stems.
- Light blush pink DK yarn: Approximately 30–60 g for embroidered buds and optional petal accents.
These quantities are planning allowances for the sample blanket, not verified consumption figures. Crochet and weigh one complete square, including its rose and leaves, before purchasing the full amount. Multiply the measured yarn usage by 48 and allow additional yarn for joining, the lace border, and tassels.
Tools
- 4.0 mm crochet hook or size needed to obtain the desired fabric.
- 3.5 mm crochet hook for firmer flower petals, if needed.
- Tapestry needle for sewing appliqués and weaving ends.
- Stitch markers for identifying corners and joining points.
- Blocking mats and rustproof pins.
- Measuring tape, scissors, and kitchen scale.
Crochet Abbreviations
- MR: Magic ring
- ch: Chain
- sc: Single crochet
- hdc: Half double crochet
- dc: Double crochet
- tr: Treble crochet
- sl st: Slip stitch
- inc: Two stitches worked into one stitch
- dec: Single crochet decrease
- BLO: Back loop only
- FLO: Front loop only
- RS: Right side
- WS: Wrong side
- sp: Space
An invisible decrease is made by inserting the hook through the front loops of two adjacent stitches before completing one single crochet.
Crochet Rose Granny Square Blanket Pattern – Step by Step
This is an original, adaptable construction inspired by the photographed blanket. The instructions below define a complete square, a spiral rose, leaves, joins, and a border. They are not a stitch-for-stitch transcription of the pictured item.
Step 1: Crochet the Ivory Granny Square Base (Make 48)
Yarn: Warm ivory
Hook: 4.0 mm
Work in joined rounds. Beginning chains count as a double crochet where stated. The square starts with four corner spaces and expands outward using double crochet groups.
Round 1: Make a MR. Ch 3 (counts as first dc), 2 dc, ch 2, [3 dc, ch 2] three times into the ring. Join with sl st to top of beginning ch 3. (12 dc, four ch-2 corners)
Round 2: Sl st into the first corner space. Ch 3, 2 dc, ch 2, 3 dc in the same corner. Ch 1. In each remaining corner work (3 dc, ch 2, 3 dc), ch 1. Join. (24 dc, four corners, four side ch-1 spaces)
Round 3: Sl st to a corner. Work (3 dc, ch 2, 3 dc) in each corner and (3 dc, ch 1) in each side ch-1 space, with ch 1 between adjacent groups. Join. (36 dc)
Rounds 4–9: Continue the established granny-square sequence: work (3 dc, ch 2, 3 dc) into every corner, 3 dc into each side ch-1 space, and ch 1 between adjacent groups. Join each round. The dc totals for rounds 4–9 are 48, 60, 72, 84, 96, and 108 respectively.
Round 10: Work 1 sc into each dc and side ch-1 space, placing (sc, ch 2, sc) in each corner. Join and fasten off.
Block the square flat. If it measures less than 25 cm, add further granny rounds before the final sc round. If it is larger, reduce the number of rounds or use a smaller hook. Every square must finish at the same measurement.
Step 2: Crochet the Raised Pink Rose (Make 48)
Yarn: Dusty rose pink
Hook: 3.5–4.0 mm
This rose is made as a long scalloped strip that is rolled into a spiral. The method produces overlapping petals without requiring individual petal attachments.
Row 1: Ch 62. Starting in the fourth chain from the hook, work 1 dc into each chain. (59 dc, plus the beginning ch-3 turning chain)
Row 2: Ch 3 and turn. Work 2 dc into each of the next 12 stitches, then 3 dc into each of the following 24 stitches, and 4 dc into each of the remaining 24 stitches, counting the top of the previous turning chain as the final stitch. (192 dc)
Row 3: Ch 1 and turn. Work [sl st in next stitch, skip 1 stitch, 5 dc in next stitch, skip 1 stitch] 48 times. Fasten off, leaving a 35 cm sewing tail. (48 scalloped petals)
To form the flower, roll the narrow starting end into a tight center. Continue wrapping the strip outward, allowing the outer scallops to open naturally. Sew through the lower edge of each layer, keeping the upper petals free.
The finished diameter will depend on how tightly the strip is rolled. Aim for a rose approximately 8–10 cm wide on the sample square. If the flower becomes too bulky, shorten the foundation chain and adjust the scallop repeat to match.
Step 3: Crochet the Green Leaves (Make 192–288)
Yarn: Olive green
Hook: 3.5 mm
Make four to six leaves per rose, depending on the desired density.
Round 1: Ch 9. Starting in the second chain from the hook, work sl st, sc, hdc, dc, dc, hdc, sc, then 3 sc into the final chain. Continue along the opposite side of the foundation chain with sc, hdc, dc, dc, hdc, sc, sl st. (17 stitches)
Fasten off, leaving a 15 cm tail.
For a pointed shape, pinch the tip while the leaf is damp and allow it to dry flat. Add a short embroidered center vein using a darker shade of green if desired.
Step 4: Make the Small Pink Flower Buds
Yarn: Light blush pink
Use small embroidered buds to fill the spaces between the roses and leaves.
Thread a tapestry needle with a double strand of pink yarn. Bring the yarn to the front of the square, make three or four short stitches radiating from one point, and secure the ends on the reverse.
Place one bud near each side of the rose arrangement. Keep the embroidery away from the outermost square stitches so it will not interfere with joining.
Step 5: Attach the Rose and Leaves
Lay one blocked square with the right side facing upward. Position the rose in the center and arrange four to six leaves around its base.
Pin the leaves first, placing their narrow ends beneath the rose. Sew them to the ivory background with matching green yarn.
Attach the rose by stitching through its underside and the square fabric. Do not stitch through every petal layer. The outer petals should remain raised, while the flower center stays securely attached.
Repeat for all 48 squares. Check that the flowers face the same direction before joining the blanket.
Step 6: Join the Granny Squares
Yarn: Muted dusty pink
Hook: 4.0 mm
Arrange the completed squares into six columns and eight rows. Check the color balance and flower orientation before connecting any pieces.
For a visible decorative seam, place two squares with wrong sides together and work a single crochet join through corresponding edge stitches. Use ch 1 at the corners if the seam becomes tight.
Continue joining squares into rows, then connect the rows to form the full blanket. Work carefully at four-square intersections to prevent raised knots.
Alternatively, use a flat slip-stitch join through the back loops of adjacent squares for a narrower seam.
Step 7: Crochet the Outer Lace Border
Yarn: Dusty pink
The photograph includes a wide openwork edge beneath the floral grid. This simplified lace border uses chain arches and shell stitches.
Border Round 1: Join pink yarn at any corner. Work sc evenly around the entire blanket, placing 3 sc into each corner. Adjust the stitch count so each side has a multiple of 6 stitches, excluding the three corner stitches. Join.
Border Round 2: Ch 1, sc in the first stitch, [ch 5, skip 5 stitches, sc in next stitch] along each side. At each corner, work (sc, ch 5, sc) into the middle corner stitch. Join.
Border Round 3: Sl st into the first ch-5 space. Work (3 dc, ch 2, 3 dc) in each ch-5 space. At each corner arch, work (3 dc, ch 3, 3 dc). Join.
Border Round 4: Ch 1. Work sc in each dc and 2 sc in each ch-2 space. Work 3 sc in each corner ch-3 space. Join.
Repeat the lace sequence if a deeper border is required, adjusting the stitch count and corner spacing to prevent rippling. Fasten off and weave in the ends.
Step 8: Add the Pink Tassels
Cut strands of dusty-pink yarn approximately 30 cm long. For each tassel, gather six to eight strands, fold them in half, and pull the folded center through an opening along the border.
Pass the loose ends through the loop and tighten the knot against the crochet fabric.
Space the tassels approximately 5–7 cm apart, with additional tassels at the corners if desired. Trim them to a uniform hanging length of approximately 12–14 cm.
Because the border is decorative, avoid placing long tassels where they may become caught in furniture or used bedding.
How to Assemble the Crochet Rose Blanket
- Complete all 48 ivory square bases.
- Block every square to the same finished dimensions.
- Crochet the pink spiral roses and secure their bases.
- Make the required green leaves and prepare the pink embroidery yarn.
- Attach the leaves and buds to the blocked square backgrounds.
- Sew each raised rose into the center of its square.
- Arrange the squares in a six-column, eight-row layout.
- Join the squares into rows, then connect the rows.
- Work the decorative lace border around the blanket.
- Add the tassels, weave in loose ends, and complete a final measurement check.
The completed bedspread consists of a joined floral grid with raised roses, green foliage, a pink lace edge, and evenly spaced tassels.
7 Technical Tips for a Better Rose Granny Square Blanket
- Mark every corner. Place a locking stitch marker in each ch-2 corner space so the square does not gradually develop an uneven edge.
- Measure before joining. Keep the blocked squares within approximately 5 mm of the target width to reduce puckering along the joining seams.
- Control the rose diameter. Measure the first completed flower and adjust the rolling tension if it exceeds 10 cm across.
- Secure the flower base. Stitch through at least three lower petal layers to prevent the raised rose from rotating during handling.
- Avoid excessive border tension. If the outer edge curls inward, increase the chain-space allowance or change to a larger hook for the border.
- Pin before sewing. Place the leaves around the flower and check the arrangement from above so the botanical details remain visible.
- Weave ends in two directions. Pass each yarn tail through several stitches, reverse direction, and weave through a second section to reduce loose ends after washing.
How to Adjust the Blanket Size
The modular construction makes it possible to produce a smaller throw or a larger bed covering without changing the rose design.
| Square Layout | Approximate Grid Size | Number of Squares |
|---|---|---|
| 4 × 5 | 100 × 125 cm | 20 |
| 5 × 6 | 125 × 150 cm | 30 |
| 6 × 8 | 150 × 200 cm | 48 |
| 8 × 9 | 200 × 225 cm | 72 |
These dimensions assume each blocked square measures exactly 25 cm, including its share of the joining seam. The lace border and tassels extend beyond the grid.
For a smaller blanket, reduce the square count rather than shrinking the roses too much. A compact rose can lose the layered petal definition that gives this design its raised floral appearance.
Frequently Asked Questions
Is this crochet rose granny square blanket suitable for beginners?
The individual stitches are accessible to crocheters who know chains, single crochet, and double crochet. However, the project is better classified as intermediate because it involves shaping spiral flowers, joining many squares, and maintaining consistent measurements.
What yarn works best for a 3D rose crochet blanket?
DK acrylic, cotton blends, and light-worsted yarn are suitable choices. A smooth yarn gives the petals defined edges and makes the small leaves easier to shape. Very fluffy yarn may obscure the details.
Can I use cotton yarn for the entire blanket?
Yes. Cotton produces well-defined stitches and can be suitable for decorative blankets. However, a large cotton bedspread may become heavy, particularly when it includes dozens of raised flowers and a deep border.
How many granny squares are needed for a bedspread?
The sample layout uses 48 squares, arranged six across and eight down. The final number depends on the blocked square size, mattress dimensions, and the amount of overhang required.
Should the roses be attached before or after joining?
For this construction, attach the leaves and roses after blocking each square but before joining the complete blanket. This makes it easier to position the flowers consistently and prevents the weight of the full blanket from interfering with sewing.
Can this blanket be machine washed?
Follow the care instructions for the least washable yarn used. A gentle wash in a large mesh bag may be suitable for some acrylic or cotton blends, but the raised flowers and tassels require careful handling. Dry flat to preserve the shape of the squares.
Conclusion
This floral bedspread combines modular crochet construction with raised rose appliqués, green leaves, pink joining seams, and an openwork border. Its appearance depends on three measurable details: consistent square dimensions, firmly attached flower bases, and balanced border tension.
Before making the full blanket, complete one square with its rose and leaves. Block it, measure the finished width, and weigh the yarn used. Those measurements will provide a more reliable estimate of the total materials required.
Save this crochet rose granny square blanket pattern to Pinterest, or share your finished project on Instagram using #RoseGrannySquareBlanket.
Would you keep all the roses dusty pink, or alternate two shades of pink across the floral grid?









