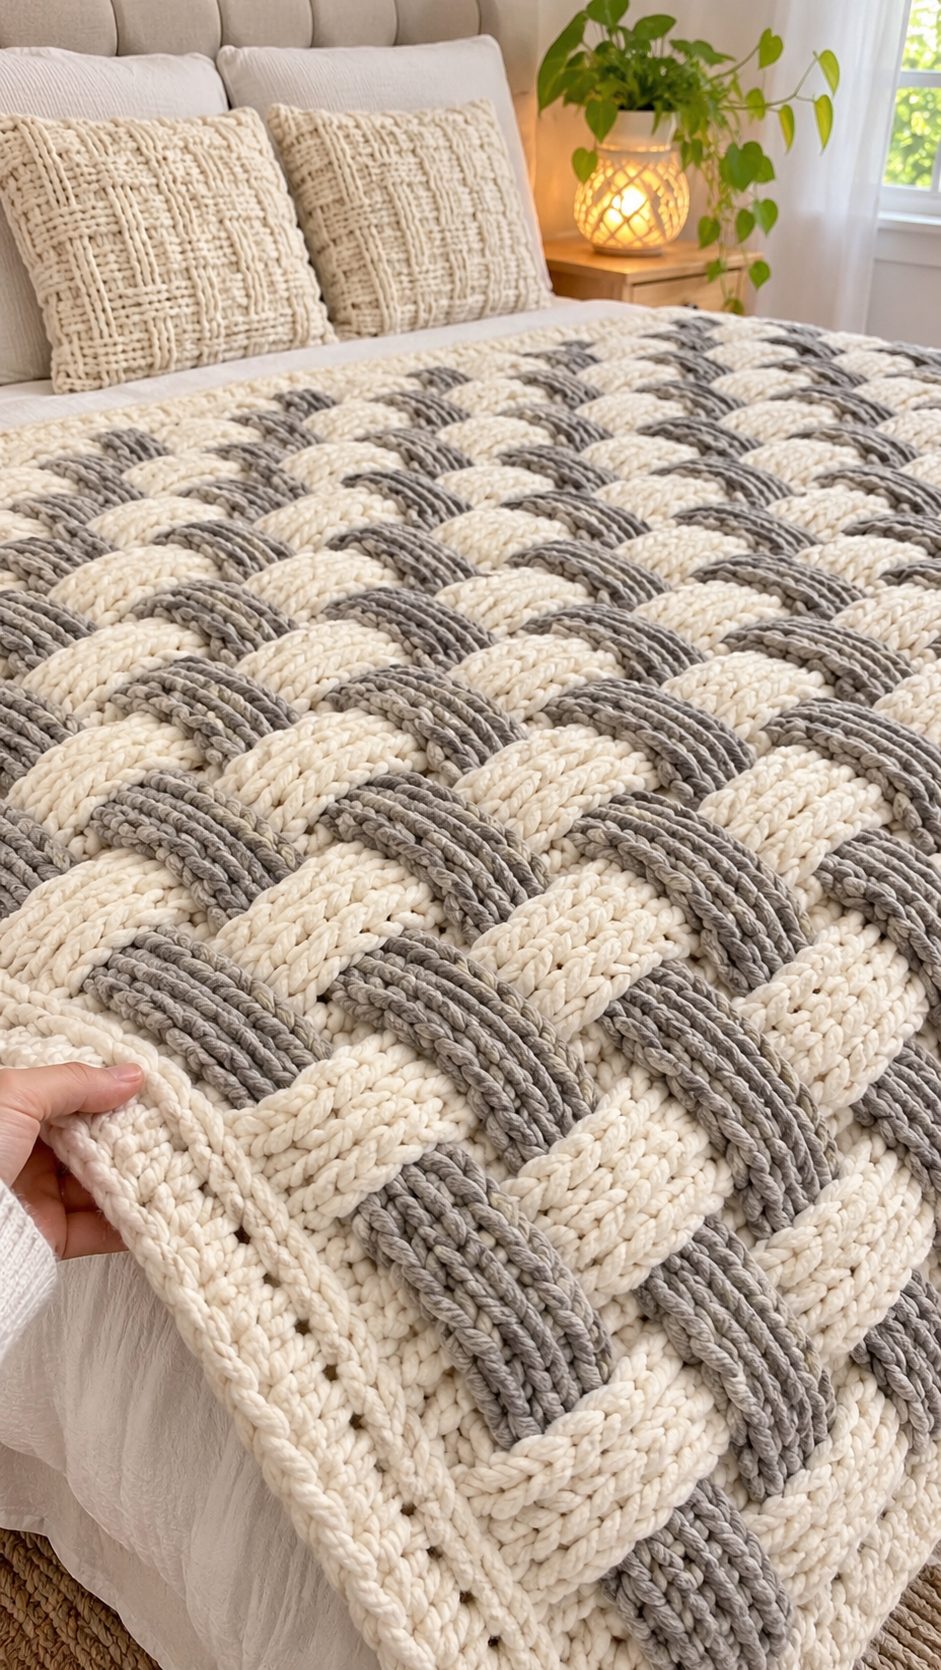
Pattern type: Chunky crochet bedspread
Skill level: Easy to intermediate
Terminology: US crochet terms
Construction: Long panels worked separately and joined
Introduction
A basketweave stitch creates thick, raised squares that look like woven fabric. In this crochet basketweave bedspread pattern, the alternating front- and back-post double crochet groups form large panels in cream, ivory, and warm greige. A wide textured border frames the blanket, while a folded top edge gives it a soft, inviting finish. The design uses a simple repeat, so it is an accessible project for crocheters who are comfortable with basic double crochet.
What Is Basketweave Crochet?
Basketweave crochet gets its woven appearance from groups of front-post double crochet (FPdc) and back-post double crochet (BPdc) stitches. The raised and recessed groups alternate every few rows, producing a grid of thick, square woven blocks.
This bedspread uses a wide basketweave repeat. Each panel contains a regular sequence of raised and recessed blocks. The fabric is dense and warm because the post stitches overlap the previous row rather than sitting in the top of a stitch. That density makes this project a good choice for a bedspread.
A basketweave stitch should NOT be called a granny square or motif blanket. It is a continuous fabric worked in rows or long panels, rather than a collection of separate motifs.
Use a smooth, bulky yarn and a large hook. A highly textured yarn can hide the post-stitch relief and make the woven pattern difficult to see. If the front-post stitches are difficult to identify, increase the hook size by 0.5 mm to create more space between stitches.
Project Information at a Glance
| Feature | Details |
|---|---|
| Skill level | Easy to intermediate |
| Estimated time | 40–60 hours, depending on size and pace |
| Sample blanket size | Approximately 150 × 200 cm before the border |
| Target panel size | Approximately 50 cm wide per panel |
| Hook | 6.0 mm, adjusted for gauge |
| Yarn weight | Bulky / chunky (Category 5) |
| Construction | 3 vertical panels joined edge to edge |
| Best for | Warm, textured bedspreads and sofa throws |
Measurements and time are project targets, not measurements established from the photograph. A 50 cm panel width produces a 150 cm blanket when three panels are joined.
Materials and Tools
Yarn
Choose yarns with similar thickness and care instructions. A smooth bulky acrylic or acrylic-wool blend will give clear stitch definition and support the raised texture.
- Cream bulky yarn: Approximately 900–1,200 g for the main basketweave panels.
- Ivory bulky yarn: Approximately 700–900 g for the contrasting panels.
- Warm greige bulky yarn: Approximately 600–800 g for the side panels and border.
These quantities are planning allowances for the sample blanket, not verified consumption figures. Crochet and weigh one complete panel section before purchasing the full amount. Multiply the measured yarn usage by three and allow additional yarn for joining and the border.
Tools
- 6.0 mm crochet hook or size needed to obtain gauge.
- 5.5 mm crochet hook for a firmer border, if needed.
- Tapestry needle for joining panels and weaving ends.
- Stitch markers for identifying panel boundaries and corners.
- Blocking mats and rustproof pins.
- Measuring tape, scissors, and kitchen scale.
Crochet Abbreviations
- MR: Magic ring
- ch: Chain
- sc: Single crochet
- hdc: Half double crochet
- dc: Double crochet
- tr: Treble crochet
- sl st: Slip stitch
- inc: Two stitches worked into one stitch
- dec: Single crochet decrease
- BLO: Back loop only
- FLO: Front loop only
- FPdc: Front-post double crochet
- BPdc: Back-post double crochet
- RS: Right side
- WS: Wrong side
- sp: Space
An invisible decrease is made by inserting the hook through the front loops of two adjacent stitches before completing one single crochet.
Crochet Basketweave Bedspread Pattern – Step by Step
This is an original, adaptable construction inspired by the photographed blanket. The instructions below define a complete panel, joining method, folded top edge, and border. They are not a stitch-for-stitch transcription of the pictured item.
Step 1: Crochet the Foundation and First Panel
Yarn: Cream bulky yarn
Hook: 6.0 mm
Work in rows. The turning chain counts as a double crochet where stated. Maintain an even edge by counting the first stitch of each row carefully.
Foundation row: Ch 58. Starting in the fourth chain from the hook, work 1 dc in each chain. (55 dc, plus the beginning ch-3 turning chain)
Row 1: Ch 3 and turn. Work 1 dc in each stitch. (56 dc)
Row 2: Ch 3 and turn. Work 1 dc in the next stitch, then [FPdc in the next 4 stitches, BPdc in the next 4 stitches] across, ending with 1 dc in the top of the turning chain.
Row 3: Ch 3 and turn. Repeat Row 2, working FPdc around each FPdc and BPdc around each BPdc.
Row 4: Ch 3 and turn. Work 1 dc in the next stitch, then [BPdc in the next 4 stitches, FPdc in the next 4 stitches] across, ending with 1 dc in the top of the turning chain.
Row 5: Ch 3 and turn. Repeat Row 4, working FPdc around each FPdc and BPdc around each BPdc.
Repeat Rows 2–5 until the panel measures approximately 200 cm in length. End with a repeat of Row 5.
Make three panels in total: one in cream, one in ivory, and one in warm greige. Adjust the yarn color for each panel while keeping the same stitch sequence.
Step 2: Add the Raised Basketweave Texture
The texture in this pattern comes from post stitches, not surface embroidery. Each raised block consists of four front-post double crochet stitches worked around the posts of the row below.
Work every front-post stitch around the post, not into the top loop. Insert the hook from the front to the back around the stitch post and complete the double crochet as usual.
After every two rows, the raised blocks change position. This creates the woven basket effect. If the texture becomes uneven, check that each post stitch aligns with the same stitch in the previous row.
Step 3: Crochet the Wide Textured Border
Yarn: Warm greige bulky yarn
Hook: 6.0 mm
The photograph includes a wide, raised border around the finished bedspread. This simplified border uses alternating post stitches.
Border Round 1: Join greige yarn at any corner. Work sc evenly around the entire blanket, placing 3 sc into each corner. Adjust the stitch count so each side has a multiple of 8 stitches, excluding the three corner stitches. Join.
Border Round 2: Ch 3, work 1 dc in the next stitch, then [FPdc in the next 4 stitches, BPdc in the next 4 stitches] along each side. At each corner, work (2 dc, ch 2, 2 dc) into the middle corner stitch. Join.
Border Round 3: Ch 3, work FPdc around each FPdc and BPdc around each BPdc. At each corner, work (2 dc, ch 2, 2 dc) into the corner space. Join.
Border Round 4: Ch 3, work 1 dc in each stitch around, placing (2 dc, ch 2, 2 dc) into each corner space. Join.
Repeat the post-stitch sequence if a deeper border is required, adjusting the stitch count and corner spacing to prevent rippling. Fasten off and weave in the ends.
Step 4: Join the Three Panels
Yarn: Warm greige bulky yarn
Hook: 6.0 mm
Arrange the three panels side by side: cream in the center, ivory on one side, and warm greige on the other side. Check the color balance before connecting any pieces.
For a visible decorative seam, place two panels with wrong sides together and work a single crochet join through corresponding edge stitches. Use ch 1 at the ends if the seam becomes tight.
Continue joining the panels into a single blanket. Work carefully at the panel junctions to prevent raised knots.
Alternatively, use a flat slip-stitch join through the back loops of adjacent panels for a narrower seam.
Step 5: Add the Folded Top Edge
The photograph includes a soft folded section at the head of the bed. This is created by turning the top of the finished blanket back on itself, rather than by adding a separate piece.
Fold the top edge down by approximately 30 cm. Pin the folded section in place, then tack the sides lightly with a few stitches of matching yarn. The fold should remain soft and flexible, not stitched flat across the entire width.
Check that the woven basketweave blocks remain aligned on the folded section. If the fold creates excess bulk, reduce the fold depth or use a lighter joining stitch.
Step 6: Add the Pillow Tuck
To create the bedroom styling shown in the image, tuck the folded edge under the pillows. The folded section should lie flat on the bed and support the pillows without pulling the panels out of alignment.
Measure the mattress width before finalizing the panel arrangement. The blanket should have enough overhang on each side to cover the mattress edge and drape naturally.
Step 7: Finish the Ends
Weave in all yarn tails using a tapestry needle. Pass each tail through several stitches, reverse direction, and weave through a second section to reduce loose ends after washing.
Block the finished blanket to the final dimensions. Pin the edges, corners, and folded top in place. Allow the blanket to dry completely before use.
How to Assemble the Crochet Basketweave Bedspread
- Crochet three basketweave panels in cream, ivory, and warm greige.
- Block each panel to the same finished dimensions.
- Arrange the panels in a vertical layout with cream in the center.
- Join the panels using a single crochet or flat slip-stitch seam.
- Work the wide textured border around the blanket.
- Fold the top edge down by approximately 30 cm.
- Tack the folded section lightly at the sides.
- Weave in all loose ends and complete a final measurement check.
The completed bedspread consists of a joined panel grid with raised basketweave blocks, a wide textured border, and a soft folded top edge.
7 Technical Tips for a Better Basketweave Bedspread
- Count every row. Place a locking stitch marker in the first stitch of each basketweave repeat so the woven blocks do not gradually shift.
- Check the post stitches. Confirm that each front-post stitch wraps around the correct post before completing the stitch.
- Keep the panel width consistent. Measure each panel before joining to reduce puckering along the seams.
- Use the same hook size. A change in hook size can alter the panel width and create an uneven edge.
- Block before joining. Blocking the panels first makes it easier to align the basketweave blocks and maintain straight seams.
- Pin before sewing. Place the panels side by side and check the pattern alignment from above before joining.
- Weave ends in two directions. Pass each yarn tail through several stitches, reverse direction, and weave through a second section to reduce loose ends after washing.
How to Adjust the Blanket Size
The panel construction makes it possible to produce a smaller throw or a larger bed covering without changing the basketweave design.
| Panel Layout | Approximate Blanket Size | Number of Panels |
|---|---|---|
| 2 panels | 100 × 150 cm | 2 |
| 3 panels | 150 × 200 cm | 3 |
| 4 panels | 200 × 200 cm | 4 |
| 5 panels | 250 × 200 cm | 5 |
These dimensions assume each panel measures exactly 50 cm in width, including its share of the joining seam. The border extends beyond the panel grid.
For a smaller blanket, reduce the panel count rather than narrowing the basketweave repeat too much. A narrow repeat can lose the thick, woven appearance that gives this design its chunky texture.
Frequently Asked Questions
Is this crochet basketweave bedspread suitable for beginners?
The individual stitches are accessible to crocheters who know chains and double crochet. However, the project is better classified as easy to intermediate because it involves front- and back-post stitches, joining long panels, and maintaining consistent measurements.
What yarn works best for a basketweave blanket?
Bulky acrylic, acrylic-wool blends, and chunky cotton yarn are suitable choices. A smooth yarn gives the post stitches defined edges and makes the woven texture easier to see. Very fluffy yarn may obscure the details.
Can I use cotton yarn for the entire blanket?
Yes. Cotton produces well-defined stitches and can be suitable for decorative blankets. However, a large cotton bedspread may become heavy, particularly when it includes a deep border and thick post stitches.
How many panels are needed for a bedspread?
The sample layout uses three panels, each approximately 50 cm wide. The final number depends on the panel width, mattress dimensions, and the amount of overhang required.
Should the panels be blocked before joining?
For this construction, block each panel before joining. This makes it easier to align the basketweave blocks consistently and prevents the weight of the full blanket from interfering with sewing.
Can this blanket be machine washed?
Follow the care instructions for the least washable yarn used. A gentle wash may be suitable for some acrylic blends, but the raised post stitches and folded edge require careful handling. Dry flat to preserve the shape of the panels.
Conclusion
This bedspread combines panel crochet construction with raised basketweave texture, a wide border, and a folded top edge. Its appearance depends on three measurable details: consistent panel dimensions, aligned post-stitch blocks, and balanced border tension.
Before making the full blanket, complete one panel section. Block it, measure the finished width, and weigh the yarn used. Those measurements will provide a more reliable estimate of the total materials required.
Save this crochet basketweave bedspread pattern to Pinterest, or share your finished project on Instagram using #BasketweaveBedspread.
Would you keep the panels in cream, ivory, and warm greige, or alternate two shades of cream across the blanket?









