Introduction
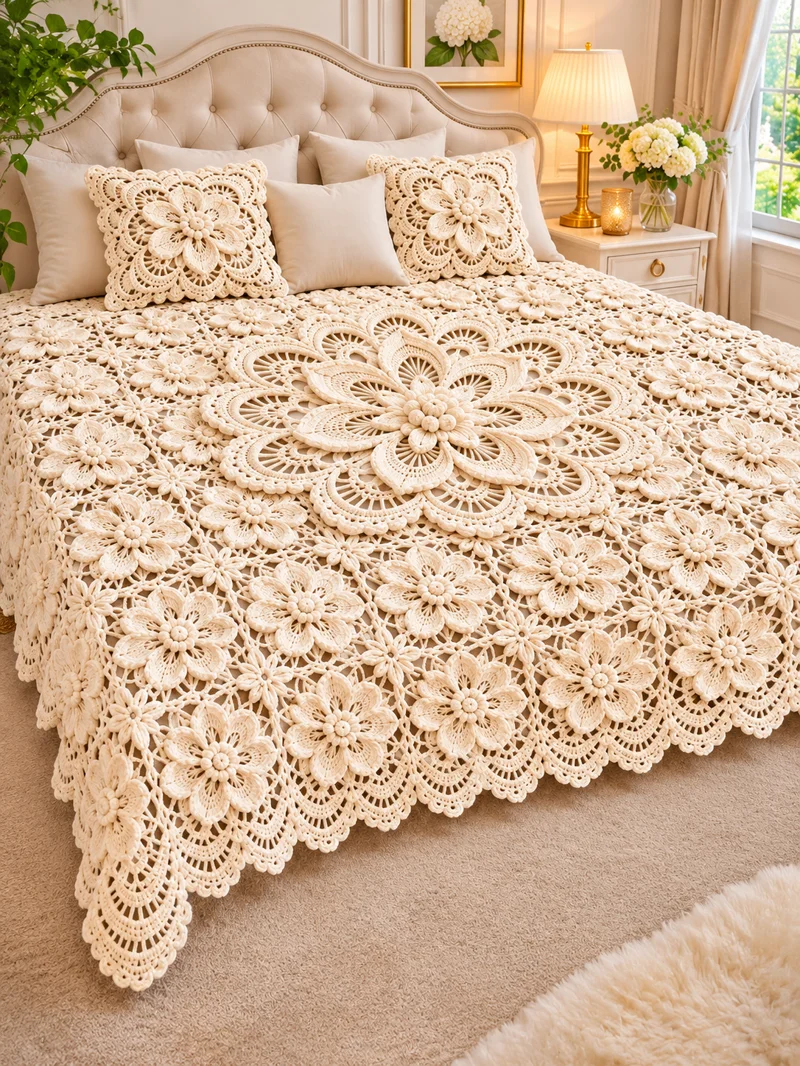
Layered floral motifs and openwork lace create a distinctive look for a handmade crochet bedspread. This crochet floral bedspread pattern combines a large central flower, smaller secondary motifs, delicate lace joins, scalloped edging, and matching pillow covers. The proposed construction uses fine cotton yarn and a 3.5 mm hook. It is suitable for an advanced project and creates an approximately queen-size crochet bedspread, with generous coverage for a matching queen-size bed. This floral crochet bedspread pattern uses imported stock footage from attached media as an inspiration reference. The pattern provided in this document is not a one-to-one copy of the pattern in the image.
The Design: What Makes This Crochet Floral Bedspread Distinctive
The main visual feature is the oversized central flower medallion. Its many petals and layered leaves give the bedspread a striking focal point.
The secondary floral motifs provide additional colour depth while balancing the design. By repeating the same family of shapes across the bedspread, the pattern creates a cohesive surface.
Delicate lace borders create an elegant contrast to the patterned motifs. Their scalloped shape adds movement to an otherwise structured bedspread.
The matching floral crochet pillow covers complete the bedroom set and give the bedspread a coordinated look. The final product should feel like a luxury item while remaining suitable for everyday use.
Everything is designed to fit together seamlessly, using a combination of advanced crochet techniques in a way that produces a lace-like texture without sacrificing structural strength.
Project Info at a Glance
| Project Detail | Specification |
|---|---|
| Skill Level | Advanced |
| Estimated Time | 100–160 hours |
| Finished Size | Approximately 220 × 240 cm |
| Hook | 3.5 mm |
| Yarn Weight | Fine cotton, category 2 |
| Main Colour | Ivory |
| Construction | Modular floral motifs joined with lace |
| Main Techniques | Magic ring, increases, clusters, shells, lace joins |
| Best For | Master bedroom décor, elegant bedding |
Note: This design was inspired by the provided reference image but does not claim to be a direct reproduction. The pattern is provisional.
Materials and Tools
Yarn
- Ivory fine cotton yarn, category 2 – approximately 2,500–3,500 g.
- Additional ivory yarn for flowers and pillow covers – approximately 150–250 g for the flowers and 300–500 g for the pillow overlays.
Any brand of category 2 cotton yarn may be substituted. Use a consistent yarn throughout the bedspread to maintain uniform stitch definition.
Ensure that you have sufficient yarn before you begin. The proposed yarn estimate is based on a queen-size bedspread and may differ if you adjust the size.
Yarn estimation is provisional. Variations in tension or yarn type can change the required amount. The safest approach is to purchase an additional 10% beyond the estimated total.
Tools
- 3.5 mm crochet hook – used for the bedspread body.
- 3.0 mm crochet hook – used for finer lace edging if required. Keep this hook available for later use.
- Tapestry needle – used for weaving in ends and joining motifs.
- Stitch markers – essential for maintaining consistent increase positions.
- Sharp scissors – for trimming yarn ends.
- Measuring tape – used to monitor size as the bedspread grows.
- Blocking mats and pins – for shaping the final lace edges.
- Two 45 × 45 cm pillow inserts – used for the matching cushion covers.
- Optional cotton backing fabric – for use when the bedspread needs extra durability.
Crochet Abbreviations
All instructions use US crochet terminology.
| Abbreviation | Meaning |
|---|---|
| MR | Magic ring |
| ch | Chain |
| sc | Single crochet |
| hdc | Half double crochet |
| dc | Double crochet |
| tr | Treble crochet |
| sl st | Slip stitch |
| inc | Increase (2 stitches in the same stitch) |
| dec | Decrease (crochet 2 stitches together) |
| BLO | Back loop only |
| st / sts | Stitch / stitches |
| sp | Space |
| rep | Repeat the instructions in brackets |
| FO | Fasten off |
Shell: A decorative stitch combination consisting of 5 dc in the same stitch or space.
Picot: Ch 3, then sl st into the first chain to form a small loop.
Cluster: Three double crochet stitches worked together into the same stitch or space.
Stitch counts require particular attention after every increase round. Invisible decreases are not used in this pattern because the pieces increase rather than decrease.
Pattern — Step by Step
Pattern note: The instructions below are original designs inspired by the visual motifs in the provided image. They do not reproduce the exact lace chart or reproduce the exact layout of the photographed bedspread. They provide a practical motif-based approach that can be tested, measured, and altered.
Part 1: Small Raised Flower Center
Yarn: Ivory (main colour). Hook: 3.5 mm.
R1: MR, ch 1, work 12 sc into MR. Join with sl st to first sc. (12)
R2: Ch 1, work 2 sc in each st around. Join. (24)
R3: Ch 1, (1 sc, 1 inc) × 12. Join. (36)
R4: Ch 1, (2 sc, 1 inc) × 12. Join. (48)
R5: Ch 1, (3 sc, 1 inc) × 12. Join. (60)
R6: Ch 1, (4 sc, 1 inc) × 12. Join. (72)
R7: Ch 1, FLO: (5 sc, 1 inc) × 12. Join. (84)
R8: Ch 1, (5 sc in each stitch, 1 sc in each of the next 5 sts, ch 3, sk 1 st) × 12. Join. (84)
Part 2: Six-Petal Crochet Flower
Yarn: Ivory (main colour). Hook: 3.5 mm.
Each central flower consists of six petals that will later be joined at the corners. This section is used multiple times for the smaller motifs and, with additional rounds, for the central medallion.
R1: MR, ch 1, work 6 sc into MR. Join with sl st. (6)
R2: Ch 1, (1 inc) × 6. Join. (12)
R3: Ch 1, (1 sc, 1 inc) × 6. Join. (18)
R4: Ch 1, (2 sc, 1 inc) × 6. Join. (24)
R5: Sl st into BLO of each stitch. (24 BLO sts; not counted)
R6: Ch 1, [work (1 dc, 1 tr, 1 dc) into next st, sk 1 st, sl st into next st] × 6. Join. (6 petals formed)
R7: Sl st to the tip of the next petal. Ch 2, work (3 dc, ch 3, 3 dc) into the same tip st, sl st between petals. Repeat around for all 6 petals.
R8: Ch 1, (1 sc in each st) × 24, with inc at the petal tips. Join. (30)
R9: Ch 1, work 1 sc in each st around. Join. (30)
R10: Ch 1, (4 sc, 1 inc) × 6. Join. (36)
Tip: At this stage, place a marker on the sixth petal to identify the tip for joining.
Continue increasing as required to reach the desired size. To make a large central flower, complete the rounds for the larger floral motif.
Part 3: Openwork Lace Circle
Yarn: Ivory (main colour). Hook: 3.5 mm.
Use the central flower as a starting point and expand it into a lace circle using increases and decorative stitches.
R1: Ch 4, join to form a ring. (4 ch)
R2: Ch 3, work 11 dc into the ring. Join. (12 dc)
R3: Ch 3, (1 dc, ch 1) × 12. Join. (24 sts incl. chains)
R4: Ch 3, (2 dc in next st, ch 1) × 12. Join. (36)
R5: Ch 1, sc in next st, ch 3, skip next st; repeat around.
R6: Ch 3, work 1 dc in next ch-sp, ch 1; repeat around.
R7: Ch 1, sc in next dc, ch 4, skip next st; repeat around.
R8: Ch 3, work 1 dc in next ch-sp, ch 1, 1 dc in next ch-sp; repeat around.
R9: Ch 1, work 1 sc in each st around. Join. (96)
R10: Ch 1, (7 sc, 1 inc) × 12. Join. (108)
R11: Ch 1, work 1 sc in each st. Join. (108)
R12: Ch 1, (8 sc, 1 inc) × 12. Join. (120)
R13: Ch 1, work 1 sc in each st. Join. (120)
R14: Ch 1, work 1 dc in each st. Join. (120)
R15: Ch 3, work 1 dc in each of the next 2 sts, ch 2, skip 2 sts; repeat around.
R16: Ch 1, work 1 sc in each st around. Join. (120)
R17: Ch 3, work 5 dc (shell) in next st, skip 2 sts, sc in next st; repeat around.
R18: Ch 1, work 1 sc in each st around. Join. (132)
Note: Stitch counts in this section are provisional and should be checked as you work.
Part 4: Large Central Floral Medallion
Yarn: Ivory (main colour). Hook: 3.5 mm.
Continue from the openwork lace circle and add further rounds to form the central medallion.
R19: Ch 1, (8 sc, 1 inc) × 12. Join. (132)
R20: Ch 1, (9 sc, 1 inc) × 12. Join. (144)
R21: Ch 4, join to form a ring. (4 ch)
R22: Ch 3, work 11 dc into the ring. Join. (12 dc)
Continue to expand the medallion if a larger central flower is required. The scalloped border is added separately after the motifs are joined.
Part 5: Small Decorative Flower Motifs
Yarn: Ivory (main colour). Hook: 3.5 mm.
The small flowers fill the spaces between the larger floral elements. They can be made in batches and attached while assembling the bedspread.
R1: MR, ch 1, work 6 sc into MR. Join. (6)
R2: Ch 1, (1 inc) × 6. Join. (12)
R3: Ch 1, (1 sc, 1 inc) × 6. Join. (18)
R4: Ch 2, (1 dc, 1 tr, ch 2, sl st) into next st, then skip 2 sts; repeat around.
R5: Ch 1, (1 sc) × 18. Join. (18)
R6: Ch 2, (1 dc, 1 tr, ch 2, sl st) into next st, then skip 2 sts; repeat around.
R7: Ch 1, work 1 sc in each st around. Join. (24)
R8: Ch 1, (3 sc, 1 inc) × 6. Join. (30)
Part 6: Joining the Floral Motifs
Joining method: Seamless join-as-you-go with single crochet stitches; crochet hook 3.5 mm.
The completed motifs are joined into a bedspread. Arrange the motifs in a layout before sewing them together.
- Lay out the motifs on a large flat surface.
- Place the large central flower in the center of the layout.
- Surround the central flower with six medium floral motifs, one for each side of the central medallion.
- Fill the gaps between the medium motifs with the small decorative flower motifs.
- Align the motif edges so that the petals meet at the center points.
- Join motifs using single crochet stitches through the corresponding stitches of adjacent motifs.
- Continue adding motifs outward until the bedspread reaches the desired size.
- Check the width and length frequently and compare them with the target size.
The article does not state the exact number of motifs required. This depends on stitch gauge and the planned finished size.
To estimate the number of motifs, work one motif completely, measure it, and use the proposed formula:
Estimated number of motifs = (target bedspread width ÷ single motif width) × (target bedspread length ÷ single motif length)
If an edge or motif looks too tight, work one round of single crochet stitches around the motif before joining it.
Part 7: Scalloped Crochet Lace Border
Yarn: Ivory (main colour). Hook: 3.5 mm.
The scalloped lace edging gives the bedspread its elegant finish.
R1: Ch 1, work 1 sc in each st around the outer edge. Join. (Stitch count determined by the layout)
R2: Ch 1, work 1 sc in each st around. Join.
R3: Ch 1, work 1 sc in each st around. Join.
R4: Ch 3, work 5 dc (shell) in next st, skip 2 sts, sc in next st; repeat around.
R5: Ch 1, work 1 sc in each st around. Join.
R6: Ch 3, work 5 dc (shell) in next st, skip 2 sts, sc in next st; repeat around.
R7: Ch 1, work (1 sc, 1 picot) in each st around. Join. Fasten off.
Weave in loose ends as you finish the border. The scalloped lace edge is the final decorative element for the bedspread.
Part 8: Matching Floral Pillow Covers
Yarn: Ivory (main colour). Hook: 3.5 mm.
The pillow covers use the same floral motifs to create matching decorative pieces.
- Measure the pillow insert and crochet a front panel to the same size.
- Make small flower motifs and join them in the same manner as the bedspread.
- Crochet a plain back panel in single crochet stitches.
- Join the two panels together on three sides.
- Insert the pillow and close the fourth side with a row of single crochet stitches.
For decorative pillow covers, use fine cotton yarn to maintain the delicate appearance.
Assembly Instructions
- Prepare the motifs: Block each motif individually before joining. Pin each motif to its target dimensions.
- Arrange the motifs: Place the central floral medallion in the center, surrounded by the secondary motifs.
- Join the motifs: Use single crochet stitches to join each motif at the points where the petals meet.
- Manage the edges: Work a round of single crochet around the outside to define the shape before adding the lace border.
- Add the scalloped border: Create the scalloped lace edge after joining all of the motifs.
- Attach the pillow covers: Assemble the matching pillow covers by joining the front and back panels.
- Ensure symmetry: Check the bedspread for any uneven edges or misaligned motifs after assembly.
- Weave in ends: Secure all loose tails and trim excess yarn.
- Block the bedspread: Pin the completed piece to its approximate dimensions and let it dry before use.
- Final inspection: Review the stitch definition, floral motifs, and lace edging before placing the bedspread on the bed.
The completed bedspread combines a central floral medallion, smaller decorative flowers, openwork lace circles, and a scalloped border.
7 Technical Tips for a Better Crochet Floral Bedspread
- Consistent tension: Maintaining even tension across all motifs is essential. Motifs crocheted with varying tension will not join cleanly and may create uneven edges.
- Colour matching: Use the same dye lot for all yarn in the project. Different dye lots can appear different when finished side by side.
- Stitch counts: Stitch counts must be verified after every increase round.
- Motif placement: Pay attention to the orientation of each motif. The petals should all face the same direction for a coordinated look.
- Border tension: A border stitched too tightly will cause the bedspread to pucker. Use a slightly larger hook for the border if it seems tight.
- Joining method: Keep the joining method consistent — use single crochet stitches consistently for clean, even joins.
- Blocking requirement: Blocking is essential for lace-based projects. Without proper blocking, the lace will not show its full detail.
Customizing the Bedspread Size
The main bedspread is modular, so it can be produced in different sizes by adjusting the number of floral motifs. Larger bedspreads can be made by adding further rows of motifs.
- For a twin-size bedspread, the layout may require fewer floral motifs.
- For a queen-size bedspread, add motifs progressively outward from the central flower, in the proportions described in the joining section.
- For a king-size bedspread, a further row of motifs may be required.
Note: Specific motif counts for each size are not stated, because motif dimensions depend on yarn and tension.
The modular design also makes it possible to replace individual worn or damaged motifs. Remove the damaged motif and crochet a replacement using the same pattern.
How to Care for a Crochet Lace Bedspread
Always check the ball band of the yarn used to confirm washing instructions.
Hand-wash the bedspread in cool water with a mild detergent. Do not use bleach unless the yarn label permits it.
To dry, press out excess water gently with a towel. Do not wring the fabric. Lay the bedspread flat to dry, reshaping the motifs as needed.
Store the bedspread folded in a breathable cotton bag or wrapped in acid-free tissue paper.
Regularly check for loose threads or weakened stitches. Repair them promptly to avoid damage to the surrounding motifs.
Frequently Asked Questions
Can I Make This Bedspread in Another Colour?
Yes. This crochet floral bedspread can be made in other colours, such as sage green or dusty pink, while retaining the same motif shapes.
How Long Will This Bedspread Take to Make?
The project is advanced and is estimated at 100–160 hours. It requires patience, consistent tension, and motif-by-motif construction.
How Do I Stop the Bedspread from Curling?
Blocking is the key step. Pin the bedspread to its finished dimensions on blocking mats and allow it to dry completely. Joining motifs evenly and keeping the border tension slightly relaxed also helps.
Can I Use a Different Yarn Weight?
A thicker yarn will produce a heavier bedspread and larger motifs. A finer yarn will make a more delicate fabric but will require more motifs. Always check the finished motif measurements and adjust your layout accordingly.
Is This Pattern Suitable for Beginners?
This is an advanced pattern. Beginners may find the openwork joins and lace border difficult. Experience with floral motifs, increases, and lace stitch patterns is recommended.
Conclusion
This crochet floral bedspread pattern combines a large central floral medallion, smaller decorative flower motifs, delicate lace joins, and a scalloped border to create a handmade heirloom piece. Its modular construction makes it suitable for twin, queen, and king sizes.
Before starting the main bedspread, test one floral motif, check its size against your gauge, and adjust the hook if needed. Record the finished measurements before continuing with the full project.
Share your finished bedspread on Pinterest or Instagram using #FloralCrochetBedspread.
Would you crochet this elegant floral bedspread in classic ivory or a soft pastel shade?








