Introduction
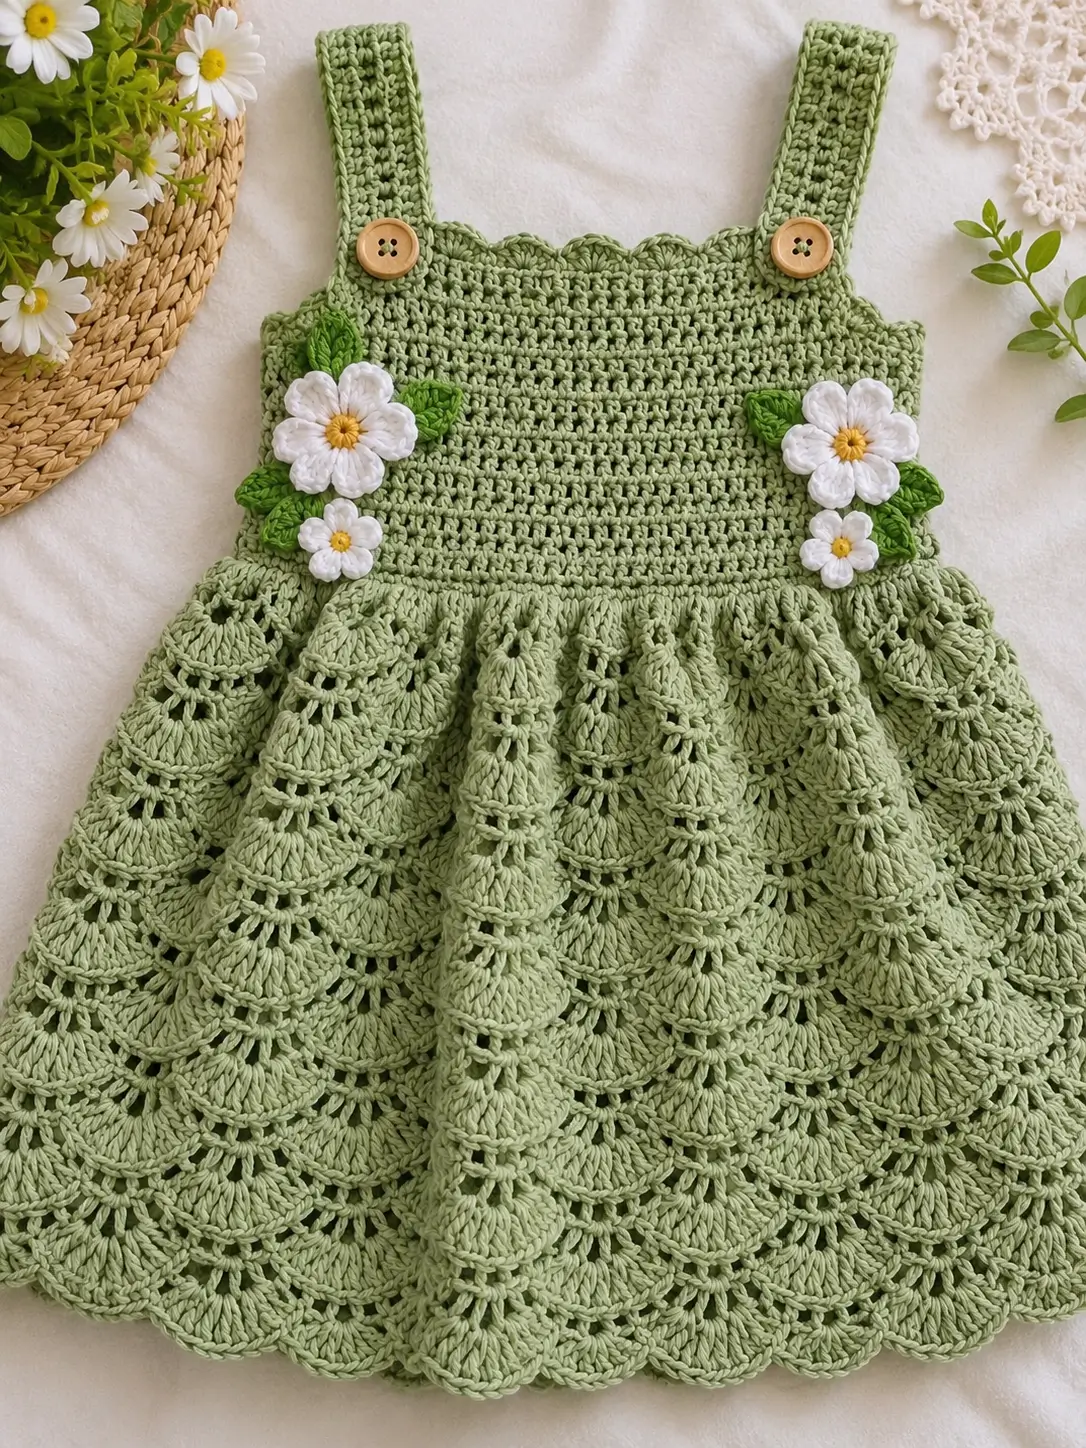
The skirt on this sage dress is built from overlapping shell columns, so the increase rate matters more than the decorative flowers. This sage green crochet baby dress pattern combines a fitted textured bodice, buttoned shoulder straps, a full openwork skirt, scalloped edging, and white floral appliqués. The construction is designed for cotton or cotton-blend yarn and suits an intermediate crocheter who can work shells, increases, shaping, and separate appliqués.
The Design: What Makes This Baby Dress Different
The dress separates the structure into two distinct areas. The upper section is relatively dense so the straps and wooden buttons have enough support. Below the waist, repeated shell groups create the much wider skirt without adding bulky seams.
The sage green yarn carries nearly the entire garment, while white flowers and brighter green leaves are added only after the dress is assembled. This keeps the decorative pieces away from the structural seams.
The photographed skirt has strong vertical shell columns rather than a simple mesh. Each column expands into a broad fan, followed by a small open section that separates it from the next fan. The main construction mistake is adding too much width in one round at the waist. Distribute increases gradually so the skirt hangs in folds instead of forming a stiff ruffle.
Project Information at a Glance
| Skill Level | Construction | Suggested Size | Hook | Yarn |
|---|---|---|---|---|
| Intermediate | Bodice + straps + circular lace skirt | Approx. 12–24 months | 3.5–4.0 mm | DK cotton or cotton blend |
The measurements in this pattern are project targets. For a wearable garment, compare the work with the intended child’s chest, waist-to-hem length, and shoulder-to-waist measurement before completing the skirt.
Materials and Tools
Yarn
- Sage green — DK weight cotton or cotton blend — approximately 250–350 g
- White — DK cotton — approximately 20–30 g for flowers
- Leaf green — DK cotton — approximately 15–20 g
- Yellow — small quantity for flower centers
Tools
- 3.5–4.0 mm crochet hook
- 2 wooden buttons, approximately 15–18 mm
- Yarn needle
- Stitch markers
- Scissors
- Measuring tape
- Blocking mat and pins
Buttons and appliqués should be attached securely. For garments intended for very young children, sewn decorative details require particular care because loose components can become a hazard.
Abbreviations
- MR — magic ring
- ch — chain
- sc — single crochet
- hdc — half double crochet
- dc — double crochet
- tr — treble crochet
- sl st — slip stitch
- sp — space
- st/sts — stitch/stitches
- RS — right side
- WS — wrong side
Measurements and Gauge
Make a blocked swatch before starting the bodice. A useful target for DK cotton with a 3.5–4.0 mm hook is approximately 18–21 stitches per 10 cm, but the actual blocked swatch controls the garment dimensions.
Measure the intended wearer around the chest. Add approximately 4–6 cm for comfortable ease.
For example:
Chest measurement: 50 cm
Finished bodice circumference: approximately 54–56 cm
The bodice in the photograph sits fairly close to the body. Excessive positive ease will make the waist drop and can pull the straps outward.
Construction Overview
The dress is worked in five main stages:
- Crochet a rectangular sage bodice.
- Add the shaped upper edge and underarm finishing.
- Make two shoulder straps with buttonholes.
- Work the lace skirt downward from the lower bodice edge.
- Add flowers, leaves, buttons, and final edging.
Bodice
The exact starting chain depends on the required chest circumference and gauge.
Calculate:
finished chest circumference × stitches per cm
Adjust the result to an even stitch count.
Foundation
With sage green, chain the required number of stitches plus turning chains.
Row 1
Hdc in the appropriate starting chain and across.
Turn.
Row 2
Ch 1, hdc across.
Turn.
Row 3
Ch 1, *hdc in next st, hdc in BLO of next st* across.
Turn.
This introduces a restrained texture without making the bodice excessively thick.
Rows 4 onward
Continue the established texture until the bodice reaches the required shoulder-to-waist depth minus the strap length.
For a small toddler dress, the bodice section may be approximately 16–20 cm deep, depending on body measurements.
Do not fasten off if the bodice will be joined directly into a tube.
Joining the Bodice
Bring the short ends together with the right side facing outward.
Join with a mattress stitch or a relaxed slip-stitch seam.
The seam should stretch at approximately the same rate as the fabric.
Position the seam at the center back.
Upper Bodice Edging
Attach sage yarn at the back seam.
Round 1
Work sc evenly around the upper edge.
Join with sl st.
Round 2
Ch 1, sc around again.
At the front neckline, maintain the existing stitch count. Do not increase unnecessarily because the upper edge needs to remain stable.
Decorative Round
For the small scallops visible around the neckline:
*skip 1 st, 5 dc in next st, skip 1 st, sl st in next st*
Repeat only across the front neckline if a cleaner underarm edge is preferred.
Shoulder Straps — Make 2
The straps are wide and relatively dense so the buttons do not distort the fabric.
Foundation
Ch enough stitches for approximately 4–5 cm width.
Row 1
Hdc across.
Row 2
Ch 1, turn, hdc across.
Rows 3 onward
Repeat Row 2 until the strap reaches the required shoulder length.
A practical starting length is approximately 16–22 cm, but fit should determine the final measurement.
Buttonhole
Near one end of the strap, work to the center stitches.
Ch 2–3, skip the same number of stitches, then continue across.
On the following row, work into the chain space.
Test the button before fastening off. The hole should pass over the button without stretching the surrounding stitches excessively.
Strap Edging
Work one round of sc around each strap.
For a small decorative edge, work:
*sc in next 3 sts, ch 2, sl st in first ch*
Repeat along the outside edges.
Keep the inner strap edges plain if the decorative bumps rub against the neckline.
Attaching the Straps
Mark the strap positions before sewing.
The two front straps should be equally distant from the center front.
Measure the distance rather than judging by eye.
Sew the fixed end securely to the back or front bodice according to the preferred button orientation.
Attach the wooden buttons to the corresponding side.
Preparing the Waist for the Skirt
Turn the dress so the lower bodice edge is accessible.
Attach sage yarn at the center back.
Waist Round 1
Work sc evenly around the lower edge.
Join.
Waist Round 2 — Controlled Increase
Ch 2.
Work approximately:
*2 hdc in next st, hdc in next 2 sts*
Repeat around, adjusting the final repeat as required.
This creates additional circumference for the skirt.
If the bodice fabric is already wide, reduce the increase frequency. The waist should begin to flare but should not form a horizontal ruffle.
Lace Shell Skirt
The photographed skirt is based on repeated vertical fan formations. The following original shell sequence creates a comparable layered effect.
Skirt Round 1
Ch 3.
Work:
*skip 2 sts, 5 dc in next st, skip 2 sts, sc in next st*
Repeat around.
Join with sl st.
Skirt Round 2
Sl st to the center dc of the first shell.
Ch 1.
*sc in center dc of shell, ch 5, sc in center dc of next shell*
Repeat around.
Skirt Round 3
Sl st into first ch-5 space.
Work:
7 dc in each ch-5 space
Place a sc between adjacent shells.
Skirt Round 4
Move to the center of the shell.
Work:
*sc in center dc, ch 5, sc in next shell center*
Repeat around.
Skirt Round 5
Work 9 dc into each ch-5 space, with sc between shells.
The increase from five to seven to nine dc widens each fan gradually.
Establishing the Vertical Shell Repeat
After the first expansion section, maintain the skirt with alternating shell and chain-space rounds.
Use this repeat:
Round A: sc at shell center, ch 5 to next shell center.
Round B: 9 dc into each ch-5 space, sc between shells.
Round C: sc at shell center, ch 6 to next shell center.
Round D: 11 dc into each ch-6 space, sc between shells.
Repeat the general structure while monitoring the skirt circumference.
The goal is a soft A-line flare with visible folds.
Creating the Openwork Detail
To reproduce the small openings between the dense shell sections, replace selected shell rounds with:
*dc, ch 1, skip 1* across each fan.
On the following round, work dc into both stitches and ch-1 spaces.
Use one openwork round after every two or three denser shell rounds.
This produces the alternating solid-and-open texture visible through the lower skirt.
Controlling the Skirt Flare
Lay the dress flat every four rounds.
If the skirt forms deep ripples immediately below the waist, too many stitches were added.
If the sides pull inward, add one additional stitch to selected shells.
Distribute corrections around the entire circumference rather than placing several increases beside one another.
Skirt Length
Continue until the skirt reaches the desired waist-to-hem measurement.
Suggested project targets are:
| Approximate Age | Waist to Hem |
|---|---|
| 6–12 months | 22–27 cm |
| 12–18 months | 26–31 cm |
| 18–24 months | 30–35 cm |
| 2–3 years | 34–40 cm |
Age labels vary substantially between children. Actual body measurements should control the finished size.
Scalloped Hem
The lower edge of the photographed dress finishes directly through the final shell formation.
Final Foundation Round
Work one chain-space round:
*sc in shell center, ch 6* around.
Final Scallop Round
Into each ch-6 space work:
sc, hdc, 3 dc, 2 tr, 3 dc, hdc, sc
Repeat around.
This creates a rounded shell point with enough depth to remain visible after blocking.
Large White Flower — Make 2
The dress uses white five-petal flowers with yellow centers.
Center
With yellow yarn:
R1: 6 sc in MR. Join. (6)
R2: 2 sc in each st around. (12)
Fasten off.
Petals
Join white yarn.
Work one petal over approximately two center stitches:
ch 2, 2 dc, 2 tr, 2 dc, ch 2, sl st
Repeat five times around the center, spacing the petals evenly.
Fasten off and weave in the ends.
Small White Flower — Make 2
With yellow:
R1: 6 sc in MR. Join.
Change to white.
For each petal:
ch 2, 2 dc, ch 2, sl st
Repeat five times.
Fasten off.
Green Leaves — Make 8
Ch 8.
Starting in second ch from hook work:
sc, hdc, dc, 2 tr, dc, hdc
Work 3 sc into the final chain.
Continue along the opposite side:
hdc, dc, 2 tr, dc, hdc, sc
Sl st to the first stitch.
Fasten off, leaving a sewing tail.
For a stronger central vein, surface slip stitch from the leaf base toward the point.
Flower Placement
Position one large flower near each side of the upper bodice.
Place a small flower slightly below each large flower.
Arrange two or three leaves around each floral group.
Pin every component before sewing.
The two arrangements do not need to be perfectly mirrored, but their overall visual weight should be similar.
Sewing the Appliqués
Use matching yarn and sew around the center and lower portions of each petal.
Leave the outer petal tips slightly free if a dimensional appearance is desired.
Leaves can be sewn along the center vein and around the lower half of the edge.
Do not leave long yarn floats on the inside of the bodice.
Optional Back Opening
If additional dressing room is needed, do not close the upper bodice completely.
Leave approximately 6–8 cm open at the center back.
Work sc along both opening edges.
Add a small chain loop on one side and a securely sewn button on the other.
This modification can make the fitted upper section easier to pass over the child’s head and shoulders.
Adjusting the Dress Width
Do not resize the garment simply by changing hook size. That also changes fabric density and the appearance of the shell pattern.
Instead, calculate the bodice from the gauge swatch.
For example, if the blocked gauge is 20 stitches per 10 cm:
20 ÷ 10 = 2 stitches per cm
For a 56 cm finished chest:
56 × 2 = 112 stitches
Start from approximately 112 body stitches, then adjust for the selected texture repeat.
Adjusting the Skirt Fullness
For a lighter skirt, make fewer increases in Waist Round 2 and maintain smaller shells.
For a fuller skirt, increase the number of shell repeats rather than placing extreme numbers of stitches inside individual shells.
A very large 15- or 17-dc fan can become heavy in cotton yarn. Additional repeats usually distribute the fabric more evenly.
Color Variations
The sage green and white combination can be changed without altering the construction.
- Dusty pink + ivory — use ivory flowers and sage leaves
- Sky blue + white — add yellow flower centers
- Lavender + cream — use deeper green leaves
- Butter yellow + white — use fresh green leaves
- Terracotta + cream — replace daisies with neutral floral appliqués
Yarn Quantity Calculation
Garment size, shell density, yarn construction, and skirt length all affect yarn consumption. A weighed swatch gives a better estimate than age alone.
Make a 15 × 15 cm sample using the main stitch pattern.
Wash and dry it.
Record its weight and area.
Because the skirt uses wider shells than the bodice, make a second shell-pattern sample if yarn quantity needs to be calculated closely.
Buy additional yarn from the same dye lot. A full lace skirt can consume substantially more yarn than its open appearance suggests.
Blocking
Wash the finished dress according to the yarn label.
Remove excess water without twisting.
Lay it flat.
Shape the bodice to the required chest measurement first.
Arrange the skirt in an even circle or semicircle and open each shell with the fingers.
Pin the scalloped hem only enough to define the curves.
Avoid stretching the waist because an enlarged waist can permanently alter the dress proportions.
Assembly
- Block the bodice to its intended chest circumference before adding decorative pieces.
- Join the bodice seam at the center back and finish the upper edge.
- Make two identical shoulder straps and test their buttonholes against the selected buttons.
- Pin the straps at equal distances from the center front and sew the fixed ends securely.
- Work the waist foundation and distribute the skirt increases around the complete circumference.
- Crochet the shell skirt to the measured waist-to-hem length.
- Finish the lower edge with the final scalloped shell round.
- Make the white flowers, yellow centers, and green leaves, then block them separately.
- Pin the floral groups to the bodice and sew every component with short, secure stitches.
- Attach the buttons, weave in all ends, wash the complete garment, and complete the final flat blocking.
7 Technical Tips
- Failure mode: the waist forms a stiff ruffle. Reduce the increase frequency in the first skirt round; the fabric should begin flaring gradually rather than folding immediately.
- Failure mode: one strap sits higher than the other. Measure both finished straps to within approximately 3 mm before attaching the buttons.
- Failure mode: the shell columns twist diagonally. Place the sc anchor consistently into the center stitch of every shell instead of estimating the center visually.
- Failure mode: the wooden button stretches its hole. Make the buttonhole slightly smaller than the button diameter and test it before completing the strap edging.
- Failure mode: the flower appliqués pull the bodice inward. Pin the bodice to its finished measurements before sewing the flowers and avoid pulling the sewing yarn tight.
- Failure mode: the hem becomes heavily ruffled. Remove one or two stitches from selected final scallops instead of trying to flatten excessive circumference during blocking.
- Failure mode: the two floral groups look unbalanced. Mark their center positions with stitch markers and keep the large flowers at approximately the same height before sewing the smaller flowers and leaves.
Care Instructions
Follow the washing instructions supplied with the yarn. Cotton garments can become noticeably heavier when wet, so support the entire dress when removing it from water.
Dry the garment flat. Reshape the straps, bodice, skirt shells, flowers, and leaves while damp.
Check buttons periodically. Any button or appliqué that begins loosening should be repaired before the garment is worn again.
Conclusion
The defining feature of this sage green crochet baby dress pattern is the transition from a stable fitted bodice to a much wider shell-lace skirt. Work from a blocked gauge swatch, calculate the bodice from the child’s actual chest measurement, and add skirt width gradually at the waist. Finish the structure before positioning the white flowers and green leaves so the appliqués do not interfere with shaping. The next practical step is to crochet and block the bodice swatch before calculating the starting stitch count. Share the finished version on Pinterest or Instagram with #SageGreenCrochetDress. Would you place the floral appliqués symmetrically as shown, or use a single flower cluster on one side?








